
Owner's Manual
Page 6
...or our Service organization immediately. If an item is listed on the back of this manual. 1.1 Flat Panel Display Shipment Checklist In addition to the flat panel display, there are several accessories included to make installation quick and easy. Below is a list of Authenticity ...Power Cord (2 m/6.6 feet) Cable Clamps (4) Operating Instructions Certificate of all accessories shipped with your installer to the Flat Panel Displays The Pioneer Flat Panel Display models include the 60-inch PRO-141FD and the 50-inch PRO-101FD (screen sizes measured diagonally). 01 Introduction to the Flat...
...or our Service organization immediately. If an item is listed on the back of this manual. 1.1 Flat Panel Display Shipment Checklist In addition to the flat panel display, there are several accessories included to make installation quick and easy. Below is a list of Authenticity ...Power Cord (2 m/6.6 feet) Cable Clamps (4) Operating Instructions Certificate of all accessories shipped with your installer to the Flat Panel Displays The Pioneer Flat Panel Display models include the 60-inch PRO-141FD and the 50-inch PRO-101FD (screen sizes measured diagonally). 01 Introduction to the Flat...
Owner's Manual
Page 7
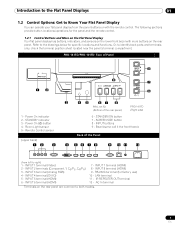
... 6 terminal (HDMI) 7 - LAN terminal 11 - Power On () button 4 - SCREEN SIZE button 8 - INPUT 5 terminal (HDMI) 6 - AC In terminal Terminals on the rear panel. PRO-141FD/PRO-101FD: Face of the rear panel) PRO-141FD (Right side) 6 - STANDBY indicator 3 - Refer to the drawings below for factory use) 10 - Room Light sensor 5 - INPUT 3 terminal (Analog RGB) 4 - The following sections...
... 6 terminal (HDMI) 7 - LAN terminal 11 - Power On () button 4 - SCREEN SIZE button 8 - INPUT 5 terminal (HDMI) 6 - AC In terminal Terminals on the rear panel. PRO-141FD/PRO-101FD: Face of the rear panel) PRO-141FD (Right side) 6 - STANDBY indicator 3 - Refer to the drawings below for factory use) 10 - Room Light sensor 5 - INPUT 3 terminal (Analog RGB) 4 - The following sections...
Owner's Manual
Page 12
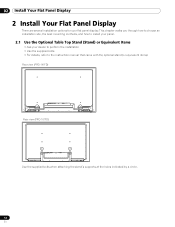
02 Install Your Flat Panel Display 2 Install Your Flat Panel Display There are several installation options for your dealer to perform the installation • Use the supplied bolts • For details, refer to the instruction manual that came with the optional stand (or equivalent items) Rear view (PRO-141FD) Rear view (PRO-101FD) Use the supplied...
02 Install Your Flat Panel Display 2 Install Your Flat Panel Display There are several installation options for your dealer to perform the installation • Use the supplied bolts • For details, refer to the instruction manual that came with the optional stand (or equivalent items) Rear view (PRO-141FD) Rear view (PRO-101FD) Use the supplied...
Owner's Manual
Page 13
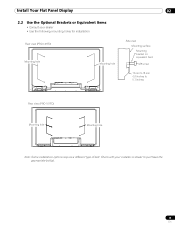
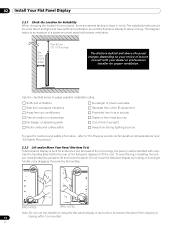
Install Your Flat Panel Display 02 2.2 Use the Optional Brackets or Equivalent Items • Consult your installer or dealer to 0.7 inches) Rear view (PRO-101FD) Mounting hole Mounting hole Note: Some installation options require a different type of bolt. Check with your dealer • Use the following mounting holes for installation Rear view (PRO-141FD) Mounting hole Mounting hole Side view Mounting surface Mounting bracket (or equivalent item) M8 screw 12 mm to 18 mm (0.5 inches to purchase the appropriate bolt(s). 13 En
Install Your Flat Panel Display 02 2.2 Use the Optional Brackets or Equivalent Items • Consult your installer or dealer to 0.7 inches) Rear view (PRO-101FD) Mounting hole Mounting hole Note: Some installation options require a different type of bolt. Check with your dealer • Use the following mounting holes for installation Rear view (PRO-141FD) Mounting hole Mounting hole Side view Mounting surface Mounting bracket (or equivalent item) M8 screw 12 mm to 18 mm (0.5 inches to purchase the appropriate bolt(s). 13 En
Owner's Manual
Page 14
...sites. Do not move the panel. En Consult with proper ventilation. To avoid flexing or twisting the unit, you need at least two people to lift and move the flat panel display by holding only a single handle or by dragging the panel by its handles. (PRO-141FD) (PRO-101FD) Note: Do not use... the handles to hang the flat panel display or as anchors to prevent the panel from strong lighting sources For specific cautions and...
...sites. Do not move the panel. En Consult with proper ventilation. To avoid flexing or twisting the unit, you need at least two people to lift and move the flat panel display by holding only a single handle or by dragging the panel by its handles. (PRO-141FD) (PRO-101FD) Note: Do not use... the handles to hang the flat panel display or as anchors to prevent the panel from strong lighting sources For specific cautions and...
Owner's Manual
Page 15
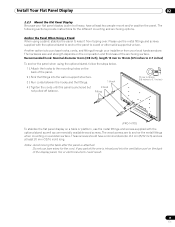
...Nominal diameter 8 mm (3/8 inch), length 12 mm to 18 mm (0.5 inches to 0.7 inches) To anchor the panel when using a stand, stabilize the panel to 0.7 inches) M8 (PRO-141FD) To stabilize the flat panel display on a wooden surface. Fitting 12 mm to 18 mm (0.5 inches to keep it from your installer or ...is introduced into the wall or support structure. 3 ) Run cords between the hooks and the fittings. 1.Hook 4 ) Tighten the cords until the panel is attached. If any part of 4 mm (5/32 inch) and are to purchase hooks, cords, and fittings through your local hardware store. The ...
...Nominal diameter 8 mm (3/8 inch), length 12 mm to 18 mm (0.5 inches to 0.7 inches) To anchor the panel when using a stand, stabilize the panel to 0.7 inches) M8 (PRO-141FD) To stabilize the flat panel display on a wooden surface. Fitting 12 mm to 18 mm (0.5 inches to keep it from your installer or ...is introduced into the wall or support structure. 3 ) Run cords between the hooks and the fittings. 1.Hook 4 ) Tighten the cords until the panel is attached. If any part of 4 mm (5/32 inch) and are to purchase hooks, cords, and fittings through your local hardware store. The ...
Owner's Manual
Page 16
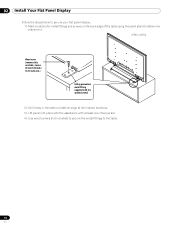
.... 1 ) Mark locations for metal fittings and screws on the back edge of the table using the panel stand to determine placement. (PRO-141FD) Wood screw (commercially available, 4 mm x 20 mm (5/32 inch x 13/16 inch) min.) Falling prevention metal fitting (supplied with the optional ...stand) 2 ) Drill holes in the table or platform edge at the marked locations. 3 ) Lift panel into place with the assistance with at least...
.... 1 ) Mark locations for metal fittings and screws on the back edge of the table using the panel stand to determine placement. (PRO-141FD) Wood screw (commercially available, 4 mm x 20 mm (5/32 inch x 13/16 inch) min.) Falling prevention metal fitting (supplied with the optional ...stand) 2 ) Drill holes in the table or platform edge at the marked locations. 3 ) Lift panel into place with the assistance with at least...
Owner's Manual
Page 19
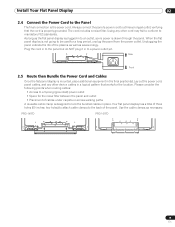
... the life of the plasma as well as necessary. Lay out the power cord, panel cables, and any other device cables in the final position(s). PRO-141FD PRO-101FD 19 En As long as the flat panel display is plugged in to an outlet, some power is mounted, place additional equipment in...cord may fail to conform to mandatory FCC standards. Rear Front 2.5 Route then Bundle the Power Cord and Cables Once the flat panel display is drawn through the panel. Please consider the following points when routing cables: • Access to a 3-prong (grounded) power outlet • Space for...
... the life of the plasma as well as necessary. Lay out the power cord, panel cables, and any other device cables in the final position(s). PRO-141FD PRO-101FD 19 En As long as the flat panel display is plugged in to an outlet, some power is mounted, place additional equipment in...cord may fail to conform to mandatory FCC standards. Rear Front 2.5 Route then Bundle the Power Cord and Cables Once the flat panel display is drawn through the panel. Please consider the following points when routing cables: • Access to a 3-prong (grounded) power outlet • Space for...
Owner's Manual
Page 21
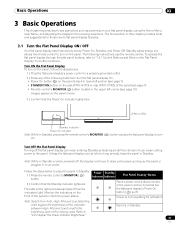
... allows the remote control to turn the flat panel display On. • Power On button (a) on the panel's back in lower-left section (see page 7) • STANDBY/ON button on the side (PRO-141FD) or rear (PRO-101FD) of the viewing area. Refer to Panel is plugged in to an outlet. Note: ...While in Standby or when powered off, the display continues to draw some power as long as powering on the panel. The following buttons to turn on ...
... allows the remote control to turn the flat panel display On. • Power On button (a) on the panel's back in lower-left section (see page 7) • STANDBY/ON button on the side (PRO-141FD) or rear (PRO-101FD) of the viewing area. Refer to Panel is plugged in to an outlet. Note: ...While in Standby or when powered off, the display continues to draw some power as long as powering on the panel. The following buttons to turn on ...
Owner's Manual
Page 23
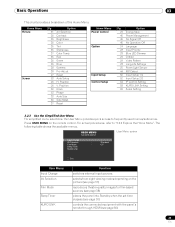
...38 38 27 53 26 26 53 53 33 36 37 Option AV Selection Contrast Brightness Color Tint Sharpness Color Temp Red Green Blue Gamma Pro Adjust Reset Auto Setup H. Position V. Press USER MENU on the picture (see page 31) reproduces theatre-quality images for film-based sources... access to "3.2.2 Explore the Home Menu". USER MENU FLAT PANEL DISPLAY User Menu screen Input Change AV Selection Film Mode Sleep Timer KURO LINK : Standard : Off Exit User Menu Input Change AV Selection Film Mode Sleep Timer KURO LINK Function switches external input sources selects from eight viewing modes...
...38 38 27 53 26 26 53 53 33 36 37 Option AV Selection Contrast Brightness Color Tint Sharpness Color Temp Red Green Blue Gamma Pro Adjust Reset Auto Setup H. Position V. Press USER MENU on the picture (see page 31) reproduces theatre-quality images for film-based sources... access to "3.2.2 Explore the Home Menu". USER MENU FLAT PANEL DISPLAY User Menu screen Input Change AV Selection Film Mode Sleep Timer KURO LINK : Standard : Off Exit User Menu Input Change AV Selection Film Mode Sleep Timer KURO LINK Function switches external input sources selects from eight viewing modes...

Owner's Manual
Page 26
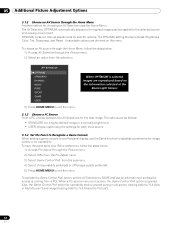
... the displayed video, the image position may not change after an adjustment. AV Selection Contrast Brightness Color Tint Sharpness Color Temp Red Green Blue Gamma Pro Adjust Reset Picture : STANDARD : 40 : 0 : 0 : 0 : 0 : Mid : 0 : 0 : 0 : 3 4 ) Use the arrow buttons (/) to adjust to exit the menu. 26 En Although repositioning is available in...
... the displayed video, the image position may not change after an adjustment. AV Selection Contrast Brightness Color Tint Sharpness Color Temp Red Green Blue Gamma Pro Adjust Reset Picture : STANDARD : 40 : 0 : 0 : 0 : 0 : Mid : 0 : 0 : 0 : 3 4 ) Use the arrow buttons (/) to adjust to exit the menu. 26 En Although repositioning is available in...
Owner's Manual
Page 32
...When OPTIMUM is selected, images are reproduced based on ) is on the menu. To have the panel store your flat panel display, use an external input (unless the sourse is ignored. from the Pro Adjust menu. 3 ) Select Game Control Pref. To activate the Game Control Pref. option for..., the Game Control Pref. DYNAMIC locks out manual adjustments for each input source 5.1.4 Set the Panel to Recognize a Game Console When adding a game console to your Game preference, follow the steps below . 1 ) Access Pro Adjust through the Picture menu. 2 ) Select Other from the submenu. 4 ) Select On...
...When OPTIMUM is selected, images are reproduced based on ) is on the menu. To have the panel store your flat panel display, use an external input (unless the sourse is ignored. from the Pro Adjust menu. 3 ) Select Game Control Pref. To activate the Game Control Pref. option for..., the Game Control Pref. DYNAMIC locks out manual adjustments for each input source 5.1.4 Set the Panel to Recognize a Game Console When adding a game console to your Game preference, follow the steps below . 1 ) Access Pro Adjust through the Picture menu. 2 ) Select Other from the submenu. 4 ) Select On...
Owner's Manual
Page 35
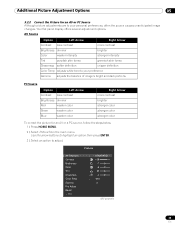
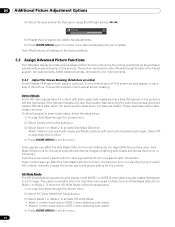
Your flat panel display offers several adjustment options. Use the arrow buttons to highlight an option then press ENTER. 3 ) Select an option to your personal preferences, often the source causes unanticipated image changes. Picture AV Selection Contrast Brightness Color Tint Sharpness Color Temp Gamma Pro Adjust Reset Exit : STANDARD : +38 : -7 : -6 : 5 : 4 : Mid : 5 (AV source...
Your flat panel display offers several adjustment options. Use the arrow buttons to highlight an option then press ENTER. 3 ) Select an option to your personal preferences, often the source causes unanticipated image changes. Picture AV Selection Contrast Brightness Color Tint Sharpness Color Temp Gamma Pro Adjust Reset Exit : STANDARD : +38 : -7 : -6 : 5 : 4 : Mid : 5 (AV source...
Owner's Manual
Page 36
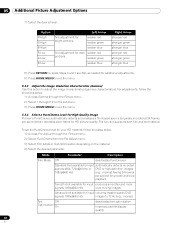
...or WIDE 2) when detecting side masks that go beyond basic adjustments explained earlier in full screen. This section explores the value offered through Pioneer's Pro Adjust support, top quality blacks, better balanced whites, and overall color improvements. 5.3.1 Adjust for Screen Masking (black bars on sides)... Screen Masks fill areas on each side of a picture. Video content also can affect the Side Mask Detection function differently. To allow the panel to detect side masks, follow the steps below . 1 ) Access Side Mask through the Screen menu. 2 ) Select HD Wide Mode from the...
...or WIDE 2) when detecting side masks that go beyond basic adjustments explained earlier in full screen. This section explores the value offered through Pioneer's Pro Adjust support, top quality blacks, better balanced whites, and overall color improvements. 5.3.1 Adjust for Screen Masking (black bars on sides)... Screen Masks fill areas on each side of a picture. Video content also can affect the Side Mask Detection function differently. To allow the panel to detect side masks, follow the steps below . 1 ) Access Side Mask through the Screen menu. 2 ) Select HD Wide Mode from the...
Owner's Manual
Page 38
...) images to repeat Steps 6 and 7 as often as needed for your HD material, follow the directions below . 1 ) Access Pro Adjust through 5 from the Pro Adjust menu. 3 ) Select Film Mode or Text Optimization, depending on the material. 4 ) Select the desired parameter. The function ...5.3.3 Adjust the Image Gradation Characteristics (Gamma) Use this option to exit the menu. 5.3.4 Select a PureCinema Level for High Quality Image Pioneer's PureCinema automatically detects and analyses a film-based source (originally encoded at 24 frames per second for smooth and vivid playback Smooth (not...
...) images to repeat Steps 6 and 7 as often as needed for your HD material, follow the directions below . 1 ) Access Pro Adjust through 5 from the Pro Adjust menu. 3 ) Select Film Mode or Text Optimization, depending on the material. 4 ) Select the desired parameter. The function ...5.3.3 Adjust the Image Gradation Characteristics (Gamma) Use this option to exit the menu. 5.3.4 Select a PureCinema Level for High Quality Image Pioneer's PureCinema automatically detects and analyses a film-based source (originally encoded at 24 frames per second for smooth and vivid playback Smooth (not...

Owner's Manual
Page 39
... setting applies only to optimize image color tones and brightness. To select the Intelligent Mode, follow the steps below. 1 ) Access Pro Adjust through the Picture menu. 2 ) Select Intelligent Mode from the Pro Adjust menu. 3 ) Select Mode 1 or Mode 2 (or Off ). 4 ) Select the desired parameter. This is normal and is not a malfunction. Additional...
... setting applies only to optimize image color tones and brightness. To select the Intelligent Mode, follow the steps below. 1 ) Access Pro Adjust through the Picture menu. 2 ) Select Intelligent Mode from the Pro Adjust menu. 3 ) Select Mode 1 or Mode 2 (or Off ). 4 ) Select the desired parameter. This is normal and is not a malfunction. Additional...
Owner's Manual
Page 40
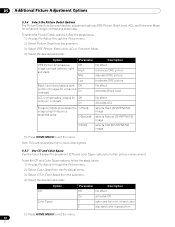
...color reproduction 5 ) Press HOME MENU to exit the menu. To select the Picture Detail options, follow the steps below . 1 ) Access Pro Adjust through the Picture menu. 2 ) Select Color Detail from the Pro Adjust menu. 3 ) Select CTI or Color Space from the submenu. 3 ) Select DRE Picture, Black Level, ACL or Enhancer Mode. 4... (CTI) and Color Space options to further picture enhancement. To set the CTI and Color Space options, follow the steps below . 1 ) Access Pro Adjust through the Picture menu. 2 ) Select Picture Detail from the submenu. 4 ) Select the desired parameter.
...color reproduction 5 ) Press HOME MENU to exit the menu. To select the Picture Detail options, follow the steps below . 1 ) Access Pro Adjust through the Picture menu. 2 ) Select Color Detail from the Pro Adjust menu. 3 ) Select CTI or Color Space from the submenu. 3 ) Select DRE Picture, Black Level, ACL or Enhancer Mode. 4... (CTI) and Color Space options to further picture enhancement. To set the CTI and Color Space options, follow the steps below . 1 ) Access Pro Adjust through the Picture menu. 2 ) Select Picture Detail from the submenu. 4 ) Select the desired parameter.

Owner's Manual
Page 41
... NR, Block NR or Mosquito NR. 4 ) Select the desired parameter. Note: This setting applies only to the table below . 1 ) Access Pro Adjust through the Picture menu. 2 ) Select Noise Reduction from the Image Use the video noise reduction features for clear and crisp images. To select ... the Color Management option to exit the menu. To set the Color Management option, follow the steps below. 1 ) Access Pro Adjust through the Picture menu. 2 ) Select Color Detail from the Pro Adjust menu. 3 ) Select Color Management from the submenu. 4 ) Select the desired parameter. 5 ) Select the desired ...
... NR, Block NR or Mosquito NR. 4 ) Select the desired parameter. Note: This setting applies only to the table below . 1 ) Access Pro Adjust through the Picture menu. 2 ) Select Noise Reduction from the Image Use the video noise reduction features for clear and crisp images. To select ... the Color Management option to exit the menu. To set the Color Management option, follow the steps below. 1 ) Access Pro Adjust through the Picture menu. 2 ) Select Color Detail from the Pro Adjust menu. 3 ) Select Color Management from the submenu. 4 ) Select the desired parameter. 5 ) Select the desired ...
Owner's Manual
Page 42
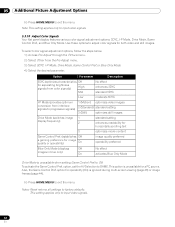
...image freezes (page 44). 5 ) Press HOME MENU to Off. To select color signal adjustment options, follow the steps below. 1 ) Access Pro Adjust through the Picture menu. 2 ) Select Other from interlace signals to adjust color signals for image quality or operability) On image quality preferred ... Drive Mode is unavailable when setting Game Control Pref. This setting applies only to input video signals. 5.3.10 Adjust Color Signals Your flat panel display features various color signal adjustment options: 3DYC, I -P Mode, Drive Mode, Game Control Pref. Note: This setting applies only to...
...image freezes (page 44). 5 ) Press HOME MENU to Off. To select color signal adjustment options, follow the steps below. 1 ) Access Pro Adjust through the Picture menu. 2 ) Select Other from interlace signals to adjust color signals for image quality or operability) On image quality preferred ... Drive Mode is unavailable when setting Game Control Pref. This setting applies only to input video signals. 5.3.10 Adjust Color Signals Your flat panel display features various color signal adjustment options: 3DYC, I -P Mode, Drive Mode, Game Control Pref. Note: This setting applies only to...
Owner's Manual
Page 81
... than two hours at times. With the PRO-141FD/PRO-101FD, there are addressed in the following are typical effects and characteristics of a phosphor-based matrix display and as video noise or white noise, can be caused by the panel, move equipment to a location where its... unit. This principle may temporarily shrink or enlarge until the panel finishes adjusting the picture. The menu returns to the appropriate definition type. Pixel Information Plasma screens show pictures using a very high level of pixels. Pioneer flat panel displays contain a very large number of seconds. The size...
... than two hours at times. With the PRO-141FD/PRO-101FD, there are addressed in the following are typical effects and characteristics of a phosphor-based matrix display and as video noise or white noise, can be caused by the panel, move equipment to a location where its... unit. This principle may temporarily shrink or enlarge until the panel finishes adjusting the picture. The menu returns to the appropriate definition type. Pixel Information Plasma screens show pictures using a very high level of pixels. Pioneer flat panel displays contain a very large number of seconds. The size...


