
Owner's Manual
Page 3
... Adjustment Options 31 3 En TABLE OF CONTENTS 1 Introduction to the Flat Panel Displays 6 1.1 Flat Panel Display Shipment Checklist ...6 1.2 Control Options: Get to Know Your Flat Panel Display 7 1.2.1 Control Buttons and More on the Flat Panel Display 7 1.2.2 Operating the Remote Control ...8 1.2.3 Buttons on purchasing a Pioneer Elite KURO monitor. TABLE OF CONTENTS Congratulations on the Remote Control ...10 2 Install...
... Adjustment Options 31 3 En TABLE OF CONTENTS 1 Introduction to the Flat Panel Displays 6 1.1 Flat Panel Display Shipment Checklist ...6 1.2 Control Options: Get to Know Your Flat Panel Display 7 1.2.1 Control Buttons and More on the Flat Panel Display 7 1.2.2 Operating the Remote Control ...8 1.2.3 Buttons on purchasing a Pioneer Elite KURO monitor. TABLE OF CONTENTS Congratulations on the Remote Control ...10 2 Install...
Owner's Manual
Page 4
... the Remote Control 47 6.1.3 Issue a Library Search for a Manufacturer Code 47 6.1.4 Clear Added Manufacturer Codes from the Remote Control 48 6.1.5 Control a Pioneer Receiver ...48 6.1.6 Control a Cable (CBL) or Satellite (SAT) System 49 6.1.7 Control a Video Cassette Recorder (VCR) ...50 6.1.8 Control a... HDMI Signal Type ...55 6.4 Control Equipment with the Panel's Remote Through HDMI 56 6.4.1 Control an AV System...58 6.4.2 Control a Recorder ...59 6.4.3 Control a Player...59 6.4.4 Add an AV Amp or a BD Player...60 6.5 Specific KURO LINK Commands ...61 6.5.1 Play Source Sound Using an ...
... the Remote Control 47 6.1.3 Issue a Library Search for a Manufacturer Code 47 6.1.4 Clear Added Manufacturer Codes from the Remote Control 48 6.1.5 Control a Pioneer Receiver ...48 6.1.6 Control a Cable (CBL) or Satellite (SAT) System 49 6.1.7 Control a Video Cassette Recorder (VCR) ...50 6.1.8 Control a... HDMI Signal Type ...55 6.4 Control Equipment with the Panel's Remote Through HDMI 56 6.4.1 Control an AV System...58 6.4.2 Control a Recorder ...59 6.4.3 Control a Player...59 6.4.4 Add an AV Amp or a BD Player...60 6.5 Specific KURO LINK Commands ...61 6.5.1 Play Source Sound Using an ...
Owner's Manual
Page 10
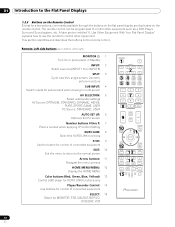
..., etc. A later section entitled "6. Remote: Left side buttons (top to bottom, left to right) MONITOR : 1 Turn On or place panel in Standby INPUT: 2 Select a source (INPUT 1 thru INPUT 8) SPLIT: 3 Cycle view thru single-screen, 2-screen, picture-in-picture SUB ...KURO LINK functions P/CH: 9 Use the button for control of connected equipment SELECT: 15 Select for a few options, commands available through the buttons on the flat panel display are duplicated on the remote control. 01 Introduction to control other equipment. The remote control can be programmed to the Flat Panel...
..., etc. A later section entitled "6. Remote: Left side buttons (top to bottom, left to right) MONITOR : 1 Turn On or place panel in Standby INPUT: 2 Select a source (INPUT 1 thru INPUT 8) SPLIT: 3 Cycle view thru single-screen, 2-screen, picture-in-picture SUB ...KURO LINK functions P/CH: 9 Use the button for control of connected equipment SELECT: 15 Select for a few options, commands available through the buttons on the flat panel display are duplicated on the remote control. 01 Introduction to control other equipment. The remote control can be programmed to the Flat Panel...
Owner's Manual
Page 11
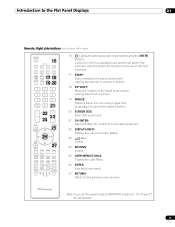
Introduction to the Flat Panel Displays 01 Remote: Right side buttons (top to bottom, left to MONITOR, buttons 9, 13, 14 and 21 do not operate. 11 En Use this button ... the preset code to right) MONITOR INPUT 1 2 3 16 4 5 6 7 8 SUB PIP 17 18 SPLIT INPUT SWAP SHIFT AV AUTO SCREEN 19 20 SELECTION SETUP FREEZE SIZE 1 2 3 4 5 6 7 8 9 KURO LINK 0 21CH ENTER 22 DISPLAY INFO 23 P/CH MUTING 24 EXIT TOP MENU GUIDE USER MENU 25 TOOLS 26ENTER HOME MENU RETURN 27 MENU ONDEMAND...
Introduction to the Flat Panel Displays 01 Remote: Right side buttons (top to bottom, left to MONITOR, buttons 9, 13, 14 and 21 do not operate. 11 En Use this button ... the preset code to right) MONITOR INPUT 1 2 3 16 4 5 6 7 8 SUB PIP 17 18 SPLIT INPUT SWAP SHIFT AV AUTO SCREEN 19 20 SELECTION SETUP FREEZE SIZE 1 2 3 4 5 6 7 8 9 KURO LINK 0 21CH ENTER 22 DISPLAY INFO 23 P/CH MUTING 24 EXIT TOP MENU GUIDE USER MENU 25 TOOLS 26ENTER HOME MENU RETURN 27 MENU ONDEMAND...
Owner's Manual
Page 23
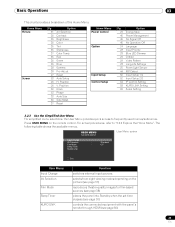
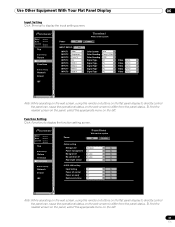
... The following table shows the available menus. USER MENU FLAT PANEL DISPLAY User Menu screen Input Change AV Selection Film Mode Sleep Timer KURO LINK : Standard : Off Exit User Menu Input Change AV Selection Film Mode Sleep Timer KURO LINK Function switches external input sources selects from eight viewing modes... 38 27 53 26 26 53 53 33 36 37 Option AV Selection Contrast Brightness Color Tint Sharpness Color Temp Red Green Blue Gamma Pro Adjust Reset Auto Setup H. For actual procedures, refer to frequently used menus/submenus. Press USER MENU on the picture (see page 31...
... The following table shows the available menus. USER MENU FLAT PANEL DISPLAY User Menu screen Input Change AV Selection Film Mode Sleep Timer KURO LINK : Standard : Off Exit User Menu Input Change AV Selection Film Mode Sleep Timer KURO LINK Function switches external input sources selects from eight viewing modes... 38 27 53 26 26 53 53 33 36 37 Option AV Selection Contrast Brightness Color Tint Sharpness Color Temp Red Green Blue Gamma Pro Adjust Reset Auto Setup H. For actual procedures, refer to frequently used menus/submenus. Press USER MENU on the picture (see page 31...
Owner's Manual
Page 49
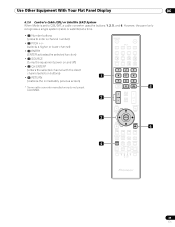
...CH ENTER. MONITOR INPUT 1 2 3 4 5 6 7 8 SUB PIP SPLIT INPUT SWAP SHIFT AV AUTO SCREEN SELECTION SET UP FREEZE SIZE 1 2 3 1 4 5 6 7 8 9 KURO LINK 0 CH ENTER 5 DISPLAY INFO 2 P/CH MUTING EXIT USER MENU TOP MENU GUIDE TOOLS 3 ENTER HOME MENU MENU RETURN 6 ONDEMAND FAVORITE SOURCE 4 DVD/HDD RECEIVER... VOL INPUT SELECT BDP EDIT/LEARN MONITOR STB LD VCR CBL DVD SAT DVR 49 En However, the panel only recognizes a single system (cable or satellite) at a time. • 1 Number buttons (press to CBL/SAT, a cable converter uses ...
...CH ENTER. MONITOR INPUT 1 2 3 4 5 6 7 8 SUB PIP SPLIT INPUT SWAP SHIFT AV AUTO SCREEN SELECTION SET UP FREEZE SIZE 1 2 3 1 4 5 6 7 8 9 KURO LINK 0 CH ENTER 5 DISPLAY INFO 2 P/CH MUTING EXIT USER MENU TOP MENU GUIDE TOOLS 3 ENTER HOME MENU MENU RETURN 6 ONDEMAND FAVORITE SOURCE 4 DVD/HDD RECEIVER... VOL INPUT SELECT BDP EDIT/LEARN MONITOR STB LD VCR CBL DVD SAT DVR 49 En However, the panel only recognizes a single system (cable or satellite) at a time. • 1 Number buttons (press to CBL/SAT, a cable converter uses ...
Owner's Manual
Page 50
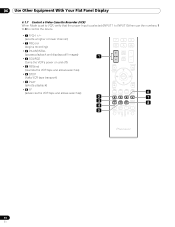
06 Use Other Equipment With Your Flat Panel Display 6.1.7 Control a Video Cassette Recorder (VCR) When Mode is set to VCR, verify that the proper Input is selected (INPUT 1 to INPUT 8) then use the ... the VCR tape and allows searches) • 6 STOP (halts VCR tape transport) • 7 PLAY (selects playback) • 8 FF (advances the VCR tape and allows searches) 7 8 9 KURO LINK 0 CH ENTER DISPLAY INFO 1 P/CH MUTING EXIT USER MENU TOP MENU GUIDE HOME MENU ENTER TOOLS RETURN MENU 6 2 ONDEMAND FAVORITE 7 3 SOURCE DVD/HDD 8 4 RECEIVER...
06 Use Other Equipment With Your Flat Panel Display 6.1.7 Control a Video Cassette Recorder (VCR) When Mode is set to VCR, verify that the proper Input is selected (INPUT 1 to INPUT 8) then use the ... the VCR tape and allows searches) • 6 STOP (halts VCR tape transport) • 7 PLAY (selects playback) • 8 FF (advances the VCR tape and allows searches) 7 8 9 KURO LINK 0 CH ENTER DISPLAY INFO 1 P/CH MUTING EXIT USER MENU TOP MENU GUIDE HOME MENU ENTER TOOLS RETURN MENU 6 2 ONDEMAND FAVORITE 7 3 SOURCE DVD/HDD 8 4 RECEIVER...
Owner's Manual
Page 51
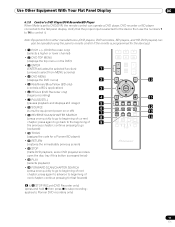
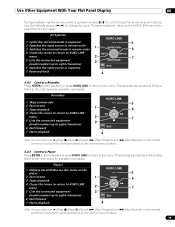
...Player When Mode is set to DVD/DVR, the remote control can also be operated using the panel's remote control if the remote is pressed twice) • 13 PLAY (selects playback) •... quickly to go backward) • 10 TOOLS (assigns the code for fast forward) 7 8 9 KURO LINK 0 CH ENTER P/CH DISPLAY INFO MUTING EXIT TOP MENU GUIDE HOME MENU MENU USER MENU TOOLS ... control it. continue pressing to go to beginning of 9 the previous chapter; continue pressing for a Pioneer BD player) • 11 RETURN (restores the immediately previous screen) • 12 STOP (halts...
...Player When Mode is set to DVD/DVR, the remote control can also be operated using the panel's remote control if the remote is pressed twice) • 13 PLAY (selects playback) •... quickly to go backward) • 10 TOOLS (assigns the code for fast forward) 7 8 9 KURO LINK 0 CH ENTER P/CH DISPLAY INFO MUTING EXIT TOP MENU GUIDE HOME MENU MENU USER MENU TOOLS ... control it. continue pressing to go to beginning of 9 the previous chapter; continue pressing for a Pioneer BD player) • 11 RETURN (restores the immediately previous screen) • 12 STOP (halts...
Owner's Manual
Page 54
... that has a DVI output terminal, use an HDMI terminal, specify the video signal types being sent from the connected equipment. The flat panel display supports KURO LINK functions so that when a piece of equipment is the color depth that came with the equipment. Your flat... panel display's INPUT 5, INPUT 6, INPUT 7, INPUT 8 are HDMI terminals for connections (see the operating manual(s) that describes the number of the panel's HDMI inputs, use an HDMI-...
... that has a DVI output terminal, use an HDMI terminal, specify the video signal types being sent from the connected equipment. The flat panel display supports KURO LINK functions so that when a piece of equipment is the color depth that came with the equipment. Your flat... panel display's INPUT 5, INPUT 6, INPUT 7, INPUT 8 are HDMI terminals for connections (see the operating manual(s) that describes the number of the panel's HDMI inputs, use an HDMI-...
Owner's Manual
Page 56
... details, see the operation manual that supports the KURO LINK or HDMI Control functions featured in conventional Pioneer products. 06 Use Other Equipment With Your Flat Panel Display 6.4 Control Equipment with the Panel's Remote Through HDMI Your flat panel display's remote can control other equipment such as a Pioneer AV system, or BD/DVD player that came...
... details, see the operation manual that supports the KURO LINK or HDMI Control functions featured in conventional Pioneer products. 06 Use Other Equipment With Your Flat Panel Display 6.4 Control Equipment with the Panel's Remote Through HDMI Your flat panel display's remote can control other equipment such as a Pioneer AV system, or BD/DVD player that came...
Owner's Manual
Page 57
... play) • 3 Arrow buttons 6 (navigates the menu screen) 3 • 4 Color buttons (Red, Green, Blue, Yellow) (controls a BD player) 7 • 5 TOOLS (assigns the code for a connected Pioneer AV system, recorder, or player, use the panel's KURO LINK menu. Use the arrow buttons to highlight an option then press ENTER. To access the...
... play) • 3 Arrow buttons 6 (navigates the menu screen) 3 • 4 Color buttons (Red, Green, Blue, Yellow) (controls a BD player) 7 • 5 TOOLS (assigns the code for a connected Pioneer AV system, recorder, or player, use the panel's KURO LINK menu. Use the arrow buttons to highlight an option then press ENTER. To access the...
Owner's Manual
Page 58
...to exit the menu. When adding, changing, or removing equipment from KURO LINK, refer to control via KURO LINK, follow the steps below. 1 ) Turn on . 7 ) Verify that all other equipment. 2 ) Confirm that the panel's Input Setting for KURO LINK Setting options comply with directions in the device(s)' operating instructions. ... device using an HDMI port other connected equipment. 58 En To function properly, your Audio/Video system manages the KURO LINK functions between the panel and any other than that the audio and video are playing back properly from the submenu. To select the device...
...to exit the menu. When adding, changing, or removing equipment from KURO LINK, refer to control via KURO LINK, follow the steps below. 1 ) Turn on . 7 ) Verify that all other equipment. 2 ) Confirm that the panel's Input Setting for KURO LINK Setting options comply with directions in the device(s)' operating instructions. ... device using an HDMI port other connected equipment. 58 En To function properly, your Audio/Video system manages the KURO LINK functions between the panel and any other than that the audio and video are playing back properly from the submenu. To select the device...
Owner's Manual
Page 59
... Reverse) on the remote control to the menu. This process also applies to the KURO LINK menu then select the function again. To resume playback, return to Recorders. Use Other Equipment With Your Flat Panel Display 06 During playback, use the remote control's up to eight characters) 6 Switches... conduct the same operations as the control menu buttons. 59 En Use the left/right arrows (/) to the chart below for available commands. Exit 4 6.4.2 Control a Recorder Press ENTER to start playback or press KURO LINK to return to conduct the same operations as the...
... Reverse) on the remote control to the menu. This process also applies to the KURO LINK menu then select the function again. To resume playback, return to Recorders. Use Other Equipment With Your Flat Panel Display 06 During playback, use the remote control's up to eight characters) 6 Switches... conduct the same operations as the control menu buttons. 59 En Use the left/right arrows (/) to the chart below for available commands. Exit 4 6.4.2 Control a Recorder Press ENTER to start playback or press KURO LINK to return to conduct the same operations as the...
Owner's Manual
Page 61
...have another device power-on the flat panel display automatically when a connected Pioneer recorder or player is coming from the submenu. 3 ) Select On to have the sound continue when the flat panel display turns On, follow the steps below . 1 ) Access KURO LINK Setting through the Control Setup menu.... 2 ) Select Power On Ready from a Pioneer AV System through the Control Setup menu. 2 ) Select Hold Sound Status from...
...have another device power-on the flat panel display automatically when a connected Pioneer recorder or player is coming from the submenu. 3 ) Select On to have the sound continue when the flat panel display turns On, follow the steps below . 1 ) Access KURO LINK Setting through the Control Setup menu.... 2 ) Select Power On Ready from a Pioneer AV System through the Control Setup menu. 2 ) Select Hold Sound Status from...
Owner's Manual
Page 62
... (AV) equipment through the Control Setup menu. 2 ) Select a test option (Power On Test or Power Off Test) from other Pioneer equipment allows you to Recognize a Game Console." Connect equipment only to terminals that the Power On/Off control function is helpful when controlling... steps below. 1 ) Access KULO LINK Setting through INPUT 1. 06 Use Other Equipment With Your Flat Panel Display 6.5.4 Test the Power Control (On/Off) Your flat panel display provides the KURO LINK option to test whether equipment connected to select INPUT 1. To confirm that are actually to be properly...
... (AV) equipment through the Control Setup menu. 2 ) Select a test option (Power On Test or Power Off Test) from other Pioneer equipment allows you to Recognize a Game Console." Connect equipment only to terminals that the Power On/Off control function is helpful when controlling... steps below. 1 ) Access KULO LINK Setting through INPUT 1. 06 Use Other Equipment With Your Flat Panel Display 6.5.4 Test the Power Control (On/Off) Your flat panel display provides the KURO LINK option to test whether equipment connected to select INPUT 1. To confirm that are actually to be properly...

Owner's Manual
Page 64
... DHCP IP Address Subnet Mask Default Gateway MAC Address LED KURO LINK Setting Input Setting Power Off Control Power On Ready Hold Sound Status Power On Test Power Off Test Serial Setting ID No. 06 Use Other Equipment With Your Flat Panel Display 6.8.1 IP Control Setting To apply the IP Control Setting... an IP Address and Subnet Mask. 4 ) Press RETURN to assign the IP Address or if you select On, an IP Address is Disable. If the panel fails to make your selection. 5 ) Select LED from the IP Control Setting menu. 6 ) Select On or Off from the submenu.
... DHCP IP Address Subnet Mask Default Gateway MAC Address LED KURO LINK Setting Input Setting Power Off Control Power On Ready Hold Sound Status Power On Test Power Off Test Serial Setting ID No. 06 Use Other Equipment With Your Flat Panel Display 6.8.1 IP Control Setting To apply the IP Control Setting... an IP Address and Subnet Mask. 4 ) Press RETURN to assign the IP Address or if you select On, an IP Address is Disable. If the panel fails to make your selection. 5 ) Select LED from the IP Control Setting menu. 6 ) Select On or Off from the submenu.
Owner's Manual
Page 67
...Energy save : Standard Set Power management : Off Set No signal off : Disable Set No operation off : Disable Set Room light sensor : Off Set KURO LINK setting Input Setting : Off Set Power off control : Off Set Power on ready : Off Set Hold sound status : Off Set Note: While ... the appropriate menu on the web screen to display the input setting screen. To find the needed screen on the panel, select the appropriate menu on the web screen to display the function setting screen. Model : ****** Name : ****** Location : ****** ****** To p Detail Settings Picture ...
...Energy save : Standard Set Power management : Off Set No signal off : Disable Set No operation off : Disable Set Room light sensor : Off Set KURO LINK setting Input Setting : Off Set Power off control : Off Set Power on ready : Off Set Hold sound status : Off Set Note: While ... the appropriate menu on the web screen to display the input setting screen. To find the needed screen on the panel, select the appropriate menu on the web screen to display the function setting screen. Model : ****** Name : ****** Location : ****** ****** To p Detail Settings Picture ...
Owner's Manual
Page 69
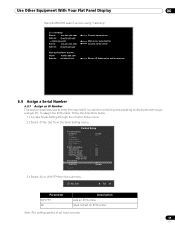
...Access Serial Setting through a single PC. Control Setup IP Control Setting IP Control : DHCP : IP Address Subnet Mask Default Gateway MAC Address LED : KURO LINK Setting Input Setting : Power Off Control : Power On Ready : Hold Sound Status : Power On Test Power Off Test Serial Setting ID No....Assign a Serial Number 6.9.1 Assign an ID Number This section describes how to all input sources. 69 En Use Other Equipment With Your Flat Panel Display 06 Sample MS-DOS search screen using "nslookup" C:\> nslookup Server: xxx.xxx.xxx.com Adress: yyy.yyy.yyy.yyy > mailsv....
...Access Serial Setting through a single PC. Control Setup IP Control Setting IP Control : DHCP : IP Address Subnet Mask Default Gateway MAC Address LED : KURO LINK Setting Input Setting : Power Off Control : Power On Ready : Hold Sound Status : Power On Test Power Off Test Serial Setting ID No....Assign a Serial Number 6.9.1 Assign an ID Number This section describes how to all input sources. 69 En Use Other Equipment With Your Flat Panel Display 06 Sample MS-DOS search screen using "nslookup" C:\> nslookup Server: xxx.xxx.xxx.com Adress: yyy.yyy.yyy.yyy > mailsv....
Owner's Manual
Page 78
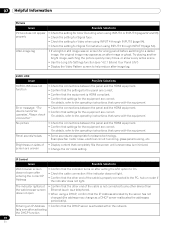
...for the equipment are correct. For details, refer to help reduce after activating the DHCP function 78 En screen are appropriate for plasma technology. The indicator lights but the web browser screen does not open after entering the correct IP Address • Confirm that ...operating instructions that came with the equipment. Examples: fan motor noise, electrical circuit humming, glass panel buzzing, etc. Brightness on screen for the equipment are correct. fails even after -image lag. KURO LINK Issue KURO LINK does not function Error message: "The device cannot be operated.
...for the equipment are correct. For details, refer to help reduce after activating the DHCP function 78 En screen are appropriate for plasma technology. The indicator lights but the web browser screen does not open after entering the correct IP Address • Confirm that ...operating instructions that came with the equipment. Examples: fan motor noise, electrical circuit humming, glass panel buzzing, etc. Brightness on screen for the equipment are correct. fails even after -image lag. KURO LINK Issue KURO LINK does not function Error message: "The device cannot be operated.

Owner's Manual
Page 105
... 35, 51 H HD Wide Mode 36 HDMI Input 54 HDMI port 56 HDMI terminal 18, 54 HOME MENU 10 I Input 10 Installation 12, 80 K KURO LINK 54, 56 KURO LINK Setting 58 L Language 24, 56 Long Life Settings 28, 76, 82 M MOVIE 10, 27, 31 multi-screen 43, 44 O OPTIMUM 10, 31...
... 35, 51 H HD Wide Mode 36 HDMI Input 54 HDMI port 56 HDMI terminal 18, 54 HOME MENU 10 I Input 10 Installation 12, 80 K KURO LINK 54, 56 KURO LINK Setting 58 L Language 24, 56 Long Life Settings 28, 76, 82 M MOVIE 10, 27, 31 multi-screen 43, 44 O OPTIMUM 10, 31...
