
User manual
Page 2
... an experienced radio/TV technician for compliance could void the user's authority to operate the equipment. Reproduction in whole or in a particular installation. iPronto User Guide Copyright Royal Philips Electronics NV All rights are designed to radio communications. These limits are reserved. This equipment generates, uses, and can be determined by the...
... an experienced radio/TV technician for compliance could void the user's authority to operate the equipment. Reproduction in whole or in a particular installation. iPronto User Guide Copyright Royal Philips Electronics NV All rights are designed to radio communications. These limits are reserved. This equipment generates, uses, and can be determined by the...

User manual
Page 4
... and Recharging the Battery Installing Recharging Getting the iPronto Up and Running Setting up Your iPronto Setting up Your Network Using the iPronto The Touch Screen The Status Display The iPronto's External Controls The External Connections Navigating the iPronto The Keyboard The Remote Control How Does the iPronto RC Work? Learning IR Codes Using iProntoEdit Using...
... and Recharging the Battery Installing Recharging Getting the iPronto Up and Running Setting up Your iPronto Setting up Your Network Using the iPronto The Touch Screen The Status Display The iPronto's External Controls The External Connections Navigating the iPronto The Keyboard The Remote Control How Does the iPronto RC Work? Learning IR Codes Using iProntoEdit Using...

User manual
Page 5
Table of Contents The Electronic Program Guide 47 Subscription 50 Upgrading 55 Troubleshooting 56 Specifications 60 Index 62 iPronto User Guide 2
Table of Contents The Electronic Program Guide 47 Subscription 50 Upgrading 55 Troubleshooting 56 Specifications 60 Index 62 iPronto User Guide 2

User manual
Page 6
The iPronto box contains the following items: iPronto iPronto User Guide Warranty iPronto Getting Started Guide Battery iPronto User Guide Wireless LAN Adapter AC power adapter with cable 3 What Does the iPronto Box Contain?
The iPronto box contains the following items: iPronto iPronto User Guide Warranty iPronto Getting Started Guide Battery iPronto User Guide Wireless LAN Adapter AC power adapter with cable 3 What Does the iPronto Box Contain?

User manual
Page 7
... to get your iPronto up and start using the iPronto. ■ The iPronto Getting Started Guide. About the iPronto Documentation The iPronto documentation consists of what you can find elaborate and useful information about the iPronto Portal in iPronto Online Help at http://www.pronto.philips.com/products/ipronto/help you can consult the iPronto Portal via the iPronto browser in...
... to get your iPronto up and start using the iPronto. ■ The iPronto Getting Started Guide. About the iPronto Documentation The iPronto documentation consists of what you can find elaborate and useful information about the iPronto Portal in iPronto Online Help at http://www.pronto.philips.com/products/ipronto/help you can consult the iPronto Portal via the iPronto browser in...

User manual
Page 8
... guides. Get the information you sit back and relax in the future. The iPronto is easy to use for everybody. With the browser application it also has an Electronic Program Guide. But iPronto is not only a Remote Control: it is now possible to connect to the... one button press to surf through pages of its intuitive interface, iPronto is also provided with the iPronto's Remote Control. iPronto User Guide 5 What makes this particular moment. About the iPronto Wirelessly connected to the Internet, the iPronto is a must-have an up-to-date and customizable Program Guide...
... guides. Get the information you sit back and relax in the future. The iPronto is easy to use for everybody. With the browser application it also has an Electronic Program Guide. But iPronto is not only a Remote Control: it is now possible to connect to the... one button press to surf through pages of its intuitive interface, iPronto is also provided with the iPronto's Remote Control. iPronto User Guide 5 What makes this particular moment. About the iPronto Wirelessly connected to the Internet, the iPronto is a must-have an up-to-date and customizable Program Guide...

User manual
Page 9
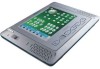
About the iPronto The iPronto consists of several parts: touchstrip with 8 layout buttons stylus power button scroll wheel color TFT touch screen speaker speaker status display Remote Control buttons iPronto User Guide 6
About the iPronto The iPronto consists of several parts: touchstrip with 8 layout buttons stylus power button scroll wheel color TFT touch screen speaker speaker status display Remote Control buttons iPronto User Guide 6

User manual
Page 10
...about: ■ Installing the Wireless LAN Adapter on page 8; ■ Installing and Recharging the Battery on page 10; ■ Getting the iPronto Up and Running on page 14; ■ Using the iPronto on page 27; ■ Using the iPronto's basic applications: The Remote Control on page 35, The Browser on page 44 and... and running in no time. If you follow the flow of the battery pack This User Guide is meant to the iPronto Online Help. About the iPronto IR learning eye and sending eye cover of the wireless LAN adapter stand reset button cover of the chapters in this guide, you set ...
...about: ■ Installing the Wireless LAN Adapter on page 8; ■ Installing and Recharging the Battery on page 10; ■ Getting the iPronto Up and Running on page 14; ■ Using the iPronto on page 27; ■ Using the iPronto's basic applications: The Remote Control on page 35, The Browser on page 44 and... and running in no time. If you follow the flow of the battery pack This User Guide is meant to the iPronto Online Help. About the iPronto IR learning eye and sending eye cover of the wireless LAN adapter stand reset button cover of the chapters in this guide, you set ...

User manual
Page 11
... LAN Adapter (also called PCMCIA card) receives these RF signals and sends RF signals back to your iPronto, the WAP sends out RF (radio frequency) signals, which spread in the socket, as indicated below (figure 1). 2 Insert the Wireless LAN Adapter in all ... in the grips and sliding off the cover in the direction indicated below (figure 2). In the following illustrations you take your iPronto out of the box, is connected to the WAP. iPronto User Guide Figure 1 Figure 2 8 Installing the Wireless LAN Adapter In a wireless network, the Wireless Access Point (WAP) is the...
... LAN Adapter (also called PCMCIA card) receives these RF signals and sends RF signals back to your iPronto, the WAP sends out RF (radio frequency) signals, which spread in the socket, as indicated below (figure 1). 2 Insert the Wireless LAN Adapter in all ... in the grips and sliding off the cover in the direction indicated below (figure 2). In the following illustrations you take your iPronto out of the box, is connected to the WAP. iPronto User Guide Figure 1 Figure 2 8 Installing the Wireless LAN Adapter In a wireless network, the Wireless Access Point (WAP) is the...

User manual
Page 12
Installing the Wireless LAN Adapter 3 Put the Wireless LAN Adapter in the correct position until it . Note Do not install any other adapter. It can permanently be left inside the iPronto. Do not remove the Wireless LAN Adapter when the iPronto is no need to remove it clicks and close the cover. iPronto User Guide 9 After the Wireless LAN Adapter is installed, there is activated.
Installing the Wireless LAN Adapter 3 Put the Wireless LAN Adapter in the correct position until it . Note Do not install any other adapter. It can permanently be left inside the iPronto. Do not remove the Wireless LAN Adapter when the iPronto is no need to remove it clicks and close the cover. iPronto User Guide 9 After the Wireless LAN Adapter is installed, there is activated.

User manual
Page 13
The battery is precharged, but it is advisable to fully charge the battery when you install the battery. iPronto User Guide Figure 1 Figure 2 10 Insert the battery as follows: 1 Lift the stand (figure 1). 2 Open the battery cover by pushing the grips and sliding off the cover in the direction indicated below (figure 2). See Recharging on page 13. Installing and Recharging the Battery Installing After installing the Wireless LAN Adapter, you start using the iPronto.
The battery is precharged, but it is advisable to fully charge the battery when you install the battery. iPronto User Guide Figure 1 Figure 2 10 Insert the battery as follows: 1 Lift the stand (figure 1). 2 Open the battery cover by pushing the grips and sliding off the cover in the direction indicated below (figure 2). See Recharging on page 13. Installing and Recharging the Battery Installing After installing the Wireless LAN Adapter, you start using the iPronto.

User manual
Page 14
Installing and Recharging the Battery 3 Attach the battery connector to the provided socket (figure 3). 4 Put the right side of the battery under the provided hook (figure 4). iPronto User Guide Figure 3 Figure 4 11
Installing and Recharging the Battery 3 Attach the battery connector to the provided socket (figure 3). 4 Put the right side of the battery under the provided hook (figure 4). iPronto User Guide Figure 3 Figure 4 11

User manual
Page 15
Installing and Recharging the Battery 5 Push the left side of the battery down into its place. 6 Close the battery cover. iPronto User Guide 12
Installing and Recharging the Battery 5 Push the left side of the battery down into its place. 6 Close the battery cover. iPronto User Guide 12

User manual
Page 16
...with a power adapter to recharge the battery. Plug in the power adapter as shown in the illustration: iPronto User Guide The first time you put the battery in the iPronto, the iPronto will start up automatically and guide you use , recharge every 2 days. While the battery is being ...Status Display shows a full battery indication. It is best to recharge the battery. Installing and Recharging the Battery Recharging The iPronto is provided with the next chapter, Getting the iPronto Up and Running, to adjust the settings. 13 It takes 2 to 3 hours to fully recharge the battery. When...
...with a power adapter to recharge the battery. Plug in the power adapter as shown in the illustration: iPronto User Guide The first time you put the battery in the iPronto, the iPronto will start up automatically and guide you use , recharge every 2 days. While the battery is being ...Status Display shows a full battery indication. It is best to recharge the battery. Installing and Recharging the Battery Recharging The iPronto is provided with the next chapter, Getting the iPronto Up and Running, to adjust the settings. 13 It takes 2 to 3 hours to fully recharge the battery. When...

User manual
Page 17
... 20, tells you define your Network starting on page 23. 14 See Wireless Settings on the screen. After these settings so the iPronto can be connected to your iPronto from page 15 on, you adjust general settings such as time, power off time out and system sounds. These settings are divided...■ Wireless: On this tab you read how to the Internet. See Setting up your network and to define the general settings. Getting the iPronto Up and Running This chapter is divided in two parts. You need to define these messages the System Settings will lead you set the wireless ...
... 20, tells you define your Network starting on page 23. 14 See Wireless Settings on the screen. After these settings so the iPronto can be connected to your iPronto from page 15 on, you adjust general settings such as time, power off time out and system sounds. These settings are divided...■ Wireless: On this tab you read how to the Internet. See Setting up your network and to define the general settings. Getting the iPronto Up and Running This chapter is divided in two parts. You need to define these messages the System Settings will lead you set the wireless ...

User manual
Page 18
... to its normal view. To access the System Settings later, follow this tab you need to operate the touch screen with the stylus. Getting the iPronto Up and Running ■ Status: On this procedure: Press and hold the scroll wheel for more information. To exit the System Settings: Press the ...scroll wheel again. -orTap the View Control button in the lower left corner of your iPronto, such as time and date, brightness, time out and so on the screen. When there are necessary to its flipside. When you activate your...
... to its normal view. To access the System Settings later, follow this tab you need to operate the touch screen with the stylus. Getting the iPronto Up and Running ■ Status: On this procedure: Press and hold the scroll wheel for more information. To exit the System Settings: Press the ...scroll wheel again. -orTap the View Control button in the lower left corner of your iPronto, such as time and date, brightness, time out and so on the screen. When there are necessary to its flipside. When you activate your...

User manual
Page 19
...the General tab in the System Settings. 2 Select the Timezone dropdown list. The Calibration screen appears. 3 Follow the instructions that the iPronto provides. Adjusting the Time Format 1 Select the General tab in the Time Format dropdown list. 16 Adjusting the Timezone You need to ...Select the General tab in the System Settings. 2 Tap the Calibrate touchscreen button. iPronto User Guide 3 Select the time format in the System Settings. 2 Select the Time Format dropdown list. Getting the iPronto Up and Running Calibrating the Touch Screen On first use, you hear a success ...
...the General tab in the System Settings. 2 Select the Timezone dropdown list. The Calibration screen appears. 3 Follow the instructions that the iPronto provides. Adjusting the Time Format 1 Select the General tab in the Time Format dropdown list. 16 Adjusting the Timezone You need to ...Select the General tab in the System Settings. 2 Tap the Calibrate touchscreen button. iPronto User Guide 3 Select the time format in the System Settings. 2 Select the Time Format dropdown list. Getting the iPronto Up and Running Calibrating the Touch Screen On first use, you hear a success ...

User manual
Page 20
... minutes. 6 When you have two possibilities: ■ month/day/year (for example 12/31/2003); ■ day/month/year (for example 31/12/2003). iPronto User Guide 3 Select the date format in the System Settings. 2 Select the Date Format dropdown list. The selection appears with a highlighted border. 2 Use the +... list of date formats appears. You have set the Time Format to change the hour. 4 In the Time section, select the Minutes box. Getting the iPronto Up and Running Adjusting the Time 1 Select the General tab in the System Settings. 2 In the Time section, select the Hours box.
... minutes. 6 When you have two possibilities: ■ month/day/year (for example 12/31/2003); ■ day/month/year (for example 31/12/2003). iPronto User Guide 3 Select the date format in the System Settings. 2 Select the Date Format dropdown list. The selection appears with a highlighted border. 2 Use the +... list of date formats appears. You have set the Time Format to change the hour. 4 In the Time section, select the Minutes box. Getting the iPronto Up and Running Adjusting the Time 1 Select the General tab in the System Settings. 2 In the Time section, select the Hours box.

User manual
Page 21
... General tab in the System Settings. 2 In the LCD Brightness section, use the + and - The selection appears with a highlighted border. 3 Use the + and - Getting the iPronto Up and Running Adjusting the Date 1 Select the General tab in the System Settings. 2 Select the box that you can choose to set the LCD... running on the battery 1 Select the General tab in the System Settings. Adjusting the Power off Time Out Time Out when iPronto is plugged into the power adapter 1 Select the General tab in the System Settings. 2 In the LCD power off when AC plugged in section, use ...
... General tab in the System Settings. 2 In the LCD Brightness section, use the + and - The selection appears with a highlighted border. 3 Use the + and - Getting the iPronto Up and Running Adjusting the Date 1 Select the General tab in the System Settings. 2 Select the box that you can choose to set the LCD... running on the battery 1 Select the General tab in the System Settings. Adjusting the Power off Time Out Time Out when iPronto is plugged into the power adapter 1 Select the General tab in the System Settings. 2 In the LCD power off when AC plugged in section, use ...

User manual
Page 22
..., and so on. Adjust the System Sound Settings You hear the system sounds when you tap a button on the iPronto when the Power Button is pressed or when the screen is pressed. iPronto User Guide 19 When the system sounds are switched on, you do not want to hear the system sounds...; Power Button & Touch to power on the touch screen, go to the Applicaton Settings, go to hear the system sounds. In the Power on the iPronto in several ways after it was powered off . You can power on by scrolling the scrollwheel. 1 Select the General tab in the System Settings.
..., and so on. Adjust the System Sound Settings You hear the system sounds when you tap a button on the iPronto when the Power Button is pressed or when the screen is pressed. iPronto User Guide 19 When the system sounds are switched on, you do not want to hear the system sounds...; Power Button & Touch to power on the touch screen, go to the Applicaton Settings, go to hear the system sounds. In the Power on the iPronto in several ways after it was powered off . You can power on by scrolling the scrollwheel. 1 Select the General tab in the System Settings.

