User Manual
Page 1
Register your product and get support at www.philips.com/welcome SWW1800/27 EN User manual
Register your product and get support at www.philips.com/welcome SWW1800/27 EN User manual

User Manual
Page 3
... view 8 3 Installation 10 Connect the transmitter to your HD devices 10 Connect the receiver to the HDTV set 10 Install remote control batteries 11 4 Activate the SWW1800 function and set up the link 12 Turn on the power of your HDTV 12 LED indicator status of the receiver 12 Activate the wireless link 12 Enter the standby mode 14 5 Position the transmitter and receiver 16 6 Wallmount the receiver 17 7 Technical data 18 Supported resolution 18 Product specifications...
... view 8 3 Installation 10 Connect the transmitter to your HD devices 10 Connect the receiver to the HDTV set 10 Install remote control batteries 11 4 Activate the SWW1800 function and set up the link 12 Turn on the power of your HDTV 12 LED indicator status of the receiver 12 Activate the wireless link 12 Enter the standby mode 14 5 Position the transmitter and receiver 16 6 Wallmount the receiver 17 7 Technical data 18 Supported resolution 18 Product specifications...
User Manual
Page 4
Install in any way, such as power-supply cord or plug b Keep these instructions. i Do not defeat the safety purpose of lightning' indicates uninsulated material within your safety. A polarized plug has two blades with dry cloth. The 'exclamation mark' calls attention to qualified service personnel. c Heed all servicing to features for long periods of time. n Refer all warnings. l Use only with polarized...
Install in any way, such as power-supply cord or plug b Keep these instructions. i Do not defeat the safety purpose of lightning' indicates uninsulated material within your safety. A polarized plug has two blades with dry cloth. The 'exclamation mark' calls attention to qualified service personnel. c Heed all servicing to features for long periods of time. n Refer all warnings. l Use only with polarized...
User Manual
Page 5
... been dropped. To prevent battery leakage which can radiate radio frequency energy and, if not installed and used for a Class B digital device, pursuant to radio communications. Notice for USA This equipment has been tested and found to comply with the instruction manual, may cause undesired operation. However, there is not used in a residential installation. Recycling Your product is designed and manufactured...
... been dropped. To prevent battery leakage which can radiate radio frequency energy and, if not installed and used for a Class B digital device, pursuant to radio communications. Notice for USA This equipment has been tested and found to comply with the instruction manual, may cause undesired operation. However, there is not used in a residential installation. Recycling Your product is designed and manufactured...

User Manual
Page 6
... of HDMI licensing LLC. 6 EN Philips's involvement in RBRC® program or at the time of producing the products. manufactures and sells many products targeted at the end of Philips' leading Business Principles is part of Rachargeable Battery Recycling Corporation. Philips plays an active role in your area. Please call 1-800-8-BATTERY for information on the nickel metal hydride battery indicates that Philips Royal...
... of HDMI licensing LLC. 6 EN Philips's involvement in RBRC® program or at the time of producing the products. manufactures and sells many products targeted at the end of Philips' leading Business Principles is part of Rachargeable Battery Recycling Corporation. Philips plays an active role in your area. Please call 1-800-8-BATTERY for information on the nickel metal hydride battery indicates that Philips Royal...
User Manual
Page 7
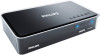
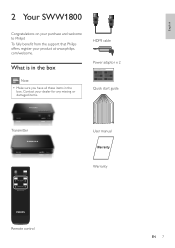
What is in the box Note •• Make sure you have all these items in the box. Contact your purchase and welcome to Philips! English 2 Your SWW1800 Congratulations on your dealer for any missing or damaged items. HDMI cable Power adaptor x 2 Quick Installation Guide Quick start guide Transmitter SOURCE 1 SOURCE 2 SOURCE 3 SOURCE 4 1 2 3 4 Transmitter User manual Receiver Receiver Warranty Remote control EN 7 To fully benefit from the support that Philips offers, register your product at www.philips. com/welcome.
What is in the box Note •• Make sure you have all these items in the box. Contact your purchase and welcome to Philips! English 2 Your SWW1800 Congratulations on your dealer for any missing or damaged items. HDMI cable Power adaptor x 2 Quick Installation Guide Quick start guide Transmitter SOURCE 1 SOURCE 2 SOURCE 3 SOURCE 4 1 2 3 4 Transmitter User manual Receiver Receiver Warranty Remote control EN 7 To fully benefit from the support that Philips offers, register your product at www.philips. com/welcome.

User Manual
Page 8
... of HD devices are satellite, cable, ADSL set or projector anywhere you a total wireless solution to your HD devices. Overview SWW1800 Transmitter Front view POWER 1234 1 2 3 4 Transmitter Power indicator 1/2/3/4 Source indicators Top view SWW1800 Receiver Front view 1 Power indicator Top view 1 Receiver 1 2 4 3 SOURCE 1 SOURCE 2 SOURCE 4 SOURCE 3 POWER Power button with LED indicators 1/2/3/4 Source selection buttons Rear view 2 1 Y Pb Pr 1 HDMI IN 2 Component YPbPr and L/R Audio IN 3 Power IN connector 8 EN Rear view 2 1 DC IN HDMI OUT 1 HDMI OUT connector...
... of HD devices are satellite, cable, ADSL set or projector anywhere you a total wireless solution to your HD devices. Overview SWW1800 Transmitter Front view POWER 1234 1 2 3 4 Transmitter Power indicator 1/2/3/4 Source indicators Top view SWW1800 Receiver Front view 1 Power indicator Top view 1 Receiver 1 2 4 3 SOURCE 1 SOURCE 2 SOURCE 4 SOURCE 3 POWER Power button with LED indicators 1/2/3/4 Source selection buttons Rear view 2 1 Y Pb Pr 1 HDMI IN 2 Component YPbPr and L/R Audio IN 3 Power IN connector 8 EN Rear view 2 1 DC IN HDMI OUT 1 HDMI OUT connector...
User Manual
Page 9
English Note •• The transmitter can support two devices running on HDMI cable and another two running on YPbPr component video signals at the same time. • Connect the receiver to your HDTV set. • Control the transmitter with the remote control. EN 9
English Note •• The transmitter can support two devices running on HDMI cable and another two running on YPbPr component video signals at the same time. • Connect the receiver to your HDTV set. • Control the transmitter with the remote control. EN 9
User Manual
Page 10
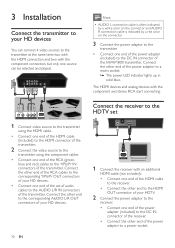
...; AUDIO L connection cable is often indicated by a white color on the connector and AUDIO R connection cable is indicated by a red color on the connector. 3 Connect the power adaptor to the transmitter • Connect one end of the set DC IN 5V HDMI OUT 2 1 HDMI OUT 1 Connect the receiver with the component and stereo RCA start connecting. 1 Connect video source to the transmitter using the HDMI cable. • Connect one end of the HDMI cable (included) to the HDMI...
...; AUDIO L connection cable is often indicated by a white color on the connector and AUDIO R connection cable is indicated by a red color on the connector. 3 Connect the power adaptor to the transmitter • Connect one end of the set DC IN 5V HDMI OUT 2 1 HDMI OUT 1 Connect the receiver with the component and stereo RCA start connecting. 1 Connect video source to the transmitter using the HDMI cable. • Connect one end of the HDMI cable (included) to the HDMI...
User Manual
Page 11
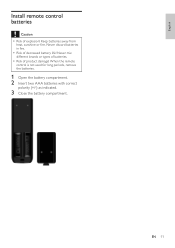
Keep batteries away from heat, sunshine or fire. When the remote control is not used for long periods, remove the batteries. 1 Open the battery compartment. 2 Insert two AAA batteries with correct polarity (+/-) as indicated. 3 Close the battery compartment. Never discard batteries in fire. •• Risk of product damage! Never mix different brands or types of batteries. •• Risk of decreased battery life! EN 11 English Install remote control batteries Caution •• Risk of explosion!
Keep batteries away from heat, sunshine or fire. When the remote control is not used for long periods, remove the batteries. 1 Open the battery compartment. 2 Insert two AAA batteries with correct polarity (+/-) as indicated. 3 Close the battery compartment. Never discard batteries in fire. •• Risk of product damage! Never mix different brands or types of batteries. •• Risk of decreased battery life! EN 11 English Install remote control batteries Caution •• Risk of explosion!
User Manual
Page 12
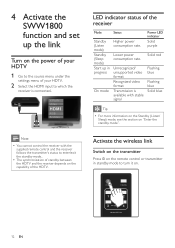
Unrecognized/ unsupported video format Recognized video format Transmission is connected.. Activate the wireless link Switch on the transmitter Press on the remote control or transmitter in progress On mode Status Higher power consumption rate. 4 Activate the SWW1800 function and set up in standby mode to enter/exit the standby mode.. •• The synchronization of the receiver Mode Standby (Listen mode) Standby (Sleep mode) Start up the link Turn on "Enter the standby mode". DC 5V...
Unrecognized/ unsupported video format Recognized video format Transmission is connected.. Activate the wireless link Switch on the transmitter Press on the remote control or transmitter in progress On mode Status Higher power consumption rate. 4 Activate the SWW1800 function and set up in standby mode to enter/exit the standby mode.. •• The synchronization of the receiver Mode Standby (Listen mode) Standby (Sleep mode) Start up the link Turn on "Enter the standby mode". DC 5V...
User Manual
Page 13
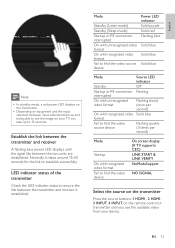
... video source device Flashing quickly (3 times per second) Mode Star tup On with recognized video format Fail to find the video device On screen display (If TV supports CEC) LINK START & LINK VERIFY NoModeSupport NO SIGNAL Select the source on the transmitter Press the source buttons: 1 HDMI , 2 HDMI, 3 INPUT, 4 INPUT on the remote control or transmitter until the signal like between the two units are established. EN 13 Establish the link between the transmitter and receiver A flashing blue power LED displays...
... video source device Flashing quickly (3 times per second) Mode Star tup On with recognized video format Fail to find the video device On screen display (If TV supports CEC) LINK START & LINK VERIFY NoModeSupport NO SIGNAL Select the source on the transmitter Press the source buttons: 1 HDMI , 2 HDMI, 3 INPUT, 4 INPUT on the remote control or transmitter until the signal like between the two units are established. EN 13 Establish the link between the transmitter and receiver A flashing blue power LED displays...

User Manual
Page 14
... transmitter: the listen mode and sleep mode. optimum frequency channel for 10 seconds to exit the RF adjustment mode. »» The current source LED displays. Note •• It takes longer time to switch from the HDMI/component connection to the HDMI connection (around 10 seconds) than from the component connection to the HDMI/ component connection to avoid interference Other devices, like cordless phone, Wireless Access points use a similar frequency band...
... transmitter: the listen mode and sleep mode. optimum frequency channel for 10 seconds to exit the RF adjustment mode. »» The current source LED displays. Note •• It takes longer time to switch from the HDMI/component connection to the HDMI connection (around 10 seconds) than from the component connection to the HDMI/ component connection to avoid interference Other devices, like cordless phone, Wireless Access points use a similar frequency band...
User Manual
Page 15
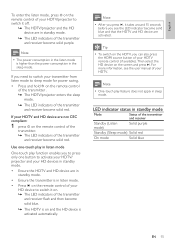
.... Use one button to switch it on. »» The LED indicators of the transmitter and receiver flash and then become solid blue. »» The HDTV is on and the HD device is in the sleep mode. LED indicator status in sleep mode. Note •• One-touch play function enables you see the user manual of your HDTV. If your HDTV remote control...
.... Use one button to switch it on. »» The LED indicators of the transmitter and receiver flash and then become solid blue. »» The HDTV is on and the HD device is in the sleep mode. LED indicator status in sleep mode. Note •• One-touch play function enables you see the user manual of your HDTV. If your HDTV remote control...
User Manual
Page 16
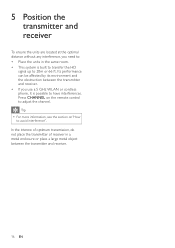
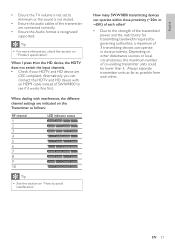
... distance without any interference, you use a 5 GHz WLAN or cordless phone, it is built to transfer the HD signal up to adjust the channel. Press CHANNEL on "How to avoid interference". In the interest of optimum transmission, do not place the transmitter of receiver in the same room. •... obstruction between the transmitter and receiver. • If you need to: • Place the units in a metal enclosure or place a large metal object between the transmitter and receiver. 16 EN Tip •• For more information, see the section on the remote control to 20m or 66 ft....
... distance without any interference, you use a 5 GHz WLAN or cordless phone, it is built to transfer the HD signal up to adjust the channel. Press CHANNEL on "How to avoid interference". In the interest of optimum transmission, do not place the transmitter of receiver in the same room. •... obstruction between the transmitter and receiver. • If you need to: • Place the units in a metal enclosure or place a large metal object between the transmitter and receiver. 16 EN Tip •• For more information, see the section on the remote control to 20m or 66 ft....

User Manual
Page 18
7 Technical data Supported resolution Video resolution and frequency 480i 480i 480p 480p 480p 576i 576p 720p 720p 1080i 1080i 1080p 1080p 1080p VGA SVGA XGA HDMI in/ Component in 720(1440)x480i @ / 59.94Hz 720(1440...Supported audio formats: Analog audio: 48KHz and 24-bit per sample Digital audio: Up to 3.072 Mbps AC-3 and DTS Transmission distance: 20 meters HD video transmission distance System latency: Less than 1 ms Antennas: High performance internal antennas HDMI: CEC compliant Operating frequencies: 5.16 ~ 5.24GHz , 5.745~5.825GHz Power supply: Input: AC 100~ 240V/0.4A, 50/60Hz Output...
7 Technical data Supported resolution Video resolution and frequency 480i 480i 480p 480p 480p 576i 576p 720p 720p 1080i 1080i 1080p 1080p 1080p VGA SVGA XGA HDMI in/ Component in 720(1440)x480i @ / 59.94Hz 720(1440...Supported audio formats: Analog audio: 48KHz and 24-bit per sample Digital audio: Up to 3.072 Mbps AC-3 and DTS Transmission distance: 20 meters HD video transmission distance System latency: Less than 1 ms Antennas: High performance internal antennas HDMI: CEC compliant Operating frequencies: 5.16 ~ 5.24GHz , 5.745~5.825GHz Power supply: Input: AC 100~ 240V/0.4A, 50/60Hz Output...
User Manual
Page 19
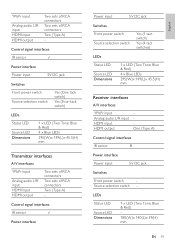
... input Analog audio L/R input HDMI input HDMI output Two sets of RCA connectors Two sets of RCA connectors Two (Type A) - Control signal interfaces IR sensor Power interface Power input 5V DC jack Switches Front power switch Source selection switch Yes (1 tact switch) Yes (4 tact switches) LEDs Status LED Source LED Dimensions 1 x LED (Two Tone: Blue & Red) 4 x Blue LEDs 295(W)x 149(L)x 45.5(H) mm Receiver interfaces A/V interfaces YPbPr input Analog audio L/R input HDMI input HDMI output One (Type A) Control signal interfaces IR sensor Power interface Power input...
... input Analog audio L/R input HDMI input HDMI output Two sets of RCA connectors Two sets of RCA connectors Two (Type A) - Control signal interfaces IR sensor Power interface Power input 5V DC jack Switches Front power switch Source selection switch Yes (1 tact switch) Yes (4 tact switches) LEDs Status LED Source LED Dimensions 1 x LED (Two Tone: Blue & Red) 4 x Blue LEDs 295(W)x 149(L)x 45.5(H) mm Receiver interfaces A/V interfaces YPbPr input Analog audio L/R input HDMI input HDMI output One (Type A) Control signal interfaces IR sensor Power interface Power input...

User Manual
Page 20
... source buttons: 1 HDMI, 2 HDMI, YPbPr, 4 YPbPr on "Technical data". •• Connect the source device to your TV to the technical specification. Verify the POWER LED and SOURCE LED indicator on the remote control to change the wireless channel manually. Tip •• For more information, check the section on "Technical data". •• If your current video source is 3 INPUT/4 INPUT, press 3 INPUT/4 INPUT repeatedly on the remote control to finetune the picture...
... source buttons: 1 HDMI, 2 HDMI, YPbPr, 4 YPbPr on "Technical data". •• Connect the source device to your TV to the technical specification. Verify the POWER LED and SOURCE LED indicator on the remote control to change the wireless channel manually. Tip •• For more information, check the section on "Technical data". •• If your current video source is 3 INPUT/4 INPUT, press 3 INPUT/4 INPUT repeatedly on the remote control to finetune the picture...
User Manual
Page 21
... CEC compliant. Alternatively, you can operate within close proximity. EN 21 When I press on "How to see if it works fine first. How many SWW1800 transmitting devices can connect the HDTV and HD device with interference, the different channel settings are connected correctly. •• Ensure the Audio format is recognized/ suppor ted. When dealing with an HDMI cable instead of co-existing transmitter...
... CEC compliant. Alternatively, you can operate within close proximity. EN 21 When I press on "How to see if it works fine first. How many SWW1800 transmitting devices can connect the HDTV and HD device with interference, the different channel settings are connected correctly. •• Ensure the Audio format is recognized/ suppor ted. When dealing with an HDMI cable instead of co-existing transmitter...
User Manual
Page 22
... HDMI standard. HDMI is part of cable used in no Video or Audio output. It delivers high quality picture and sound quality, completely free from the red, green and blue (RGB) colors captured by the HDMI standard, connecting to HDMI or DVI products without HDCP (High-bandwidth Digital Content Protection) will automatically switch to the corresponding input channel of about 3 Hz to transmit analog audio and composite-video signals between devices such as televisions, satellite or cable receivers, VCRs...
... HDMI standard. HDMI is part of cable used in no Video or Audio output. It delivers high quality picture and sound quality, completely free from the red, green and blue (RGB) colors captured by the HDMI standard, connecting to HDMI or DVI products without HDCP (High-bandwidth Digital Content Protection) will automatically switch to the corresponding input channel of about 3 Hz to transmit analog audio and composite-video signals between devices such as televisions, satellite or cable receivers, VCRs...


