Leaflet
Page 1
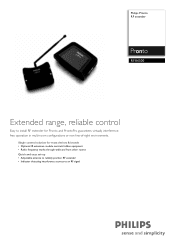
Philips Pronto RF extender RFX6500 Extended range, reliable control Easy to install RF extender for most devices & brands • Optional IR extension module controls hidden equipment • Radio frequency works through walls and from other rooms Quick and easy set-up • Adjustable antenna to reliably position RF extender • Indicator detecting interference sources to an RF signal Single control solution for Pronto and ProntoPro guarantees virtually interferencefree operation in multi-room configurations or non-line-of-sight environments.
Philips Pronto RF extender RFX6500 Extended range, reliable control Easy to install RF extender for most devices & brands • Optional IR extension module controls hidden equipment • Radio frequency works through walls and from other rooms Quick and easy set-up • Adjustable antenna to reliably position RF extender • Indicator detecting interference sources to an RF signal Single control solution for Pronto and ProntoPro guarantees virtually interferencefree operation in multi-room configurations or non-line-of-sight environments.
User manual
Page 5
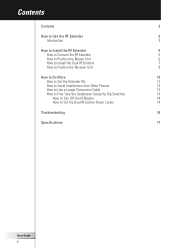
... to Install the Dual IR Emitters 7 How to Position the Receiver Unit 9 How to Do More 12 How to Set the Extender IDs 12 How to Avoid Interference from Other Prontos 13 How to Use a Longer Connection Cable 13 How to Fine-Tune the Installation Using the Dip Switches 14 How to...
... to Install the Dual IR Emitters 7 How to Position the Receiver Unit 9 How to Do More 12 How to Set the Extender IDs 12 How to Avoid Interference from Other Prontos 13 How to Use a Longer Connection Cable 13 How to Fine-Tune the Installation Using the Dip Switches 14 How to...

User manual
Page 6
... as a carrier for instance in a small closet. ■ The Dual IR emitters instead of the Blaster unit. User Guide 3 EN RF signals IR signals Pronto Receiver unit Blaster unit When the Blaster unit cannot reach all devices or transmits with the Blaster unit. When you want to the audio/video... accurately, you can be solved using the Dual IR emitters alone. How to the Blaster unit, which converts the signals into IR signals. The RF Extender consists of the devices, for IR commands. This unit is limited space around the IR receivers of two units: a Receiver unit, and a Blaster unit...
... as a carrier for instance in a small closet. ■ The Dual IR emitters instead of the Blaster unit. User Guide 3 EN RF signals IR signals Pronto Receiver unit Blaster unit When the Blaster unit cannot reach all devices or transmits with the Blaster unit. When you want to the audio/video... accurately, you can be solved using the Dual IR emitters alone. How to the Blaster unit, which converts the signals into IR signals. The RF Extender consists of the devices, for IR commands. This unit is limited space around the IR receivers of two units: a Receiver unit, and a Blaster unit...

User manual
Page 7
How to Use the RF Extender Situation B: The RF Extender controls devices placed in the situation shown above can control all RF Extenders individually with your devices. Situation C: The RF Extender is placed inside a closet, a rack or another piece of the remote control. User Guide 4 You can also be remotely controlled when they are not in the line of sight of furniture together with one or more Pronto Remote Controls. Situation A: Your devices can be combined. The arrangements in an adjacent room.
How to Use the RF Extender Situation B: The RF Extender controls devices placed in the situation shown above can control all RF Extenders individually with your devices. Situation C: The RF Extender is placed inside a closet, a rack or another piece of the remote control. User Guide 4 You can also be remotely controlled when they are not in the line of sight of furniture together with one or more Pronto Remote Controls. Situation A: Your devices can be combined. The arrangements in an adjacent room.

User manual
Page 12
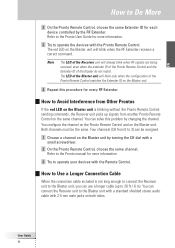
... LED blinks and burns as little as WiFi base stations, audio/video devices, microwave ovens, or wireless telephones) are operated nearby. If the RF Extender and the Pronto Remote Control work in other appliances (such as possible. The LED on all devices that may be placed in a location where there is indicated.... To find the position with the least amount of the Receiver unit to blink. There may cause RF interference. EN How to Install the RF Extender How to Position the Receiver Unit For optimal performance, the Receiver unit should be RF interference when other situations...
... LED blinks and burns as little as WiFi base stations, audio/video devices, microwave ovens, or wireless telephones) are operated nearby. If the RF Extender and the Pronto Remote Control work in other appliances (such as possible. The LED on all devices that may be placed in a location where there is indicated.... To find the position with the least amount of the Receiver unit to blink. There may cause RF interference. EN How to Install the RF Extender How to Position the Receiver Unit For optimal performance, the Receiver unit should be RF interference when other situations...

User manual
Page 13
...; Inside a metal closet, since these devices may cause RF interference. It will cause the Receiver unit to be less sensitive to Install the RF Extender 3 Check the LED on the Receiver unit for RF interference. User Guide 10 If the LED does not blink, or blinks only sporadically, mount ... RF interference. If the LED does not blink, or blinks only sporadically, position the Receiver unit there, and continue with the Pronto Remote Control, the LEDs of the Pronto Remote Control. 6 Try out other positions moving the Receiver unit around , and check the LED for RF interference. If the ...
...; Inside a metal closet, since these devices may cause RF interference. It will cause the Receiver unit to be less sensitive to Install the RF Extender 3 Check the LED on the Receiver unit for RF interference. User Guide 10 If the LED does not blink, or blinks only sporadically, mount ... RF interference. If the LED does not blink, or blinks only sporadically, position the Receiver unit there, and continue with the Pronto Remote Control, the LEDs of the Pronto Remote Control. 6 Try out other positions moving the Receiver unit around , and check the LED for RF interference. If the ...
User manual
Page 14
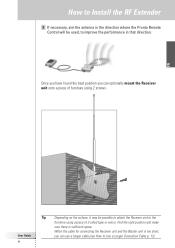
EN User Guide 11 Tip Depending on the surface, it may be used, to improve the performance in the direction where the Pronto Remote Control will be possible to attach the Receiver unit to the furniture using 2 screws. When the cable for connecting the Receiver unit and the ...Blaster unit is sufficient space. How to Install the RF Extender 8 If necessary, aim the antenna in that direction. Once you have found the best position you can optionally mount the Receiver unit onto a piece of...
EN User Guide 11 Tip Depending on the surface, it may be used, to improve the performance in the direction where the Pronto Remote Control will be possible to attach the Receiver unit to the furniture using 2 screws. When the cable for connecting the Receiver unit and the ...Blaster unit is sufficient space. How to Install the RF Extender 8 If necessary, aim the antenna in that direction. Once you have found the best position you can optionally mount the Receiver unit onto a piece of...
User manual
Page 15
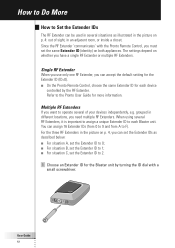
...on both appliances. You can accept the default setting for the Extender ID (ID=0). ■ On the Pronto Remote Control, choose the same Extender ID for each Blaster unit. Single RF Extender When you use only one RF Extender, you can assign 16 Extender IDs (from 0 to 9 and from A to F). ... by turning the ID dial with the Pronto Remote Control, you must set the Extender ID to 2. 1 Choose an Extender ID for the Blaster unit by the RF Extender. Since the RF Extender 'communicates' with a small screwdriver. User Guide 12 For the three RF Extenders in the picture on p. 4: out...
...on both appliances. You can accept the default setting for the Extender ID (ID=0). ■ On the Pronto Remote Control, choose the same Extender ID for each Blaster unit. Single RF Extender When you use only one RF Extender, you can assign 16 Extender IDs (from 0 to 9 and from A to F). ... by turning the ID dial with the Pronto Remote Control, you must set the Extender ID to 2. 1 Choose an Extender ID for the Blaster unit by the RF Extender. Since the RF Extender 'communicates' with a small screwdriver. User Guide 12 For the three RF Extenders in the picture on p. 4: out...
User manual
Page 16
...be assigned. 1 Choose a channel on the Blaster unit. 4 Repeat this problem by the RF Extender. Four channels (CH from another Pronto Remote Control on the Blaster unit will blink when the RF Extender receives a correct command. The LED of the Blaster unit will always blink when RF signals are... being received, even when the extender ID of the Pronto Remote Control and the Extender ID of the Pronto Remote Control matches the Extender ID on the Blaster unit by turning the CH dial with the Pronto Remote Control. Refer to the Pronto manual for more information. 3 Try to ...
...be assigned. 1 Choose a channel on the Blaster unit. 4 Repeat this problem by the RF Extender. Four channels (CH from another Pronto Remote Control on the Blaster unit will blink when the RF Extender receives a correct command. The LED of the Blaster unit will always blink when RF signals are... being received, even when the extender ID of the Pronto Remote Control and the Extender ID of the Pronto Remote Control matches the Extender ID on the Blaster unit by turning the CH dial with the Pronto Remote Control. Refer to the Pronto manual for more information. 3 Try to ...

