Leaflet
Page 2
...the even lines, both fields are playing. All Rights reserved. DVD Micro Theater MCD735/37 Specifications Sound • Output Power: Total 200W • Sound Enhancement: ...no line structure. Dynamic Bass Boost Dynamic Bass Boost maximizes your eye perceives a sharper picture with 2xAAA batteries • IFU / User Manual: English, French, Spanish Dimensions • Set dimensions (W x H x D): 210 x 135 x 255 mm • Surround Speaker ...Digital Sound Control makes it easy for different musical styles. www.philips.com The limitation of the usual 10bit DAC become in your music...
...the even lines, both fields are playing. All Rights reserved. DVD Micro Theater MCD735/37 Specifications Sound • Output Power: Total 200W • Sound Enhancement: ...no line structure. Dynamic Bass Boost Dynamic Bass Boost maximizes your eye perceives a sharper picture with 2xAAA batteries • IFU / User Manual: English, French, Spanish Dimensions • Set dimensions (W x H x D): 210 x 135 x 255 mm • Surround Speaker ...Digital Sound Control makes it easy for different musical styles. www.philips.com The limitation of the usual 10bit DAC become in your music...
User manual
Page 6
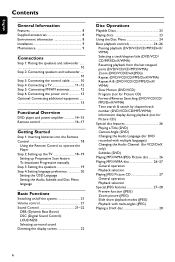
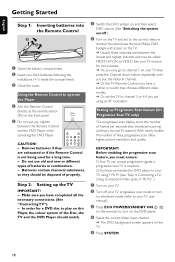
... Control 18 Using the Remote Control to operate the Player Step 2: Setting up the TV 18~19 Setting up Progressive Scan feature To deactivate Progressive manually Step 3: Setting the speakers 19 Step 4: Setting language preference 20 Setting the OSD Language Setting the Audio, Subtitle and Disc Menu language Basic Functions Switching...
... Control 18 Using the Remote Control to operate the Player Step 2: Setting up the TV 18~19 Setting up Progressive Scan feature To deactivate Progressive manually Step 3: Setting the speakers 19 Step 4: Setting language preference 20 Setting the OSD Language Setting the Audio, Subtitle and Disc Menu language Basic Functions Switching...
User manual
Page 11
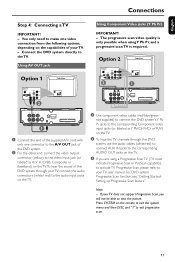
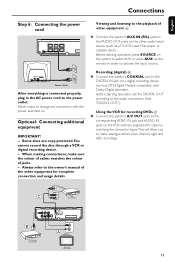
... corresponding Component video input jacks (or labeled as Y Pb/Cb Pr/Cr or YUV) on the TV.To hear the sound of your TV user manual. Using AV OUT jack Option 1 Connections Using Component Video jacks (Y Pb Pr) IMPORTANT! - Press SYSTEM on the TV. 1 Use component video cables (red/blue/green...
... corresponding Component video input jacks (or labeled as Y Pb/Cb Pr/Cr or YUV) on the TV.To hear the sound of your TV user manual. Using AV OUT jack Option 1 Connections Using Component Video jacks (Y Pb Pr) IMPORTANT! - Press SYSTEM on the TV. 1 Use component video cables (red/blue/green...
User manual
Page 13
.... - Before starting operation, press SOURCE on the system to select AUX or press AUX on the remote in the AC power cord to the owner's manual of the other equipment for recording DVDs C ● Connect the system's A/V OUT jacks to the corresponding VIDEO IN jack and AUDIO IN jacks on the...
.... - Before starting operation, press SOURCE on the system to select AUX or press AUX on the remote in the AC power cord to the owner's manual of the other equipment for recording DVDs C ● Connect the system's A/V OUT jacks to the corresponding VIDEO IN jack and AUDIO IN jacks on the...
User manual
Page 18
...completed all the necessary connections. (See "Connecting TV"). - Batteries contain chemical substances, so they are using Y Pb Pr (see the blue Philips DVD background screen on the TV. ➜ Usually these channels are between the Remote Control and the DVD Player while operating the DVD Player...(for a long time. - Remove batteries if they should see "Step 4: Connecting a TVUsing Component Video jacks (Y Pb Pr)".) 1 Turn on your TV user manual). 3 Press ECO POWER/STANDBY ON B (B on the remote) to channel 3 or 4 if you are exhausted or if the Remote Control is required. 2) You...
...completed all the necessary connections. (See "Connecting TV"). - Batteries contain chemical substances, so they are using Y Pb Pr (see the blue Philips DVD background screen on the TV. ➜ Usually these channels are between the Remote Control and the DVD Player while operating the DVD Player...(for a long time. - Remove batteries if they should see "Step 4: Connecting a TVUsing Component Video jacks (Y Pb Pr)".) 1 Turn on your TV user manual). 3 Press ECO POWER/STANDBY ON B (B on the remote) to channel 3 or 4 if you are exhausted or if the Remote Control is required. 2) You...
User manual
Page 19
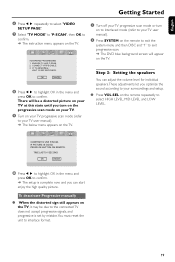
... this state until you turn on the progressive scan mode on your TV. 9 Turn on your TV progressive scan mode (refer to your TV user manual). ➜ The below menu appears on the TV. 1 Turn off your TV progressive scan mode or turn on to interlaced mode (refer to your... unit to the connected TV does not accept progressive signals, and progressive is complete now and you optimize the sound according to your TV user manual). 2 Press SYSTEM on the TV. 1. English Getting Started 6 Press 1 2 repeatedly to select "VIDEO SETUP PAGE". 7 Select "TV MODE" to "P-SCAN", then OK to confirm. ...
... this state until you turn on the progressive scan mode on your TV. 9 Turn on your TV progressive scan mode (refer to your TV user manual). ➜ The below menu appears on the TV. 1 Turn off your TV progressive scan mode or turn on to interlaced mode (refer to your... unit to the connected TV does not accept progressive signals, and progressive is complete now and you optimize the sound according to your TV user manual). 2 Press SYSTEM on the TV. 1. English Getting Started 6 Press 1 2 repeatedly to select "VIDEO SETUP PAGE". 7 Select "TV MODE" to "P-SCAN", then OK to confirm. ...
User manual
Page 39
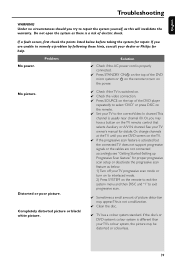
...Scan feature" for proper progressive scan setup or deactivate the progressive scan feature as below before taking the system for repair. See your dealer or Philips for details. If you may have a button on the remote. ✔ Set your TV to remedy a problem by following these hints, consult... your TV owner's manual for help. If a fault occurs, first check the points listed below : 1) Turn off your TV's colour system, the picture may appear.This is ...
...Scan feature" for proper progressive scan setup or deactivate the progressive scan feature as below before taking the system for repair. See your dealer or Philips for details. If you may have a button on the remote. ✔ Set your TV to remedy a problem by following these hints, consult... your TV owner's manual for help. If a fault occurs, first check the points listed below : 1) Turn off your TV's colour system, the picture may appear.This is ...
Quick start guide (English)
Page 1
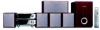
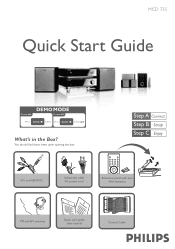
You should find these items upon opening the box. MCD 735 Quick Start Guide BAND BAND What's in the Box? A/V cord (R/W/Y) Subwoofer cable AC power cord RReemmoottee ccoonnttrrooll wwiitthh ttwwoo AAA batteries FM and AM antennas Quick 1 Start Guide U ser 2 M anual Quick start guide User manual Control Cable
You should find these items upon opening the box. MCD 735 Quick Start Guide BAND BAND What's in the Box? A/V cord (R/W/Y) Subwoofer cable AC power cord RReemmoottee ccoonnttrrooll wwiitthh ttwwoo AAA batteries FM and AM antennas Quick 1 Start Guide U ser 2 M anual Quick start guide User manual Control Cable
Quick start guide (English)
Page 2
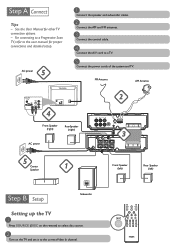
Tips - For connecting to a Progressive Scan TV, refer to the user manual for other TV connection options. - AC power 5 1 Connect the speaker and subwoofer cables. 2 Connect the AM and FM antennas. 3 Connect the control cable. 4 Connect the A/V ...) to select disc source. 2 Turn on the TV and set it to a TV. 5 Connect the power cords of the system and TV. See the User Manual for proper connections and detailed setup.
Tips - For connecting to a Progressive Scan TV, refer to the user manual for other TV connection options. - AC power 5 1 Connect the speaker and subwoofer cables. 2 Connect the AM and FM antennas. 3 Connect the control cable. 4 Connect the A/V ...) to select disc source. 2 Turn on the TV and set it to a TV. 5 Connect the power cords of the system and TV. See the User Manual for proper connections and detailed setup.

Quick start guide (English)
Page 3
...and hold CLOCK on the remote. 2 When the hour digits flash, turn VOLUME-/+ on the system or press VOLUME+/- To set clock in the User Manual for 3 seconds or more to switch to confirm the time setting. on the remote to set the minutes. 4 Press CLOCK again to normal standby mode... the progressive scan feature is activated but the connected TV does not support progressive signals or the cables are not connected accordingly, see the user manual for proper progressive scan setup or deactivate the progressive scan feature as below . 1 In standby mode, press and hold STANDBY-ON/ECO POWER 2 on ...
...and hold CLOCK on the remote. 2 When the hour digits flash, turn VOLUME-/+ on the system or press VOLUME+/- To set clock in the User Manual for 3 seconds or more to switch to confirm the time setting. on the remote to set the minutes. 4 Press CLOCK again to normal standby mode... the progressive scan feature is activated but the connected TV does not support progressive signals or the cables are not connected accordingly, see the user manual for proper progressive scan setup or deactivate the progressive scan feature as below . 1 In standby mode, press and hold STANDBY-ON/ECO POWER 2 on ...

Quick start guide (English)
Page 4
...the label side of the disc is displayed. First, select the source you wish to program all available stations in the accompany owner's manual. http://www.philips.com PDCC-JS/JW-0627 Programming and tuning to radio stations 1 Press SOURCE (TUNER on the remote) to select tuner source. 2... Press PROG on the remote for example). - Notes for example). 2005 C Koninklijie Philips Electronics N.V. If not pressÉÅ. 3 To stop playback, press PRESET-/9 (9 on the remote control (DISC or TUNER, for more than two seconds ...
...the label side of the disc is displayed. First, select the source you wish to program all available stations in the accompany owner's manual. http://www.philips.com PDCC-JS/JW-0627 Programming and tuning to radio stations 1 Press SOURCE (TUNER on the remote) to select tuner source. 2... Press PROG on the remote for example). - Notes for example). 2005 C Koninklijie Philips Electronics N.V. If not pressÉÅ. 3 To stop playback, press PRESET-/9 (9 on the remote control (DISC or TUNER, for more than two seconds ...


