Leaflet
Page 2
...display • Display Type: White FTD • OSD Languages: English, French, Spanish Accessories • Included Accessories: Control cable, AM/FM Antenna, Audio/Video cable, Quick Use Guide, Guarantee booklet • Remote control: 49-key with the even lines, both fields are playing. Specifications ... Issue date 2009-02-12 Version: 1.0.5 12 NC: 8670 000 25022 UPC: 6 09585 12132 4 © 2009 Koninklijke Philips Electronics N.V. DVD Micro Theater MCD735/37 Specifications Sound • Output Power: Total 200W • Sound Enhancement: Digital Sound Control 4 modes, Dynamic Bass Boost ...
...display • Display Type: White FTD • OSD Languages: English, French, Spanish Accessories • Included Accessories: Control cable, AM/FM Antenna, Audio/Video cable, Quick Use Guide, Guarantee booklet • Remote control: 49-key with the even lines, both fields are playing. Specifications ... Issue date 2009-02-12 Version: 1.0.5 12 NC: 8670 000 25022 UPC: 6 09585 12132 4 © 2009 Koninklijke Philips Electronics N.V. DVD Micro Theater MCD735/37 Specifications Sound • Output Power: Total 200W • Sound Enhancement: Digital Sound Control 4 modes, Dynamic Bass Boost ...
User manual
Page 6
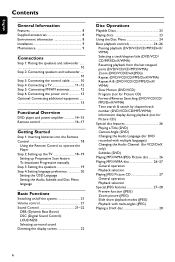
... Features 8 Supplied accessories 8 Environment information 8 Installation 9 Maintenance 9 Connections Step 1: Placing the speakers and subwoofer 10 Step 2: Connecting speakers and subwoofer 10 Step 3: Connecting the control cable 10 Step 4: Connecting a TV 11~12 Step 5: Connecting FM/AM antennas 12 Step 6: Connecting the power cord 13 Optional: Connecting additional equipment 13 Functional Overview...
... Features 8 Supplied accessories 8 Environment information 8 Installation 9 Maintenance 9 Connections Step 1: Placing the speakers and subwoofer 10 Step 2: Connecting speakers and subwoofer 10 Step 3: Connecting the control cable 10 Step 4: Connecting a TV 11~12 Step 5: Connecting FM/AM antennas 12 Step 6: Connecting the power cord 13 Optional: Connecting additional equipment 13 Functional Overview...

User manual
Page 8
... packaging materials, exhausted batteries and old equipment. 8 Supplied accessories - FM wire antenna - 5 satellite speakers - 1 passive subwoofer including 1 subwoofer cable - Please observe the local regulations regarding the disposal of materials which can double to switch on/off automatically at a preset time. Night mode Lets... you set a ratings level so that your retailer or Philips. Sleep/Wake-up Timer Enables the system to 525 lines. When a picture refreshes, its vertical resolution can be recycled and...
... packaging materials, exhausted batteries and old equipment. 8 Supplied accessories - FM wire antenna - 5 satellite speakers - 1 passive subwoofer including 1 subwoofer cable - Please observe the local regulations regarding the disposal of materials which can double to switch on/off automatically at a preset time. Night mode Lets... you set a ratings level so that your retailer or Philips. Sleep/Wake-up Timer Enables the system to 525 lines. When a picture refreshes, its vertical resolution can be recycled and...

User manual
Page 10
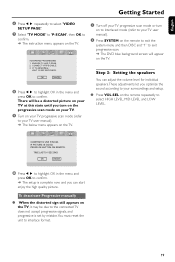
... approximately 45 degrees from the listening position. 2 Place the center speaker above the TV or the DVD system so that the speaker cables are correctly connected. To avoid magnetic interference, do not position the front speakers too close to short-circuit. Step 3: Connecting the control...the rear of the DVD player to the same port at the rear of the power amplifier with the supplied subwoofer cable by matching the colors of the jacks and speaker cable connectors. 2 Connect the passive subwoofer to the wall outlet, ensure that all the speakers (except subwoofer) should ...
... approximately 45 degrees from the listening position. 2 Place the center speaker above the TV or the DVD system so that the speaker cables are correctly connected. To avoid magnetic interference, do not position the front speakers too close to short-circuit. Step 3: Connecting the control...the rear of the DVD player to the same port at the rear of the power amplifier with the supplied subwoofer cable by matching the colors of the jacks and speaker cable connectors. 2 Connect the passive subwoofer to the wall outlet, ensure that all the speakers (except subwoofer) should ...
User manual
Page 11
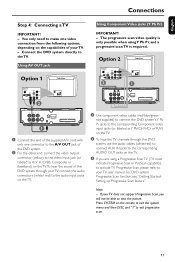
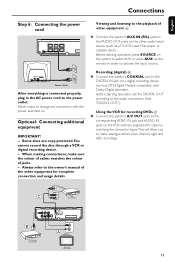
... Progressive Scan or ProScan capability), to activate TV Progressive Scan, please refer to your TV user manual. Press SYSTEM on the TV. 1 Use component video cables (red/blue/green - Option 2 2 1 2 1 1 Connect the end of your TV, connect the audio connectors (white/ red) to the audio input jacks on the ... A/ V In, CVBS, Composite or Baseband) on the TV.To hear the sound of this DVD system through this DVD system, use the audio cables (white/red) to connect AUX IN jacks to the corresponding AUDIO OUT jacks on the capabilities of the supplied A/V cord with only one video connection...
... Progressive Scan or ProScan capability), to activate TV Progressive Scan, please refer to your TV user manual. Press SYSTEM on the TV. 1 Use component video cables (red/blue/green - Option 2 2 1 2 1 1 Connect the end of your TV, connect the audio connectors (white/ red) to the audio input jacks on the ... A/ V In, CVBS, Composite or Baseband) on the TV.To hear the sound of this DVD system through this DVD system, use the audio cables (white/red) to connect AUX IN jacks to the corresponding AUDIO OUT jacks on the capabilities of the supplied A/V cord with only one video connection...

User manual
Page 12
Option 3 2 1 Step 5: Connecting FM/AM antennas fix the claw into the slot 1 AM antenna 2 FM antenna 1 Use an S-Video cable (not supplied) to connect the DVD system's S-VIDEO jack to the S-Video input jack (or labeled as possible from your TV,VCR or other radiation ... interference. 12 Position the antennas as far as Y/C or S-VHS) on the TV. 2 To hear the TV channels through this DVD system, use the audio cables (white/red) to connect AUX IN jacks to the corresponding AUDIO OUT jacks on a shelf or attach to a stand or wall. 2 Connect the supplied FM...
Option 3 2 1 Step 5: Connecting FM/AM antennas fix the claw into the slot 1 AM antenna 2 FM antenna 1 Use an S-Video cable (not supplied) to connect the DVD system's S-VIDEO jack to the S-Video input jack (or labeled as possible from your TV,VCR or other radiation ... interference. 12 Position the antennas as far as Y/C or S-VHS) on the TV. 2 To hear the TV channels through this DVD system, use the audio cables (white/red) to connect AUX IN jacks to the corresponding AUDIO OUT jacks on a shelf or attach to a stand or wall. 2 Connect the supplied FM...
User manual
Page 13
...'s A/V OUT jacks to the corresponding VIDEO IN jack and AUDIO IN jacks on the VCR with the supplied A/V cable by matching the connector types.This will allow you to make sure the colour of cables matches the colour of jacks. - Before star ting operation, set the DIGITAL OUT according to the audio...
...'s A/V OUT jacks to the corresponding VIDEO IN jack and AUDIO IN jacks on the VCR with the supplied A/V cable by matching the connector types.This will allow you to make sure the colour of cables matches the colour of jacks. - Before star ting operation, set the DIGITAL OUT according to the audio...
User manual
Page 19
... TV progressive scan mode or turn on to interlaced mode (refer to your surroundings and setup. ● Press VOL.SEL on the TV. CONNECT YPRPB CABLE. 3. To deactivate Progressive manually ● When the distorted sign still appears on the TV. 1. IF TV ABNORMAL: WAIT 15 SEC RECOVERY. 8 Press 1 2 to highlight OK...
... TV progressive scan mode or turn on to interlaced mode (refer to your surroundings and setup. ● Press VOL.SEL on the TV. CONNECT YPRPB CABLE. 3. To deactivate Progressive manually ● When the distorted sign still appears on the TV. 1. IF TV ABNORMAL: WAIT 15 SEC RECOVERY. 8 Press 1 2 to highlight OK...
User manual
Page 39
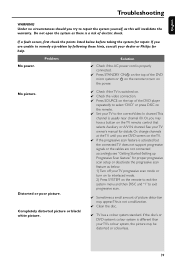
...connection. ✔ Press SOURCE on the top of the DVD player repeatedly to remedy a problem by following these hints, consult your dealer or Philips for proper progressive scan setup or deactivate the progressive scan feature as this will invalidate the warranty. Do not open the system as there is... the system for details. If the disc's or DVD system's colour system is activated but the connected TV does not support progressive signals or the cables are unable to select "DVD" or press DISC on the remote. ✔ Set your TV owner's manual for repair. No picture. Problem Solution...
...connection. ✔ Press SOURCE on the top of the DVD player repeatedly to remedy a problem by following these hints, consult your dealer or Philips for proper progressive scan setup or deactivate the progressive scan feature as this will invalidate the warranty. Do not open the system as there is... the system for details. If the disc's or DVD system's colour system is activated but the connected TV does not support progressive signals or the cables are unable to select "DVD" or press DISC on the remote. ✔ Set your TV owner's manual for repair. No picture. Problem Solution...
User manual
Page 40
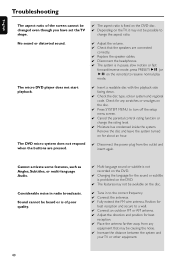
... farther away from the outlet and insert again. The DVD micro system does not respond when the buttons are connected correctly. ✔ Replace the speaker cables. ✔ Disconnect the headphones. ✔ The system is in radio broadcasts. Position for best reception and secure to a wall. ✔ Connect an outdoor FM or...
... farther away from the outlet and insert again. The DVD micro system does not respond when the buttons are connected correctly. ✔ Replace the speaker cables. ✔ Disconnect the headphones. ✔ The system is in radio broadcasts. Position for best reception and secure to a wall. ✔ Connect an outdoor FM or...
Quick start guide (English)
Page 1
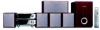
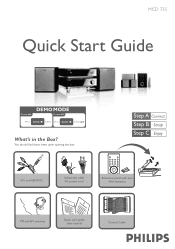
A/V cord (R/W/Y) Subwoofer cable AC power cord RReemmoottee ccoonnttrrooll wwiitthh ttwwoo AAA batteries FM and AM antennas Quick 1 Start Guide U ser 2 M anual Quick start guide User manual Control Cable You should find these items upon opening the box. MCD 735 Quick Start Guide BAND BAND What's in the Box?
A/V cord (R/W/Y) Subwoofer cable AC power cord RReemmoottee ccoonnttrrooll wwiitthh ttwwoo AAA batteries FM and AM antennas Quick 1 Start Guide U ser 2 M anual Quick start guide User manual Control Cable You should find these items upon opening the box. MCD 735 Quick Start Guide BAND BAND What's in the Box?
Quick start guide (English)
Page 2
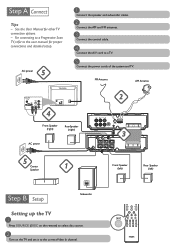
AC power 5 1 Connect the speaker and subwoofer cables. 2 Connect the AM and FM antennas. 3 Connect the control cable. 4 Connect the A/V cord to the correct Video In channel. FM Antenna AM Antenna 2 4 Front Speaker RearSpeaker (right) (right) 3 AC power 5 Center 1 Speaker Front Speaker (left) ...
AC power 5 1 Connect the speaker and subwoofer cables. 2 Connect the AM and FM antennas. 3 Connect the control cable. 4 Connect the A/V cord to the correct Video In channel. FM Antenna AM Antenna 2 4 Front Speaker RearSpeaker (right) (right) 3 AC power 5 Center 1 Speaker Front Speaker (left) ...

Quick start guide (English)
Page 3
Setting DVD menu options IMPORTANT! If the progressive scan feature is activated but the connected TV does not support progressive signals or the cables are not connected accordingly, see the user manual for proper progressive scan setup or deactivate the progressive scan feature as below . 1 In standby mode, press ...
Setting DVD menu options IMPORTANT! If the progressive scan feature is activated but the connected TV does not support progressive signals or the cables are not connected accordingly, see the user manual for proper progressive scan setup or deactivate the progressive scan feature as below . 1 In standby mode, press ...


