
Leaflet
Page 1
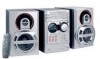
Micro Hi-Fi System with 5 CD Tray Changer MC 500 USB PC Link for MP3 Streaming Remote Control your MP3 music on your PC • USB PC Link • Song titles from PC on audio system display Power and Performance • 100W RMS Total Power • MAX Sound for instant Power Boost • 2 way Bass Reflex Speaker System with MAX Bass Port Personalized sound settings • Digital Sound Control (Rock, Techno, Jazz, Optimal) • Virtual Environment Control (Cinema, Hall, Concert, Cyber)
Micro Hi-Fi System with 5 CD Tray Changer MC 500 USB PC Link for MP3 Streaming Remote Control your MP3 music on your PC • USB PC Link • Song titles from PC on audio system display Power and Performance • 100W RMS Total Power • MAX Sound for instant Power Boost • 2 way Bass Reflex Speaker System with MAX Bass Port Personalized sound settings • Digital Sound Control (Rock, Techno, Jazz, Optimal) • Virtual Environment Control (Cinema, Hall, Concert, Cyber)

Leaflet
Page 2
... (cinema, hall, concert, cyber) amplifier • 100 watts Total Power • 2 x 50 watts RMS loudspeaker boxes • 2-way Bass Reflex speaker system • 5.25" woofer • 2" Tweeter with ferro fluid cooled • Detachable metal grilles • MAX Bass Port connections • Audio Input ... PC Hard Disk into a 'Massive MP3 Music Jukebox'. During streaming of Philips Consumer Electronics Company http://www.philipsusa.com Micro Hi-Fi System with 5 CD Tray Changer standard product information MC 500 USB PC link • Bundled MusicMatch Jukebox software • Track info ...
... (cinema, hall, concert, cyber) amplifier • 100 watts Total Power • 2 x 50 watts RMS loudspeaker boxes • 2-way Bass Reflex speaker system • 5.25" woofer • 2" Tweeter with ferro fluid cooled • Detachable metal grilles • MAX Bass Port connections • Audio Input ... PC Hard Disk into a 'Massive MP3 Music Jukebox'. During streaming of Philips Consumer Electronics Company http://www.philipsusa.com Micro Hi-Fi System with 5 CD Tray Changer standard product information MC 500 USB PC link • Bundled MusicMatch Jukebox software • Track info ...

User manual
Page 8
... and remote control 10-11 Control buttons available on the remote only ... 11 Connections Step 1: Connecting FM/AM antennas 12 Step 2: Connecting the speakers 13 Step 3: Connecting to PC 13 Step 4: Connecting the AC power cord ........ 13 Step 5: Inserting batteries into the remote control 13 Using ...the remote control to operate the system 13 USB PC Link Quick Setup Guide 14 PC system requirement 14 Install MusicMatch software 14 Enable digital CD audio output 15 Connecting USB PC Link 15 Basic Operations...
... and remote control 10-11 Control buttons available on the remote only ... 11 Connections Step 1: Connecting FM/AM antennas 12 Step 2: Connecting the speakers 13 Step 3: Connecting to PC 13 Step 4: Connecting the AC power cord ........ 13 Step 5: Inserting batteries into the remote control 13 Using ...the remote control to operate the system 13 USB PC Link Quick Setup Guide 14 PC system requirement 14 Install MusicMatch software 14 Enable digital CD audio output 15 Connecting USB PC Link 15 Basic Operations...

User manual
Page 11
... - Displays the timer setting. ≥ TIMER ON/OFF - Displays disc remaining playback time. ºB - Point the remote control towards this sensor. ! TUNER: toggles between the system and PC's USB port. )n - Switches to playback. # OPEN/CLOSE 0 1~5 - Opens/closes the individual disc tray. $ MAX SOUND (MAX ON/OFF) - Adjusts the volume level. ^ ...random play mode. ª DISPLAY - English Functional Overview 9 Display screen 0 iR - Disc trays (1~5) @ 5 DISC DIRECT PLAY 1~5 (CD 1~5) - Switches to clock display mode. ≤ SNOOZE - The speakers output will be cancelled.
... - Displays the timer setting. ≥ TIMER ON/OFF - Displays disc remaining playback time. ºB - Point the remote control towards this sensor. ! TUNER: toggles between the system and PC's USB port. )n - Switches to playback. # OPEN/CLOSE 0 1~5 - Opens/closes the individual disc tray. $ MAX SOUND (MAX ON/OFF) - Adjusts the volume level. ^ ...random play mode. ª DISPLAY - English Functional Overview 9 Display screen 0 iR - Disc trays (1~5) @ 5 DISC DIRECT PLAY 1~5 (CD 1~5) - Switches to clock display mode. ≤ SNOOZE - The speakers output will be cancelled.

User manual
Page 12
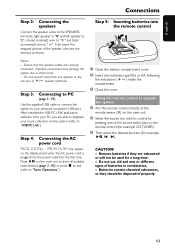
...cord to the wall. - Step 1: Connecting FM/AM antennas - Position the antennas as far as possible from a TV,VCR or other speakers can damage the unit and sound quality will be negatively affected. - The combination of the antennas for optimal reception. - Adjust the position of... the main unit and speakers provide the best sound. P5 WARNING! - Using other radiation source to page 3 - For better FM stereo reception, connect external FM antenna....
...cord to the wall. - Step 1: Connecting FM/AM antennas - Position the antennas as far as possible from a TV,VCR or other speakers can damage the unit and sound quality will be negatively affected. - The combination of the antennas for optimal reception. - Adjust the position of... the main unit and speakers provide the best sound. P5 WARNING! - Using other radiation source to page 3 - For better FM stereo reception, connect external FM antenna....
User manual
Page 13
...- P5) Use the supplied USB cable to connect the system to your music collection via the system (refer to short-circuit. - PRESS PLAY" may damage the system due to "USB PC Link"). Remove batteries if they should be used for a long time. - speaker terminals. Press ÉÅ on the main unit.... the AC power cord "AUTO INSTALL - Using the remote control to operate the system 1 Aim the remote control directly at the remote sensor (iR) on the main unit to PC (page 3 - Ensure that the speaker cables are able to control by pressing one pair of batteries in combination. - ...
...- P5) Use the supplied USB cable to connect the system to your music collection via the system (refer to short-circuit. - PRESS PLAY" may damage the system due to "USB PC Link"). Remove batteries if they should be used for a long time. - speaker terminals. Press ÉÅ on the main unit.... the AC power cord "AUTO INSTALL - Using the remote control to operate the system 1 Aim the remote control directly at the remote sensor (iR) on the main unit to PC (page 3 - Ensure that the speaker cables are able to control by pressing one pair of batteries in combination. - ...

User manual
Page 15
... the playlist in random order. - During playback, - Press REPEAT to playback your music collection from the PC via the powerful amplifier and speakers of this CD-ROM device' setting option is necessary to configure your PC's hardware as follows: Connecting to USB PC Link USB PC LINK...is detected, "CONNECTING" is displayed and the USB indicator will be flashing. ➜ If "NO CONNECTION" is displayed, check the connection between your PC and micro system. 3 Press í or ë until the desired track in the playlist. 5 To exit, select another active mode or press Ç. 15 IMPORTANT!...
... the playlist in random order. - During playback, - Press REPEAT to playback your music collection from the PC via the powerful amplifier and speakers of this CD-ROM device' setting option is necessary to configure your PC's hardware as follows: Connecting to USB PC Link USB PC LINK...is detected, "CONNECTING" is displayed and the USB indicator will be flashing. ➜ If "NO CONNECTION" is displayed, check the connection between your PC and micro system. 3 Press í or ë until the desired track in the playlist. 5 To exit, select another active mode or press Ç. 15 IMPORTANT!...
User manual
Page 23
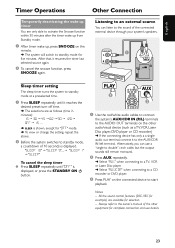
...OUT L R 1 R L AUX/ CDR IN AC MAINS R L AUX/ CDR IN AM ANTENNA FM ANTENNA + - - + R L SPEAKERS 6Ω Sleep timer setting The sleep timer turns the system to standby mode at a preselected time. 1 Press SLEEP repeatedly until "OFF" is displayed, or press the STANDBY ON B button. English Timer...10 seconds is displayed. Always refer to the owner's manual of the connected external device through your system's speakers. PLAY 3 AUX 2 1 Use the red/white audio cables to connect the system's AUX/CDR IN (R/L) terminals to the AUDIO OUT terminals on the connected device to a CD ...
...OUT L R 1 R L AUX/ CDR IN AC MAINS R L AUX/ CDR IN AM ANTENNA FM ANTENNA + - - + R L SPEAKERS 6Ω Sleep timer setting The sleep timer turns the system to standby mode at a preselected time. 1 Press SLEEP repeatedly until "OFF" is displayed, or press the STANDBY ON B button. English Timer...10 seconds is displayed. Always refer to the owner's manual of the connected external device through your system's speakers. PLAY 3 AUX 2 1 Use the red/white audio cables to connect the system's AUX/CDR IN (R/L) terminals to the AUDIO OUT terminals on the connected device to a CD ...

User manual
Page 24
... Frequency response Input sensitivity AUX In / CDR In Output Speakers Headphones (1) (6 Ω, 60 Hz - 12.5 kHz, 10% THD) 100 W total power 2 x 50 W RMS(1) 2 x 45 W FTC(1) 75 dB A (IEC) 50 - 20000 Hz, -3 dB 500 mV / 1V 6 Ω 32 Ω - ...presets Antenna FM AM 87.5 - 108 MHz 530 - 1700 kHz 40 300 Ω dipole wire Loop antenna SPEAKERS System Impedance Woofer Tweeter Dimensions (w x h x d) Weight GENERAL Material/finish AC Power Power Consumption Active Standby Dimensions (w x h x d) Weight (without speakers) 2 way, Bass reflex 6 Ω 1 x 5.25" 1 x 2" Ferrofluid cooled 180 x 268 ...
... Frequency response Input sensitivity AUX In / CDR In Output Speakers Headphones (1) (6 Ω, 60 Hz - 12.5 kHz, 10% THD) 100 W total power 2 x 50 W RMS(1) 2 x 45 W FTC(1) 75 dB A (IEC) 50 - 20000 Hz, -3 dB 500 mV / 1V 6 Ω 32 Ω - ...presets Antenna FM AM 87.5 - 108 MHz 530 - 1700 kHz 40 300 Ω dipole wire Loop antenna SPEAKERS System Impedance Woofer Tweeter Dimensions (w x h x d) Weight GENERAL Material/finish AC Power Power Consumption Active Standby Dimensions (w x h x d) Weight (without speakers) 2 way, Bass reflex 6 Ω 1 x 5.25" 1 x 2" Ferrofluid cooled 180 x 268 ...

User manual
Page 25
If you try to repair the system yourself, as there is a risk of poor quality. ✔ Adjust the volume. ✔ Disconnect the headphones. ✔ Check that the speakers are connected correctly. ✔ Check that the AC power cord is connected properly. ✔ When in the disc with label...is too weak, adjust the antenna or connect an external antenna for better reception. ✔ Increase the distance between the remote control and the system. ✔ Replace the battery. ✔ Point the remote control directly toward the IR sensor. Radio reception is poor. ✔ If the ...
If you try to repair the system yourself, as there is a risk of poor quality. ✔ Adjust the volume. ✔ Disconnect the headphones. ✔ Check that the speakers are connected correctly. ✔ Check that the AC power cord is connected properly. ✔ When in the disc with label...is too weak, adjust the antenna or connect an external antenna for better reception. ✔ Increase the distance between the remote control and the system. ✔ Replace the battery. ✔ Point the remote control directly toward the IR sensor. Radio reception is poor. ✔ If the ...


