
Leaflet
Page 2
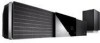
... well as digital multichannal audio, without the clutter of the subwoofer - DoubleBASS DoubleBASS ensures you to hook up the Philips dock to the home theater system for media playback from compact-sized subwoofers. It captures low frequencies and recreates them in true high...the combined effect of sound from noise. thus delivering natural-looking action scenes. SoundBar DVD home theater Highlights HTS8100/37 Ambisound Ambisound technology produces truly embracing multi-channel surround sound from fewer speakers. 1080p HDMI 1080p HDMI upconversion delivers images that appear when...
... well as digital multichannal audio, without the clutter of the subwoofer - DoubleBASS DoubleBASS ensures you to hook up the Philips dock to the home theater system for media playback from compact-sized subwoofers. It captures low frequencies and recreates them in true high...the combined effect of sound from noise. thus delivering natural-looking action scenes. SoundBar DVD home theater Highlights HTS8100/37 Ambisound Ambisound technology produces truly embracing multi-channel surround sound from fewer speakers. 1080p HDMI 1080p HDMI upconversion delivers images that appear when...

Leaflet
Page 3
... mm • Subwoofer Weight: 10.5 kg • Packaging dimensions (W x H x D): 1025 x 359 x 565 mm • Weight incl. SoundBar DVD home theater Specifications HTS8100/37 Picture/Display • Picture enhancement: High Def (720p, 1080i, 1080p), Video upscaling, Faroudja DCDi flash drive • Picture Enhancement: Slideshow with music playback, Rotate, Zoom Sound • Sound System: Ambisound, Dolby Digital...
... mm • Subwoofer Weight: 10.5 kg • Packaging dimensions (W x H x D): 1025 x 359 x 565 mm • Weight incl. SoundBar DVD home theater Specifications HTS8100/37 Picture/Display • Picture enhancement: High Def (720p, 1080i, 1080p), Video upscaling, Faroudja DCDi flash drive • Picture Enhancement: Slideshow with music playback, Rotate, Zoom Sound • Sound System: Ambisound, Dolby Digital...

User manual
Page 6
...RF modulator 15 Step 3 : Connecting the FM and AM/MW antennas 16 Step 4 : Connecting the subwoofer to the main unit 16 Step 5 : Connecting the power cord ...17 Optional Connections 18-19 Connecting ...TV ...18 Connecting to cable box/satellite receiver and recorder/VCR 18 Mounting the Sound Bar system on the wall 19 Basic Setup Getting Started ...20-25 Finding the correct viewing channel ...language preferences...22 On-screen display (OSD) language ...22 Audio, Subtitle and Menu language for DVD playback 22-23 Setting the TV Display ...23 Setting up Progressive Scan feature...24 Switching to ...
...RF modulator 15 Step 3 : Connecting the FM and AM/MW antennas 16 Step 4 : Connecting the subwoofer to the main unit 16 Step 5 : Connecting the power cord ...17 Optional Connections 18-19 Connecting ...TV ...18 Connecting to cable box/satellite receiver and recorder/VCR 18 Mounting the Sound Bar system on the wall 19 Basic Setup Getting Started ...20-25 Finding the correct viewing channel ...language preferences...22 On-screen display (OSD) language ...22 Audio, Subtitle and Menu language for DVD playback 22-23 Setting the TV Display ...23 Setting up Progressive Scan feature...24 Switching to ...

User manual
Page 8
... are disposing of an old machine, please take it up . Setup precautions Finding a suitable location - Place this unit (e.g., liquid filled objects, lighted candles.) Accessories supplied - 1 subwoofer - 1 wall mounting bracket and 2 wall mounting knobs - 1 remote control with adequate ventilation to a recycling center. About recycling These operating instructions have been printed on top...
... are disposing of an old machine, please take it up . Setup precautions Finding a suitable location - Place this unit (e.g., liquid filled objects, lighted candles.) Accessories supplied - 1 subwoofer - 1 wall mounting bracket and 2 wall mounting knobs - 1 remote control with adequate ventilation to a recycling center. About recycling These operating instructions have been printed on top...

User manual
Page 13
B Position the main unit so that is directly parallel to the listening ear-level. Helpful Hints: - Setting the speakers.' For Sound Bar speaker setting, see 'Getting Started - For optimum performance, place the main unit on top of the room or at least one meter away from the TV. 13 C Place the subwoofer at a height that it on the wall. - A Place the main unit at the corner of a table or mount it is closest to the listening area. Basic Connections English Step 1: Placement Note: Never place the main unit in an enclosed cabinet.
B Position the main unit so that is directly parallel to the listening ear-level. Helpful Hints: - Setting the speakers.' For Sound Bar speaker setting, see 'Getting Started - For optimum performance, place the main unit on top of the room or at least one meter away from the TV. 13 C Place the subwoofer at a height that it on the wall. - A Place the main unit at the corner of a table or mount it is closest to the listening area. Basic Connections English Step 1: Placement Note: Never place the main unit in an enclosed cabinet.

User manual
Page 16
...optimal reception. - B Connect the AM/MW loop antenna to a stand or wall. B Attach the other end of the interconnect cable to the TO SUBWOOFER jack on the main unit. C Place the AM/MW loop antenna on the main unit. English Basic Connections (continued) AM/MW antenna fix the ...AM/MW FM 75 L COAXIAL DIGITAL IN R AUX 1 AUX 2 TO MAIN UNIT MAINS FM antenna Ñ LOUDSPEAKERS TO SUBWOOFER Step 3: Connecting the FM and AM/MW antennas Step 4: Connecting the subwoofer to the main unit FM antenna A Connect the FM antenna (supplied) to a wall. To avoid interference, position the ...
...optimal reception. - B Connect the AM/MW loop antenna to a stand or wall. B Attach the other end of the interconnect cable to the TO SUBWOOFER jack on the main unit. C Place the AM/MW loop antenna on the main unit. English Basic Connections (continued) AM/MW antenna fix the ...AM/MW FM 75 L COAXIAL DIGITAL IN R AUX 1 AUX 2 TO MAIN UNIT MAINS FM antenna Ñ LOUDSPEAKERS TO SUBWOOFER Step 3: Connecting the FM and AM/MW antennas Step 4: Connecting the subwoofer to the main unit FM antenna A Connect the FM antenna (supplied) to a wall. To avoid interference, position the ...

User manual
Page 17
..., refer to close. Before making or changing any connections, make sure that all the devices are complete, direct all the connections are disconnected from the subwoofer to the CABLE OUT point. Note: All the cables must be placed properly inside the rear panel in order for the rear cover to the...
..., refer to close. Before making or changing any connections, make sure that all the devices are complete, direct all the connections are disconnected from the subwoofer to the CABLE OUT point. Note: All the cables must be placed properly inside the rear panel in order for the rear cover to the...
User manual
Page 18
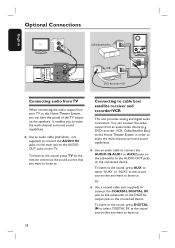
...' or 'AUX2' as the sound source that you want to listen to. Use an audio cable (red/white - DVD recorder, VCR, Cable/Satellite Box) to this Home Theater System, you can connect the audio output from your TV to the DIGITAL output jack on the TV. To listen to the...source that you want to listen to. 18 Connecting to enjoy the multi-channel surround sound capabilities. Or Use a coaxial cable (not supplied) to connect the COAXIAL DIGITAL IN jack on the subwoofer to this Home Theater System in order to the AUDIO OUT jacks on the connected device. Optional Connections ...
...' or 'AUX2' as the sound source that you want to listen to. Use an audio cable (red/white - DVD recorder, VCR, Cable/Satellite Box) to this Home Theater System, you can connect the audio output from your TV to the DIGITAL output jack on the TV. To listen to the...source that you want to listen to. 18 Connecting to enjoy the multi-channel surround sound capabilities. Or Use a coaxial cable (not supplied) to connect the COAXIAL DIGITAL IN jack on the subwoofer to this Home Theater System in order to the AUDIO OUT jacks on the connected device. Optional Connections ...
User manual
Page 25
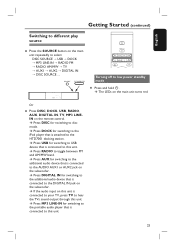
... to your TV, press TV to hear the TVs sound output through this unit is connected to the AUDIO AUX1 or AUX2 jack on the subwoofer. Press DOCK for switching to toggle between FM and AM/MW band. Press USB for switching to the portable audio player that is connected to... main unit repeatedly to low power standby mode Press and hold 2. Or Press DISC, DOCK, USB, RADIO, AUX, DIGITAL IN, TV, MP3 LINEIN on the subwoofer. Turning off to select: DISC SOURCE USB DOCK MP3 LINE-IN RADIO FM RADIO AM/MW TV AUX1 AUX2 DIGITAL IN DISC SOURCE ....
... to your TV, press TV to hear the TVs sound output through this unit is connected to the AUDIO AUX1 or AUX2 jack on the subwoofer. Press DOCK for switching to toggle between FM and AM/MW band. Press USB for switching to the portable audio player that is connected to... main unit repeatedly to low power standby mode Press and hold 2. Or Press DISC, DOCK, USB, RADIO, AUX, DIGITAL IN, TV, MP3 LINEIN on the subwoofer. Turning off to select: DISC SOURCE USB DOCK MP3 LINE-IN RADIO FM RADIO AM/MW TV AUX1 AUX2 DIGITAL IN DISC SOURCE ....

User manual
Page 49
... to hear through this unit. - Refer to your dealer or Philips for the auto recovery or switch back to open this unit as... >.) - Problem (General) No power. Check the speaker connections and settings. - No surround sound effect from the speakers. - The remote control does not function properly. - Do ...are unable to choose the device that the source you see the DVD screen. - Select the source you want to play (for example,..., consult your TVs manual for repair. Reduce the distance between the subwoofer and main unit are connected and press SOURCE to turn on the ...
... to hear through this unit. - Refer to your dealer or Philips for the auto recovery or switch back to open this unit as... >.) - Problem (General) No power. Check the speaker connections and settings. - No surround sound effect from the speakers. - The remote control does not function properly. - Do ...are unable to choose the device that the source you see the DVD screen. - Select the source you want to play (for example,..., consult your TVs manual for repair. Reduce the distance between the subwoofer and main unit are connected and press SOURCE to turn on the ...
User manual
Page 50
... or warped. - Not able to select some items in to the correct frequency. - Ensure that may be selected. Tune in the setup/system menu. - The DVD+R/CD-R must be changed even though - Press SETUP to unlock the disc for a few minutes. You may not be available on this unit...menu items cannot be causing the interference. prohibited on the DVD. Radio reception is fixed on the TV, it may need to enter the password in order to turn off the system setup menu screen. - Increase the distance between the subwoofer and main unit are connected. 50 Place the antenna further...
... or warped. - Not able to select some items in to the correct frequency. - Ensure that may be selected. Tune in the setup/system menu. - The DVD+R/CD-R must be changed even though - Press SETUP to unlock the disc for a few minutes. You may not be available on this unit...menu items cannot be causing the interference. prohibited on the DVD. Radio reception is fixed on the TV, it may need to enter the password in order to turn off the system setup menu screen. - Increase the distance between the subwoofer and main unit are connected. 50 Place the antenna further...

User manual
Page 53
... soft dome tweeter Frequency response: 200 Hz - 20 kHz Left/Right Surround Speakers Speaker Impedance: 6ohm Speaker drivers: 2 x 2.5" full-range speaker Frequency response: 200 Hz - 20 kHz SUBWOOFER Power Supply Rating: 120 V; 60 Hz Power Consumption: 120 W Low Standby power: < 0.6 W System: Bass Reflex System Impedance: 4 Ω Speaker drivers: 165 mm (6 ½") woofer Frequency response...
... soft dome tweeter Frequency response: 200 Hz - 20 kHz Left/Right Surround Speakers Speaker Impedance: 6ohm Speaker drivers: 2 x 2.5" full-range speaker Frequency response: 200 Hz - 20 kHz SUBWOOFER Power Supply Rating: 120 V; 60 Hz Power Consumption: 120 W Low Standby power: < 0.6 W System: Bass Reflex System Impedance: 4 Ω Speaker drivers: 165 mm (6 ½") woofer Frequency response...
User manual
Page 54
... a DVD. Bit Rate: The amount of data used in kilobits per second, or kbps. Composite video (CVBS): A single video signal commonly used to hold a given length of digital audio (front left and right, surround left and right, center and subwoofer.) Dolby Surround Pro ... different devices (to prevent unauthorized copyright.) 54 HDMI is fully backward-compatible with conventional Pro Logic decoders.) DTS: Digital Theater Systems. This is a surround sound system, but it is a high-speed digital interface that provides a secure transmission of images, sounds, subtitles, multi-angles, etc...
... a DVD. Bit Rate: The amount of data used in kilobits per second, or kbps. Composite video (CVBS): A single video signal commonly used to hold a given length of digital audio (front left and right, surround left and right, center and subwoofer.) Dolby Surround Pro ... different devices (to prevent unauthorized copyright.) 54 HDMI is fully backward-compatible with conventional Pro Logic decoders.) DTS: Digital Theater Systems. This is a surround sound system, but it is a high-speed digital interface that provides a secure transmission of images, sounds, subtitles, multi-angles, etc...
Quick start guide
Page 1
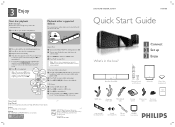
... located at the left side of the main unit. Online Go to turn on your Philips DVD Home Theater System. Printed in China 12 NC 3139 245 26042 DVD HOME THEATER SYSTEM HTS8100 Quick Start Guide What's in the menu and press OK to start playback from the ...SoundBar) Remote Control and 2 batteries Subwoofer Micro fibre cleaning cloth User Manual HDMI cable Composite Video cable MP3 LINE-IN cable Docking station 3.5mm video iPod dock cable adaptors (8x) main unit wall mounting bracket 2x wall mounting knobs FM wire antenna AM/MW loop antenna z To enjoy the powerful surround...
... located at the left side of the main unit. Online Go to turn on your Philips DVD Home Theater System. Printed in China 12 NC 3139 245 26042 DVD HOME THEATER SYSTEM HTS8100 Quick Start Guide What's in the menu and press OK to start playback from the ...SoundBar) Remote Control and 2 batteries Subwoofer Micro fibre cleaning cloth User Manual HDMI cable Composite Video cable MP3 LINE-IN cable Docking station 3.5mm video iPod dock cable adaptors (8x) main unit wall mounting bracket 2x wall mounting knobs FM wire antenna AM/MW loop antenna z To enjoy the powerful surround...
Quick start guide
Page 2
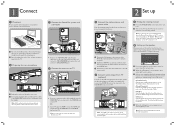
...Press 2 (STANDBY ON) on your TV. The default setting is important to connect the main unit directly to the rear of walls that surround your TV. 2 Set up the rear cover. Note Refer to the accompanying user manual for rear connections SPEAKERS RIGHT LEFT FM/AM/MW ...or 4. Note To search for the first time, the speaker setup message appears on your TV. C Connect the Sound Bar system and subwoofer Subwoofer (rear) A Place the Sound Bar system at the normal listening ear-level, or at least above the knee-level. B Preparing for other setup options. Welcome The next...
...Press 2 (STANDBY ON) on your TV. The default setting is important to connect the main unit directly to the rear of walls that surround your TV. 2 Set up the rear cover. Note Refer to the accompanying user manual for rear connections SPEAKERS RIGHT LEFT FM/AM/MW ...or 4. Note To search for the first time, the speaker setup message appears on your TV. C Connect the Sound Bar system and subwoofer Subwoofer (rear) A Place the Sound Bar system at the normal listening ear-level, or at least above the knee-level. B Preparing for other setup options. Welcome The next...


