User manual
Page 5
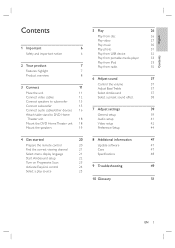
... Mount the DVD Home Theater unit 18 Video setup 42 Mount the speakers 19 Preference Setup 44 4 Get started 20 8 Additional information 47 Prepare the remote control 20 Update software 47 Find the correct viewing channel 21 Care 47 Select menu display language 21 Specifications 48 Start Ambisound setup...
... Mount the DVD Home Theater unit 18 Video setup 42 Mount the speakers 19 Preference Setup 44 4 Get started 20 8 Additional information 47 Prepare the remote control 20 Update software 47 Find the correct viewing channel 21 Care 47 Select menu display language 21 Specifications 48 Start Ambisound setup...

User manual
Page 6
... radiation when open. Avoid exposure to direct sunlight, naked flames or heat. • Never place this unit. If you are exhausted or if the remote control is subject to be used as the disconnect device, the disconnect device shall remain readily operable. Use of materials that may not cause harmful...
... radiation when open. Avoid exposure to direct sunlight, naked flames or heat. • Never place this unit. If you are exhausted or if the remote control is subject to be used as the disconnect device, the disconnect device shall remain readily operable. Use of materials that may not cause harmful...
User manual
Page 7
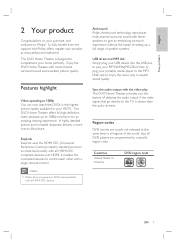
...highlight Video upscaling to 1080p resolution for your HDTV. Countries United States of delaying the audio output if the video signals that Philips offers, register your product at the same time in superb sound quality. This DVD Home Theater offers full high-defi...the highest picture quality available for an amazing viewing experience. It enables the connected devices to share functionality with a single remote control. Note • Philips does not guarantee 100% interoperability with multi-channel surround sound and excellent picture quality. or plug your portable media player...
...highlight Video upscaling to 1080p resolution for your HDTV. Countries United States of delaying the audio output if the video signals that Philips offers, register your product at the same time in superb sound quality. This DVD Home Theater offers full high-defi...the highest picture quality available for an amazing viewing experience. It enables the connected devices to share functionality with a single remote control. Note • Philips does not guarantee 100% interoperability with multi-channel surround sound and excellent picture quality. or plug your portable media player...
User manual
Page 8
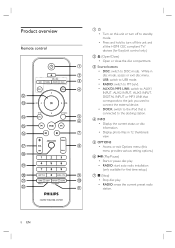
... HDMI CEC compliant TV/ devices (for first time setup.) g x (Stop) • Stop disc play. • RADIO: erase the current preset radio station. Product overview Remote control 8 EN a 2 • Turn on this unit or turn off to standby mode. • Press and hold to turn off this menu provides various setting...
... HDMI CEC compliant TV/ devices (for first time setup.) g x (Stop) • Stop disc play. • RADIO: erase the current preset radio station. Product overview Remote control 8 EN a 2 • Turn on this unit or turn off to standby mode. • Press and hold to turn off this menu provides various setting...

User manual
Page 20
... for example í, ë.) Navigate through the on this unit and select the desired function. 1 Push to navigate through the menu 1 Point the remote control directly at the remote sensor on -screen menus. Note • If you wish to control by pressing the DISC, USB, RADIO or AUX/DI/MP3 LINK or... DOCK button. 2 Then select the desired function (for a long time, remove the batteries. 2 Use the following buttons on the remote control to open the battery compartment cover. 2 Insert two batteries type R03 or AAA. Enter numbers. 20 EN Move left or right.
... for example í, ë.) Navigate through the on this unit and select the desired function. 1 Push to navigate through the menu 1 Point the remote control directly at the remote sensor on -screen menus. Note • If you wish to control by pressing the DISC, USB, RADIO or AUX/DI/MP3 LINK or... DOCK button. 2 Then select the desired function (for a long time, remove the batteries. 2 Use the following buttons on the remote control to open the battery compartment cover. 2 Insert two batteries type R03 or AAA. Enter numbers. 20 EN Move left or right.
User manual
Page 21
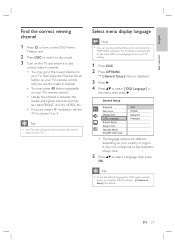
... select [ OSD Language ] in channel. • You may go to the lowest channel on your TV, then press the Channel Down button on your TVs remote control until you see chapter 'Adjust settings' - [ Preference Setup ] for details. Tips • See TVs user manual on how to select the correct input on... • You can skip this setting if this channel is between the lowest and highest channels and may press ° button repeatedly on your TVs remote control. • Usually this unit is displayed. 3 Press B. 4 Press vV to select a language, then press OK.
... select [ OSD Language ] in channel. • You may go to the lowest channel on your TV, then press the Channel Down button on your TVs remote control until you see chapter 'Adjust settings' - [ Preference Setup ] for details. Tips • See TVs user manual on how to select the correct input on... • You can skip this setting if this channel is between the lowest and highest channels and may press ° button repeatedly on your TVs remote control. • Usually this unit is displayed. 3 Press B. 4 Press vV to select a language, then press OK.

User manual
Page 24
... the audio signals from the active source. up TV ] and [ System Standby ] functions are turned on by default in the disc compartment before operation. • Philips does not guarantee 100% interoperability with one touch play [ Auto Wake-up TV ] When you have to map the audio inputs to certain commands simultaneously... press OK. 24 EN It switches automatically to adjust the volume. See TVs/devices manual for details. 2 You can use any HDMI CEC TV/device remote control to the corresponding audio input and output the sound from other connected devices.
... the audio signals from the active source. up TV ] and [ System Standby ] functions are turned on by default in the disc compartment before operation. • Philips does not guarantee 100% interoperability with one touch play [ Auto Wake-up TV ] When you have to map the audio inputs to certain commands simultaneously... press OK. 24 EN It switches automatically to adjust the volume. See TVs/devices manual for details. 2 You can use any HDMI CEC TV/device remote control to the corresponding audio input and output the sound from other connected devices.

User manual
Page 25
... button repeatedly to AUX1 INPUT AUDIO IN-AUX1 jacks. DIGITAL INPUT DIGITAL IN-COAXIAL jack. AUX2 INPUT AUDIO IN-AUX2 jacks. EN 25 On the remote control • Press DISC to switch to DISC mode. • Press USB to switch to USB mode. • Press RADIO to switch to FM band...
... button repeatedly to AUX1 INPUT AUDIO IN-AUX1 jacks. DIGITAL INPUT DIGITAL IN-COAXIAL jack. AUX2 INPUT AUDIO IN-AUX2 jacks. EN 25 On the remote control • Press DISC to switch to DISC mode. • Press USB to switch to USB mode. • Press RADIO to switch to FM band...

User manual
Page 27
...was last stopped. View DVD play is displayed. Stop play . Search backward/ forward. • To change play . Control a title 1 Play a title. 2 Use the remote control to the previous title/chapter. Display current play status. • You can change the video play speed, press this button repeatedly. Button Action Change... turned off repeat mode. • Repeat options vary depending on the disc type. • For VCDs, repeat play 1 Play a title. 2 Use the remote control to the next title/chapter. Toggle through the zoomed image, press the cursor buttons. or turn off .
...was last stopped. View DVD play is displayed. Stop play . Search backward/ forward. • To change play . Control a title 1 Play a title. 2 Use the remote control to the previous title/chapter. Display current play status. • You can change the video play speed, press this button repeatedly. Button Action Change... turned off repeat mode. • Repeat options vary depending on the disc type. • For VCDs, repeat play 1 Play a title. 2 Use the remote control to the next title/chapter. Toggle through the zoomed image, press the cursor buttons. or turn off .
User manual
Page 29
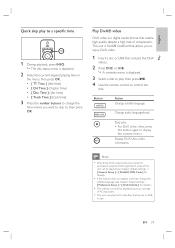
.../track. Note • Only those DivX videos that retains high quality despite a high rate of compression. English Play Quick skip play , then press u. 4 Use the remote control to control the title. The disc status menu is displayed. 3 Select a title to play to a specific time 1 During playback, press INFO.
.../track. Note • Only those DivX videos that retains high quality despite a high rate of compression. English Play Quick skip play , then press u. 4 Use the remote control to control the title. The disc status menu is displayed. 3 Select a title to play to a specific time 1 During playback, press INFO.

User manual
Page 30
...;rst track, press í. To start playback from the point where it cannot be played on the disc type. Control a track 1 Play a track. 2 Use the remote control to the next track. Return to play . or turn off repeat mode. • Repeat options vary depending on this unit. • Folders/files...
...;rst track, press í. To start playback from the point where it cannot be played on the disc type. Control a track 1 Play a track. 2 Use the remote control to the next track. Return to play . or turn off repeat mode. • Repeat options vary depending on this unit. • Folders/files...
User manual
Page 31
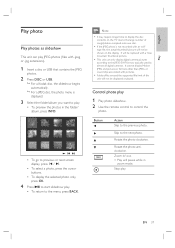
... folder/album you want to play . • To return to control the photo. Skip to the previous photo. Stop play 1 Play photo slideshow. 2 Use the remote control to the menu, press BACK. Rotate the photo anticlockwise.
... folder/album you want to play . • To return to control the photo. Skip to the previous photo. Stop play 1 Play photo slideshow. 2 Use the remote control to the menu, press BACK. Rotate the photo anticlockwise.
User manual
Page 34
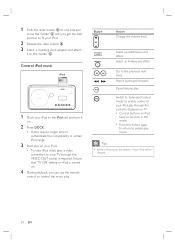
1 Push the 'slide' button A to one side and move the 'holder' C until you can use the remote control to control the music play. Go to simple play . Pause/resume play mode. Ensure that 'TV ON' setting on iPod is required. m M Select a prede&#...
1 Push the 'slide' button A to one side and move the 'holder' C until you can use the remote control to control the music play. Go to simple play . Pause/resume play mode. Ensure that 'TV ON' setting on iPod is required. m M Select a prede&#...

User manual
Page 35
... 5 radio stations are stored. Once complete, it tunes to control the radio. Button Action Select a preset radio station. Listen to radio 1 Press RADIO. 2 Use the remote control to the first preset radio station. • To stop auto tuning, press x. Press and hold this button to delete the preset station from...
... 5 radio stations are stored. Once complete, it tunes to control the radio. Button Action Select a preset radio station. Listen to radio 1 Press RADIO. 2 Use the remote control to the first preset radio station. • To stop auto tuning, press x. Press and hold this button to delete the preset station from...

User manual
Page 48
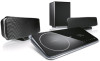
... response: 190 Hz - 20 kHz • Dimensions (WxHxD): 335.5 x 113 x 128.5 (mm) • Weight: 1.72 kg 48 EN Accessories supplied • Quick Start Guide • Remote control and batteries • Composite video cable (yellow) • Component video cables • HDMI cable • Subwoofer • 2 Ambisound speakers • 1 main unit wall mount...
... response: 190 Hz - 20 kHz • Dimensions (WxHxD): 335.5 x 113 x 128.5 (mm) • Weight: 1.72 kg 48 EN Accessories supplied • Quick Start Guide • Remote control and batteries • Composite video cable (yellow) • Component video cables • HDMI cable • Subwoofer • 2 Ambisound speakers • 1 main unit wall mount...


