
Leaflet
Page 3
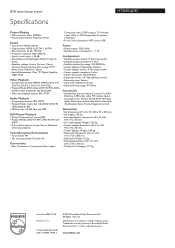
...Reception/Transmission • Tuner Bands: FM • No. DVD home theater system Specifications HTS3151D/37 Picture/Display • D/A converter: 12bit, 108MHz • Picture enhancement: Progressive ... 000 35159 UPC: 6 09585 14544 3 © 2009 Koninklijke Philips Electronics N.V. www.philips.com of Koninklijke Philips Electronics N.V. All Rights reserved. Specifications are the property of preset ...8 ohm • Subwoofer freq range: 45-150 Hz Accessories • Included Accessories: Remote Control, 2 x AAA Batteries, CVBS video cable, FM antenna, Quick start guide, User Manual...
...Reception/Transmission • Tuner Bands: FM • No. DVD home theater system Specifications HTS3151D/37 Picture/Display • D/A converter: 12bit, 108MHz • Picture enhancement: Progressive ... 000 35159 UPC: 6 09585 14544 3 © 2009 Koninklijke Philips Electronics N.V. www.philips.com of Koninklijke Philips Electronics N.V. All Rights reserved. Specifications are the property of preset ...8 ohm • Subwoofer freq range: 45-150 Hz Accessories • Included Accessories: Remote Control, 2 x AAA Batteries, CVBS video cable, FM antenna, Quick start guide, User Manual...

User manual
Page 6
... of contents General General Information ...8 Setup precautions...8 Accessories supplied ...8 Cleaning discs ...8 About recycling...8 Product Overview Main Unit ...9 Remote Control ...10-12 Using the remote control ...12 Connections Basic Connections ...13-17 Step 1 : Placing the speakers ...13 Step 2 : Connecting to TV ...14-15...the speakers' channels...23 Disc Playback Disc Operations ...24-32 Playable discs ...24 Playing a disc ...24 Basic playback controls...25 Selecting various repeat/shuf e functions 25 Programming disc tracks...26 Other playback features for video discs (DVD/VCD/SVCD...
... of contents General General Information ...8 Setup precautions...8 Accessories supplied ...8 Cleaning discs ...8 About recycling...8 Product Overview Main Unit ...9 Remote Control ...10-12 Using the remote control ...12 Connections Basic Connections ...13-17 Step 1 : Placing the speakers ...13 Step 2 : Connecting to TV ...14-15...the speakers' channels...23 Disc Playback Disc Operations ...24-32 Playable discs ...24 Playing a disc ...24 Basic playback controls...25 Selecting various repeat/shuf e functions 25 Programming disc tracks...26 Other playback features for video discs (DVD/VCD/SVCD...
User manual
Page 8
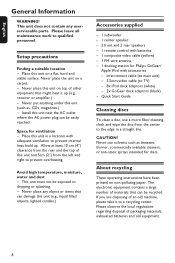
... a straight line. Install this unit (e.g., liquid lled objects, lighted candles.) Accessories supplied - 1 subwoofer - 1 center speaker - 2 front and 2 rear speakers - 1 remote control with batteries - 1 composite video cable (yellow) - 1 FM wire antenna - 1 docking station for Philips GoGear/ Apple iPod with adequate ventilation to prevent overheating. interconnect cable (to main unit) - 3.5mm video cable (to quali...
... a straight line. Install this unit (e.g., liquid lled objects, lighted candles.) Accessories supplied - 1 subwoofer - 1 center speaker - 2 front and 2 rear speakers - 1 remote control with batteries - 1 composite video cable (yellow) - 1 FM wire antenna - 1 docking station for Philips GoGear/ Apple iPod with adequate ventilation to prevent overheating. interconnect cable (to main unit) - 3.5mm video cable (to quali...
User manual
Page 10
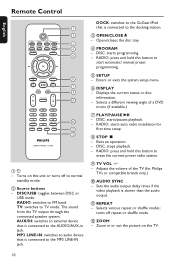
...to the docking station. DISC: starts programming. - Enters or exits the system setup menu. DISC: starts/pauses playback. - RADIO: starts auto radio installation for Philips TVs or compatible brands only.) j AUDIO SYNC - Exits an operation. - Adjusts the volume of a DVD movie (if available.) g PLAY/PAUSE u - ... rst time setup. h STOP Ç - turns off to the AUDIO/AUX-in or out the picture on this button to the MP3 LINE-IN jack. Remote Control English 1 2 3 4 5 6 7 8 9 10 11 12 a 2 - Turns on the TV. 10 DISC/USB: toggles between DISC or USB mode. RADIO: switches to TV ...
...to the docking station. DISC: starts programming. - Enters or exits the system setup menu. DISC: starts/pauses playback. - RADIO: starts auto radio installation for Philips TVs or compatible brands only.) j AUDIO SYNC - Exits an operation. - Adjusts the volume of a DVD movie (if available.) g PLAY/PAUSE u - ... rst time setup. h STOP Ç - turns off to the AUDIO/AUX-in or out the picture on this button to the MP3 LINE-IN jack. Remote Control English 1 2 3 4 5 6 7 8 9 10 11 12 a 2 - Turns on the TV. 10 DISC/USB: toggles between DISC or USB mode. RADIO: switches to TV ...
User manual
Page 11
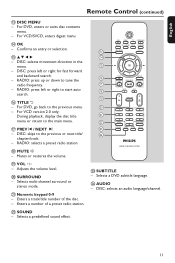
...: skips to tune the radio frequency. - Mutes or restores the volume. Enters a track/title number of a preset radio station. Selects a DVD subtitle language. x AUDIO - English Remote Control (continued) m DISC MENU - For DVD, enters or exits disc contents menu. - o v V b B - RADIO: press left or right for fast forward and backward search. - Selects multi-channel...
...: skips to tune the radio frequency. - Mutes or restores the volume. Enters a track/title number of a preset radio station. Selects a DVD subtitle language. x AUDIO - English Remote Control (continued) m DISC MENU - For DVD, enters or exits disc contents menu. - o v V b B - RADIO: press left or right for fast forward and backward search. - Selects multi-channel...
User manual
Page 12
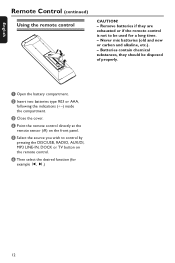
... mix batteries (old and new or carbon and alkaline, etc.). - Batteries contain chemical substances, they are exhausted or if the remote control is not to control by pressing the DISC/USB, RADIO, AUX/DI, MP3 LINE-IN, DOCK or TV button on the front panel. A Open...the battery compartment. B Insert two batteries type R03 or AAA, following the indications (+ ) inside the compartment. D Point the remote control directly at the remote sensor (iR) on the remote control. Remove batteries if they should be used for example í, ë.) 12 E Select the source you wish to be disposed...
... mix batteries (old and new or carbon and alkaline, etc.). - Batteries contain chemical substances, they are exhausted or if the remote control is not to control by pressing the DISC/USB, RADIO, AUX/DI, MP3 LINE-IN, DOCK or TV button on the front panel. A Open...the battery compartment. B Insert two batteries type R03 or AAA, following the indications (+ ) inside the compartment. D Point the remote control directly at the remote sensor (iR) on the remote control. Remove batteries if they should be used for example í, ë.) 12 E Select the source you wish to be disposed...
User manual
Page 14
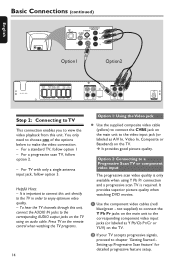
... video playback from this unit directly to the TV in order to enjoy optimum video quality. - For a standard TV, follow option 1 - Press TV on the remote control when watching the TV programs. 14 Option 1: Using the Video jack Use the supplied composite video cable (yellow) to connect the CVBS jack on the...
... video playback from this unit directly to the TV in order to enjoy optimum video quality. - For a standard TV, follow option 1 - Press TV on the remote control when watching the TV programs. 14 Option 1: Using the Video jack Use the supplied composite video cable (yellow) to connect the CVBS jack on the...
User manual
Page 18
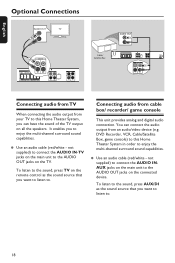
... enjoy the multi-channel surround sound capabilities. Connecting audio from an audio/video device (e.g. You can have the sound of the TV output on the remote control as the sound source that you to the AUDIO OUT jacks on the connected device. Use an audio cable (red/white - It enables you want...
... enjoy the multi-channel surround sound capabilities. Connecting audio from an audio/video device (e.g. You can have the sound of the TV output on the remote control as the sound source that you to the AUDIO OUT jacks on the connected device. Use an audio cable (red/white - It enables you want...

User manual
Page 19
... the lowest channel on your TV, then press the Channel Down button on your TV, press TV to select the correct input on your TV's remote control. If you see the Video In channel. English Finding the correct viewing channel A Press SOURCE button on the main unit until you are using a RF... modulator, set the TV to channel 3 or 4. You may be called FRONT, A/V IN, VIDEO, etc.. Refer to your TV's user manual on the remote control. Or Press DISC/USB, RADIO, DOCK, TV, AUX/DI or MP3 LINE-IN on how to hear the TVs sound output through this unit. 19...
... the lowest channel on your TV, then press the Channel Down button on your TV, press TV to select the correct input on your TV's remote control. If you see the Video In channel. English Finding the correct viewing channel A Press SOURCE button on the main unit until you are using a RF... modulator, set the TV to channel 3 or 4. You may be called FRONT, A/V IN, VIDEO, etc.. Refer to your TV's user manual on the remote control. Or Press DISC/USB, RADIO, DOCK, TV, AUX/DI or MP3 LINE-IN on how to hear the TVs sound output through this unit. 19...
User manual
Page 20
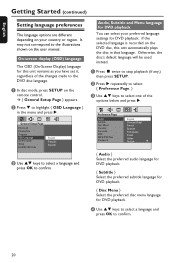
... Saver Sleep DivX(R) VOD Code English Français Espanõl C Use keys to select a language and press OK to the illustrations shown on the remote control. { General Setup Page } appears. Otherwise, the disc's default language will be used instead. It may not correspond to con rm.
... Saver Sleep DivX(R) VOD Code English Français Espanõl C Use keys to select a language and press OK to the illustrations shown on the remote control. { General Setup Page } appears. Otherwise, the disc's default language will be used instead. It may not correspond to con rm.
User manual
Page 21
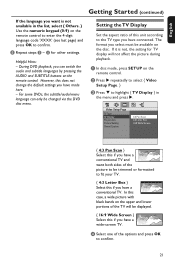
... TV. For some DVDs, the subtitle/audio/menu language can switch the audio and subtitle languages by pressing the AUDIO and SUBTITLE buttons on the remote control. During DVD playback, you can only be displayed. { 16:9 Wide Screen } Select this case, a wide picture with black bands on the upper and .... B Press repeatedly to select { Video Setup Page. } C Press to highlight { TV Display } in the list, select { Others. } Use the numeric keypad (0-9) on the remote control to enter the 4-digit language code 'XXXX' (see last page) and press OK to con rm. A In disc mode, press SETUP on the...
... TV. For some DVDs, the subtitle/audio/menu language can switch the audio and subtitle languages by pressing the AUDIO and SUBTITLE buttons on the remote control. During DVD playback, you can only be displayed. { 16:9 Wide Screen } Select this case, a wide picture with black bands on the upper and .... B Press repeatedly to select { Video Setup Page. } C Press to highlight { TV Display } in the list, select { Others. } Use the numeric keypad (0-9) on the remote control to enter the 4-digit language code 'XXXX' (see last page) and press OK to con rm. A In disc mode, press SETUP on the...
User manual
Page 22
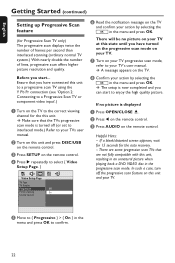
... rm your TV. Helpful Hints: - B Turn on this unit and press DISC/USB on the remote control. There will be no picture is displayed A Press OPEN/CLOSE ç. A message appears on the remote control. B Press on the TV. D Press repeatedly to enjoy the high quality picture. In such a case, ...turn off (or set to interlaced mode.) Refer to con rm. 22 The setup is turned off the progressive scan feature on the remote control. Ensure that you have connected this unit, resulting in an unnatural picture when playing back a DVD VIDEO disc in the menu and press OK....
... rm your TV. Helpful Hints: - B Turn on this unit and press DISC/USB on the remote control. There will be no picture is displayed A Press OPEN/CLOSE ç. A message appears on the remote control. B Press on the TV. D Press repeatedly to enjoy the high quality picture. In such a case, ...turn off (or set to interlaced mode.) Refer to con rm. 22 The setup is turned off the progressive scan feature on the remote control. Ensure that you have connected this unit, resulting in an unnatural picture when playing back a DVD VIDEO disc in the menu and press OK....
User manual
Page 23
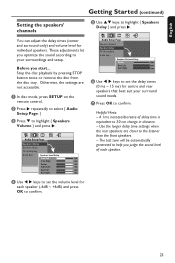
... disc tray. Otherwise, the settings are closer to set the delay times (0 ms ~ 15 ms) for each speaker. A In disc mode, press SETUP on the remote control. Before you judge the sound level of delay time is equivalent to con rm. 23 G Press OK to highlight { Speakers Volume } and press . D Use keys...
... disc tray. Otherwise, the settings are closer to set the delay times (0 ms ~ 15 ms) for each speaker. A In disc mode, press SETUP on the remote control. Before you judge the sound level of delay time is equivalent to con rm. 23 G Press OK to highlight { Speakers Volume } and press . D Use keys...
User manual
Page 24
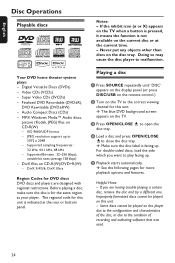
... the disc tray. ISO 9660/UDF format - Playing a disc A Press SOURCE repeatedly until 'DISC' appears on the display panel (or press DISC/USB on the remote control.) B Turn on this unit. Make sure the disc label is for the same region as your player. Before playing a disc, make sure the disc is...
... the disc tray. ISO 9660/UDF format - Playing a disc A Press SOURCE repeatedly until 'DISC' appears on the display panel (or press DISC/USB on the remote control.) B Turn on this unit. Make sure the disc label is for the same region as your player. Before playing a disc, make sure the disc is...
User manual
Page 25
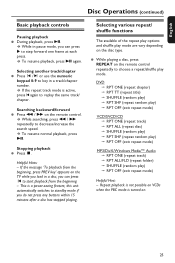
...replay the same track/ chapter. To resume playback, press u again. To resume normal playback, press u. If the repeat track mode is turned on the remote control. Helpful Hints: - While playing a disc, press REPEAT on the disc type. Selecting another track/chapter Press í /ë or use the numeric keypad.../Windows Media™ Audio RPT ONE (repeat track) RPT ALL/FLD (repeat folder) SHUFFLE (random play mode are vary depending on the remote control repeatedly to key in pause mode, you do not press any buttons within 15 minutes after a disc has stopped playing. Repeat playback is ...
...replay the same track/ chapter. To resume playback, press u again. To resume normal playback, press u. If the repeat track mode is turned on the remote control. Helpful Hints: - While playing a disc, press REPEAT on the disc type. Selecting another track/chapter Press í /ë or use the numeric keypad.../Windows Media™ Audio RPT ONE (repeat track) RPT ALL/FLD (repeat folder) SHUFFLE (random play mode are vary depending on the remote control repeatedly to key in pause mode, you do not press any buttons within 15 minutes after a disc has stopped playing. Repeat playback is ...
User manual
Page 26
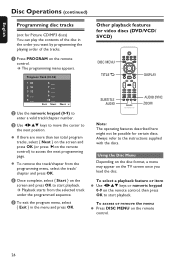
...OK. If there are more than ten total program tracks, select { Next } on the screen and press OK (or press ëon the remote control. 26 Always refer to the next position. Using the Disc Menu Depending on the disc format, a menu may appear on the screen and press OK... appears. Playback starts from the programming menu, select the track/ chapter and press OK. To access or remove the menu Press DISC MENU on the remote control) to start playback. Program: Track (01-16) 2 12 6 7 8 9 10 Exit Start Next B Use the numeric keypad (0-9) to start playback. E To exit the program...
...OK. If there are more than ten total program tracks, select { Next } on the screen and press OK (or press ëon the remote control. 26 Always refer to the next position. Using the Disc Menu Depending on the disc format, a menu may appear on the screen and press OK... appears. Playback starts from the programming menu, select the track/ chapter and press OK. To access or remove the menu Press DISC MENU on the remote control) to start playback. Program: Track (01-16) 2 12 6 7 8 9 10 Exit Start Next B Use the numeric keypad (0-9) to start playback. E To exit the program...
User manual
Page 32
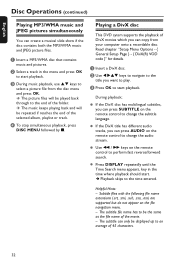
.... D To stop simultaneous playback, press DISC MENU followed by x. If the DivX title has different audio tracks, you can press SUBTITLE on the remote control to change the audio stream. Helpful Hints: - If the DivX disc has multilingual subtitles, you want to be displayed up to select a picture ...playback. Subtitle les with the following le name extensions (.srt, .smi, .sub, .ssa, .ass) are supported but do not appear on the remote control to start . The subtitle can create a musical slide show if the disc contains both the MP3/WMA music and JPEG picture les. English Disc ...
.... D To stop simultaneous playback, press DISC MENU followed by x. If the DivX title has different audio tracks, you can press SUBTITLE on the remote control to change the audio stream. Helpful Hints: - If the DivX disc has multilingual subtitles, you want to be displayed up to select a picture ...playback. Subtitle les with the following le name extensions (.srt, .smi, .sub, .ssa, .ass) are supported but do not appear on the remote control to start . The subtitle can create a musical slide show if the disc contains both the MP3/WMA music and JPEG picture les. English Disc ...
User manual
Page 33
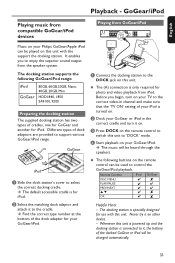
... remote control to switch this unit. The following GoGear/iPod range: iPod GoGear 80GB, 60GB,30GB, Nano, 40GB, 20GB, Mini HDD1840, 1850 SA9100, 9200 Preparing the docking station The supplied docking station has two types of your GoGear/iPod. The docking station is specially designed for your Philips ...to the cradle. B Dock your GoGear or iPod in the correct cradle and turn on this unit to select the correct docking cradle. Remote Control iPod GoGear DISC MENU PLAY/PAUSE PREV/NEXT OK Helpful Hints: - The (A) connection is turned on this unit with this unit is ...
... remote control to switch this unit. The following GoGear/iPod range: iPod GoGear 80GB, 60GB,30GB, Nano, 40GB, 20GB, Mini HDD1840, 1850 SA9100, 9200 Preparing the docking station The supplied docking station has two types of your GoGear/iPod. The docking station is specially designed for your Philips ...to the cradle. B Dock your GoGear or iPod in the correct cradle and turn on this unit to select the correct docking cradle. Remote Control iPod GoGear DISC MENU PLAY/PAUSE PREV/NEXT OK Helpful Hints: - The (A) connection is turned on this unit with this unit is ...
User manual
Page 34
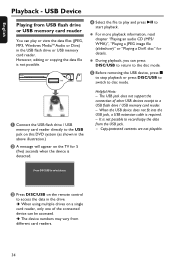
... the USB device, press x to stop playback or press DISC/USB to switch to the disc mode. Helpful Hints: - When using multiple drives on the remote control to the USB jack on the TV for details. A Connect the USB ash drive / USB memory card reader directly to access the data in the...
... the USB device, press x to stop playback or press DISC/USB to switch to the disc mode. Helpful Hints: - When using multiple drives on the remote control to the USB jack on the TV for details. A Connect the USB ash drive / USB memory card reader directly to access the data in the...
User manual
Page 35
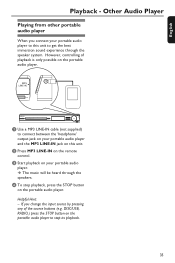
C Start playback on the remote control. D To stop its playback. 35 Other Audio Player Playing from other portable audio player When you change the input source by pressing any of playback ... the portable audio player. English Playback - B Press MP3 LINE-IN on your portable audio player. The music will be heard through the speaker system. However, controlling of the source buttons (e.g. DISC/USB, RADIO,) press the STOP button on the portable audio player. Helpful Hint: - If you connect your portable audio player...
C Start playback on the remote control. D To stop its playback. 35 Other Audio Player Playing from other portable audio player When you change the input source by pressing any of playback ... the portable audio player. English Playback - B Press MP3 LINE-IN on your portable audio player. The music will be heard through the speaker system. However, controlling of the source buttons (e.g. DISC/USB, RADIO,) press the STOP button on the portable audio player. Helpful Hint: - If you connect your portable audio player...

