
Leaflet
Page 2
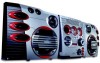
...Next/Previous Track Search, Repeat/one/all the advantages of Koninklijke Philips Electronics N.V. All Rights reserved. Packaging: 21 kg Power • Power supply: 110V, 50Hz • Standby power consumption: < 1 W • FWM587/37 Product highlights Gameport connection Game Sound modes MIX-IT for ... Eco Power Standby: 1 watt • Indications: DIM mode Accessories • Included Accessories: AC Power Cord, FM/ MW Antenna • Remote control: 32-key with a small footprint. In addition, Class 'D' Digital Amplifier has greater than 90% efficiency compared to give the final output....
...Next/Previous Track Search, Repeat/one/all the advantages of Koninklijke Philips Electronics N.V. All Rights reserved. Packaging: 21 kg Power • Power supply: 110V, 50Hz • Standby power consumption: < 1 W • FWM587/37 Product highlights Gameport connection Game Sound modes MIX-IT for ... Eco Power Standby: 1 watt • Indications: DIM mode Accessories • Included Accessories: AC Power Cord, FM/ MW Antenna • Remote control: 32-key with a small footprint. In addition, Class 'D' Digital Amplifier has greater than 90% efficiency compared to give the final output....
User manual
Page 8
...Contents General Information Supplied accessories 9 Environmental information 9 Care and safety information 9 Functional Overview Main unit and remote control 10-11 Control buttons available on the remote control only 11 Connections Step 1: Connecting FM/ AM antennas 13 Step 2: Connecting the speakers 13 Step ...Connecting to game console 13 Step 4: Connecting the AC power cord ........ 13 Step 5: Inserting batteries into the remote control 14 Using the remote control to operate the system 14 Gameport Operations About Gameport 15 Preparation before use 15 Starting operation 15 Basic ...
...Contents General Information Supplied accessories 9 Environmental information 9 Care and safety information 9 Functional Overview Main unit and remote control 10-11 Control buttons available on the remote control only 11 Connections Step 1: Connecting FM/ AM antennas 13 Step 2: Connecting the speakers 13 Step ...Connecting to game console 13 Step 4: Connecting the AC power cord ........ 13 Step 5: Inserting batteries into the remote control 14 Using the remote control to operate the system 14 Gameport Operations About Gameport 15 Preparation before use 15 Starting operation 15 Basic ...
User manual
Page 9
... power outlet when not in a straight line from cold to warm surroundings, making it . Video cinch cable (yellow) - General Information Do not block the vents - Remote control and two AA batteries. - English Refer to the type plate on the lens. -
... power outlet when not in a straight line from cold to warm surroundings, making it . Video cinch cable (yellow) - General Information Do not block the vents - Remote control and two AA batteries. - English Refer to the type plate on the lens. -

User manual
Page 10
... DIM SLEEP CLK/TIMER TIMER ON/OFF DSC VAC MUTE MAX ON/OFF GAME GAME SOUND MIX-IT º ª • 4 0 ≥ ! $ # Main unit and remote control 1 ECO POWER indicator - TUNER: toggles between DISC 1~5. -
... DIM SLEEP CLK/TIMER TIMER ON/OFF DSC VAC MUTE MAX ON/OFF GAME GAME SOUND MIX-IT º ª • 4 0 ≥ ! $ # Main unit and remote control 1 ECO POWER indicator - TUNER: toggles between DISC 1~5. -
User manual
Page 11
...PROG (PROGRAM) - Selects a disc tray to your game console's left /right channel. ) iR SENSOR - CD: starts/pauses playback. (only on the remote control only £ CD 1~5 - Turns on /off the optimal mix of various sound features. ! or 24-hour clock display. *n - Indicates signal ...strength of these music sources (CD,TUNER or AUX). @ MODE (GAME SOUND) - Point the remote control towards this sensor. ¡ Disc trays (1~5) ™ OPEN•CLOSE 0 (DISC 1~5) - Control buttons available on the main unit) - Repeats ...
...PROG (PROGRAM) - Selects a disc tray to your game console's left /right channel. ) iR SENSOR - CD: starts/pauses playback. (only on the remote control only £ CD 1~5 - Turns on /off the optimal mix of various sound features. ! or 24-hour clock display. *n - Indicates signal ...strength of these music sources (CD,TUNER or AUX). @ MODE (GAME SOUND) - Point the remote control towards this sensor. ¡ Disc trays (1~5) ™ OPEN•CLOSE 0 (DISC 1~5) - Control buttons available on the main unit) - Repeats ...

User manual
Page 14
...be used for example CAUTION! - Do not use old and new or different types of properly. 14 Using the remote control to operate the system 1 Aim the remote control directly at the remote sensor (iR) on the main unit. 2 Select the source you wish to control by pressing one of the... (for example CD,TUNER). 3 Then select the desired function (for a long time. - English Connections Step 5: Inserting batteries into the remote control 3 1 2 1 Open the battery compartment cover. 2 Insert two batteries type R06 or AA, following the indications (+-) inside the compartment. 3 Close the cover. ...
...be used for example CAUTION! - Do not use old and new or different types of properly. 14 Using the remote control to operate the system 1 Aim the remote control directly at the remote sensor (iR) on the main unit. 2 Select the source you wish to control by pressing one of the... (for example CD,TUNER). 3 Then select the desired function (for a long time. - English Connections Step 5: Inserting batteries into the remote control 3 1 2 1 Open the battery compartment cover. 2 Insert two batteries type R06 or AA, following the indications (+-) inside the compartment. 3 Close the cover. ...
User manual
Page 15
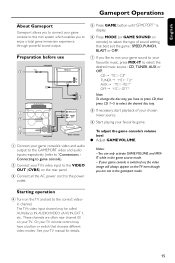
... the game console's volume level ● Adjust GAME VOLUME. You can only activate GAME VOLUME and MIXIT while in channel. Starting operation 4 Turn on remote) to select the type of your chosen mixer source. 9 Start playing your favourite game. The TV's video input channel may have to press CD, ...then press CD 1~5 to enjoy a total game immersion experience through powerful sound output. Or, your TV remote control may be called AUX(iliary) IN, AUDIO/VIDEO (A/V) IN, EXT 1, etc. CD ™ "MIX-CD" TUNER ™ "MIX-TU" AUX ™ "MIX-...
... the game console's volume level ● Adjust GAME VOLUME. You can only activate GAME VOLUME and MIXIT while in channel. Starting operation 4 Turn on remote) to select the type of your chosen mixer source. 9 Start playing your favourite game. The TV's video input channel may have to press CD, ...then press CD 1~5 to enjoy a total game immersion experience through powerful sound output. Or, your TV remote control may be called AUX(iliary) IN, AUDIO/VIDEO (A/V) IN, EXT 1, etc. CD ™ "MIX-CD" TUNER ™ "MIX-TU" AUX ™ "MIX-...
User manual
Page 17
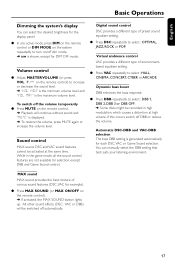
...or Game Sound selection. MAX sound MAX sound provides the best mixture of environmentbased equaliser setting. ● Press VAC repeatedly to turn on the remote control. ➜ Playback will be activated at high volume. Dynamic bass boost DBB enhances the bass response. ● Press DBB repeatedly to ...MUTE on /off dim mode. ➜ DIM is generated automatically for the display panel. ● In any active mode, press DIM on the remote control or DIM MODE on the system repeatedly to select : HALL, CINEMA, CONCERT, CYBER or ARCADE. Digital sound control DSC provides a different ...
...or Game Sound selection. MAX sound MAX sound provides the best mixture of environmentbased equaliser setting. ● Press VAC repeatedly to turn on the remote control. ➜ Playback will be activated at high volume. Dynamic bass boost DBB enhances the bass response. ● Press DBB repeatedly to ...MUTE on /off dim mode. ➜ DIM is generated automatically for the display panel. ● In any active mode, press DIM on the remote control or DIM MODE on the system repeatedly to select : HALL, CINEMA, CONCERT, CYBER or ARCADE. Digital sound control DSC provides a different ...

User manual
Page 18
... disc stabiliser rings or disc treatment sheets, etc., as offered on the display. 4 Repeat steps 1~3 for regular discs. P4) 1 Press OPEN•CLOSE 0 DISC 1 on remote. ➜ The selected disc will be muted. To play facing up . To ensure good system performance, wait until the desired track is designed for loading...
... disc stabiliser rings or disc treatment sheets, etc., as offered on the display. 4 Repeat steps 1~3 for regular discs. P4) 1 Press OPEN•CLOSE 0 DISC 1 on remote. ➜ The selected disc will be muted. To play facing up . To ensure good system performance, wait until the desired track is designed for loading...
User manual
Page 19
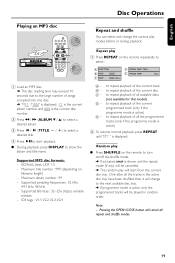
... change to repeat playback of all repeat and shuffle modes. 19 Random play ● Press SHUFFLE on the remote repeatedly to show the album and title name. Repeat play 1 Press REPEAT on the remote to repeat playback of all the tracks in random order. to repeat playback of the current programmed track...
... change to repeat playback of all repeat and shuffle modes. 19 Random play ● Press SHUFFLE on the remote repeatedly to show the album and title name. Repeat play 1 Press REPEAT on the remote to repeat playback of all the tracks in random order. to repeat playback of the current programmed track...
User manual
Page 22
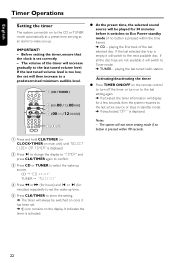
... setting again. ➜ If activated, the timer information will switch to wake you up. Activating/deactivating the timer ● Press TIMER ON/OFF on the remote control to turn off the timer or turn on the display. playing the first track of the timer will increase gradually to Tuner mode. ➜...
... setting again. ➜ If activated, the timer information will switch to wake you up. Activating/deactivating the timer ● Press TIMER ON/OFF on the remote control to turn off the timer or turn on the display. playing the first track of the timer will increase gradually to Tuner mode. ➜...
User manual
Page 25
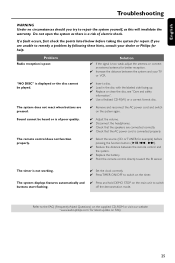
... the remote control directly toward the IR sensor. Do not open the system as this will invalidate the warranty. The system does not react when buttons are pressed. ✔ Remove and reconnect the AC power cord and switch on the supplied CD-ROM or visit our website "www.audio.philips.com... first check the points listed below before pressing the function button (ÉÅ, S , T). ✔ Reduce the distance between the system and your dealer or Philips for latest update on the timer. The timer is poor. Refer to the FAQ (Frequently Asked Questions) on the system again.
... the remote control directly toward the IR sensor. Do not open the system as this will invalidate the warranty. The system does not react when buttons are pressed. ✔ Remove and reconnect the AC power cord and switch on the supplied CD-ROM or visit our website "www.audio.philips.com... first check the points listed below before pressing the function button (ÉÅ, S , T). ✔ Reduce the distance between the system and your dealer or Philips for latest update on the timer. The timer is poor. Refer to the FAQ (Frequently Asked Questions) on the system again.


