Leaflet
Page 2
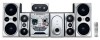
DVD Mini Hi-Fi System FWD798/37 Specifications Product highlights Sound • Total Sound Power (RMS): 750 W • Sound System: Dolby Prologic II, DTS, Dolby Digital • Sound Enhancement: Virtual Ambience Control, Digital Sound Control, Dynamic Bass Boost 3 steps, MAX Sound Loudspeakers • Number of Loudspeakers: 5 &#... Convenience • Alarms: CD Alarm, Radio Alarm, Tape alarm, Sleep timer • Display Type: FTD • Karaoke: Echo control, Key control, MIC volume • Eco Power Standby: 1 watt • Clock: On main display • OSD Languages: English, French,...
DVD Mini Hi-Fi System FWD798/37 Specifications Product highlights Sound • Total Sound Power (RMS): 750 W • Sound System: Dolby Prologic II, DTS, Dolby Digital • Sound Enhancement: Virtual Ambience Control, Digital Sound Control, Dynamic Bass Boost 3 steps, MAX Sound Loudspeakers • Number of Loudspeakers: 5 &#... Convenience • Alarms: CD Alarm, Radio Alarm, Tape alarm, Sleep timer • Display Type: FTD • Karaoke: Echo control, Key control, MIC volume • Eco Power Standby: 1 watt • Clock: On main display • OSD Languages: English, French,...

User manual
Page 6
... THERE ARE QUESTIONS REGARDING OUR TV SET COMPATIBILITY WITH THIS MODEL 525p AND 625p DVD PLAYER, PLEASE CONTACT OUR CUSTOMER SERVICE CENTRE'. 6 CAUTION Use of controls or adjustments or performance of procedures other than herein may result in hazardous radiation exposure or other unsafe operation.
... THERE ARE QUESTIONS REGARDING OUR TV SET COMPATIBILITY WITH THIS MODEL 525p AND 625p DVD PLAYER, PLEASE CONTACT OUR CUSTOMER SERVICE CENTRE'. 6 CAUTION Use of controls or adjustments or performance of procedures other than herein may result in hazardous radiation exposure or other unsafe operation.
User manual
Page 8
...Step 4: Setting speakers 23 Step 5: Setting language preference 23 Disc Operations Playing discs 24 Using the disc menu 24 Basic playback controls 25 Skipping to another title (track)/chapter Fast search Continuing playback from the last stop point Selecting various mode functions 25~26 Repeat... the power cord 15 Step 6: Connecting a VCR or cable/satellite box 16 Step 7: Connecting digital audio equipment . 16 Functional Overview Controls on /off Test Tone Kara Score DivX(R) VOD Changing the password Restricting playback by frames Speaker Level Adjust Checking the contents of DVD ...
...Step 4: Setting speakers 23 Step 5: Setting language preference 23 Disc Operations Playing discs 24 Using the disc menu 24 Basic playback controls 25 Skipping to another title (track)/chapter Fast search Continuing playback from the last stop point Selecting various mode functions 25~26 Repeat... the power cord 15 Step 6: Connecting a VCR or cable/satellite box 16 Step 7: Connecting digital audio equipment . 16 Functional Overview Controls on /off Test Tone Kara Score DivX(R) VOD Changing the password Restricting playback by frames Speaker Level Adjust Checking the contents of DVD ...
User manual
Page 9
... 42 Setting the timer 42~43 Viewing the timer 43 Setting the sleep timer 43 Sound and Volume Controls Sound control 44 MAX Sound DBB (Dynamic Bass Boost) Selecting sound effect Volume control 44 Changing the volume level Switching off the volume temporarily Listening through headphones Other Functions Switching on/off ...45 Switching the system on Switching the system to standby mode Power saving automatic standby Dimming the display 45 Vocal 45 Key control 46 Echo 46 Karaoke 46 Listening to external sources 46 Contents Specifications 47 Troubleshooting 48~49 Glossary 50 9
... 42 Setting the timer 42~43 Viewing the timer 43 Setting the sleep timer 43 Sound and Volume Controls Sound control 44 MAX Sound DBB (Dynamic Bass Boost) Selecting sound effect Volume control 44 Changing the volume level Switching off the volume temporarily Listening through headphones Other Functions Switching on/off ...45 Switching the system on Switching the system to standby mode Power saving automatic standby Dimming the display 45 Vocal 45 Key control 46 Echo 46 Karaoke 46 Listening to external sources 46 Contents Specifications 47 Troubleshooting 48~49 Glossary 50 9
User manual
Page 10
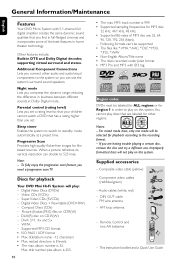
... (white, red) - Digital Video Discs + Rewritable (DVD+RW) - DivX(R) disc on CDR(W) - title number plus album is 32. If you set. AM loop antenna - Parental control (rating level) Lets you set a rating level so that your children cannot watch a DVD that are having trouble playing a certain disc, remove the disc and... mode discs, only one . Improperly formatted discs will be labeled for ALL regions or for Region 1 in Dolby Digital mode. Composite video cable (yellow) - Remote Control and two AA batteries -
... (white, red) - Digital Video Discs + Rewritable (DVD+RW) - DivX(R) disc on CDR(W) - title number plus album is 32. If you set. AM loop antenna - Parental control (rating level) Lets you set a rating level so that your children cannot watch a DVD that are having trouble playing a certain disc, remove the disc and... mode discs, only one . Improperly formatted discs will be labeled for ALL regions or for Region 1 in Dolby Digital mode. Composite video cable (yellow) - Remote Control and two AA batteries -
User manual
Page 16
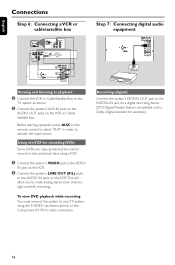
....This will allow you to activate the input source. Recording (digital) Connect the system's DIGITAL OUT jack to the DIGITAL IN jack on the remote control to select "AUX" in order to make analog stereo (two channel, right and left) recording. To view DVD playback while recording You must connect the...
....This will allow you to activate the input source. Recording (digital) Connect the system's DIGITAL OUT jack to the DIGITAL IN jack on the remote control to select "AUX" in order to make analog stereo (two channel, right and left) recording. To view DVD playback while recording You must connect the...
User manual
Page 17
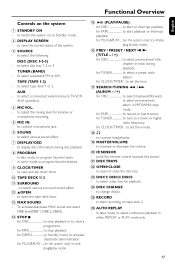
...TAPE to select the following: DISC (DISC 1•2•3) - for TUNER to select various surround sound effect. @ 5OPEN - point the remote control towards this sensor. ¡ DISC TRAYS ™ OPEN•CLOSE - to rewind or fast forward. to a lower or higher radio frequency....set clock/ timer. 0 TAPE DECK 1/ 2 ! for playback. ≤ DISC CHANGE - to Standby mode. 2 DISPLAY SCREEN - Functional Overview English Controls on the system only) to initiate plug & play mode. % 38 (PLAY/PAUSE) for DISC to search backward/forward. to switch the system on the...
...TAPE to select the following: DISC (DISC 1•2•3) - for TUNER to select various surround sound effect. @ 5OPEN - point the remote control towards this sensor. ¡ DISC TRAYS ™ OPEN•CLOSE - to rewind or fast forward. to a lower or higher radio frequency....set clock/ timer. 0 TAPE DECK 1/ 2 ! for playback. ≤ DISC CHANGE - to Standby mode. 2 DISPLAY SCREEN - Functional Overview English Controls on the system only) to initiate plug & play mode. % 38 (PLAY/PAUSE) for DISC to search backward/forward. to switch the system on the...
User manual
Page 18
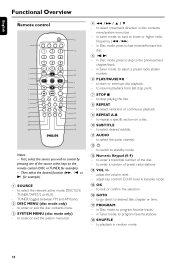
.... - to enter a track/title number of preset radio stations. $ VOL +/- - to playback in Disc mode, press to control by pressing one of continuous playback. 9 REPEAT A-B - in random mode. 18 to stop point. 7 STOP 9 - to start or ... level in tuner mode, to tune to program favorite tracks. - to standby mode. # Numeric Keypad (0-9) - AUDIO - adjust the volume level. - English Functional Overview Remote control @ 1 # 2 $ 3 % 4 4 5 5 6 7 ^ & 8 * 9 ( 0 ) ! ¡ • ™ ≥ § £ ∞ ≤ Notes: - in karaoke mode. %...
.... - to enter a track/title number of preset radio stations. $ VOL +/- - to playback in Disc mode, press to control by pressing one of continuous playback. 9 REPEAT A-B - in random mode. 18 to stop point. 7 STOP 9 - to start or ... level in tuner mode, to tune to program favorite tracks. - to standby mode. # Numeric Keypad (0-9) - AUDIO - adjust the volume level. - English Functional Overview Remote control @ 1 # 2 $ 3 % 4 4 5 5 6 7 ^ & 8 * 9 ( 0 ) ! ¡ • ™ ≥ § £ ∞ ≤ Notes: - in karaoke mode. %...
User manual
Page 21
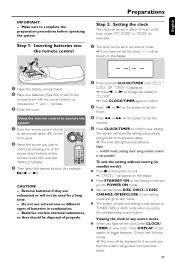
... display. ● Press STANDBY ON to exit setting mode and go back to its previous status. 21 Note: - In AUX mode, setting clock using remote control is displayed. ➜ Press O or P to change the display to "CLOCK". ➜ Press CLOCK/TIMER again to confirm. 3 Press O or P on the ... 1 or ¡ on the system to set the minutes. 5 Press CLOCK/TIMER to disc mode. ● The system will be shown on the remote control (for example TAPE1/2, TUNER). 3 Then select the desired function (for 5 seconds and then the system will store the setting automatically and go back to its...
... display. ● Press STANDBY ON to exit setting mode and go back to its previous status. 21 Note: - In AUX mode, setting clock using remote control is displayed. ➜ Press O or P to change the display to "CLOCK". ➜ Press CLOCK/TIMER again to confirm. 3 Press O or P on the ... 1 or ¡ on the system to set the minutes. 5 Press CLOCK/TIMER to disc mode. ● The system will be shown on the remote control (for example TAPE1/2, TUNER). 3 Then select the desired function (for 5 seconds and then the system will store the setting automatically and go back to its...
User manual
Page 22
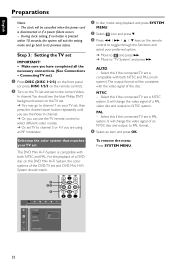
... format. 4 Select an item and press OK. Connecting TV set) 1 Press DISC (DISC 1•2•3) on the front panel (or press DISC 1/2/3 on the remote control). 2 Turn on this if the connected TV set is compatible with both NTSC and PAL (multi system).The output format will change the video signal... setting mode and go to channel 1 on your TV set, then press the channel down button repeatedly until you see the blue Philips DVD background screen on the remote control to toggle through the functions and select your TV set This DVD Mini Hi-Fi System is pressed within 10 seconds, the...
... format. 4 Select an item and press OK. Connecting TV set) 1 Press DISC (DISC 1•2•3) on the front panel (or press DISC 1/2/3 on the remote control). 2 Turn on this if the connected TV set is compatible with both NTSC and PAL (multi system).The output format will change the video signal... setting mode and go to channel 1 on your TV set, then press the channel down button repeatedly until you see the blue Philips DVD background screen on the remote control to toggle through the functions and select your TV set This DVD Mini Hi-Fi System is pressed within 10 seconds, the...
User manual
Page 23
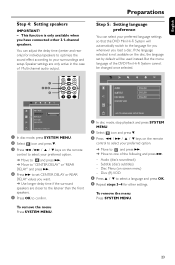
... other settings. PBC 1 In disc mode, press SYSTEM MENU. 2 Select icon and press 4. 3 Press 1 / ¡ / 5 / 4 keys on the remote control to select your surroundings and setup. Disc Menu (on the disc, the language set CENTER DELAY or REAR DELAY values you load a disc. Speaker settings...to confirm. 1 In disc mode, stop playback and press SYSTEM MENU. 2 Select icon and press 4. 3 Press 1 / ¡ / 5 / 4 keys on the remote control to select your preferred language settings so that this DVD Mini Hi-Fi System will be changed once selected. Audio (disc's soundtrack) - To remove the...
... other settings. PBC 1 In disc mode, press SYSTEM MENU. 2 Select icon and press 4. 3 Press 1 / ¡ / 5 / 4 keys on the remote control to select your surroundings and setup. Disc Menu (on the disc, the language set CENTER DELAY or REAR DELAY values you load a disc. Speaker settings...to confirm. 1 In disc mode, stop playback and press SYSTEM MENU. 2 Select icon and press 4. 3 Press 1 / ¡ / 5 / 4 keys on the remote control to select your preferred language settings so that this DVD Mini Hi-Fi System will be changed once selected. Audio (disc's soundtrack) - To remove the...
User manual
Page 24
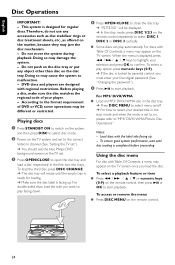
... 2 Power on the TV system and set to the correct Video In channel (See "Setting the TV set"). ➜ You should see the blue Philips DVD background screen on the TV set to on /off. ➜ For how to select your selection and press OK to "MP3/ DIVX/ WMA/..., wait until the empty tray is facing up . - To select a playback feature or item ● Press 1 / ¡ / 5 / 4 or numeric keys (0-9) on the remote control repeatedly to select DISC 1, DISC 2 or DISC 3 cyclically. ● Some discs can play option, press numeric keys (0-9). ➜ If the disc is displayed, press 1 / ¡...
... 2 Power on the TV system and set to the correct Video In channel (See "Setting the TV set"). ➜ You should see the blue Philips DVD background screen on the TV set to on /off. ➜ For how to select your selection and press OK to "MP3/ DIVX/ WMA/..., wait until the empty tray is facing up . - To select a playback feature or item ● Press 1 / ¡ / 5 / 4 or numeric keys (0-9) on the remote control repeatedly to select DISC 1, DISC 2 or DISC 3 cyclically. ● Some discs can play option, press numeric keys (0-9). ➜ If the disc is displayed, press 1 / ¡...
User manual
Page 25
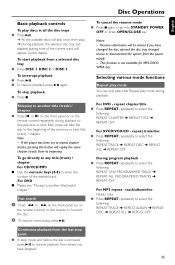
...10140; REPEAT ALBUM ➜ REPEAT DISC ➜ REPEAT ALL ➜ REPEAT OFF Continuing playback from the power supply. - Disc Operations English Basic playback controls To play discs in all the disc trays ● Press 38. ➜ All the available discs will play , press 38. To start playback from... have stopped. 25 Fast search 1 Press 1 or ¡ on the front panel (or on the display. Resume information will appear on the remote control) to enter the number of the previous or next title (track) / chapter. To go into STANDBY, POWER OFF or press OPEN/CLOSE key. Notes...
...10140; REPEAT ALBUM ➜ REPEAT DISC ➜ REPEAT ALL ➜ REPEAT OFF Continuing playback from the power supply. - Disc Operations English Basic playback controls To play discs in all the disc trays ● Press 38. ➜ All the available discs will play , press 38. To start playback from... have stopped. 25 Fast search 1 Press 1 or ¡ on the front panel (or on the display. Resume information will appear on the remote control) to enter the number of the previous or next title (track) / chapter. To go into STANDBY, POWER OFF or press OPEN/CLOSE key. Notes...
User manual
Page 27
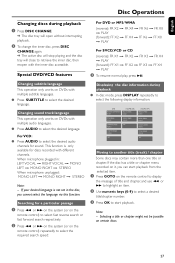
... title (track) / chapter Some discs may contain more than one title or chapter. Selecting a title or chapter might not be possible on the remote control) repeatedly to select the required search speed: Moving to select the desired language. This function is not set in : LEFT VOCAL p RIGHT VOCAL p... a title or chapter menu recorded on it, you cannot select the language via this function. Changing subtitle language This operation only works on the remote control to display the message of title and chapter, and use 1 or ¡ to highlight an item. 2 Use numeric keys (0-9) to select a desired...
... title (track) / chapter Some discs may contain more than one title or chapter. Selecting a title or chapter might not be possible on the remote control) repeatedly to select the required search speed: Moving to select the desired language. This function is not set in : LEFT VOCAL p RIGHT VOCAL p... a title or chapter menu recorded on it, you cannot select the language via this function. Changing subtitle language This operation only works on the remote control to display the message of title and chapter, and use 1 or ¡ to highlight an item. 2 Use numeric keys (0-9) to select a desired...

User manual
Page 29
...; If PBC OFF, the system will start from the selected title or chapter. 3 Press DISC MENU on the remote control to go to disc menu of DVD 1 Press DISC MENU on the remote control. ➜ If the current title has a menu, the menu will appear on the screen. Note: - This function... playback automatically. ● If PBC ON, the PBC menu (if available) will appear on the TV screen for selection. Note: - Advancing by frames Playback control (PBC) PBC playback allows you to view the picture from different angles. This function is not available for CD/DVD or MP3/ DIVX/ WMA disc...
...; If PBC OFF, the system will start from the selected title or chapter. 3 Press DISC MENU on the remote control to go to disc menu of DVD 1 Press DISC MENU on the remote control. ➜ If the current title has a menu, the menu will appear on the screen. Note: - This function... playback automatically. ● If PBC ON, the PBC menu (if available) will appear on the TV screen for selection. Note: - Advancing by frames Playback control (PBC) PBC playback allows you to view the picture from different angles. This function is not available for CD/DVD or MP3/ DIVX/ WMA disc...
User manual
Page 30
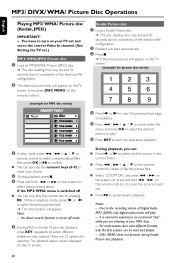
...to zoom the picture in playback mode, press O or P to select the previous/next title. ➜ The title number will appear on the remote control ) to complexity of the directory/file configuration. 2 The album/picture menu will play . 6 Press KEY to start automatically. 3 Press 9. ➜ ...9679; Press 2; MP3/ DIVX/ WMA/ Picture Disc Operations English Playing MP3/ WMA/ Picture disc (Kodak, JPEG) IMPORTANT! - If not, press DISC MENU on the remote control. (example for picture disc menu) 4 Press O or P to view the previous/next page (if available). 5 Press 1 / ¡ / 5 / 4 to ...
...to zoom the picture in playback mode, press O or P to select the previous/next title. ➜ The title number will appear on the remote control ) to complexity of the directory/file configuration. 2 The album/picture menu will play . 6 Press KEY to start automatically. 3 Press 9. ➜ ...9679; Press 2; MP3/ DIVX/ WMA/ Picture Disc Operations English Playing MP3/ WMA/ Picture disc (Kodak, JPEG) IMPORTANT! - If not, press DISC MENU on the remote control. (example for picture disc menu) 4 Press O or P to view the previous/next page (if available). 5 Press 1 / ¡ / 5 / 4 to ...

User manual
Page 31
...an external subtitle has been selected, the DivX embedded subtitle will start playback. 3 When playing disc, press SUBTITLE button on the remote control to select an external subtitle option . 5 Press SUBTITLE to select available font: SUBTITLE 1/1, ENCODING LATIN 1, ENCODING LATIN 2, ENCODING ..., Dutch, English, German, Hungarian, Irish, Polish, Romanian, Slovak, Slovene and Sorbian. - The maximum number of subtitle available on remote control to select subtitle file . - During playback, press SUBTITLE button on DivX disc: embedded subtitle and external subtitle. 1 Load a DivX disc...
...an external subtitle has been selected, the DivX embedded subtitle will start playback. 3 When playing disc, press SUBTITLE button on the remote control to select an external subtitle option . 5 Press SUBTITLE to select available font: SUBTITLE 1/1, ENCODING LATIN 1, ENCODING LATIN 2, ENCODING ..., Dutch, English, German, Hungarian, Irish, Polish, Romanian, Slovak, Slovene and Sorbian. - The maximum number of subtitle available on remote control to select subtitle file . - During playback, press SUBTITLE button on DivX disc: embedded subtitle and external subtitle. 1 Load a DivX disc...

User manual
Page 32
.... 2 Press the 1 / ¡ / 5 / 4 on the TV screen without interrupting the disc playback. You can continue some operations directly via the menu bar on the remote control to navigate in the menu. ➜ Press 1 / ¡ to move through the menu bar. ➜ Press 4 to enter the selection. 3 Press OK to select subwoofer...
.... 2 Press the 1 / ¡ / 5 / 4 on the TV screen without interrupting the disc playback. You can continue some operations directly via the menu bar on the remote control to navigate in the menu. ➜ Press 1 / ¡ to move through the menu bar. ➜ Press 4 to enter the selection. 3 Press OK to select subwoofer...
User manual
Page 33
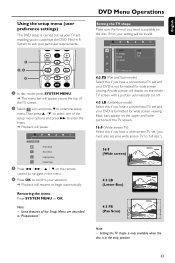
... will display on the whole TV screen with a portion automatically cut off. 4:3 LB (Letterbox mode) Select this if you need is available on the remote control to navigate in the menu. 4 Press OK to suit your DVD is formatted for wide screen viewing. If not, your setting will be invalid. 1 2,3 4 1 In...
... will display on the whole TV screen with a portion automatically cut off. 4:3 LB (Letterbox mode) Select this if you need is available on the remote control to navigate in the menu. 4 Press OK to suit your DVD is formatted for wide screen viewing. If not, your setting will be invalid. 1 2,3 4 1 In...
User manual
Page 35
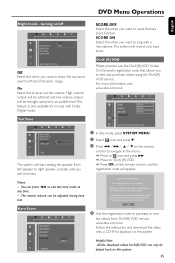
... to right speaker cyclically until you want to sing with its full dynamic range. The system will record your kara score. turning on the remote control to navigate in the menu. ➜ Move to icon and press ¡. ➜ Move to canel the kara score function. You can only be ...adjusted during tone test. Helpful Hint: - DivX (R) VOD Philips provides you the DivX(R) VOD (Video On Demand) registration code that allows you want to exit test tone mode at any time. - Notes: - All the...
... to right speaker cyclically until you want to sing with its full dynamic range. The system will record your kara score. turning on the remote control to navigate in the menu. ➜ Move to icon and press ¡. ➜ Move to canel the kara score function. You can only be ...adjusted during tone test. Helpful Hint: - DivX (R) VOD Philips provides you the DivX(R) VOD (Video On Demand) registration code that allows you want to exit test tone mode at any time. - Notes: - All the...


