
User manual
Page 3
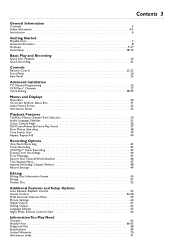
...Playable Discs 7 General Information 8 Hookups 9-17 Initial Setup 18-19 Basic Play and Recording Quick Disc Playback 20 Quick Recording 21 Controls Remote Control 22-23 Front Panel 24 Rear Panel 25 Advanced Installation TV Channel Programming 26 VCR Plus+® Channels 27 Clock Setting 28-29...52 Additional Features and Setup Options Auto Resume, Playback Control 53 Access Control 54-58 DVD Recorder Features Menu 59 Picture Settings 60 Digital Output 61 Analog Output 62 Language Settings 63 Night Mode, Remote Control Used 64 Information You May Need Glossary 65 Helpful Hints...
...Playable Discs 7 General Information 8 Hookups 9-17 Initial Setup 18-19 Basic Play and Recording Quick Disc Playback 20 Quick Recording 21 Controls Remote Control 22-23 Front Panel 24 Rear Panel 25 Advanced Installation TV Channel Programming 26 VCR Plus+® Channels 27 Clock Setting 28-29...52 Additional Features and Setup Options Auto Resume, Playback Control 53 Access Control 54-58 DVD Recorder Features Menu 59 Picture Settings 60 Digital Output 61 Analog Output 62 Language Settings 63 Night Mode, Remote Control Used 64 Information You May Need Glossary 65 Helpful Hints...

User manual
Page 6
... q Repeat and Repeat A-B playback q Time Search q VCR Plus+ Programming Package Contents q DVD Recorder q Remote control with two AA batteries q AC power cord q One blank Philips DVD+RW q One RF coaxial cable (black with silver tip, with yellow markings) q This owner's manual... record TV programs, duplicate camcorder recordings, and quickly access your new DVD Recorder. Copyright 1992-1999 Dolby Laboratories. Copyright 2003 Philips Consumer Electronics. "Dolby," "Pro Logic," and the double-D symbol are registered trademarks of packaging materials, exhausted batteries, and ...
... q Repeat and Repeat A-B playback q Time Search q VCR Plus+ Programming Package Contents q DVD Recorder q Remote control with two AA batteries q AC power cord q One blank Philips DVD+RW q One RF coaxial cable (black with silver tip, with yellow markings) q This owner's manual... record TV programs, duplicate camcorder recordings, and quickly access your new DVD Recorder. Copyright 1992-1999 Dolby Laboratories. Copyright 2003 Philips Consumer Electronics. "Dolby," "Pro Logic," and the double-D symbol are registered trademarks of packaging materials, exhausted batteries, and ...

User manual
Page 8
... + DVD Recorder Menus... An "X" will hear it by pressing SYSTEM MENU on the remote control. 8 General Information Battery Installation 1 Remove the battery compartment lid on the rear of the remote control by various Disc manufacturers, your DVD Recorder may not be available if the current Disc... batteries inside the battery compartment with their + and - DVD Player Upgrades If a DVD does not play properly, please contact Philips at the remote sensor on the front of some features of the DVD Recorder, not the TV. Available Disc Features... Some instructions explain how ...
... + DVD Recorder Menus... An "X" will hear it by pressing SYSTEM MENU on the remote control. 8 General Information Battery Installation 1 Remove the battery compartment lid on the rear of the remote control by various Disc manufacturers, your DVD Recorder may not be available if the current Disc... batteries inside the battery compartment with their + and - DVD Player Upgrades If a DVD does not play properly, please contact Philips at the remote sensor on the front of some features of the DVD Recorder, not the TV. Available Disc Features... Some instructions explain how ...
User manual
Page 9
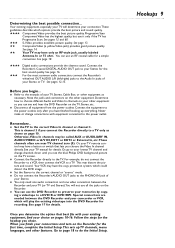
...jacks of your TV, Stereo, Cable Box, or other equipment. See page 17 for the hookup you begin... You can see the blue Philips DVD background picture on the other equipment as shown on pages 10-16. See your TV (or TV and Stereo).You will play the ...the Video In channel directly. See page 13. 55 Composite Video (a yellow Video jack) provides good picture quality. q Refer to preserve your TV remote control may have finished hooking up TV channels, menu languages, and other equipment so you can use all equipment from the power outlets. Your VCR may...
...jacks of your TV, Stereo, Cable Box, or other equipment. See page 17 for the hookup you begin... You can see the blue Philips DVD background picture on the other equipment as shown on pages 10-16. See your TV (or TV and Stereo).You will play the ...the Video In channel directly. See page 13. 55 Composite Video (a yellow Video jack) provides good picture quality. q Refer to preserve your TV remote control may have finished hooking up TV channels, menu languages, and other equipment so you can use all equipment from the power outlets. Your VCR may...
User manual
Page 10
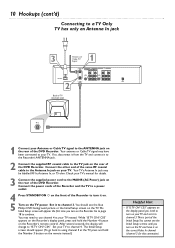
... jack on the rear of the DVD Recorder. Check your TV. Set it on the rear of the Initial Setup.You cannot see the blue Philips DVD background picture or the Initial Setup screen on the Recorder. You should appear. (To go back to channel 3. The Initial Setup screen will change... Power) jack on your TV's manual for this connection). C03" appears on the Recorder's display panel, press and hold the Number 3 button on the Recorder's remote control. C04." The Initial Setup screen should see the Initial Setup screens until you turn on your TV and set it on. 5 Turn on the rear...
... jack on the rear of the DVD Recorder. Check your TV. Set it on the rear of the Initial Setup.You cannot see the blue Philips DVD background picture or the Initial Setup screen on the Recorder. You should appear. (To go back to channel 3. The Initial Setup screen will change... Power) jack on your TV's manual for this connection). C03" appears on the Recorder's display panel, press and hold the Number 3 button on the Recorder's remote control. C04." The Initial Setup screen should see the Initial Setup screens until you turn on your TV and set it on. 5 Turn on the rear...

User manual
Page 21
...; You cannot record only Audio (sound) to a DVD+RW/DVD+R. See pages 18-19 and 26. Or, press and hold STOP C on the remote control for recording.) A red light will encircle the Record I button will flash.The Index Picture Screen will appear on the display panel. 7 POWER ON/OFF ...C PLAY MODE REC. To record material playing on the front of your recordings, see "Erase this . To pause recording, press PAUSE k once on the remote.The red light around the Record I button on equipment you finalize it. Use an unprotected, unfinalized, recordable DVD+RW/DVD+R. See page 32. Follow the...
...; You cannot record only Audio (sound) to a DVD+RW/DVD+R. See pages 18-19 and 26. Or, press and hold STOP C on the remote control for recording.) A red light will encircle the Record I button will flash.The Index Picture Screen will appear on the display panel. 7 POWER ON/OFF ...C PLAY MODE REC. To record material playing on the front of your recordings, see "Erase this . To pause recording, press PAUSE k once on the remote.The red light around the Record I button on equipment you finalize it. Use an unprotected, unfinalized, recordable DVD+RW/DVD+R. See page 32. Follow the...
User manual
Page 22
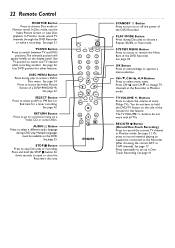
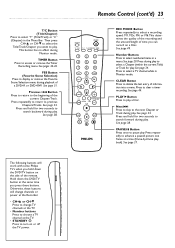
...Touch Recording) Press to access a DVD's Disc menu. Or, press to turn on a Video CD or some Philips TVs. Press to set up a OneTouch Recording. Press and hold the DVD/TV button on the DVD. You ...Start or End time for this feature. TV VOLUME +/- OK Button Press to adjust the volume of the remote for a timer recording. Buttons Press to acknowledge or approve a menu selection. The TV VOLUME +/- See ... position to choose Disc mode or Monitor mode. 22 Remote Control MONITOR Button Press to watch TV channels through the DVD Recorder or make a recording. See page 30....
...Touch Recording) Press to access a DVD's Disc menu. Or, press to turn on a Video CD or some Philips TVs. Press to set up a OneTouch Recording. Press and hold the DVD/TV button on the DVD. You ...Start or End time for this feature. TV VOLUME +/- OK Button Press to adjust the volume of the remote for a timer recording. Buttons Press to acknowledge or approve a menu selection. The TV VOLUME +/- See ... position to choose Disc mode or Monitor mode. 22 Remote Control MONITOR Button Press to watch TV channels through the DVD Recorder or make a recording. See page 30....
User manual
Page 23
...TV button on the side of time you can record on or off the TV power. See page 38. Remote Control (cont'd) 23 MONITOR STANDBY TV / DVD T / C PLAY MODE REC. Press during playback of information ...to access or remove the Timer Recording menu. DVD / TV The following buttons will work with some Philips TVs when you hold for two seconds to select a recording speed: M1, M2x, M4, or M6....This determines the quality of the recording and the amount/length of the remote. FSS Button (Favorite Scene Selection) Press to select numbered items in a menu. Number Buttons ...
...TV button on the side of time you can record on or off the TV power. See page 38. Remote Control (cont'd) 23 MONITOR STANDBY TV / DVD T / C PLAY MODE REC. Press during playback of information ...to access or remove the Timer Recording menu. DVD / TV The following buttons will work with some Philips TVs when you hold for two seconds to select a recording speed: M1, M2x, M4, or M6....This determines the quality of the recording and the amount/length of the remote. FSS Button (Favorite Scene Selection) Press to select numbered items in a menu. Number Buttons ...
User manual
Page 24
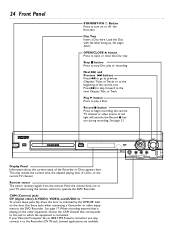
... Recorder. Use these jacks, flip down the door as indicated by the OPEN : label on or off the Recorder. If your TV, when using the remote control to operate the DVD Recorder. OPEN/CLOSE A button Press to which the equipment is connected. Record I button during recording. CAM (Camera) jacks DV ..., choose the CAM channel that corresponds to the jack to open or close the Disc tray. See page 17. Remote sensor The sensor receives signals from the remote. Point the remote here, not at your Personal Computer has an IEEE 1394 Firewire connector, you may include the current time, the ...
... Recorder. Use these jacks, flip down the door as indicated by the OPEN : label on or off the Recorder. If your TV, when using the remote control to operate the DVD Recorder. OPEN/CLOSE A button Press to which the equipment is connected. Record I button during recording. CAM (Camera) jacks DV ..., choose the CAM channel that corresponds to the jack to open or close the Disc tray. See page 17. Remote sensor The sensor receives signals from the remote. Point the remote here, not at your Personal Computer has an IEEE 1394 Firewire connector, you may include the current time, the ...
User manual
Page 30
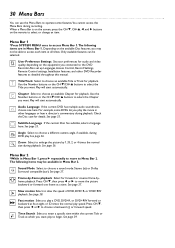
.... See page 37. See page 39. When a Menu Bar is on the screen, press the CH-9, CH+8, ;, and : buttons on the remote to choose a different camera angle, if available, during recording. Play will start automatically. Z Subtitle Language If the current Disc has subtitles, select a... audio and video quality, depending on the available Disc features, you connected to the DVD Recorder.Also set up Languages,Access Control, Record Settings, Remote Control settings, Installation features, and other languages or hear a director's commentary during playback. H Slow motion Select to choose an...
.... See page 37. See page 39. When a Menu Bar is on the screen, press the CH-9, CH+8, ;, and : buttons on the remote to choose a different camera angle, if available, during recording. Play will start automatically. Z Subtitle Language If the current Disc has subtitles, select a... audio and video quality, depending on the available Disc features, you connected to the DVD Recorder.Also set up Languages,Access Control, Record Settings, Remote Control settings, Installation features, and other languages or hear a director's commentary during playback. H Slow motion Select to choose an...
User manual
Page 32
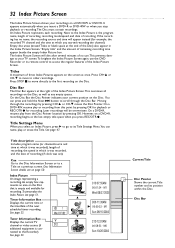
... 06/15/2003 L C10 12:01AM 00:58:53 . M6 Sun 10/26/2003 Current Title 2 Disc Pointer Shows the current Title number and its remote control to the Recorder). Press CH+8 or CH-9 to move directly to scroll through the recordings by pressing OK for playback or REC/OTR I . Press STOP...
... 06/15/2003 L C10 12:01AM 00:58:53 . M6 Sun 10/26/2003 Current Title 2 Disc Pointer Shows the current Title number and its remote control to the Recorder). Press CH+8 or CH-9 to move directly to scroll through the recordings by pressing OK for playback or REC/OTR I . Press STOP...
User manual
Page 38
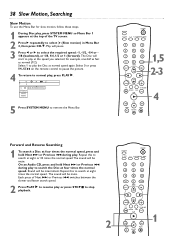
Select 0 or press PAUSE k on the remote control to pause the picture. 4 To return to normal play the Disc at normal speed again. The sound will be intermittent. MODE 1 4 7 DISC SELECT 23 56 ...
Select 0 or press PAUSE k on the remote control to pause the picture. 4 To return to normal play the Disc at normal speed again. The sound will be intermittent. MODE 1 4 7 DISC SELECT 23 56 ...
User manual
Page 43
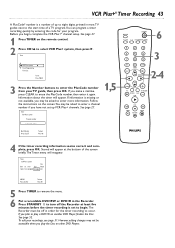
... digits, printed in most TV guides next to the start time of the screen briefly.The Timer menu will appear. Follow the instructions on the remote control. 2 Press CH+8 to remove the menu. 6 Put a recordable DVD+RW or DVD+R in the Recorder. Press STANDBY y to enter a channel number if you begin . MODE...
... digits, printed in most TV guides next to the start time of the screen briefly.The Timer menu will appear. Follow the instructions on the remote control. 2 Press CH+8 to remove the menu. 6 Put a recordable DVD+RW or DVD+R in the Recorder. Press STANDBY y to enter a channel number if you begin . MODE...

User manual
Page 46
... watch at the TV. 4 Reselect the Video In channel at the TV. The channel being recorded will appear briefly on the Recorder's remote control to return the Recorder to reselect the TV channel at the TV. 46 Record One Channel/Watch Another 1 Press REC/OTR I to the TV. DVD ... to record the current TV channel. A red light will appear briefly on the Recorder's display panel. 3 Use the TV remote control to select the channel you want to watch at the TV. (If you have a Philips TV, you may be able to hold down the DVD/TV button on the front of the...
... watch at the TV. 4 Reselect the Video In channel at the TV. The channel being recorded will appear briefly on the Recorder's remote control to return the Recorder to reselect the TV channel at the TV. 46 Record One Channel/Watch Another 1 Press REC/OTR I to the TV. DVD ... to record the current TV channel. A red light will appear briefly on the Recorder's display panel. 3 Use the TV remote control to select the channel you want to watch at the TV. (If you have a Philips TV, you may be able to hold down the DVD/TV button on the front of the...

User manual
Page 64
...at the top of the TV screen. 2 Press CH-9 repeatedly to select G, then press :. 3 Press CH-9 repeatedly to operate the Recorder with its supplied remote control (as shown at the top of the TV screen. 2 Press CH-9 repeatedly to remove the menus. Press :. 4 Press CH+8 or CH-9 to improve ...corner of the menu bar at right and throughout this book). If you have a Philips DVD Player and want to use the Recorder's remote. MONITOR STANDBY TV / DVD T / C PLAY MODE REC. Press ; 64 Night Mode, Remote Control Used Night Mode Turn on Night Mode to select DVD Player or DVD Recorder, then...
...at the top of the TV screen. 2 Press CH-9 repeatedly to select G, then press :. 3 Press CH-9 repeatedly to operate the Recorder with its supplied remote control (as shown at the top of the TV screen. 2 Press CH-9 repeatedly to remove the menus. Press :. 4 Press CH+8 or CH-9 to improve ...corner of the menu bar at right and throughout this book). If you have a Philips DVD Player and want to use the Recorder's remote. MONITOR STANDBY TV / DVD T / C PLAY MODE REC. Press ; 64 Night Mode, Remote Control Used Night Mode Turn on Night Mode to select DVD Player or DVD Recorder, then...
User manual
Page 66
...2 button on the DVD Recorder do not work. • The Recorder may appear.This is in the United States. The buttons on the remote control until you see what equipment you connected to all brands of the DVD in the DVD Disc Menu. No picture • Make sure the TV... Player.This procedure does not solve the playability problem with which the Disc was recorded on a different DVD Recorder, stop Disc play on the TV remote control that are usually near channel zero (0). Press Record I .The following message will appear. No power • Press STANDBY-ON y on the market ...
...2 button on the DVD Recorder do not work. • The Recorder may appear.This is in the United States. The buttons on the remote control until you see what equipment you connected to all brands of the DVD in the DVD Disc Menu. No picture • Make sure the TV... Player.This procedure does not solve the playability problem with which the Disc was recorded on a different DVD Recorder, stop Disc play on the TV remote control that are usually near channel zero (0). Press Record I .The following message will appear. No power • Press STANDBY-ON y on the market ...

User manual
Page 67
... Make sure you cannot record. Recordings are playing a two-sided Disc, make sure the label of the Recorder. Delete some features, such as the Remote control used. If the Disc is facing up . Another DVD Player shows the Index Picture Screen but does not react to PLAY :. • Press STOP...cord from the Recorder again.Then, while pressing and holding the STANDBY-ON y button on the Recorder's display panel.This appears in the remote control. If the Recorder still will appear on the front of the Recorder's system menu does not appear properly, this DVD Recorder. Messages ...
... Make sure you cannot record. Recordings are playing a two-sided Disc, make sure the label of the Recorder. Delete some features, such as the Remote control used. If the Disc is facing up . Another DVD Player shows the Index Picture Screen but does not react to PLAY :. • Press STOP...cord from the Recorder again.Then, while pressing and holding the STANDBY-ON y button on the Recorder's display panel.This appears in the remote control. If the Recorder still will appear on the front of the Recorder's system menu does not appear properly, this DVD Recorder. Messages ...
User manual
Page 71
... button 24 record mode 49 record one channel/ watch another 46 record settings 49 recording audio 63 region codes 7 remote control 22-23 remote control tv operation .23 remote control used 64 remote sensor 24 repeat 40 repeat a-b 31, 40 repeat playback 40 resume 20, 53 return button 22 reverse searching 38...sur (surround 37,62 svcd 7 s-video in/out jacks . . .13, 17, 25 system menu button 22 T/C button 23 table of 3 controls, remote 22-23 copying videotapes 17 daylight saving 28-29 diagnostic test 68 digital audio 9, 16, 61 digital output 16, 61 dimmed 59 disc bar 32...
... button 24 record mode 49 record one channel/ watch another 46 record settings 49 recording audio 63 region codes 7 remote control 22-23 remote control tv operation .23 remote control used 64 remote sensor 24 repeat 40 repeat a-b 31, 40 repeat playback 40 resume 20, 53 return button 22 reverse searching 38...sur (surround 37,62 svcd 7 s-video in/out jacks . . .13, 17, 25 system menu button 22 T/C button 23 table of 3 controls, remote 22-23 copying videotapes 17 daylight saving 28-29 diagnostic test 68 digital audio 9, 16, 61 digital output 16, 61 dimmed 59 disc bar 32...


