
User manual
Page 3
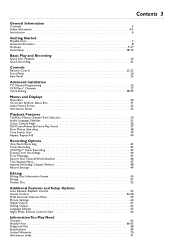
...Information Contents 3 Safety Information 4-5 Introduction 6 Getting Started Playable Discs 7 General Information 8 Hookups 9-17 Initial Setup 18-19 Basic Play and Recording Quick Disc Playback 20 Quick Recording 21 Controls Remote Control 22-23 Front Panel 24 Rear Panel 25 Advanced Installation TV Channel Programming...50 Editing 51 Finalize Disc 52 Additional Features and Setup Options Auto Resume, Playback Control 53 Access Control 54-58 DVD Recorder Features Menu 59 Picture Settings 60 Digital Output 61 Analog Output 62 Language Settings 63 Night Mode, Remote Control Used...
...Information Contents 3 Safety Information 4-5 Introduction 6 Getting Started Playable Discs 7 General Information 8 Hookups 9-17 Initial Setup 18-19 Basic Play and Recording Quick Disc Playback 20 Quick Recording 21 Controls Remote Control 22-23 Front Panel 24 Rear Panel 25 Advanced Installation TV Channel Programming...50 Editing 51 Finalize Disc 52 Additional Features and Setup Options Auto Resume, Playback Control 53 Access Control 54-58 DVD Recorder Features Menu 59 Picture Settings 60 Digital Output 61 Analog Output 62 Language Settings 63 Night Mode, Remote Control Used...
User manual
Page 9
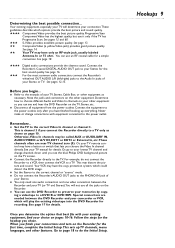
...may have finished hooking up TV channels, menu languages, and other equipment so you can see the blue Philips DVD background picture on page 10. q Do not connect the Recorder's AUDIO OUT jacks to your lowest TV channel and change connections with your existing equipment, find your Stereo... manual for recording. Remember... See your Stereo or TV. For example, do the Initial Setup. Hookups 9 See page 16. q Refer to a TV. q Set the Stereo to your TV, Stereo, Cable Box, or other equipment. Special connections are near TV channel zero (0). See page 17 for a ...
...may have finished hooking up TV channels, menu languages, and other equipment so you can see the blue Philips DVD background picture on page 10. q Do not connect the Recorder's AUDIO OUT jacks to your lowest TV channel and change connections with your existing equipment, find your Stereo... manual for recording. Remember... See your Stereo or TV. For example, do the Initial Setup. Hookups 9 See page 16. q Refer to a TV. q Set the Stereo to your TV, Stereo, Cable Box, or other equipment. Special connections are near TV channel zero (0). See page 17 for a ...
User manual
Page 17
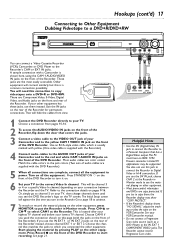
... are complete, connect all the equipment. Or, simply go to channel 5 on the front of the DVD Recorder. See your TV to the correct Video In channel. Hookups (cont'd) 17 Connecting to Other Equipment Dubbing Videotape to a DVD+R/DVD+RW STANDBY-ON OPEN/CLOSE You can use this jack to connect the... Recorder to Digital Video or Hi-8 camcorders. Use an RCA-style video cable, which you connected the ...
... are complete, connect all the equipment. Or, simply go to channel 5 on the front of the DVD Recorder. See your TV to the correct Video In channel. Hookups (cont'd) 17 Connecting to Other Equipment Dubbing Videotape to a DVD+R/DVD+RW STANDBY-ON OPEN/CLOSE You can use this jack to connect the... Recorder to Digital Video or Hi-8 camcorders. Use an RCA-style video cable, which you connected the ...

User manual
Page 21
.../Satellite Receiver, set up . On a DVD+R, the Recorder automatically starts recording at the Cable Box/Satellite Receiver. Recording options are using the Recorder. See page 17. Press OPEN/CLOSE A to prepare for about three seconds to a DVD+RW/DVD+R. Recording will begin , set the DVD Recorder to record. Quick Recording 21 STANDBY-ON OPEN/CLOSE 1-2 OPEN 4 The Recorder can record TV programming onto a DVD+RW or...
.../Satellite Receiver, set up . On a DVD+R, the Recorder automatically starts recording at the Cable Box/Satellite Receiver. Recording options are using the Recorder. See page 17. Press OPEN/CLOSE A to prepare for about three seconds to a DVD+RW/DVD+R. Recording will begin , set the DVD Recorder to record. Quick Recording 21 STANDBY-ON OPEN/CLOSE 1-2 OPEN 4 The Recorder can record TV programming onto a DVD+RW or...
User manual
Page 22
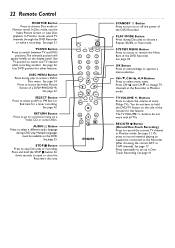
In Monitor mode, watch one TV channel while recording another. TV/DVD Button Press to switch between TV and DVD positions.The selected position will appear briefly on a Video CD or some Philips TVs. Use DVD position for this feature. See page 32. SELECT Button Press to acknowledge or approve a menu ...the correct EXT or CAM channel). Buttons Press to watch TV channels through the DVD Recorder or make a recording. See page 41. In Disc mode, use the Index Picture Screen or view Disc playback. See page 17. Use TV position to adjust the volume of the remote for other features....
In Monitor mode, watch one TV channel while recording another. TV/DVD Button Press to switch between TV and DVD positions.The selected position will appear briefly on a Video CD or some Philips TVs. Use DVD position for this feature. See page 32. SELECT Button Press to acknowledge or approve a menu ...the correct EXT or CAM channel). Buttons Press to watch TV channels through the DVD Recorder or make a recording. See page 41. In Disc mode, use the Index Picture Screen or view Disc playback. See page 17. Use TV position to adjust the volume of the remote for other features....
User manual
Page 24
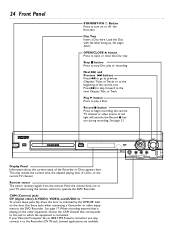
... Track. See page 21. This may connect it to the DVD Recorder. When recording material that corresponds to the jack to stop Disc play a Disc. A red light will encircle the Record I button Press to turn on or off the Recorder. CAM (Camera) jacks DV (digital video), S-VIDEO, VIDEO... status of the current one. See page 17. Stop C button Press to which the equipment is playing on the door. Record I button during recording. S-VIDEO VIDEO L AUDIO R CAM 1 24 Front Panel STANDBY-ON y Button Press to begin recording the current TV channel or video source. ...
... Track. See page 21. This may connect it to the DVD Recorder. When recording material that corresponds to the jack to stop Disc play a Disc. A red light will encircle the Record I button Press to turn on or off the Recorder. CAM (Camera) jacks DV (digital video), S-VIDEO, VIDEO... status of the current one. See page 17. Stop C button Press to which the equipment is playing on the door. Record I button during recording. S-VIDEO VIDEO L AUDIO R CAM 1 24 Front Panel STANDBY-ON y Button Press to begin recording the current TV channel or video source. ...

User manual
Page 25
... Use the supplied audio cables (red and white) to connect these jacks to connect the DVD Recorder directly to the S- DIGITAL AUDIO OUT Helpful Hints • Use the same EXT (external) number for example, a DVD Player). COMPONENT VIDEO (Y PB PR): Connect the supplied three-strand component video cable here ...you use IN EXT 2 S-VIDEO (Y/C), use all the jacks. Rear Panel 25 MAINS jack Connect the supplied AC power cord here. See page 17. See page 17. • AUDIO L/R (left /right): Connect audio cables here and to the digital audio coaxial In jack of the jacks. Coaxial DIGITAL AUDIO...
... Use the supplied audio cables (red and white) to connect these jacks to connect the DVD Recorder directly to the S- DIGITAL AUDIO OUT Helpful Hints • Use the same EXT (external) number for example, a DVD Player). COMPONENT VIDEO (Y PB PR): Connect the supplied three-strand component video cable here ...you use IN EXT 2 S-VIDEO (Y/C), use all the jacks. Rear Panel 25 MAINS jack Connect the supplied AC power cord here. See page 17. See page 17. • AUDIO L/R (left /right): Connect audio cables here and to the digital audio coaxial In jack of the jacks. Coaxial DIGITAL AUDIO...

User manual
Page 57
...rating between 1-8, and scenes with the same rating or lower will appear in this menu only when a non-finalized DVD+R is in the Recorder. Enter the four-digit code to standard U.S. NC-17 6 - G • Finalize disc will play . Select "0" (- -) to deactivate Parental level.The entire ... Number buttons to 8. W X YZ a ~ 1 2 1en off no off s Access control Auto resume Finalize disc [] [] [] [] Enter code MONITOR STANDBY TV / DVD T / C PLAY MODE REC. R 4 - to select in the second screen, then press :. Follow the steps below to set the Parental Level at the top of...
...rating between 1-8, and scenes with the same rating or lower will appear in this menu only when a non-finalized DVD+R is in the Recorder. Enter the four-digit code to standard U.S. NC-17 6 - G • Finalize disc will play . Select "0" (- -) to deactivate Parental level.The entire ... Number buttons to 8. W X YZ a ~ 1 2 1en off no off s Access control Auto resume Finalize disc [] [] [] [] Enter code MONITOR STANDBY TV / DVD T / C PLAY MODE REC. R 4 - to select in the second screen, then press :. Follow the steps below to set the Parental Level at the top of...
User manual
Page 69
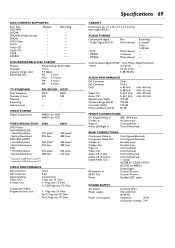
...AC 50/60 Hz Operation 29 W Low-power standby 3 W Sony Philips Digital Interface) • PCM 2-channel - 16, 20, 24 bit fs 48, 96 kHz AUDIO PERFORMANCE DA Converter AD Converter DVD Video CD Audio CD Signal-Noise (1kHz) Dynamic Range (1kHz) Crosstalk ...CABINET Dimensions (w x h x d): 17 x 3 x 13 inches Net weight: 8.8 lbs. DISC FORMATS SUPPORTED Disc type DVD+RW DVD+R DVD-RW (Video format) DVD-R DVD-Video SVCD Video CD Audio CD CD-R CD-RW Playback Recording DVD+REWRITABLE DISC FORMAT Medium Diameter Capacity (single side) Recording time Phase-Change ReWritable 12 cm ...
...AC 50/60 Hz Operation 29 W Low-power standby 3 W Sony Philips Digital Interface) • PCM 2-channel - 16, 20, 24 bit fs 48, 96 kHz AUDIO PERFORMANCE DA Converter AD Converter DVD Video CD Audio CD Signal-Noise (1kHz) Dynamic Range (1kHz) Crosstalk ...CABINET Dimensions (w x h x d): 17 x 3 x 13 inches Net weight: 8.8 lbs. DISC FORMATS SUPPORTED Disc type DVD+RW DVD+R DVD-RW (Video format) DVD-R DVD-Video SVCD Video CD Audio CD CD-R CD-RW Playback Recording DVD+REWRITABLE DISC FORMAT Medium Diameter Capacity (single side) Recording time Phase-Change ReWritable 12 cm ...
User manual
Page 71
...63 playback control 53 playing a disc 20 pluscode 43, 45 power cord 10-16, 25 preserving memories 17 previous j button 23, 24, 34, 38 progressive scan 12, 60 protection 50 quick disc playback 20 quick recording 21 rear panel 25 rec/otr I button . . . . .21-22, 41 rec mode button... panel 24, 59 divide title 51 dolby surround 37, 62 dts 16 dv (digital video 17, 24 dvd/tv button/switch 23 dvd recorder features menu . .59 editing 50-51 erase disc 50 erase this title 47 erasing timer recordings . . . . .44 error messages 45 fast motion 30 favorite scene selection . . . . .51 ...
...63 playback control 53 playing a disc 20 pluscode 43, 45 power cord 10-16, 25 preserving memories 17 previous j button 23, 24, 34, 38 progressive scan 12, 60 protection 50 quick disc playback 20 quick recording 21 rear panel 25 rec/otr I button . . . . .21-22, 41 rec mode button... panel 24, 59 divide title 51 dolby surround 37, 62 dts 16 dv (digital video 17, 24 dvd/tv button/switch 23 dvd recorder features menu . .59 editing 50-51 erase disc 50 erase this title 47 erasing timer recordings . . . . .44 error messages 45 fast motion 30 favorite scene selection . . . . .51 ...


