
Leaflet
Page 1
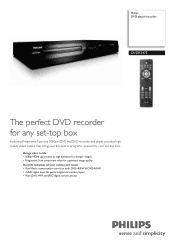
Philips DVD player/recorder DVDR3475 The perfect DVD recorder for perfect digital camcorder copies • Plays DivX, MP3 and JPEG digital camera photos Brings video to life • 1080p HDMI upconverts to high definition for sharper images • Progressive Scan component video for optimized image quality Records and plays ... records on both DVD+R/RW & DVD-R/RW • i.LINK digital input for any set-top box Featuring Progressive Scan and 1080p HDMI, this DVD recorder and player provides high quality video output that brings out the best in programs received by your set-top box.
Philips DVD player/recorder DVDR3475 The perfect DVD recorder for perfect digital camcorder copies • Plays DivX, MP3 and JPEG digital camera photos Brings video to life • 1080p HDMI upconverts to high definition for sharper images • Progressive Scan component video for optimized image quality Records and plays ... records on both DVD+R/RW & DVD-R/RW • i.LINK digital input for any set-top box Featuring Progressive Scan and 1080p HDMI, this DVD recorder and player provides high quality video output that brings out the best in programs received by your set-top box.
Leaflet
Page 2
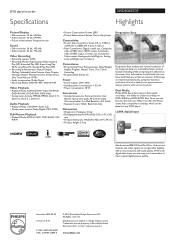
... single cable digitally, with no loss in their respective owners. DVD player/recorder Specifications DVDR3475/37 Highlights Picture/Display • D/A converter: 10 bit, 54 MHz •...), S-video in • Rear Connections: Digital coaxial out, Composite video (CVBS) input, HDMI output, Composite video (CVBS) output, S-Video out, Component Video output, Analog audio Left/...2.4 kg • Progressive Scan Progressive Scan doubles the vertical resolution of Koninklijke Philips Electronics N.V. Trademarks are written at one time. Specifications are subject to create ...
... single cable digitally, with no loss in their respective owners. DVD player/recorder Specifications DVDR3475/37 Highlights Picture/Display • D/A converter: 10 bit, 54 MHz •...), S-video in • Rear Connections: Digital coaxial out, Composite video (CVBS) input, HDMI output, Composite video (CVBS) output, S-Video out, Component Video output, Analog audio Left/...2.4 kg • Progressive Scan Progressive Scan doubles the vertical resolution of Koninklijke Philips Electronics N.V. Trademarks are written at one time. Specifications are subject to create ...
User manual
Page 5
...:56:07 Avoid locations subject to out. Also, please take a moment to the representative. Our representatives will be happy to clean the unit. philips.com/welcome Cleaning the cabinet • Wipe the front panel and other exterior surfaces of the unit with a soft, slightly damp cloth. •...define the cause of malfunction. • With an AM radio: Tune an AM radio to "TROUBLESHOOTING" in camera of cellular phone). HDMI, the HDMI logo and HighDefinition Multimedia Interface are having, and be prepared to explain this user manual, the laser optical pickup unit may be fluttering ...
...:56:07 Avoid locations subject to out. Also, please take a moment to the representative. Our representatives will be happy to clean the unit. philips.com/welcome Cleaning the cabinet • Wipe the front panel and other exterior surfaces of the unit with a soft, slightly damp cloth. •...define the cause of malfunction. • With an AM radio: Tune an AM radio to "TROUBLESHOOTING" in camera of cellular phone). HDMI, the HDMI logo and HighDefinition Multimedia Interface are having, and be prepared to explain this user manual, the laser optical pickup unit may be fluttering ...
User manual
Page 6
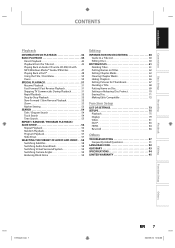
... Panel Display 12 Connections CONNECTION TO AN EXTERNAL TUNER 13 SETTINGS FOR THE VIDEO INPUT 14 CONNECTION TO A TV 15 CONNECTION TO A TV WITH AN HDMI COMPATIBLE PORT 16 CONNECTION TO AN AUDIO SYSTEM 18 Basic Setup GUIDE TO ON-SCREEN DISPLAYS AND MENUS . . . . 19 On-Screen Display / Menu 19 Main...
... Panel Display 12 Connections CONNECTION TO AN EXTERNAL TUNER 13 SETTINGS FOR THE VIDEO INPUT 14 CONNECTION TO A TV 15 CONNECTION TO A TV WITH AN HDMI COMPATIBLE PORT 16 CONNECTION TO AN AUDIO SYSTEM 18 Basic Setup GUIDE TO ON-SCREEN DISPLAYS AND MENUS . . . . 19 On-Screen Display / Menu 19 Main...
User manual
Page 7
... Protect 70 Erasing Disc 71 Making Edits Compatible 72 Function Setup LIST OF SETTINGS 73 SETUPS 75 Playback 75 Display 79 Video 81 DivX 83 HDMI 84 Reset All 86 Others TROUBLESHOOTING 87 Frequently Asked Questions 91 LANGUAGE CODE 92 GLOSSARY 93 SPECIFICATIONS 94 LIMITED WARRANTY 95 Recording Playback Editing Function...
... Protect 70 Erasing Disc 71 Making Edits Compatible 72 Function Setup LIST OF SETTINGS 73 SETUPS 75 Playback 75 Display 79 Video 81 DivX 83 HDMI 84 Reset All 86 Others TROUBLESHOOTING 87 Frequently Asked Questions 91 LANGUAGE CODE 92 GLOSSARY 93 SPECIFICATIONS 94 LIMITED WARRANTY 95 Recording Playback Editing Function...
User manual
Page 8
...discs on a regular DVD player: Recorded discs can enjoy clearer audio/video output when connecting this unit, the signal from the E2 only). HDMI (High-Definition Multimedia Interface) You can be output even when the power of the symbols listed above under the function heading, the operation is...chapter mark setting: Chapter marks will automatically be put the following features are also available. Hiding chapters: To keep others from discs with an HDMI-compatible port. E7E4AUD.indd 8 2007/05/16 14:56:08 Even if you choose DVD-RW/-R, these discs will be recorded in the ...
...discs on a regular DVD player: Recorded discs can enjoy clearer audio/video output when connecting this unit, the signal from the E2 only). HDMI (High-Definition Multimedia Interface) You can be output even when the power of the symbols listed above under the function heading, the operation is...chapter mark setting: Chapter marks will automatically be put the following features are also available. Hiding chapters: To keep others from discs with an HDMI-compatible port. E7E4AUD.indd 8 2007/05/16 14:56:08 Even if you choose DVD-RW/-R, these discs will be recorded in the ...
User manual
Page 9
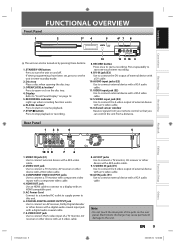
...IN OUT Y L PB/CB L R AV IN IN R PR/CR OUT S-VIDEO AV OUT COMPONENT VIDEO OUTPUT S-VIDEO HDMI OUT COAXIAL DIGITAL AUDIO OUTPUT PCM / BITSTREAM 10 9 8 7 6 1. HDMI OUT jack Use an HDMI cable to connect to connect external device with a RCA audio cable. AC Power Cord Connect to a standard AC outlet... to supply power to "Front Panel Display" on and off. S-VIDEO IN jack (E1) Use to connect external device with an HDMI compatible port. 5. Display Refer to this unit. 6. VIDEO IN jack (E1) Use to connect the S-video output of a TV monitor, AV receiver ...
...IN OUT Y L PB/CB L R AV IN IN R PR/CR OUT S-VIDEO AV OUT COMPONENT VIDEO OUTPUT S-VIDEO HDMI OUT COAXIAL DIGITAL AUDIO OUTPUT PCM / BITSTREAM 10 9 8 7 6 1. HDMI OUT jack Use an HDMI cable to connect to connect external device with a RCA audio cable. AC Power Cord Connect to a standard AC outlet... to supply power to "Front Panel Display" on and off. S-VIDEO IN jack (E1) Use to connect external device with an HDMI compatible port. 5. Display Refer to this unit. 6. VIDEO IN jack (E1) Use to connect the S-video output of a TV monitor, AV receiver ...
User manual
Page 11
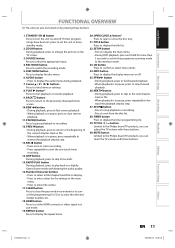
...6. RAPID PLAY button During playback, press to play back in a slightly faster/slower mode with these buttons. Number/Character buttons • Press to the Philips brand TV products, you can adjust the TV volume with these buttons. 1. OPEN/CLOSE A button* Press to exit from the title list. 28. STOP...products, you can mute the TV volume with keeping the audio quality. 16. SKIP button During playback, press to set the HDMI connector's video signal output mode. 19. HDMI button Press to skip 30 seconds. 15. SETUP button • Press to display the main menu. • During DVD ...
...6. RAPID PLAY button During playback, press to play back in a slightly faster/slower mode with these buttons. Number/Character buttons • Press to the Philips brand TV products, you can adjust the TV volume with these buttons. 1. OPEN/CLOSE A button* Press to exit from the title list. 28. STOP...products, you can mute the TV volume with keeping the audio quality. 16. SKIP button During playback, press to set the HDMI connector's video signal output mode. 19. HDMI button Press to skip 30 seconds. 15. SETUP button • Press to display the main menu. • During DVD ...

User manual
Page 12
... : Flashes when a recording pauses. : Appears when a disc is in the afternoon with the clock display. 2. Appears when HDMI output mode (1080i) is selected. Appears when HDMI output mode (1080p) is loaded on a disc. 12 EN Appears when the PBC function is closing. Appears when a disc ...• Selected external input position • Remaining time for one-touch timer recording • Selected HDMI OUTPUT mode Display Message Appears when the disc tray is selected. Appears when HDMI output mode (720p) is opening. Appears when the disc tray is activated. (Video CD playback...
... : Flashes when a recording pauses. : Appears when a disc is in the afternoon with the clock display. 2. Appears when HDMI output mode (1080i) is selected. Appears when HDMI output mode (1080p) is loaded on a disc. 12 EN Appears when the PBC function is closing. Appears when a disc ...• Selected external input position • Remaining time for one-touch timer recording • Selected HDMI OUTPUT mode Display Message Appears when the disc tray is selected. Appears when HDMI output mode (720p) is opening. Appears when the disc tray is activated. (Video CD playback...
User manual
Page 13
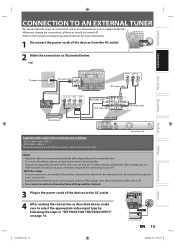
...OUTPUT S-VIDEO external tuner S-video cable VIDEO VIDEO IN OUT Y L PB/CB L R AV IN IN R PR/CR OUT S-VIDEO AV OUT COMPONENT VIDEO OUTPUT S-VIDEO HDMI OUT COAXIAL DIGITAL AUDIO OUTPUT PCM / BITSTREAM Supplied cables used in "SETTINGS FOR THE VIDEO INPUT" IN VIDEO IN Y VIDEO... HDMI OUT OUT on the external tuner. Be sure that the external tuner is off . • Refer to the manual accompanying external devices foarntmenonare information. 2 1 ...
...OUTPUT S-VIDEO external tuner S-video cable VIDEO VIDEO IN OUT Y L PB/CB L R AV IN IN R PR/CR OUT S-VIDEO AV OUT COMPONENT VIDEO OUTPUT S-VIDEO HDMI OUT COAXIAL DIGITAL AUDIO OUTPUT PCM / BITSTREAM Supplied cables used in "SETTINGS FOR THE VIDEO INPUT" IN VIDEO IN Y VIDEO... HDMI OUT OUT on the external tuner. Be sure that the external tuner is off . • Refer to the manual accompanying external devices foarntmenonare information. 2 1 ...

User manual
Page 14
General Setting Playback Display Video Recording Clock DivX HDMI Reset All Progressive Scan TV Aspect Video InpVuidteo Input E1 (Rear) E2 (Front) 5 Use [K / L] to select the input jack type to exit. 14 EN E7E4AUD.... you are using before making a recording. 1 Press [SETUP] and use [K / L] to select "General Setting", then press [OK]. General Setting Playback Display Video Recording Clock DivX HDMI Reset All Progressive Scan TV Aspect E1V(Rideeaor)InpVuidteo Input E1Vi(dReeoarIn) E2S-(VFirdoenot)In 6 Press [SETUP] to connect, then press [OK]. SETTINGS FOR THE...
General Setting Playback Display Video Recording Clock DivX HDMI Reset All Progressive Scan TV Aspect Video InpVuidteo Input E1 (Rear) E2 (Front) 5 Use [K / L] to select the input jack type to exit. 14 EN E7E4AUD.... you are using before making a recording. 1 Press [SETUP] and use [K / L] to select "General Setting", then press [OK]. General Setting Playback Display Video Recording Clock DivX HDMI Reset All Progressive Scan TV Aspect E1V(Rideeaor)InpVuidteo Input E1Vi(dReeoarIn) E2S-(VFirdoenot)In 6 Press [SETUP] to connect, then press [OK]. SETTINGS FOR THE...
User manual
Page 15
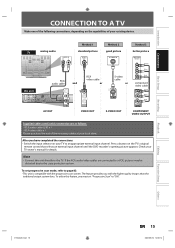
... RCA audio cable and RCA video cable or S-video cable or this unit VIDEO VIDEO IN OUT Y L PB/CB L R IN R AV IN S-VIDEO AV OUT HDMI OUT COAXIAL DIGITAL AUDIO OUTPUT PCM / BITSTREAM AV OUT VIDEO OUT L R AV OUT VIDEO OUT L R AV OUT VIDEO OUT OUT S-VIDEO S-VIDEO OUT better picture...
... RCA audio cable and RCA video cable or S-video cable or this unit VIDEO VIDEO IN OUT Y L PB/CB L R IN R AV IN S-VIDEO AV OUT HDMI OUT COAXIAL DIGITAL AUDIO OUTPUT PCM / BITSTREAM AV OUT VIDEO OUT L R AV OUT VIDEO OUT L R AV OUT VIDEO OUT OUT S-VIDEO S-VIDEO OUT better picture...
User manual
Page 16
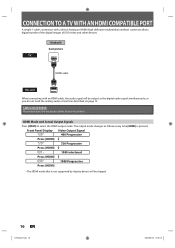
...interface) connector allows digital transfer of the digital images of DVD-video and other devices. The output mode changes as follows every time [HDMI] is not supported by display device will be skipped. 16 EN E7E4AUD.indd 16 2007/05/16 14:56:15 Please purchase the ...necessary cables at your local store. HDMI Mode and Actual Output Signals Press [HDMI] to select the HDMI output mode. Cables not included. CONNECTION TO A TV WITH AN HDMI COMPATIBLE PORT A simple 1-cable connection with an HDMI cable, the audio signal will be output as the digital...
...interface) connector allows digital transfer of the digital images of DVD-video and other devices. The output mode changes as follows every time [HDMI] is not supported by display device will be skipped. 16 EN E7E4AUD.indd 16 2007/05/16 14:56:15 Please purchase the ...necessary cables at your local store. HDMI Mode and Actual Output Signals Press [HDMI] to select the HDMI output mode. Cables not included. CONNECTION TO A TV WITH AN HDMI COMPATIBLE PORT A simple 1-cable connection with an HDMI cable, the audio signal will be output as the digital...
User manual
Page 17
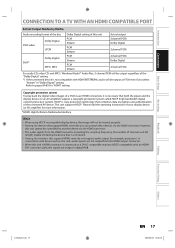
...• Among the devices that comprises data encryption and authentication of channels and bit length) maybe limited by another device via an HDMI connection, it is connected. • Among the monitors that both the player and the display device (or an AV amplifier) support... a copyright protection system called HDCP (high-bandwidth digital content protection system). Refer to a DVI-D compatible monitor (HDCP compatible) with HDMI BITSTREAM, audio will be output as this unit, audio signals are output in "Dolby Digital" setting. Copyright protection system To play back ...
...• Among the devices that comprises data encryption and authentication of channels and bit length) maybe limited by another device via an HDMI connection, it is connected. • Among the monitors that both the player and the display device (or an AV amplifier) support... a copyright protection system called HDCP (high-bandwidth digital content protection system). Refer to a DVI-D compatible monitor (HDCP compatible) with HDMI BITSTREAM, audio will be output as this unit, audio signals are output in "Dolby Digital" setting. Copyright protection system To play back ...
User manual
Page 18
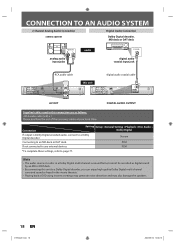
... audio COAXIAL digital audio coaxial input jack RCA audio cable VIDEO VIDEO IN OUT Y L PB/CB L R IN R AV IN S-VIDEO AV OUT HDMI OUT COAXIAL DIGITAL AUDIO OUTPUT PCM / BITSTREAM VIDEO OUT L AV OUT R AV OUT digital audio coaxial cable this unit VIDEO VIDEO IN OUT Y L... PB/CB L R AV IN IN R PR/CR OUT S-VIDEO AV OUT COMPONENT VIDEO OUTPUT S-VIDEO HDMI OUT COAXIAL DIGITAL AUDIO OUTPUT PCM / BITSTREAM COAXIAL DIGITAL AUDIO OUTPUT PCM / BITSTREAM DIGITAL AUDIO OUTPUT Supplied cables used in the movie theaters. •...
... audio COAXIAL digital audio coaxial input jack RCA audio cable VIDEO VIDEO IN OUT Y L PB/CB L R IN R AV IN S-VIDEO AV OUT HDMI OUT COAXIAL DIGITAL AUDIO OUTPUT PCM / BITSTREAM VIDEO OUT L AV OUT R AV OUT digital audio coaxial cable this unit VIDEO VIDEO IN OUT Y L... PB/CB L R AV IN IN R PR/CR OUT S-VIDEO AV OUT COMPONENT VIDEO OUTPUT S-VIDEO HDMI OUT COAXIAL DIGITAL AUDIO OUTPUT PCM / BITSTREAM COAXIAL DIGITAL AUDIO OUTPUT PCM / BITSTREAM DIGITAL AUDIO OUTPUT Supplied cables used in the movie theaters. •...
User manual
Page 19
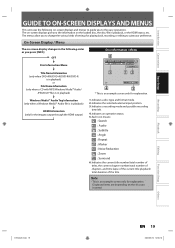
...Angle : Repeat : Marker : Noise Reduction : Zoom : Surround 6. Note • This is an example screen only for the images output through the HDMI output) 1. The on-screen displays give you the information on the disc you inserted. Introduction Connections Basic Setup Recording GUIDE TO ON-SCREEN DISPLAYS AND...This unit uses the following order as you press [INFO]. On-Screen Display / Menu The on-screen display changes in playback) HDMI Information (only for explanation. Indicates a disc type and format mode. 2. Playback Editing Function Setup Others E7E4AUD.indd 19 EN 19...
...Angle : Repeat : Marker : Noise Reduction : Zoom : Surround 6. Note • This is an example screen only for the images output through the HDMI output) 1. The on-screen displays give you the information on the disc you inserted. Introduction Connections Basic Setup Recording GUIDE TO ON-SCREEN DISPLAYS AND...This unit uses the following order as you press [INFO]. On-Screen Display / Menu The on-screen display changes in playback) HDMI Information (only for explanation. Indicates a disc type and format mode. 2. Playback Editing Function Setup Others E7E4AUD.indd 19 EN 19...

User manual
Page 20
... image. 2. Displays title/file name. Windows Media™ Audio Tag Information Artist Name 1 1. Indicates an operation status. 1. Indicates the HDMI audio format. 4. Indicates the HDMI video format. 3. Indicates artist/title information (only when available) • First, artist name will be displayed. • If you press [INFO] one more time, title ...
... image. 2. Displays title/file name. Windows Media™ Audio Tag Information Artist Name 1 1. Indicates an operation status. 1. Indicates the HDMI audio format. 4. Indicates the HDMI video format. 3. Indicates artist/title information (only when available) • First, artist name will be displayed. • If you press [INFO] one more time, title ...
User manual
Page 21
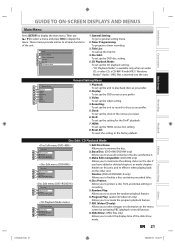
... PBC (playback control) function. 8. These menus provide entries to the factory default. Recording: To set up the video setting. 4. HDMI: To set up the OSD screen as you prefer. 3. Introduction Connections Basic Setup Recording Playback GUIDE TO ON-SCREEN DISPLAYS AND MENUS ... to activate the random playback feature. 6. Video: To set up the unit to record to rename the disc. 2. Display: To set up the HDMI connection setting. 8. Disc Edit / CD Playback Mode Disc Edit 1 2 Edit Disc Name Erase Disc 3 Make Edits Compatible 4 Disc Protect OFF ON ...
... PBC (playback control) function. 8. These menus provide entries to the factory default. Recording: To set up the video setting. 4. HDMI: To set up the OSD screen as you prefer. 3. Introduction Connections Basic Setup Recording Playback GUIDE TO ON-SCREEN DISPLAYS AND MENUS ... to activate the random playback feature. 6. Video: To set up the unit to record to rename the disc. 2. Display: To set up the HDMI connection setting. 8. Disc Edit / CD Playback Mode Disc Edit 1 2 Edit Disc Name Erase Disc 3 Make Edits Compatible 4 Disc Protect OFF ON ...

User manual
Page 23
General Setting Playback Display Video Clock Setting Recording Clock JAN / 01 / 2007 ( MON ) DivX 12 : 00 AM HDMI Reset All Your setting will be lost if either there is a power failure or this unit has been unplugged for more than 30 seconds. • ...]. 3 Use [K / L] to suit your preference, then press [OK]. General Setting Playback Display Video Clock Setting Recording Clock JAN / 01 / 2007 ( MON ) DivX 12 : 00 AM HDMI Reset All 4 Use [{ / B] to select an item to set the built-in calendar from the year 2007 up to select "General Setting", then press [OK...
General Setting Playback Display Video Clock Setting Recording Clock JAN / 01 / 2007 ( MON ) DivX 12 : 00 AM HDMI Reset All Your setting will be lost if either there is a power failure or this unit has been unplugged for more than 30 seconds. • ...]. 3 Use [K / L] to suit your preference, then press [OK]. General Setting Playback Display Video Clock Setting Recording Clock JAN / 01 / 2007 ( MON ) DivX 12 : 00 AM HDMI Reset All 4 Use [{ / B] to select an item to set the built-in calendar from the year 2007 up to select "General Setting", then press [OK...

User manual
Page 25
...other unit recordable on the remaining time of the disc. 5) Press [SETUP] to exit. General Setting Playback Display Video Recording Clock DivX HDMI Reset All Auto Chapter Make RecordAinugtoCFoimnaplaiztieble Make Recording Compatible ON OFF ON: OFF: Title list will appear. 3) Use [K / L] to... press [OK]. 2) Use [K / L] to select "ON" or "OFF", then press [OK]. General Setting Playback Display Video Recording Clock DivX HDMI Reset All Auto Chapter Auto ChaptAeur to Finalize Make Recording Compatible OFF 5 minutes 10 minutes 15 minutes 30 minutes 60 minutes 5) Press [SETUP] to select...
...other unit recordable on the remaining time of the disc. 5) Press [SETUP] to exit. General Setting Playback Display Video Recording Clock DivX HDMI Reset All Auto Chapter Make RecordAinugtoCFoimnaplaiztieble Make Recording Compatible ON OFF ON: OFF: Title list will appear. 3) Use [K / L] to... press [OK]. 2) Use [K / L] to select "ON" or "OFF", then press [OK]. General Setting Playback Display Video Recording Clock DivX HDMI Reset All Auto Chapter Auto ChaptAeur to Finalize Make Recording Compatible OFF 5 minutes 10 minutes 15 minutes 30 minutes 60 minutes 5) Press [SETUP] to select...