
Leaflet
Page 3
... 12 NC: 8622 810 13241 UPC: 6 09585 11203 2 © 2009 Koninklijke Philips Electronics N.V. or their respective owners. www.philips.com DVD recorder/VCR with i.LINK digital input Specifications DVDR3435V/37 Picture/Display • A/D converter: 10 bit, 54 MHz • D/A ...Left/ Right out 2x Convenience • Programmable Events: 8 • Programming/Timer Enhancements: VCR Plus+, One Touch Recording, Daily/Weekly Repeat Program, Manual Timer • Programming Period: 1 month Power • Power supply: 120V, 60Hz • Power consumption: 30 W • Standby power consumption...
... 12 NC: 8622 810 13241 UPC: 6 09585 11203 2 © 2009 Koninklijke Philips Electronics N.V. or their respective owners. www.philips.com DVD recorder/VCR with i.LINK digital input Specifications DVDR3435V/37 Picture/Display • A/D converter: 10 bit, 54 MHz • D/A ...Left/ Right out 2x Convenience • Programmable Events: 8 • Programming/Timer Enhancements: VCR Plus+, One Touch Recording, Daily/Weekly Repeat Program, Manual Timer • Programming Period: 1 month Power • Power supply: 120V, 60Hz • Power consumption: 30 W • Standby power consumption...

User manual
Page 5
... although you can cause this unit becomes inoperative, do not adhere to locate an Authorized Service Center. CLEANING THE DISC LENS • If this User Manual, the laser optical pickup unit may be cleaned. 1. If a Video Head Cleaner does not solve the problem, please call our help line mentioned on all...
... although you can cause this unit becomes inoperative, do not adhere to locate an Authorized Service Center. CLEANING THE DISC LENS • If this User Manual, the laser optical pickup unit may be cleaned. 1. If a Video Head Cleaner does not solve the problem, please call our help line mentioned on all...

User manual
Page 6
6 Table of contents Before you start Precautions 2 Table of contents 6 Features 7 Symbol in this User Manual 7 Functional overview 8 Installing batteries in the remote control 10 Using a remote control 10 The VCR/DVD recorder switching 10 Setup menus 11 Display menu ...automatically 20 Adding/deleting channels 21 Guide channel setting 22 Selecting the TV stereo or SAP 24 Setting the clock 25 Auto Clock Setting 25 Manual Clock Setting 26 Setting the Daylight Saving Time 27 Selecting the TV aspect ratio 27 Recording Information on DVD recording 28 Information 28 Recordable disc...
6 Table of contents Before you start Precautions 2 Table of contents 6 Features 7 Symbol in this User Manual 7 Functional overview 8 Installing batteries in the remote control 10 Using a remote control 10 The VCR/DVD recorder switching 10 Setup menus 11 Display menu ...automatically 20 Adding/deleting channels 21 Guide channel setting 22 Selecting the TV stereo or SAP 24 Setting the clock 25 Auto Clock Setting 25 Manual Clock Setting 26 Setting the Daylight Saving Time 27 Selecting the TV aspect ratio 27 Recording Information on DVD recording 28 Information 28 Recordable disc...

User manual
Page 7
.... You will be played on regular DVD players, including computer DVD drives compatible with DivX® files Available to VHS tapes. Symbol in this User Manual To specify for what disc type each function is, we put your home: When connecting the unit to an amplifier or a decoder which are also...
.... You will be played on regular DVD players, including computer DVD drives compatible with DivX® files Available to VHS tapes. Symbol in this User Manual To specify for what disc type each function is, we put your home: When connecting the unit to an amplifier or a decoder which are also...

User manual
Page 12
... disc. Indicates current video status. 2. Indicates a current channel number and an audio status of disc play. Displayed items will give you the information on this manual, only one disc type is an example screen only for explanation. E9A90UD_EN.indb 12 6/12/2006 4:21:02 PM Some operations are available while disc...
... disc. Indicates current video status. 2. Indicates a current channel number and an audio status of disc play. Displayed items will give you the information on this manual, only one disc type is an example screen only for explanation. E9A90UD_EN.indb 12 6/12/2006 4:21:02 PM Some operations are available while disc...
User manual
Page 15
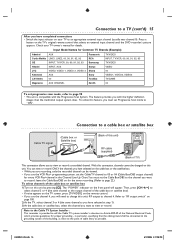
... use the channel 4, you will appear. Connection to a TV (cont'd) 15 After you have completed connections • Switch the input selector on your TV owner's manual for details. Connection to a cable box or satellite box Cable TV signal (Cable box or Satellite box) IN OUT DVD/VCR ANT-IN (Back of...
... use the channel 4, you will appear. Connection to a TV (cont'd) 15 After you have completed connections • Switch the input selector on your TV owner's manual for details. Connection to a cable box or satellite box Cable TV signal (Cable box or Satellite box) IN OUT DVD/VCR ANT-IN (Back of...

User manual
Page 16
... in the movie theaters. • The audio source on a disc in a Dolby Digital Multichannel surround format cannot be turned off. • Refer to the operation manual accompanying external devices for more information. Helpful Hints • By connecting this unit to a Multi-channel Dolby Digital decoder, you change the connections, all devices...
... in the movie theaters. • The audio source on a disc in a Dolby Digital Multichannel surround format cannot be turned off. • Refer to the operation manual accompanying external devices for more information. Helpful Hints • By connecting this unit to a Multi-channel Dolby Digital decoder, you change the connections, all devices...

User manual
Page 19
.... Initial Setup Clock Setting 5 Proceed to which the unit is available in your desired language On Screen menu. Select the input to the step 3 of "Manual Clock Setting" on page 26. • If a Public Broadcasting Station (PBS) is connected. Initial Setup English Français Español 3-4 3 Using [K / L], select your...
.... Initial Setup Clock Setting 5 Proceed to which the unit is available in your desired language On Screen menu. Select the input to the step 3 of "Manual Clock Setting" on page 26. • If a Public Broadcasting Station (PBS) is connected. Initial Setup English Français Español 3-4 3 Using [K / L], select your...
User manual
Page 21
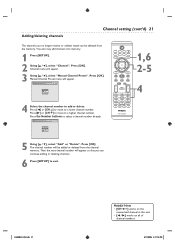
... Preset VCR DVD CH 2 Add Delete 4 Select the channel number to select a channel number directly. Manual Channel Preset VCR DVD CH 7 Add Delete TV/VIDEO VCR DVD OPEN/CLOSE SEARCH AUDIO TITLE RAPID PLAY DISC MENU SETUP OK BACK REW PLAY... number will appear so that you no longer receive or seldom watch can continue adding or deleting channels. 6 Press [SETUP] to exit. Manual Channel Preset menu will appear. 3 Using [K / L], select "Manual Channel Preset". Press [B] or [CH +] to move to a higher channel number. Press [OK]. Press the Number buttons to add or ...
... Preset VCR DVD CH 2 Add Delete 4 Select the channel number to select a channel number directly. Manual Channel Preset VCR DVD CH 7 Add Delete TV/VIDEO VCR DVD OPEN/CLOSE SEARCH AUDIO TITLE RAPID PLAY DISC MENU SETUP OK BACK REW PLAY... number will appear so that you no longer receive or seldom watch can continue adding or deleting channels. 6 Press [SETUP] to exit. Manual Channel Preset menu will appear. 3 Using [K / L], select "Manual Channel Preset". Press [B] or [CH +] to move to a higher channel number. Press [OK]. Press the Number buttons to add or ...

User manual
Page 25
... DVD REC SET 6 1,5 2-4 4 DVD RECORDER Using the Number buttons or [K / L], enter your PBS channel number: Using [K / L], select "Manual". Leave it off for the time only when the power is off the unit. Clock menu will appear. Press [OK]. Press [OK]. The Auto Clock...[OK]. Option window will appear. 3 Using [K / L], select "Auto Clock Setting". If a Public Broadcasting Station (PBS) is not correct, set the clock manually and cancel the Auto Clock Setting function: Using [K / L], select "OFF" in "Auto Clock Setting". Auto Clock Setting Make sure • The antenna/Cable...
... DVD REC SET 6 1,5 2-4 4 DVD RECORDER Using the Number buttons or [K / L], enter your PBS channel number: Using [K / L], select "Manual". Leave it off for the time only when the power is off the unit. Clock menu will appear. Press [OK]. Press [OK]. The Auto Clock...[OK]. Option window will appear. 3 Using [K / L], select "Auto Clock Setting". If a Public Broadcasting Station (PBS) is not correct, set the clock manually and cancel the Auto Clock Setting function: Using [K / L], select "OFF" in "Auto Clock Setting". Auto Clock Setting Make sure • The antenna/Cable...

User manual
Page 26
... will be lost if either there is a power failure or this unit has been unplugged for more than 30 seconds when you set the clock manually. 6/12/2006 4:21:20 PM Clock Setting VCR DVD Press [OK] again. Default date will move the cursor. Although seconds are not displayed, they begin... move on AM. A cursor will appear. 4 Using [K / L], enter the date (month / day / year). Clock Setting menu will appear. Press [OK]. 26 Setting the clock (cont'd) Manual Clock Setting 1 Press [SETUP]. 2 Using [K / L], select "Clock".
... will be lost if either there is a power failure or this unit has been unplugged for more than 30 seconds when you set the clock manually. 6/12/2006 4:21:20 PM Clock Setting VCR DVD Press [OK] again. Default date will move the cursor. Although seconds are not displayed, they begin... move on AM. A cursor will appear. 4 Using [K / L], enter the date (month / day / year). Clock Setting menu will appear. Press [OK]. 26 Setting the clock (cont'd) Manual Clock Setting 1 Press [SETUP]. 2 Using [K / L], select "Clock".

User manual
Page 34
...appropriate recording mode to the left and the right in the Timer Programming menu. • After step 9, you have not set the clock yet: A manual clock setting menu will be stored. • To set a Timer Programming. VCR DVD CH DVD VCR Mode 8 DVD Auto Press [OK] when information... channel 2 minutes before setting a Timer Programming. • Press [{ / B] to move the cursor to complete recording the program. Continue with step 3 in "Manual Clock Setting" on the front display. will be canceled and you cannot change the channel. JAN/01 12:57AM 1:57AM 2. --- 3. ---
...appropriate recording mode to the left and the right in the Timer Programming menu. • After step 9, you have not set the clock yet: A manual clock setting menu will be stored. • To set a Timer Programming. VCR DVD CH DVD VCR Mode 8 DVD Auto Press [OK] when information... channel 2 minutes before setting a Timer Programming. • Press [{ / B] to move the cursor to complete recording the program. Continue with step 3 in "Manual Clock Setting" on the front display. will be canceled and you cannot change the channel. JAN/01 12:57AM 1:57AM 2. --- 3. ---

User manual
Page 57
... one disc. • Up to 8 hierarchies can be recognised in the 9th or deeper hierarchies cannot be displayed up DivX® files, read their instruction manual beforehand. • Never use the MPEG4 tools when you inserted a disc and pressed [PLAY B]. • When playing back the files recorded in high bit rates...
... one disc. • Up to 8 hierarchies can be recognised in the 9th or deeper hierarchies cannot be displayed up DivX® files, read their instruction manual beforehand. • Never use the MPEG4 tools when you inserted a disc and pressed [PLAY B]. • When playing back the files recorded in high bit rates...
User manual
Page 93
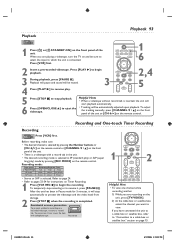
... the unit or [CH +/-] on the remote control. Playback will pause and sound will be muted. 4 Press [PLAY B] to begin playback. To adjust the tracking manually, press [CHANNEL L / K] on Timer Recording. 1 Press [VCR REC I] to resume play ) mode by pressing the Number buttons or [CH +/-] on the remote control or [CHANNEL...
... the unit or [CH +/-] on the remote control. Playback will pause and sound will be muted. 4 Press [PLAY B] to begin playback. To adjust the tracking manually, press [CHANNEL L / K] on Timer Recording. 1 Press [VCR REC I] to resume play ) mode by pressing the Number buttons or [CH +/-] on the remote control or [CHANNEL...

User manual
Page 96
...cord securely. • Check if the connecting cords are distorted. • Adjust TV antenna. • Adjust the picture (see the TV's instruction manual). • Place the unit and TV farther apart. • Place the TV and any TV program using RF connection. • Switch the ... or • The timer setting overlapped with another setting that restricts copying. • The timer setting overlapped with "Auto Channel Preset" or "Manual Channel Preset" in question and connect it again. D • There is distorted. • Keep the equipment which may eliminate the problem and...
...cord securely. • Check if the connecting cords are distorted. • Adjust TV antenna. • Adjust the picture (see the TV's instruction manual). • Place the unit and TV farther apart. • Place the TV and any TV program using RF connection. • Switch the ... or • The timer setting overlapped with another setting that restricts copying. • The timer setting overlapped with "Auto Channel Preset" or "Manual Channel Preset" in question and connect it again. D • There is distorted. • Keep the equipment which may eliminate the problem and...
User manual
Page 97
... language using the DVD-Video's menu. This is because the unit is adding disc data to automatically format a DVD+RW/DVD-RW. See the instruction manual supplied with the disc. The angles cannot be changed . • Multi-angles are not recorded on the DVD-Video being played back. • The DVD...
... language using the DVD-Video's menu. This is because the unit is adding disc data to automatically format a DVD+RW/DVD-RW. See the instruction manual supplied with the disc. The angles cannot be changed . • Multi-angles are not recorded on the DVD-Video being played back. • The DVD...
User manual
Page 103
... Care Center at least functionally equivalent or most comparable to operate in Philips current inventory, or (3) refund the original purchase price of original purchase ("Warranty Period") from state/province to operate per Owner's Manual. Philips is not liable for any programs, data, or other information is new or which has been manufactured from...
... Care Center at least functionally equivalent or most comparable to operate in Philips current inventory, or (3) refund the original purchase price of original purchase ("Warranty Period") from state/province to operate per Owner's Manual. Philips is not liable for any programs, data, or other information is new or which has been manufactured from...

Quick start guide
Page 1
... Cable TV signal or 1 Remove the Antenna or Cable TV signal from your TV. 2 Connect it to start getting channels available in the User Manual. "Initial Setup" will appear. The Recorder is ready for connection options. EN E9A90UD_QSG_EN.indd 1 5/17/2006 8:28:10 PM CH 1 Auto Presetting...Recorder. 3 Connect the supplied RF coaxial cable to which details other TV connection possibilities. Then press [OK] to the table on . DVDR3435V/37 First connect ... The unit will automatically appear. Refer to set language. "Channel Preset" will start Channel Preset.
... Cable TV signal or 1 Remove the Antenna or Cable TV signal from your TV. 2 Connect it to start getting channels available in the User Manual. "Initial Setup" will appear. The Recorder is ready for connection options. EN E9A90UD_QSG_EN.indd 1 5/17/2006 8:28:10 PM CH 1 Auto Presetting...Recorder. 3 Connect the supplied RF coaxial cable to which details other TV connection possibilities. Then press [OK] to the table on . DVDR3435V/37 First connect ... The unit will automatically appear. Refer to set language. "Channel Preset" will start Channel Preset.

Quick start guide
Page 2
... disc tray guide. Press [OK]. Printed in China 8239 300 50721 1VMN22960/E9A90UD***** Detailed playback features and additional functions are described in the accompanying User Manual. Quick Disc Recording Quick Disc Play LABEL 1 ALL LABEL STANDBY-ON 4 HEAD HI-FI STEREO ONE TOUCH RECORDING • LONG PLAY DVDR 3435V DVD RECORDER...
... disc tray guide. Press [OK]. Printed in China 8239 300 50721 1VMN22960/E9A90UD***** Detailed playback features and additional functions are described in the accompanying User Manual. Quick Disc Recording Quick Disc Play LABEL 1 ALL LABEL STANDBY-ON 4 HEAD HI-FI STEREO ONE TOUCH RECORDING • LONG PLAY DVDR 3435V DVD RECORDER...

