
Leaflet
Page 3
... UPC: 6 09585 11468 5 © 2009 Koninklijke Philips Electronics N.V. Specifications are the property of Koninklijke Philips Electronics N.V. All Rights reserved. www.philips.com DVD player/recorder Specifications DVDR3400/37 Picture/Display • D/A converter: 10 bit,...60Hz • Standby power consumption: < 3 W • Power consumption: 27 W (Typical) W Accessories • Included Accessories: Remote Control, User Manual, Quick start guide, RF antenna cable, Warranty Leaflet, 2 x AAA Batteries, Audio/Video cable • Remote Control 12NC: 242254900926 Dimensions • ...
... UPC: 6 09585 11468 5 © 2009 Koninklijke Philips Electronics N.V. Specifications are the property of Koninklijke Philips Electronics N.V. All Rights reserved. www.philips.com DVD player/recorder Specifications DVDR3400/37 Picture/Display • D/A converter: 10 bit,...60Hz • Standby power consumption: < 3 W • Power consumption: 27 W (Typical) W Accessories • Included Accessories: Remote Control, User Manual, Quick start guide, RF antenna cable, Warranty Leaflet, 2 x AAA Batteries, Audio/Video cable • Remote Control 12NC: 242254900926 Dimensions • ...

User manual
Page 9
... films are usually not released at the same time in the guarantee booklet. - This equipment should not be played back on this user manual before they can be used for identification and supply ratings. DVD±R discs have questions or if problems occur during operation, see the...of copyrights and constitute a criminal offence. The corresponding telephone numbers and e-mail addresses are keyed to a specific region code. English Introduction Your Philips recorder allows you to record TV programs or duplicate camcorder recordings to a DVD±RW or DVD±R and play Region 1 DVDs ...
... films are usually not released at the same time in the guarantee booklet. - This equipment should not be played back on this user manual before they can be used for identification and supply ratings. DVD±R discs have questions or if problems occur during operation, see the...of copyrights and constitute a criminal offence. The corresponding telephone numbers and e-mail addresses are keyed to a specific region code. English Introduction Your Philips recorder allows you to record TV programs or duplicate camcorder recordings to a DVD±RW or DVD±R and play Region 1 DVDs ...

User manual
Page 20
... VIDEO (CVBS) PR COMPONENT Y VIDEO L L R R S-VIDEO (Y/C) COAXIAL PB (DIGITAL AUDIO) AUDIO C TV AU D IO O UT S-V ID E O IN V ID E O IN Connecting to the respective connected device's user manual for the complete connections to the matching VIDEO/AUDIO output jacks on the recorder to your TV.
... VIDEO (CVBS) PR COMPONENT Y VIDEO L L R R S-VIDEO (Y/C) COAXIAL PB (DIGITAL AUDIO) AUDIO C TV AU D IO O UT S-V ID E O IN V ID E O IN Connecting to the respective connected device's user manual for the complete connections to the matching VIDEO/AUDIO output jacks on the recorder to your TV.
User manual
Page 21
.../whote/yellow) jacks on the recorder to the ANTENNA-IN jack on the TV. Helpful Hints: - Connect the recorder directly to the respective connected device's user manual for playback if the recorder is a VCR or an additional device in between, the picture quality may be recorded. -
.../whote/yellow) jacks on the recorder to the ANTENNA-IN jack on the TV. Helpful Hints: - Connect the recorder directly to the respective connected device's user manual for playback if the recorder is a VCR or an additional device in between, the picture quality may be recorded. -

User manual
Page 22
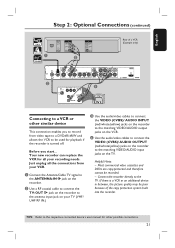
... front panel of a VCR (Example only) Connecting to a VCR and Cable Box/Satellite Receiver A Connect the Antenna/Cable TV signal to the respective connected device's user manual for other possible connections. 22 C Use a RF coaxial cable (not supplied) to connect the TV-OUT jack on the recorder to the antenna input jack...
... front panel of a VCR (Example only) Connecting to a VCR and Cable Box/Satellite Receiver A Connect the Antenna/Cable TV signal to the respective connected device's user manual for other possible connections. 22 C Use a RF coaxial cable (not supplied) to connect the TV-OUT jack on the recorder to the antenna input jack...

User manual
Page 23
... Step 2: Optional Connections (continued) DV OUT L AR B OR Connecting a camcorder to the front jacks You can use the front jacks to the respective connected device's user manual for other possible connections. 23 OR, Use an S-Video cable to the i.LINK standard. Option 1: Using the DV IN jack Use this connection if you...
... Step 2: Optional Connections (continued) DV OUT L AR B OR Connecting a camcorder to the front jacks You can use the front jacks to the respective connected device's user manual for other possible connections. 23 OR, Use an S-Video cable to the i.LINK standard. Option 1: Using the DV IN jack Use this connection if you...

User manual
Page 24
... drive / USB memory card reader. - The USB port does not support the connection of other possible connections. 24 TIPS: Refer to the respective connected device's user manual for other USB devices except to view the files stored in the above illustration.) B Press USB on the front panel (as shown in the USB...
... drive / USB memory card reader. - The USB port does not support the connection of other possible connections. 24 TIPS: Refer to the respective connected device's user manual for other USB devices except to view the files stored in the above illustration.) B Press USB on the front panel (as shown in the USB...

User manual
Page 25
...remote control until you see the Video In channel. You may not correspond to the illustrations shown on -screen display. Usually this recorder's on the user manual. SOURCE REPEAT USB SELECT TOOLS CLEAR OPEN/CLOSE ç ZOOM DISC MENU SETUP OK PLAY A Press SETUP. Language settings can only be called ... turn on using a RF modulator. The language options are using the setup menu features to access its options. B Turn on your TV manual for the first time, it is no disc in the menu. The setup menu appears. When you are different depending on the TV and...
...remote control until you see the Video In channel. You may not correspond to the illustrations shown on -screen display. Usually this recorder's on the user manual. SOURCE REPEAT USB SELECT TOOLS CLEAR OPEN/CLOSE ç ZOOM DISC MENU SETUP OK PLAY A Press SETUP. Language settings can only be called ... turn on using a RF modulator. The language options are using the setup menu features to access its options. B Turn on your TV manual for the first time, it is no disc in the menu. The setup menu appears. When you are different depending on the TV and...

User manual
Page 43
... disc, you want to play, then press OK. Subtitle files with the following filename extensions (.srt, .smi, .sub, .sami) are external subtitles available on this user manual. A Insert a USB flash drive or USB memory card reader into the USB port. B Press PLAY/PAUSE u to poor clarity of digital contents during internet downloading...
... disc, you want to play, then press OK. Subtitle files with the following filename extensions (.srt, .smi, .sub, .sami) are external subtitles available on this user manual. A Insert a USB flash drive or USB memory card reader into the USB port. B Press PLAY/PAUSE u to poor clarity of digital contents during internet downloading...
User manual
Page 59
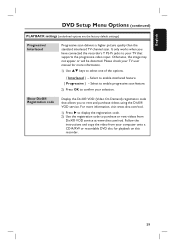
... only works when you have connected the recorder's Y Pb Pr jacks to your TV that allows you to purchase or rent videos from your TV user manual for playback on this recorder. 59 Select to enable progressive scan feature. 2) Press OK to enable interlaced feature. { Progressive } -
... only works when you have connected the recorder's Y Pb Pr jacks to your TV that allows you to purchase or rent videos from your TV user manual for playback on this recorder. 59 Select to enable progressive scan feature. 2) Press OK to enable interlaced feature. { Progressive } -

Quick start guide
Page 1
...STOP . F Once the copy list selection is complete, press REC to automatically record 30 minutes. Need help? Online Go to www.philips.com/usasupport. 2006 © Philips Consumer Electronics A Division of discs for our operators. A Recording from . (eg, TUNER, CAM1, CAM2, DV, EXT1, EXT2 or... press SELECT . Printed in China 12 NC 3139 245 22142 dvdr3400_37_qsg_eng_22142.indd 1 DVD Player/ Recorder DVDR3400 Quick Start Guide What's in a disc and close the disc tray. C Press REC MODE repeatedly to record. User Manual See the user manual that you want to access the USB mode.
...STOP . F Once the copy list selection is complete, press REC to automatically record 30 minutes. Need help? Online Go to www.philips.com/usasupport. 2006 © Philips Consumer Electronics A Division of discs for our operators. A Recording from . (eg, TUNER, CAM1, CAM2, DV, EXT1, EXT2 or... press SELECT . Printed in China 12 NC 3139 245 22142 dvdr3400_37_qsg_eng_22142.indd 1 DVD Player/ Recorder DVDR3400 Quick Start Guide What's in a disc and close the disc tray. C Press REC MODE repeatedly to record. User Manual See the user manual that you want to access the USB mode.

Quick start guide
Page 2
... PR PB Y COMPONENT VIDEO VIDEO (CVBS) PR COMPONENT Y VIDEO L L R R S-VIDEO (Y/C) COAXIAL PB (DIGITAL AUDIO) AUDIO C To AC power OUTPUT F HDMI ~ MAINS Philips recorder (rear) D VIDEO (CVBS) OUT 1 PR COMPONENT VIDEO Y L R OUT 2 COAXIAL PB S-VIDEO (Y/C) (DIGITAL AUDIO) OU E L R AUDIO A Before connecting, unplug...selection. Select an item by pressing right X. Note To further fine-tune the date and time settings, see the accompanying User Manual. D Select the TV's video input channel that accesses the video input channel labeled SOURCE, AV or SELECT. C Setup ...
... PR PB Y COMPONENT VIDEO VIDEO (CVBS) PR COMPONENT Y VIDEO L L R R S-VIDEO (Y/C) COAXIAL PB (DIGITAL AUDIO) AUDIO C To AC power OUTPUT F HDMI ~ MAINS Philips recorder (rear) D VIDEO (CVBS) OUT 1 PR COMPONENT VIDEO Y L R OUT 2 COAXIAL PB S-VIDEO (Y/C) (DIGITAL AUDIO) OU E L R AUDIO A Before connecting, unplug...selection. Select an item by pressing right X. Note To further fine-tune the date and time settings, see the accompanying User Manual. D Select the TV's video input channel that accesses the video input channel labeled SOURCE, AV or SELECT. C Setup ...

