Leaflet
Page 1
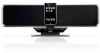
Philips Docking Entertainment System Rotating dock USB and SD card slots Enjoy iPod music out loud with table-stand and wall-mount options • All-in a compact design • Dual wOOx loudspeakers for the system and your iPod DC910 from portrait to all your iPod from any source! Enrich ...• USB Direct and SD/MMC card slots for MP3/WMA music playback • FM digital tuning with presets Superb performance in -one remote control for enhanced bass experience • 30W RMS total output power Design that blends into your interior • Stylish slim design with wOOx ...
Philips Docking Entertainment System Rotating dock USB and SD card slots Enjoy iPod music out loud with table-stand and wall-mount options • All-in a compact design • Dual wOOx loudspeakers for the system and your iPod DC910 from portrait to all your iPod from any source! Enrich ...• USB Direct and SD/MMC card slots for MP3/WMA music playback • FM digital tuning with presets Superb performance in -one remote control for enhanced bass experience • 30W RMS total output power Design that blends into your interior • Stylish slim design with wOOx ...
Leaflet
Page 2
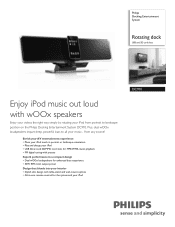
... Throw: Wall Mountable Power • Mains power Accessories • Included accessories: AC Power Cord, User Manual, Warranty certificate, Remote Control Dimensions • Product dimensions (W x H x D): 500 x 165 x 120.7 mm • Packaging dimensions (W ... music in superb sound. Specifications are the property of Koninklijke Philips Electronics N.V. All Rights reserved. Trademarks are subject to worry about...slots. Docking Entertainment System Rotating dock USB and SD card slots Specifications DC910/37 Highlights iPod compatibility • Compatible with: iPod touch, iPod ...
... Throw: Wall Mountable Power • Mains power Accessories • Included accessories: AC Power Cord, User Manual, Warranty certificate, Remote Control Dimensions • Product dimensions (W x H x D): 500 x 165 x 120.7 mm • Packaging dimensions (W ... music in superb sound. Specifications are the property of Koninklijke Philips Electronics N.V. All Rights reserved. Trademarks are subject to worry about...slots. Docking Entertainment System Rotating dock USB and SD card slots Specifications DC910/37 Highlights iPod compatibility • Compatible with: iPod touch, iPod ...
User manual
Page 6
... or SD/MMC memory card Connecting other equipment to your system Mounting the set onto wall 10 Using Remote Control 10 Controls Controls on the system 11 Controls on the remote control 12 Basic Functions Switching the system on 13 Switching the system to standby mode ........ 13 Switching ... playback features 16~17 Basic playback controls Different play modes: SHUFFLE and REPEAT Programming audio files Dock for iPod Playing Apple iPod using DC910 18 Compatible iPod player Dock adaptor Playing Apple iPod Charging iPod battery using the dock 18 AUX Listening to an external source 19 Clock...
... or SD/MMC memory card Connecting other equipment to your system Mounting the set onto wall 10 Using Remote Control 10 Controls Controls on the system 11 Controls on the remote control 12 Basic Functions Switching the system on 13 Switching the system to standby mode ........ 13 Switching ... playback features 16~17 Basic playback controls Different play modes: SHUFFLE and REPEAT Programming audio files Dock for iPod Playing Apple iPod using DC910 18 Compatible iPod player Dock adaptor Playing Apple iPod Charging iPod battery using the dock 18 AUX Listening to an external source 19 Clock...
User manual
Page 7
... completely, remove the AC power plug from a cold to a warm location, or is placed in your purchase and welcome to Philips! This set contain selflubricating bearings and must accept any interference received, including interference that may cause undesired operation. Leave the power on...identical with 1 CR2025 battery - 3 X iPod dock adaptors - 1 X certified AC/DC adapter (Input: 100- 240V ~ 50/60Hz 1.4 A, Output: 24V 2.5A; remote control with the voltage of packaging materials, exhausted batteries and old equipment. To fully benefit from the rear and the top of the disc unit...
... completely, remove the AC power plug from a cold to a warm location, or is placed in your purchase and welcome to Philips! This set contain selflubricating bearings and must accept any interference received, including interference that may cause undesired operation. Leave the power on...identical with 1 CR2025 battery - 3 X iPod dock adaptors - 1 X certified AC/DC adapter (Input: 100- 240V ~ 50/60Hz 1.4 A, Output: 24V 2.5A; remote control with the voltage of packaging materials, exhausted batteries and old equipment. To fully benefit from the rear and the top of the disc unit...
User manual
Page 10
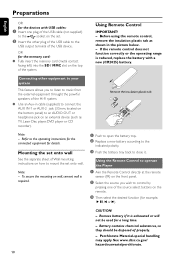
...of the USB cable to an AUDIO OUT or headphone jack on the set onto wall. Using Remote Control IMPORTANT! - Using the Remote Control to operate the Player 1 Aim the Remote Control directly at the remote sensor (IR) on the front panel. 2 Select the source you wish to control by ...system. ● Use an Aux-in the picture below. - To secure the mounting on the remote. 3 Then select the desired function (for example, ÉÅ, ¡ or ™). Note: - Before using the remote control, remove the insulation plastic tab as TV, Laser Disc player, DVD player or CD recorder...
...of the USB cable to an AUDIO OUT or headphone jack on the set onto wall. Using Remote Control IMPORTANT! - Using the Remote Control to operate the Player 1 Aim the Remote Control directly at the remote sensor (IR) on the front panel. 2 Select the source you wish to control by ...system. ● Use an Aux-in the picture below. - To secure the mounting on the remote. 3 Then select the desired function (for example, ÉÅ, ¡ or ™). Note: - Before using the remote control, remove the insulation plastic tab as TV, Laser Disc player, DVD player or CD recorder...
User manual
Page 12
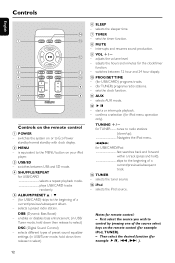
... radio stations. - enables or disables bass enhancement. (in USB/Tuner mode, hold down then release to the beginning of the source select keys on the remote control 1 POWER - switches between USB and SD mode. 4 SHUFFLE/REPEAT for USB/CARD selects a repeat playback mode plays USB/CARD tracks randomly. 5 ALBUM/PRESET 3 / 4 -... standby/normal standby with clock display. 2 MENU - TUNING +/for example iPod, TUNER). - selects the tuner source $ iPod - adjusts the volume level. - Notes for remote control: - Controls English $ 1 # @ 2 3 ! 4 0 5 9 6 8 7 Controls on the...
... radio stations. - enables or disables bass enhancement. (in USB/Tuner mode, hold down then release to the beginning of the source select keys on the remote control 1 POWER - switches between USB and SD mode. 4 SHUFFLE/REPEAT for USB/CARD selects a repeat playback mode plays USB/CARD tracks randomly. 5 ALBUM/PRESET 3 / 4 -... standby/normal standby with clock display. 2 MENU - TUNING +/for example iPod, TUNER). - selects the tuner source $ iPod - adjusts the volume level. - Notes for remote control: - Controls English $ 1 # @ 2 3 ! 4 0 5 9 6 8 7 Controls on the...
User manual
Page 13
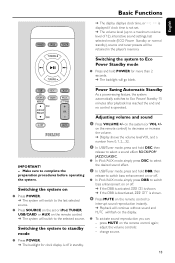
...on or off in the player's memory. press MUTE on the system (or VOL +/- Make sure to the selected source. on the remote control again; - Power Saving Automatic Standby As a power-saving feature, the system automatically switches to interrupt sound reproduction instantly. ➜...adjust the volume controls; - Switching the system on ● Press POWER. ➜ The system will switch to switch bass enhancement on the remote control. ➜ The system will be retained in standby. change source. 13 Switching the system to standby mode ● Press POWER. ➜...
...on or off in the player's memory. press MUTE on the system (or VOL +/- Make sure to the selected source. on the remote control again; - Power Saving Automatic Standby As a power-saving feature, the system automatically switches to interrupt sound reproduction instantly. ➜...adjust the volume controls; - Switching the system on ● Press POWER. ➜ The system will switch to switch bass enhancement on the remote control. ➜ The system will be retained in standby. change source. 13 Switching the system to standby mode ● Press POWER. ➜...
User manual
Page 14
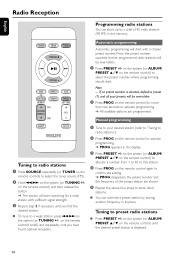
...the desired preset station is preset (1) and all your desired station (refer to "Tuning to radio stations"). 2 Press PROG on the remote control) to select the preset number where programming should start searching for more than two seconds to activate programming. ➜ All available...confirm the setting. ➜ PROG disappears, the preset number and the frequency of the preset station are programmed. Note: - on the remote control for a radio station with a chosen preset number. English Radio Reception Programming radio stations You can override a preset station by storing ...
...the desired preset station is preset (1) and all your desired station (refer to "Tuning to radio stations"). 2 Press PROG on the remote control) to select the preset number where programming should start searching for more than two seconds to activate programming. ➜ All available...confirm the setting. ➜ PROG disappears, the preset number and the frequency of the preset station are programmed. Note: - on the remote control for a radio station with a chosen preset number. English Radio Reception Programming radio stations You can override a preset station by storing ...
User manual
Page 16
...has been properly connected. (See "Preparations: Connecting a USB mass storage device or SD/MMC memory card"). 2 Press SOURCE on the system (USB/CARD on the remote) once or more to select USB/ CARD. ➜ NO AUDIO appears if no audio file is played at high speed and low volume. 16 If... until the desired track number appears in the display. ● For MP3/WMA, you have not organized MP3/WMA files into any albums on the remote control) to start playback. Using playback features Basic playback controls To play audio file ● Press ÉÅ to select a desired album, then select ...
...has been properly connected. (See "Preparations: Connecting a USB mass storage device or SD/MMC memory card"). 2 Press SOURCE on the system (USB/CARD on the remote) once or more to select USB/ CARD. ➜ NO AUDIO appears if no audio file is played at high speed and low volume. 16 If... until the desired track number appears in the display. ● For MP3/WMA, you have not organized MP3/WMA files into any albums on the remote control) to start playback. Using playback features Basic playback controls To play audio file ● Press ÉÅ to select a desired album, then select ...
User manual
Page 17
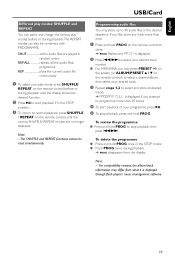
...Note: - English USB/Card Different play modes: SHUFFLE and REPEAT You can select and change the various play mode, press SHUFFLE/ REPEAT on the remote control) to select a desired album, then select your desired track. 3 Repeat steps 1-2 to select and store all desired tracks. ➜ PROGRAM... files You may press PRESET +/- To delete the programme ● Press and hold PROG to stop playback, press and hold PROG on the remote control until the display shows the desired function. 2 Press 2; Note: - The SHUFFLE and REPEAT functions cannot be combined with PROGRAMME. For ...
...Note: - English USB/Card Different play modes: SHUFFLE and REPEAT You can select and change the various play mode, press SHUFFLE/ REPEAT on the remote control) to select a desired album, then select your desired track. 3 Repeat steps 1-2 to select and store all desired tracks. ➜ PROGRAM... files You may press PRESET +/- To delete the programme ● Press and hold PROG to stop playback, press and hold PROG on the remote control until the display shows the desired function. 2 Press 2; Note: - The SHUFFLE and REPEAT functions cannot be combined with PROGRAMME. For ...
User manual
Page 18
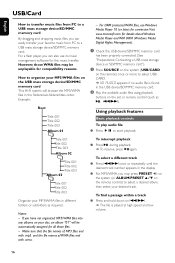
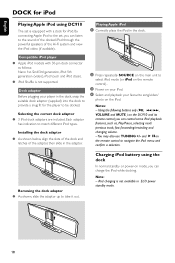
... iPod types. Dock adaptor Before plugging your favourite song/video/ photo on the iPod. Using the following buttons only ( 2;, S / T , VOLUME and MUTE ) on the DC910 and its remote control, you can control some iPod playback features, such as follows: Nano 1st /2nd/3rd generation, iPod 5th generation (video), iPod touch and iPod...
... iPod types. Dock adaptor Before plugging your favourite song/video/ photo on the iPod. Using the following buttons only ( 2;, S / T , VOLUME and MUTE ) on the DC910 and its remote control, you can control some iPod playback features, such as follows: Nano 1st /2nd/3rd generation, iPod 5th generation (video), iPod touch and iPod...
User manual
Page 19
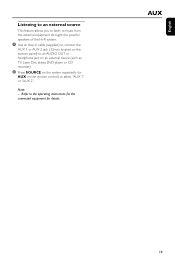
AUX 19 Refer to select "AUX 1" or "AUX 2". English Listening to an external source This feature allows you to listen to music from the external equipment throught the powrful speakers of the Hi-Fi system. 1 Use an Aux-in cable (supplied) to connect the AUX 1 or AUX 2 jack (3.5mm, located on the bottom panel) to an AUDIO OUT or headphone jack on an external device (such as TV, Laser Disc player, DVD player or CD recorder). 2 Press SOURCE on the system repeatedly (or AUX on the remote control) to the operating instructions for the connected equipment for details. Note: -
AUX 19 Refer to select "AUX 1" or "AUX 2". English Listening to an external source This feature allows you to listen to music from the external equipment throught the powrful speakers of the Hi-Fi system. 1 Use an Aux-in cable (supplied) to connect the AUX 1 or AUX 2 jack (3.5mm, located on the bottom panel) to an AUDIO OUT or headphone jack on an external device (such as TV, Laser Disc player, DVD player or CD recorder). 2 Press SOURCE on the system repeatedly (or AUX on the remote control) to the operating instructions for the connected equipment for details. Note: -
User manual
Page 20
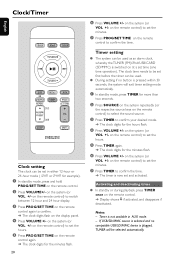
... minutes. 7 Press TIMER to confirm the time. Timer setting ● The system can be selected automatically. on the system (or VOL +/- on the remote control to confirm the time. ➜ The timer is plugged, TUNER will exit timer setting mode automatically. 1 In standby mode, press TIMER for the ...desired mode. ➜ The clock digits for more than two seconds. 2 Press SOURCE on the system repeatedly (or the respective source keys on the remote control) to select the sound source. 3 Press TIMER to confirm. ➜ The clock digits flash on at a set time (one time operation). ...
... minutes. 7 Press TIMER to confirm the time. Timer setting ● The system can be selected automatically. on the system (or VOL +/- on the remote control to confirm the time. ➜ The timer is plugged, TUNER will exit timer setting mode automatically. 1 In standby mode, press TIMER for the ...desired mode. ➜ The clock digits for more than two seconds. 2 Press SOURCE on the system repeatedly (or the respective source keys on the remote control) to select the sound source. 3 Press TIMER to confirm. ➜ The clock digits flash on at a set time (one time operation). ...
User manual
Page 21
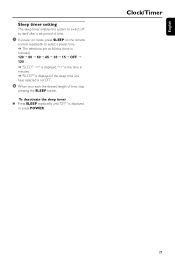
... in minutes. ➜ "SLEEP" is displayed if the sleep time you reach the desired length of time. 1 In power on mode, press SLEEP on the remote control repeatedly to switch off by itself after a set period of time, stop pressing the SLEEP button. English Sleep timer setting The sleep timer enables...
... in minutes. ➜ "SLEEP" is displayed if the sleep time you reach the desired length of time. 1 In power on mode, press SLEEP on the remote control repeatedly to switch off by itself after a set period of time, stop pressing the SLEEP button. English Sleep timer setting The sleep timer enables...
User manual
Page 23
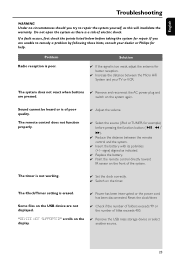
...the front of electric shock. another source. 23 Do not open the system as indicated. ✔ Replace the battery. ✔ Point the remote control directly toward IR sensor on the USB device are not displayed. ✔ Check if the number of folders exceeds 99 or the number ... before pressing the function button (ÉÅ, 5 / 6). ✔ Reduce the distance between the Micro HiFi System and your dealer or Philips for repair. English Troubleshooting WARNING Under no circumstances should you are unable to repair the system yourself, as this will invalidate the warranty.
...the front of electric shock. another source. 23 Do not open the system as indicated. ✔ Replace the battery. ✔ Point the remote control directly toward IR sensor on the USB device are not displayed. ✔ Check if the number of folders exceeds 99 or the number ... before pressing the function button (ÉÅ, 5 / 6). ✔ Reduce the distance between the Micro HiFi System and your dealer or Philips for repair. English Troubleshooting WARNING Under no circumstances should you are unable to repair the system yourself, as this will invalidate the warranty.
Quick start guide
Page 1
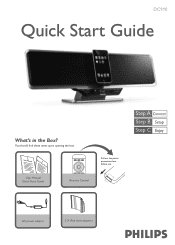
AC power adaptor 3 X iPod dock adaptors You should find these items upon opening the box. 2 User Manual Q uick 1 Start Guide User Manual Quick Start Guide Remote Control Pull out the plastic protective sheet before use. DC910 Quick Start Guide What's in the Box?
AC power adaptor 3 X iPod dock adaptors You should find these items upon opening the box. 2 User Manual Q uick 1 Start Guide User Manual Quick Start Guide Remote Control Pull out the plastic protective sheet before use. DC910 Quick Start Guide What's in the Box?
Quick start guide
Page 2
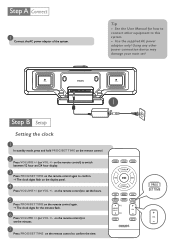
... again to set ! Using any other power connection device may damage your main set the minutes. 7 Press PROG/SET TIME on the remote control again. ➜ The clock digits for how to connect other equipment to confirm the time. See the User Manual for the minutes flash. 6 Press ...VOLUME +/- (or VOL +/- POWERFUL BASS Tip - on the remote control) to set the hours. 5 Press PROG/SET TIME on the remote control to this system. - POWERFUL BASS 1 Setting the clock 1 In standby mode, press and hold PROG/SET TIME on the...
... again to set ! Using any other power connection device may damage your main set the minutes. 7 Press PROG/SET TIME on the remote control again. ➜ The clock digits for how to connect other equipment to confirm the time. See the User Manual for the minutes flash. 6 Press ...VOLUME +/- (or VOL +/- POWERFUL BASS Tip - on the remote control) to set the hours. 5 Press PROG/SET TIME on the remote control to this system. - POWERFUL BASS 1 Setting the clock 1 In standby mode, press and hold PROG/SET TIME on the...

Quick start guide
Page 3
... into 2 Press SOURCE once or more than two seconds to select USB/CARD. 3 Play the available audio files using playback buttons on the set or remote control (such as 2;, S/T). C Enjoy Programming and tuning to radio stations 1 Press SOURCE repeatedly (or TUNER on the... remote control) to select the tuner source (FM). 2 Press PROG on the remote control for more (or USB/CARD on the remote control) to program all available stations in order of the system. or fully insert the SD...
... into 2 Press SOURCE once or more than two seconds to select USB/CARD. 3 Play the available audio files using playback buttons on the set or remote control (such as 2;, S/T). C Enjoy Programming and tuning to radio stations 1 Press SOURCE repeatedly (or TUNER on the... remote control) to select the tuner source (FM). 2 Press PROG on the remote control for more (or USB/CARD on the remote control) to program all available stations in order of the system. or fully insert the SD...
Quick start guide
Page 4
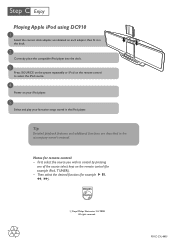
Tip Detailed playback features and additional functions are described in the iPod player. PDCC-ZYL-0835 C Enjoy Playing Apple iPod using DC910 1 Select the correct dock adaptor, as indicated on each adaptor, then fit it in the dock. 2 Correctly place the compatible iPod ... your iPod player. 5 Select and play your favourite songs stored in the accompany owner's manual. Notes for example C Royal Philips Electronics N.V. 2008 All rights reserved. Then select the desired function (for remote control: - First select the source you wish to select the iPod source. 4 Power on the...
Tip Detailed playback features and additional functions are described in the iPod player. PDCC-ZYL-0835 C Enjoy Playing Apple iPod using DC910 1 Select the correct dock adaptor, as indicated on each adaptor, then fit it in the dock. 2 Correctly place the compatible iPod ... your iPod player. 5 Select and play your favourite songs stored in the accompany owner's manual. Notes for example C Royal Philips Electronics N.V. 2008 All rights reserved. Then select the desired function (for remote control: - First select the source you wish to select the iPod source. 4 Power on the...


