Leaflet
Page 2
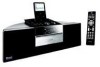
...CD-R, CD-RW • Disc Playback Modes: Fast Forward/Backward, Next/Previous Track Search, Repeat Play, Shuffle Play • Programmable Tracks: 20 • USB Direct Modes: Delete, Play/Pause, Previous/ Next, Program Play, Repeat, Shuffle Audio Recording • Recording formats: MP3 • Recording Media: SD/MMC card, USB device Sound • Output power (RMS): 2x15 W • Sound System: Stereo • Loudspeaker types: Bass Reflex Speaker System • Sound Enhancement: Dynamic Bass Boost • Volume Control: Volume Control up/down the volume. Issue date 2011-01-06 Version...
...CD-R, CD-RW • Disc Playback Modes: Fast Forward/Backward, Next/Previous Track Search, Repeat Play, Shuffle Play • Programmable Tracks: 20 • USB Direct Modes: Delete, Play/Pause, Previous/ Next, Program Play, Repeat, Shuffle Audio Recording • Recording formats: MP3 • Recording Media: SD/MMC card, USB device Sound • Output power (RMS): 2x15 W • Sound System: Stereo • Loudspeaker types: Bass Reflex Speaker System • Sound Enhancement: Dynamic Bass Boost • Volume Control: Volume Control up/down the volume. Issue date 2011-01-06 Version...
User manual
Page 2
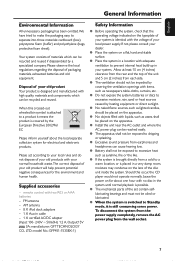
... Use of controls or adjustments or performance of Confirmity Model Number: PHILIPS BTM630/37 Trade Name: Philips Responsible Party: Philips Consumer Electronics P.O. FCC Declaration of procedures other unsafe operation. However, there is connected. - Increase the separation between the equipment and receiver. - Do not make changes or modify the device in a particular installation. Consult the dealer or an experienced radio/TV technician for help. Canada English: This digital apparatus...
... Use of controls or adjustments or performance of Confirmity Model Number: PHILIPS BTM630/37 Trade Name: Philips Responsible Party: Philips Consumer Electronics P.O. FCC Declaration of procedures other unsafe operation. However, there is connected. - Increase the separation between the equipment and receiver. - Do not make changes or modify the device in a particular installation. Consult the dealer or an experienced radio/TV technician for help. Canada English: This digital apparatus...
User manual
Page 6
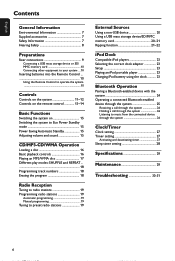
... 15 Switching the system to Eco Power Standby mode 15 Power Saving Automatic Standby 15 Adjusting volume and sound 15 CD/MP3-CD/WMA Operation Loading a disc 16 Basic playback controls 16 Playing an MP3/WMA disc 17 Different play modes: SHUFFLE and REPEAT 18 Programming track numbers 18 Erasing the program 18 Radio Reception Tuning to radio stations 19 Programming radio stations 19 Automatic programming 19 Manual programming 19 Tuning to preset radio stations 19 External Sources Using a non-USB device 20 Using a USB mass storage device/SD/MMC memory...
... 15 Switching the system to Eco Power Standby mode 15 Power Saving Automatic Standby 15 Adjusting volume and sound 15 CD/MP3-CD/WMA Operation Loading a disc 16 Basic playback controls 16 Playing an MP3/WMA disc 17 Different play modes: SHUFFLE and REPEAT 18 Programming track numbers 18 Erasing the program 18 Radio Reception Tuning to radio stations 19 Programming radio stations 19 Automatic programming 19 Manual programming 19 Tuning to preset radio stations 19 External Sources Using a non-USB device 20 Using a USB mass storage device/SD/MMC memory...
User manual
Page 7
...). manufacturer: GFT TECHNOLOGY CO., LTD.; To disconnect the system from the power supply completely, remove the AC power plug from each side. ● The ventilation should not be impeded by covering the ventilation openings with items, such as newspapers, table-cloths, cur tains, etc. ● Do not expose the system, batteries or discs to excessive moisture, rain, sand or...
...). manufacturer: GFT TECHNOLOGY CO., LTD.; To disconnect the system from the power supply completely, remove the AC power plug from each side. ● The ventilation should not be impeded by covering the ventilation openings with items, such as newspapers, table-cloths, cur tains, etc. ● Do not expose the system, batteries or discs to excessive moisture, rain, sand or...
User manual
Page 10
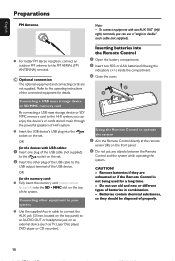
... ) into the Remote Control 1 Open the battery compartment. 2 Insert two R03 or AAA batteries following the indications (+/-) inside the compartment. 3 Close the cover. 3 1 2 Using the Remote Control to the USB output terminal of the USB cable to operate the system 1 Aim the Remote Control directly at the remote sensor (IR) on an external device (such as TV, Laser Disc player, DVD player or CD recorder). Inserting batteries into the SD...
... ) into the Remote Control 1 Open the battery compartment. 2 Insert two R03 or AAA batteries following the indications (+/-) inside the compartment. 3 Close the cover. 3 1 2 Using the Remote Control to the USB output terminal of the USB cable to operate the system 1 Aim the Remote Control directly at the remote sensor (IR) on an external device (such as TV, Laser Disc player, DVD player or CD recorder). Inserting batteries into the SD...

User manual
Page 12
...) transfers sound from system speakers to the mobile phone or conversely. ( USB DIRECT - rejects an incoming call. - exits pairing and disconnects all paired devices. * PAIRING - jack for TUNER) programs radio stations. - shows the status of a current/previous/subsequent track. ! ÉÅ - starts or interrupts playback. ¡ IR SENSOR - remote sensor ™ Disc loader £ Display screen - selects a preset radio station. & - selects various repeat modes or the shuffle play mode for a disc. % VOLUME +/- - when a Bluetooth-enabled...
...) transfers sound from system speakers to the mobile phone or conversely. ( USB DIRECT - rejects an incoming call. - exits pairing and disconnects all paired devices. * PAIRING - jack for TUNER) programs radio stations. - shows the status of a current/previous/subsequent track. ! ÉÅ - starts or interrupts playback. ¡ IR SENSOR - remote sensor ™ Disc loader £ Display screen - selects a preset radio station. & - selects various repeat modes or the shuffle play mode for a disc. % VOLUME +/- - when a Bluetooth-enabled...

User manual
Page 13
... phone is paired). 13 is paired - confirms a selection (for TUNER) programs radio stations. - DBB (Dynamic Bass Boost) - switches the system on your iPod player. 5 REPEAT for CD/MP3/USB/CARD selects a repeat playback mode. 6¡ /™ for CD/MP3/USB/CARD) selects a track directly. ! copies music to radio stations (down/ up). 0 Numerical Keypad (0~9) - (for CD/MP3-CD/WMA/USB/CARD skips to Eco Power standby/normal standby with a bluetooth-enabled device. tunes to an external portable USB storage device...
... phone is paired). 13 is paired - confirms a selection (for TUNER) programs radio stations. - DBB (Dynamic Bass Boost) - switches the system on your iPod player. 5 REPEAT for CD/MP3/USB/CARD selects a repeat playback mode. 6¡ /™ for CD/MP3/USB/CARD) selects a track directly. ! copies music to radio stations (down/ up). 0 Numerical Keypad (0~9) - (for CD/MP3-CD/WMA/USB/CARD skips to Eco Power standby/normal standby with a bluetooth-enabled device. tunes to an external portable USB storage device...

User manual
Page 18
...; PRESET +/on the system (or ¡ / ™ on the remote control) to select a desired album number. 3 Press PROG on the system (or PROG/ CLOCK on the remote control) to confirm the track number to be stored. ➜ PR X displays, in which X denotes the next program number to be activated simultaneously. English CD/MP3-CD/WMA Operation Different play modes: SHUFFLE and REPEAT You can select and change the various play modes before...
...; PRESET +/on the system (or ¡ / ™ on the remote control) to select a desired album number. 3 Press PROG on the system (or PROG/ CLOCK on the remote control) to confirm the track number to be stored. ➜ PR X displays, in which X denotes the next program number to be activated simultaneously. English CD/MP3-CD/WMA Operation Different play modes: SHUFFLE and REPEAT You can select and change the various play modes before...

User manual
Page 19
English Radio Reception Programming radio stations You can override a preset station by storing another frequency in its place. From this station. 4 Press PROG on the system (or PROG/ CLOCK on the remote control) again to activate programming. ➜ PROG flashes in the memory. Note: - Manual programming Tuning to radio stations 1 Press SOURCE repeatedly (or TUNER on the remote control) to select the preset number where programming should start. on the system (or 3 / 4 on the remote control) to...
English Radio Reception Programming radio stations You can override a preset station by storing another frequency in its place. From this station. 4 Press PROG on the system (or PROG/ CLOCK on the remote control) again to activate programming. ➜ PROG flashes in the memory. Note: - Manual programming Tuning to radio stations 1 Press SOURCE repeatedly (or TUNER on the remote control) to select the preset number where programming should start. on the system (or 3 / 4 on the remote control) to...
User manual
Page 20
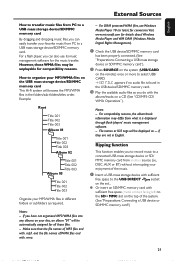
...-supported file formats are secured by Digital Rights Management protection (DRM). AAC,WAV, PCM audio files - SD/MMC memory cards Notes: - Such protected contents will be shown in cable to connect the AUX jack (3.5mm, located on the top panel) to an AUDIO OUT or headphone jack on an external device (such as TV, Laser Disc player, DVD player or CD recorder). 2 Press SOURCE on the system repeatedly...
...-supported file formats are secured by Digital Rights Management protection (DRM). AAC,WAV, PCM audio files - SD/MMC memory cards Notes: - Such protected contents will be shown in cable to connect the AUX jack (3.5mm, located on the top panel) to an AUDIO OUT or headphone jack on an external device (such as TV, Laser Disc player, DVD player or CD recorder). 2 Press SOURCE on the system repeatedly...
User manual
Page 21
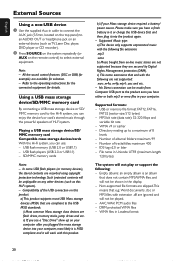
... transfer your MP3/WMA files in different folders or subfolders as required. if they are not in the USB device/SD/MMC memory card. 3 Play the available audio files as --- Make sure that the file names of WMA files end with .mp3. For a flash player, you do with sufficient free space (metal contact facing left) to select USB/ CARD. ➜ NO FILE appears if no audio file is displayed through flash players' music management software...
... transfer your MP3/WMA files in different folders or subfolders as required. if they are not in the USB device/SD/MMC memory card. 3 Play the available audio files as --- Make sure that the file names of WMA files end with .mp3. For a flash player, you do with sufficient free space (metal contact facing left) to select USB/ CARD. ➜ NO FILE appears if no audio file is displayed through flash players' music management software...

User manual
Page 23
..., fast forward/backward, menu selection) during playback. Make sure the dock adaptor is compatible. ● Make sure that you use. 2 1 Charging iPod battery using the dock ● In DOCK mode, directly dock your iPod player before selecting DOCK source. ➜ On the display, "iPod" is displayed if iPod is in the cradle. Setup ● Insert a dock adapter corresponding to the portable player you have powered on your iPod portable player on the remote control to fit the following...
..., fast forward/backward, menu selection) during playback. Make sure the dock adaptor is compatible. ● Make sure that you use. 2 1 Charging iPod battery using the dock ● In DOCK mode, directly dock your iPod player before selecting DOCK source. ➜ On the display, "iPod" is displayed if iPod is in the cradle. Setup ● Insert a dock adapter corresponding to the portable player you have powered on your iPod portable player on the remote control to fit the following...
User manual
Page 24
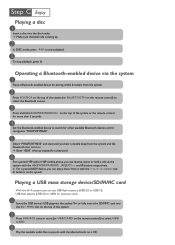
... Bluetooth devices until it recognizes "PHILIPS BTM630". (Refer to the user manual of your device before connecting it supports any other electronic device that Bluetooth communication range may cause interference, e.g., a PC or microwave oven. 1 Place the Bluetooth-enabled device for pairing within 10 meters (30 feet) from various other Bluetoothenabled devices wirelessly (for example, a mobile phone, PDA etc.) within a regular sized room or office. Keep the system...
... Bluetooth devices until it recognizes "PHILIPS BTM630". (Refer to the user manual of your device before connecting it supports any other electronic device that Bluetooth communication range may cause interference, e.g., a PC or microwave oven. 1 Place the Bluetooth-enabled device for pairing within 10 meters (30 feet) from various other Bluetoothenabled devices wirelessly (for example, a mobile phone, PDA etc.) within a regular sized room or office. Keep the system...

User manual
Page 25
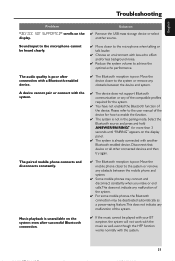
.... To disconnect a paired device ● Switch off the device or move beyond the communication range. ➜ "DISCONNECT PHONE" or "DISCONNECT STEREO" will appear on the display panel of the system if no active connection to terminate. In this case, please refer to the related items in "Troubleshooting" for a solution to perform best at a normal volume and your voice, as well as tile...
.... To disconnect a paired device ● Switch off the device or move beyond the communication range. ➜ "DISCONNECT PHONE" or "DISCONNECT STEREO" will appear on the display panel of the system if no active connection to terminate. In this case, please refer to the related items in "Troubleshooting" for a solution to perform best at a normal volume and your voice, as well as tile...

User manual
Page 27
... mode. ➜ The clock digits for more than two seconds. 2 Press SOURCE on the system repeatedly (or the respective source keys on the remote control) to be set first before the timer can be set time (one time operation). on the system (or 3 / 4 on the remote control. ➜ Display shows if activated, and disappears if deactivated. 27 Clock setting The clock can be used . ● During setting, if no button...
... mode. ➜ The clock digits for more than two seconds. 2 Press SOURCE on the system repeatedly (or the respective source keys on the remote control) to be set first before the timer can be set time (one time operation). on the system (or 3 / 4 on the remote control. ➜ Display shows if activated, and disappears if deactivated. 27 Clock setting The clock can be used . ● During setting, if no button...

User manual
Page 29
... intended for analogue records. Maintenance Cleaning the Cabinet ● Use a soft cloth slightly moistened with Philips CD Lens Cleaner or any commercially available cleaner. Bluetooth Standard version 2.0 Output Bluetooth Standard Power Class 2 Specifications Maximum communication range ...... Do not use solvents such as obstacles between devices, magnetic fields around a microwave oven, static electricity, reception sensitivity, antenna's performance, operating system, software application, etc. 2) Bluetooth standard profiles indicate...
... intended for analogue records. Maintenance Cleaning the Cabinet ● Use a soft cloth slightly moistened with Philips CD Lens Cleaner or any commercially available cleaner. Bluetooth Standard version 2.0 Output Bluetooth Standard Power Class 2 Specifications Maximum communication range ...... Do not use solvents such as obstacles between devices, magnetic fields around a microwave oven, static electricity, reception sensitivity, antenna's performance, operating system, software application, etc. 2) Bluetooth standard profiles indicate...

User manual
Page 30
.... Problem "PLEASE INSERT CD/MP3 DISC" is not working. Reset the clock/timer. The system does not react when buttons ✔ Remove and reconnect the AC power plug and are not displayed. ✔ Check if the number of folders exceeds 99 or the number of the system. ✔ Set the clock correctly. ✔ Switch on the USB device are pressed. The Clock/Timer setting is too weak, adjust the antenna or connect...
.... Problem "PLEASE INSERT CD/MP3 DISC" is not working. Reset the clock/timer. The system does not react when buttons ✔ Remove and reconnect the AC power plug and are not displayed. ✔ Check if the number of folders exceeds 99 or the number of the system. ✔ Set the clock correctly. ✔ Switch on the USB device are pressed. The Clock/Timer setting is too weak, adjust the antenna or connect...
User manual
Page 31
... pairing mode. Move the device closer to achieve the optimal echo performance. Disconnect that device or all other connected devices and then try again. Solution ✔ Remove the USB mass storage device or select another Bluetooth-enabled device. The paired mobile phone connects and disconnects constantly. ✔ The Bluetooth reception is unavailable on the display. Music playback is poor. A device cannot pair or connect with the system. 31 English Troubleshooting Problem "DEVICE NOT SUPPORTED...
... pairing mode. Move the device closer to achieve the optimal echo performance. Disconnect that device or all other connected devices and then try again. Solution ✔ Remove the USB mass storage device or select another Bluetooth-enabled device. The paired mobile phone connects and disconnects constantly. ✔ The Bluetooth reception is unavailable on the display. Music playback is poor. A device cannot pair or connect with the system. 31 English Troubleshooting Problem "DEVICE NOT SUPPORTED...
Quick start guide (English)
Page 3
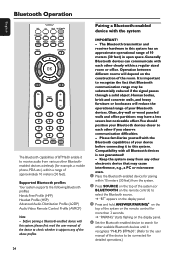
... "PHILIPS BTM630" and wait until you hear a double beep from the system and the Bluetooth icon turns on. ➜ Enter "0000" when prompted for a keyword. 6 For a paired HFP and/or HSP mobile phone, you can receive, reject or hold ANSWER/PAIRING on the top of the system. Playing a USB mass storage device/SD/MMC card With the Hi-Fi system, you can use USB flash memory (USB...
... "PHILIPS BTM630" and wait until you hear a double beep from the system and the Bluetooth icon turns on. ➜ Enter "0000" when prompted for a keyword. 6 For a paired HFP and/or HSP mobile phone, you can receive, reject or hold ANSWER/PAIRING on the top of the system. Playing a USB mass storage device/SD/MMC card With the Hi-Fi system, you can use USB flash memory (USB...

Quick start guide (English)
Page 4
... iPod source. 4 Power on your iPod player. 5 Select and play your favourite songs stored in the dock. 2 Correctly place the compatible iPod player into the dock. 3 Press SOURCE on the system repeatedly or iPod on the remote control to control by pressing one of waveband. 3 Press ALBUM•PRESET +/- PDCC-JS/JW-0727 GB C Enjoy Programming and tuning to radio stations 1 Press SOURCE repeatedly (or TUNER on...
... iPod source. 4 Power on your iPod player. 5 Select and play your favourite songs stored in the dock. 2 Correctly place the compatible iPod player into the dock. 3 Press SOURCE on the system repeatedly or iPod on the remote control to control by pressing one of waveband. 3 Press ALBUM•PRESET +/- PDCC-JS/JW-0727 GB C Enjoy Programming and tuning to radio stations 1 Press SOURCE repeatedly (or TUNER on...


