Leaflet
Page 1
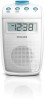
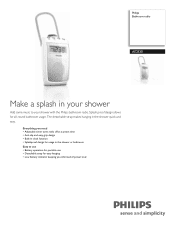
... to your shower Add some music to use • Battery operation for portable use • Detachable strap for easy hanging • Low battery indicator keeping you need • Adjustable timer turns radio off at a preset time • Anti-slip and easy-grip design • Built-in clock function • Splashproof design for all-round bathroom usage. Everything you informed of power level Philips Bathroom radio AE2330 Make a splash in your shower with...
... to your shower Add some music to use • Battery operation for portable use • Detachable strap for easy hanging • Low battery indicator keeping you need • Adjustable timer turns radio off at a preset time • Anti-slip and easy-grip design • Built-in clock function • Splashproof design for all-round bathroom usage. Everything you informed of power level Philips Bathroom radio AE2330 Make a splash in your shower with...

Leaflet
Page 2
... bath. Detachable strap A detachable strap is low. The radio can handle a brief jet of water on the digital timer. Bathroom radio Specifications Convenience • Display Digits: 5 • Clock: sleep timer Sound • Sound system: mono • Volume control: rotary (digital) • Output power: 300 mW RMS Tuner/Reception/Transmission • Tuner bands: AM, FM • Tuner enhancement: auto digital tuning Accessories • Others: User Manual • Warranty: Warranty Certificate Dimensions • Gross...
... bath. Detachable strap A detachable strap is low. The radio can handle a brief jet of water on the digital timer. Bathroom radio Specifications Convenience • Display Digits: 5 • Clock: sleep timer Sound • Sound system: mono • Volume control: rotary (digital) • Output power: 300 mW RMS Tuner/Reception/Transmission • Tuner bands: AM, FM • Tuner enhancement: auto digital tuning Accessories • Others: User Manual • Warranty: Warranty Certificate Dimensions • Gross...
User manual
Page 3
English Register online at : www.philips.com/welcome This "bolt of the most from our convenient home shopping network. directly Registering your product guarantees that you should not be placed on this apparatus. The "exclamation point" calls attention to features for ...rear of the best-built, best-backed products available today.We'll do not remove product covering. the privileges to which is our way of plug to prevent operating and maintenance problems. WARNING: To reduce the risk of from the manufacturer. Dear PHILIPS product owner: Thank you qualify, plus large de...
English Register online at : www.philips.com/welcome This "bolt of the most from our convenient home shopping network. directly Registering your product guarantees that you should not be placed on this apparatus. The "exclamation point" calls attention to features for ...rear of the best-built, best-backed products available today.We'll do not remove product covering. the privileges to which is our way of plug to prevent operating and maintenance problems. WARNING: To reduce the risk of from the manufacturer. Dear PHILIPS product owner: Thank you qualify, plus large de...
User manual
Page 4
... of the product. • Product repair and/or part replacement because of improper installation or maintenance, connections to improper voltage supply, power line surge, lightning damage, retained images or screen markings resulting from the date of the replacement or repair for ninety (90) days or for you. When a product or part is exchanged, any media contained within the control of customer controls on any replacement item becomes your product becomes Philips' property. PHILIPS SHALL...
... of the product. • Product repair and/or part replacement because of improper installation or maintenance, connections to improper voltage supply, power line surge, lightning damage, retained images or screen markings resulting from the date of the replacement or repair for ninety (90) days or for you. When a product or part is exchanged, any media contained within the control of customer controls on any replacement item becomes your product becomes Philips' property. PHILIPS SHALL...
User manual
Page 6
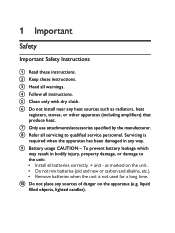
... place any heat sources such as marked on the apparatus (e.g. Servicing is not used for a long time. liquid filled objects, lighted candles). h Refer all instructions. as radiators, heat registers, stoves, or other apparatus (including amplifiers) that produce heat. i Battery usage CAUTION - f Do not install near any sources of danger on the unit. • Do...
... place any heat sources such as marked on the apparatus (e.g. Servicing is not used for a long time. liquid filled objects, lighted candles). h Refer all instructions. as radiators, heat registers, stoves, or other apparatus (including amplifiers) that produce heat. i Battery usage CAUTION - f Do not install near any sources of danger on the unit. • Do...
User manual
Page 7
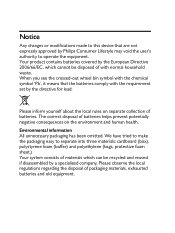
...symbol with the chemical symbol 'Pb', it means that are not expressly approved by Philips Consumer Lifestyle may void the user's authority to operate the equipment. Your product contains batteries covered by the European Directive 2006/66/EC, which cannot be disposed of materials which can be recycled and...specialized company. Notice Any changes or modifications made to this device that the batteries comply with the requirement set by the directive for lead: Please inform yourself about the local rules on the environment and human health. We have tried to make the packaging easy to ...
...symbol with the chemical symbol 'Pb', it means that are not expressly approved by Philips Consumer Lifestyle may void the user's authority to operate the equipment. Your product contains batteries covered by the European Directive 2006/66/EC, which cannot be disposed of materials which can be recycled and...specialized company. Notice Any changes or modifications made to this device that the batteries comply with the requirement set by the directive for lead: Please inform yourself about the local rules on the environment and human health. We have tried to make the packaging easy to ...
User manual
Page 8
The correct disposal of these products helps prevent potentially negative consequences on the separate collection of your product at www.philips.com/welcome. To fully benefit from the support that Philips offers, register your package: • Main unit • User manual Please visit www.recycle.philips.com for additional information on your purchase, and welcome to FM/AM radio stations What's in your...
The correct disposal of these products helps prevent potentially negative consequences on the separate collection of your product at www.philips.com/welcome. To fully benefit from the support that Philips offers, register your package: • Main unit • User manual Please visit www.recycle.philips.com for additional information on your purchase, and welcome to FM/AM radio stations What's in your...
User manual
Page 9
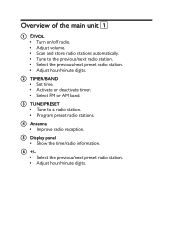
... Turn on/off radio. • Adjust volume. • Scan and store radio stations automatically. • Tune to a radio station. • Program preset radio stations. b TIMER/BAND • Set time. • Activate or deactivate timer. • Select FM or AM band. f +/• Select the previous/next preset radio station. • Adjust hour/minute digits. c TUNE/PRESET • Tune to the previous/next radio station. • Select the previous/next preset radio station. • Adjust hour/minute digits. d Antenna • Improve radio reception. e Display panel • Show the time...
... Turn on/off radio. • Adjust volume. • Scan and store radio stations automatically. • Tune to a radio station. • Program preset radio stations. b TIMER/BAND • Set time. • Activate or deactivate timer. • Select FM or AM band. f +/• Select the previous/next preset radio station. • Adjust hour/minute digits. c TUNE/PRESET • Tune to the previous/next radio station. • Select the previous/next preset radio station. • Adjust hour/minute digits. d Antenna • Improve radio reception. e Display panel • Show the time...

User manual
Page 10
.... See www.dtsc.ca.gov/ hazardouswaste/perchlorate. 1 Open the battery compartment. 2 Insert 3 AA batteries (not supplied) with correct polarity (+/-) as indicated. 3 Close the battery compartment. Never discard batteries in this apparatus.The model number and serial number are on the bottom of the apparatus.Write the numbers here: Model No Serial No Install battery 2 Caution • Risk of product damage! If you contact Philips, you...
.... See www.dtsc.ca.gov/ hazardouswaste/perchlorate. 1 Open the battery compartment. 2 Insert 3 AA batteries (not supplied) with correct polarity (+/-) as indicated. 3 Close the battery compartment. Never discard batteries in this apparatus.The model number and serial number are on the bottom of the apparatus.Write the numbers here: Model No Serial No Install battery 2 Caution • Risk of product damage! If you contact Philips, you...
User manual
Page 11
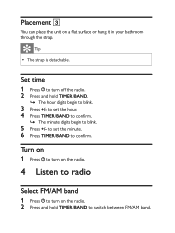
... TIMER/BAND to confirm. to set the hour. 4 Press TIMER/BAND to confirm. » The minute digits begin to blink. 3 Press +/- Placement 3 You can place the unit on the radio. 2 Press and hold TIMER/BAND. » The hour digits begin to blink. 5 Press +/- Tip • The strap is detachable. to set the minute. 6 Press TIMER/BAND to switch between FM/AM band. Set time 1 Press to turn...
... TIMER/BAND to confirm. to set the hour. 4 Press TIMER/BAND to confirm. » The minute digits begin to blink. 3 Press +/- Placement 3 You can place the unit on the radio. 2 Press and hold TIMER/BAND. » The hour digits begin to blink. 5 Press +/- Tip • The strap is detachable. to set the minute. 6 Press TIMER/BAND to switch between FM/AM band. Set time 1 Press to turn...

User manual
Page 12
Tune to a radio station 1 Press to turn on the radio. 2 Press TUNE/PRESET to start tuning. » [FM] or [AM] begins to blink. 3 Rotate clockwise or counter-clockwise to tune to a radio station. 4 Press TUNE/PRESET again to confirm.
Tune to a radio station 1 Press to turn on the radio. 2 Press TUNE/PRESET to start tuning. » [FM] or [AM] begins to blink. 3 Rotate clockwise or counter-clockwise to tune to a radio station. 4 Press TUNE/PRESET again to confirm.

User manual
Page 13
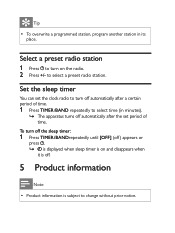
... clockwise or counter-clockwise to select a preset number. 5 Press TUNE/PRESET to confirm. 6 Repeat steps 2 - 5 to turn on the radio. 2 Press and hold for 2 seconds. » All available stations are programmed in the order of 20 preset FM radio stations and 20 preset AM radio stations. 1 Press to program more stations. Program radio stations manually Note • You can program a maximum of waveband reception strength. » The first programed radio station broadcasts automatically.
... clockwise or counter-clockwise to select a preset number. 5 Press TUNE/PRESET to confirm. 6 Repeat steps 2 - 5 to turn on the radio. 2 Press and hold for 2 seconds. » All available stations are programmed in the order of 20 preset FM radio stations and 20 preset AM radio stations. 1 Press to program more stations. Program radio stations manually Note • You can program a maximum of waveband reception strength. » The first programed radio station broadcasts automatically.
User manual
Page 14
... displayed when sleep timer is on and disappears when it is off. 5 Product information Note • Product information is subject to turn off automatically after the set period of time. Select a preset radio station 1 Press to change without prior notice. to select time (in its place. Tip • To overwrite a programmed station, program another station in minutes). » The apparatus turns off automatically after a certain period of time. 1 Press TIMER/BAND repeatedly to select a preset radio station. Set...
... displayed when sleep timer is on and disappears when it is off. 5 Product information Note • Product information is subject to turn off automatically after the set period of time. Select a preset radio station 1 Press to change without prior notice. to select time (in its place. Tip • To overwrite a programmed station, program another station in minutes). » The apparatus turns off automatically after a certain period of time. 1 Press TIMER/BAND repeatedly to select a preset radio station. Set...
User manual
Page 15
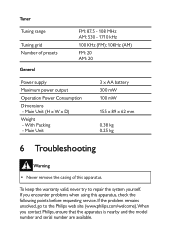
... KHz (FM); 10KHz (AM) FM: 20 AM: 20 Power supply Maximum power output Operation Power Consumption Dimensions - To keep the warranty valid, never try to the Philips web site (www.philips.com/welcome). Tuner Tuning range Tuning grid Number of this apparatus, check the following points before requesting service. When you encounter problems when using this apparatus. Main Unit (H x W x D) Weight - If you contact...
... KHz (FM); 10KHz (AM) FM: 20 AM: 20 Power supply Maximum power output Operation Power Consumption Dimensions - To keep the warranty valid, never try to the Philips web site (www.philips.com/welcome). Tuner Tuning range Tuning grid Number of this apparatus, check the following points before requesting service. When you encounter problems when using this apparatus. Main Unit (H x W x D) Weight - If you contact...
User manual
Page 16
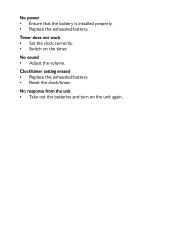
Clock/timer setting erased • Replace the exhausted battery. • Reset the clock/timer. No power • Ensure that the battery is installed properly. • Replace the exhausted battery. No response from the unit • Take out the batteries and turn on the timer. No sound • Adjust the volume. Timer does not work • Set the clock correctly. • Switch on the unit again.
Clock/timer setting erased • Replace the exhausted battery. • Reset the clock/timer. No power • Ensure that the battery is installed properly. • Replace the exhausted battery. No response from the unit • Take out the batteries and turn on the timer. No sound • Adjust the volume. Timer does not work • Set the clock correctly. • Switch on the unit again.
User manual
Page 17
AE2330_37_UM_V2.0 All rights reserved. Box 10313 Stamford, CT 06904 Phone: 1-888-PHILIPS (744-5477) Meet Philips at the Internet http://www.philips.com/welcome © 2010 Koninklijke Philips Electronics N.V. Philips Consumer Lifestyle A division of Philips Electronics North America Corporation P.O.
AE2330_37_UM_V2.0 All rights reserved. Box 10313 Stamford, CT 06904 Phone: 1-888-PHILIPS (744-5477) Meet Philips at the Internet http://www.philips.com/welcome © 2010 Koninklijke Philips Electronics N.V. Philips Consumer Lifestyle A division of Philips Electronics North America Corporation P.O.


