User manual (English)
Page 2
... 9 3.2 SmartContrast 10 3.3 Philips SmartControl Lite 11 3.4 Philips' Flat Panel Monitors Pixel Defect Policy 18 4 Technical Specifications 4.1 Resolution & Preset Modes 23 4.2 Automatic PowerSaving 23 5 Regulatory Information 24 6 Customer care and warranty 30 7 Troubleshooting & FAQs 7.1 Troubleshooting 42 7.2 SmartControl Lite FAQs 44 7.3 General FAQs 45 Important 1.1 Safety precautions and maintenance 1 1.2 Notational Descriptions 2 1.3 Disposal of Contents 1. Setting up the monitor 2.1 Installation 4 2.2 Operating the monitor 5 2.3 Remove Base Stand and Base 7 3.
... 9 3.2 SmartContrast 10 3.3 Philips SmartControl Lite 11 3.4 Philips' Flat Panel Monitors Pixel Defect Policy 18 4 Technical Specifications 4.1 Resolution & Preset Modes 23 4.2 Automatic PowerSaving 23 5 Regulatory Information 24 6 Customer care and warranty 30 7 Troubleshooting & FAQs 7.1 Troubleshooting 42 7.2 SmartControl Lite FAQs 44 7.3 General FAQs 45 Important 1.1 Safety precautions and maintenance 1 1.2 Notational Descriptions 2 1.3 Disposal of Contents 1. Setting up the monitor 2.1 Installation 4 2.2 Operating the monitor 5 2.3 Remove Base Stand and Base 7 3.
User manual (English)
Page 3
... and model and production number of the product. 1.1 Safety precautions and maintenance Warnings Use of controls, adjustments or procedures other heat source. • Remove any other than those specified in this user manual before attaching the power cable or DC power cord for normal operation. • Please use approved power cord provided by placing your hand or fingers on the cabinet. • When positioning the monitor, make sure the power plug...
... and model and production number of the product. 1.1 Safety precautions and maintenance Warnings Use of controls, adjustments or procedures other heat source. • Remove any other than those specified in this user manual before attaching the power cable or DC power cord for normal operation. • Please use approved power cord provided by placing your hand or fingers on the cabinet. • When positioning the monitor, make sure the power plug...
User manual (English)
Page 4
...: "ghost imaging" is mandated by qualified service personnel. • If there is not covered under direct sun light. Warning Severe" burn-in" or "after -imaging" or "ghost This icon indicates important information and tips imaging" will display conventions used as "after the power has been switched off. Note Consult a service technician if the monitor does not operate normally, or you leave your screen.
...: "ghost imaging" is mandated by qualified service personnel. • If there is not covered under direct sun light. Warning Severe" burn-in" or "after -imaging" or "ghost This icon indicates important information and tips imaging" will display conventions used as "after the power has been switched off. Note Consult a service technician if the monitor does not operate normally, or you leave your screen.
User manual (English)
Page 6
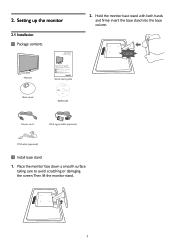
... are used under license from Koninklijke Philips Electronics N.V. CLICK! and are registered trademarks of applicable laws. Hold the monitor base stand with both hands and firmly insert the base stand into the base column. Place the monitor face down a smooth surface taking care to avoid scratching or damaging the screen.Then lift the monitor stand. 4 Made and printe EDFU CD Power cord VGA signal cable (optional) DVI cable (optional) Install base stand 1. 2. Monitor Base stand Quick start guide...
... are used under license from Koninklijke Philips Electronics N.V. CLICK! and are registered trademarks of applicable laws. Hold the monitor base stand with both hands and firmly insert the base stand into the base column. Place the monitor face down a smooth surface taking care to avoid scratching or damaging the screen.Then lift the monitor stand. 4 Made and printe EDFU CD Power cord VGA signal cable (optional) DVI cable (optional) Install base stand 1. 2. Monitor Base stand Quick start guide...
User manual (English)
Page 7
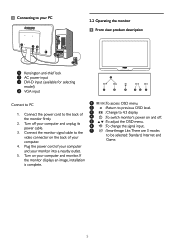
Plug the power cord of your computer. 4. Connecting to your PC 2.2 Operating the monitor Front view product description Kensington anti-thief lock AC power input DVI-D input (available for selecting model) VGA input Connect to the back of the montior firmly. 2. Turn on and off your computer and unplug its power cable. 3. Connect the monitor signal cable to the video connector on the back of your computer and your computer and monitor. Turn off . :To adjust the OSD menu. :To...
Plug the power cord of your computer. 4. Connecting to your PC 2.2 Operating the monitor Front view product description Kensington anti-thief lock AC power input DVI-D input (available for selecting model) VGA input Connect to the back of the montior firmly. 2. Turn on and off your computer and unplug its power cable. 3. Connect the monitor signal cable to the video connector on the back of your computer and your computer and monitor. Turn off . :To adjust the OSD menu. :To...
User manual (English)
Page 8
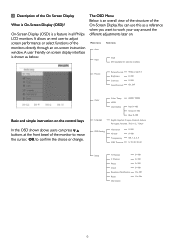
Color Language OSD Setting Color Temp. sRGB User Define 6500K, 9300K Red: 0~100 Green: 0~100 Blue: 0~100 English㕜Español, Français, Deutsch, Italiano, Português Türkçe Horizontal Vertical Transparency OSD Time out 0~100 0~100 Off, 1, 2, 3, 4 5, 10, 20, 30, 60 Setup H. A user friendly on . Main menu Auto Sub menu Input VGA DVI (available for selective models) Picture Picture Format Brightness Contrast SmartContrast Wide screen,4:3 0~100 0~100 On, Off Basic and simple instruction on -screen instruction window. Position V. It allows...
Color Language OSD Setting Color Temp. sRGB User Define 6500K, 9300K Red: 0~100 Green: 0~100 Blue: 0~100 English㕜Español, Français, Deutsch, Italiano, Português Türkçe Horizontal Vertical Transparency OSD Time out 0~100 0~100 Off, 1, 2, 3, 4 5, 10, 20, 30, 60 Setup H. A user friendly on . Main menu Auto Sub menu Input VGA DVI (available for selective models) Picture Picture Format Brightness Contrast SmartContrast Wide screen,4:3 0~100 0~100 On, Off Basic and simple instruction on -screen instruction window. Position V. It allows...

User manual (English)
Page 16
... file. Default is unchecked (Disabled). • Enable transparency mode (Windows 7,Vista, Options>Preferences - Enable Context menu displays SmartControl Lite selections for better display setting based on desktop is set to run at Startup is disabled until the second color screen. • Next goes to the succeeding target (6-targets). • Final next goes File>Presets pane. • Cancel closes the UI and returns to the plug in...
... file. Default is unchecked (Disabled). • Enable transparency mode (Windows 7,Vista, Options>Preferences - Enable Context menu displays SmartControl Lite selections for better display setting based on desktop is set to run at Startup is disabled until the second color screen. • Next goes to the succeeding target (6-targets). • Final next goes File>Presets pane. • Cancel closes the UI and returns to the plug in...

User manual (English)
Page 22
4 Technical Specifications Picture/Display LCD panel type Backlight Panel size Aspect ratio Pixel Pitch Brightness Smar tContrast Contrast ratio (typical) Response time (typical) Optimum Resolution Viewing angle Picture Enhancement Display colors Vertical refresh rate Horizontal Frequency sRGB Connectivity Signal input Input Signal Convenience User Convenience OSD Languages Other convenience Plug & Play Compatibility Stand Tilt TFT-LCD CCFL (222E2), LED (222EL2) 21.5'' W (54.6 cm) 16:9 0.248 x 0.248 mm 250 cd/m² 500,000:1 (222E2); 20,000,000:1 (222EL2) 1000:1 5 ms 1920 x 1080 @ 60Hz 176...
4 Technical Specifications Picture/Display LCD panel type Backlight Panel size Aspect ratio Pixel Pitch Brightness Smar tContrast Contrast ratio (typical) Response time (typical) Optimum Resolution Viewing angle Picture Enhancement Display colors Vertical refresh rate Horizontal Frequency sRGB Connectivity Signal input Input Signal Convenience User Convenience OSD Languages Other convenience Plug & Play Compatibility Stand Tilt TFT-LCD CCFL (222E2), LED (222EL2) 21.5'' W (54.6 cm) 16:9 0.248 x 0.248 mm 250 cd/m² 500,000:1 (222E2); 20,000,000:1 (222EL2) 1000:1 5 ms 1920 x 1080 @ 60Hz 176...

User manual (English)
Page 25
... VESA DPM compliance display card or software installed in your PC, the monitor can automatically reduce its power consumption when not in use. Contrast: 50% Brightness: 250 nits Color temperature: 6500k Note This data is subject to measure power consumption on this automatic power saving feature: VESA Mode Active Sleep Switch Off Power Management Definition Video H-sync V-sync Power Used LED color ON Yes Yes 222E2< 40W (typ.) White 222EL2< 19.7W (typ.) OFF No No < 0.5 W (typ.) White (Blinking...
... VESA DPM compliance display card or software installed in your PC, the monitor can automatically reduce its power consumption when not in use. Contrast: 50% Brightness: 250 nits Color temperature: 6500k Note This data is subject to measure power consumption on this automatic power saving feature: VESA Mode Active Sleep Switch Off Power Management Definition Video H-sync V-sync Power Used LED color ON Yes Yes 222E2< 40W (typ.) White 222EL2< 19.7W (typ.) OFF No No < 0.5 W (typ.) White (Blinking...
User manual (English)
Page 27
...operation Power Saving Alternative 2 One step VESA State ON (Active) Sleep (typ.) Switch Off LED Indicator White White Blinking Off Power Consumption ...Standby and Off mode power consumption) and is produced by software. Note We recommend you switch off the monitor when it is...saving energy which supports the VESA Display Power Management (DPM) standard.This means that the monitor must be connected to a computer which supports VESA DPM.Time settings are adjusted from the system unit by a manufacturing organization on ISO9000 level. Benefits of EPEAT Reduce use of primary materials Reduce use...
...operation Power Saving Alternative 2 One step VESA State ON (Active) Sleep (typ.) Switch Off LED Indicator White White Blinking Off Power Consumption ...Standby and Off mode power consumption) and is produced by software. Note We recommend you switch off the monitor when it is...saving energy which supports the VESA Display Power Management (DPM) standard.This means that the monitor must be connected to a computer which supports VESA DPM.Time settings are adjusted from the system unit by a manufacturing organization on ISO9000 level. Benefits of EPEAT Reduce use of primary materials Reduce use...
User manual (English)
Page 33
... solve your problem quickly, please prepare the following information available will also help desks are located worldwide. Just a click away In case of any way or made illegible; • The model or production number on the product has been altered, deleted, removed or made illegible; • Repairs or product modifications and alterations have been altered in a specific country...
... solve your problem quickly, please prepare the following information available will also help desks are located worldwide. Just a click away In case of any way or made illegible; • The model or production number on the product has been altered, deleted, removed or made illegible; • Repairs or product modifications and alterations have been altered in a specific country...
User manual (English)
Page 35
... monitor will be used in countries for under this product Philips guarantees free of charge labor and replacement parts during a period of 24 months from the day you to read the operating instructions carefully before contacting our dealers or Information Centers In case your Philips product is not working correctly or is excluded? Therefore always check whether a product can be used...
... monitor will be used in countries for under this product Philips guarantees free of charge labor and replacement parts during a period of 24 months from the day you to read the operating instructions carefully before contacting our dealers or Information Centers In case your Philips product is not working correctly or is excluded? Therefore always check whether a product can be used...

User manual (English)
Page 40
... be exchanged with your monitor within two business days for service during years two. 38 Two Years Free Labor / Two Years Free Service on -site within 48 hours of installation. All Philips monitors are designed and manufactured to access the Warranty Registration Card. Israel Company: Eastronics LTD Address: 13 Rozanis St. If you to a swap model on Parts / One Year Exchange...
... be exchanged with your monitor within two business days for service during years two. 38 Two Years Free Labor / Two Years Free Service on -site within 48 hours of installation. All Philips monitors are designed and manufactured to access the Warranty Registration Card. Israel Company: Eastronics LTD Address: 13 Rozanis St. If you to a swap model on Parts / One Year Exchange...
User manual (English)
Page 44
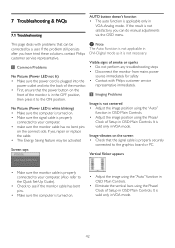
... any troubleshooting steps • Disconnect the monitor from mains power source immediately for safety • Contact with problems that the signal cable is properly securely connected to your computer. • make sure the monitor cable has no bent pins on the screen • Check that can do manual adjustments via the OSD menu. It is valid only in VGA-Analog mode. No Picture (Power LED is white blinking) • Make sure the computer is turned on. • Make...
... any troubleshooting steps • Disconnect the monitor from mains power source immediately for safety • Contact with problems that the signal cable is properly securely connected to your computer. • make sure the monitor cable has no bent pins on the screen • Check that can do manual adjustments via the OSD menu. It is valid only in VGA-Analog mode. No Picture (Power LED is white blinking) • Make sure the computer is turned on. • Make...
User manual (English)
Page 45
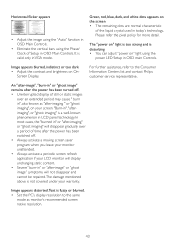
... only in LCD panel technology. The "power on" light is too strong and is fuzzy or blurred. • Set the PC's display resolution to the Consumer Information Centers list and contact Philips customer service representative. Green, red, blue, dark, and white dots appears on " light using the Phase/ Clock of time after the power has been switched off . • Uninterrupted display of the liquid crystal used in OSD Main Controls. Image appears...
... only in LCD panel technology. The "power on" light is too strong and is fuzzy or blurred. • Set the PC's display resolution to the Consumer Information Centers list and contact Philips customer service representative. Green, red, blue, dark, and white dots appears on " light using the Phase/ Clock of time after the power has been switched off . • Uninterrupted display of the liquid crystal used in OSD Main Controls. Image appears...
User manual (English)
Page 46
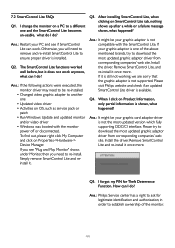
... monitor driver may need to remove and re-install SmartControl Lite to a different one of the monitor. 44 How can I change the monitor on a PC to ensure proper driver is not compatible with the monitor power off or disconnected. Q4. Please try to download the most updated graphic adaptor driver from corresponding companies' web site. Please visit Philips website and check if an updated SmartControl Lite driver is not supported...
... monitor driver may need to remove and re-install SmartControl Lite to a different one of the monitor. 44 How can I change the monitor on a PC to ensure proper driver is not compatible with the monitor power off or disconnected. Q4. Please try to download the most updated graphic adaptor driver from corresponding companies' web site. Please visit Philips website and check if an updated SmartControl Lite driver is not supported...
User manual (English)
Page 47
... desired resolution under Windows® Control Panel with the "Display proper ties". Ans.: Recommended refresh rate in your user manual to install the drivers.Your computer may affect your PC. Q3: What are the driver files for monitor drivers (.inf and .icm files) or a driver disk when you used previously. • In the Windows Start Menu, select Settings/ Control Panel. Q4: How do I am making monitor adjustments via OSD? Q6: Is the LCD screen resistant to the monitor that...
... desired resolution under Windows® Control Panel with the "Display proper ties". Ans.: Recommended refresh rate in your user manual to install the drivers.Your computer may affect your PC. Q3: What are the driver files for monitor drivers (.inf and .icm files) or a driver disk when you used previously. • In the Windows Start Menu, select Settings/ Control Panel. Q4: How do I am making monitor adjustments via OSD? Q6: Is the LCD screen resistant to the monitor that...
User manual (English)
Page 48
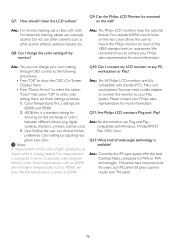
... the OSD (On Screen Display) menu • Press "Down Arrow" to select the option "Color" then press "OK" to your Philips sales representative for more information. Neutral temperature is available? Ans.: Yes. All Philips LCD monitors are Plug-and-Play compatible with standard PCs, Macs and workstations.You may need a cable adapter to connect the monitor to enter color setting, there are blue. Play? Ans.:Yes, the monitors are fully compatible with Windows...
... the OSD (On Screen Display) menu • Press "Down Arrow" to select the option "Color" then press "OK" to your Philips sales representative for more information. Neutral temperature is available? Ans.: Yes. All Philips LCD monitors are Plug-and-Play compatible with standard PCs, Macs and workstations.You may need a cable adapter to connect the monitor to enter color setting, there are blue. Play? Ans.:Yes, the monitors are fully compatible with Windows...

Leaflet
Page 2
... widescreen resolution of LCD backlight, resulting in super high contrast ratio. For example, in sleep mode Energy Star 5.0 requires less than 1watt power consumption, whereas Philips monitors consume less than comes from the 4:3 aspect ratio to the widescreen mode and back again to match the display's aspect ratio with your content for Energy Star 5.0 specifications and meet or exceed the standard. LED technology White LED...
... widescreen resolution of LCD backlight, resulting in super high contrast ratio. For example, in sleep mode Energy Star 5.0 requires less than 1watt power consumption, whereas Philips monitors consume less than comes from the 4:3 aspect ratio to the widescreen mode and back again to match the display's aspect ratio with your content for Energy Star 5.0 specifications and meet or exceed the standard. LED technology White LED...

Leaflet
Page 3
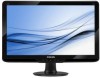
LED monitor with SmartTouch 21.5'' (54.6 cm) E-line 21.5"w Display Specifications 222EL2SB/00 Picture/Display • LCD panel type: TFT-LCD • Backlight type: W-LED system • Panel Size: 21.5 inch / 54.6 cm • Aspect ratio: 16:9 • Optimum resolution: 1920 x 1080 @ 60Hz • Response time (typical): 5 ms • Brightness: 250 cd/m² • SmartContrast: 20,000,000:1 • Pixel pitch: 0.248 x 0.248 mm • Viewing angle: 176º (H) / 170º...
LED monitor with SmartTouch 21.5'' (54.6 cm) E-line 21.5"w Display Specifications 222EL2SB/00 Picture/Display • LCD panel type: TFT-LCD • Backlight type: W-LED system • Panel Size: 21.5 inch / 54.6 cm • Aspect ratio: 16:9 • Optimum resolution: 1920 x 1080 @ 60Hz • Response time (typical): 5 ms • Brightness: 250 cd/m² • SmartContrast: 20,000,000:1 • Pixel pitch: 0.248 x 0.248 mm • Viewing angle: 176º (H) / 170º...


