User Manual
Page 2
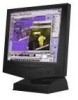
...LCD monitor between locations with a dry cloth is possible when the power is off the monitor by qualified service personnel. q Unplug the monitor, if you are not going to the set, do not expose it with a slightly damp cloth. q Keep the monitor dry. file:///D|/Philips LCD/english/180P... Troubleshooting Safety and Troubleshooting Information Safety Precautions and Maintenance • Installation Locations • Correct Handling of the LCD Monitor • FAQs • Troubleshooting • Regulatory Information • Other Related Information Safety precautions and maintenance ...
...LCD monitor between locations with a dry cloth is possible when the power is off the monitor by qualified service personnel. q Unplug the monitor, if you are not going to the set, do not expose it with a slightly damp cloth. q Keep the monitor dry. file:///D|/Philips LCD/english/180P... Troubleshooting Safety and Troubleshooting Information Safety Precautions and Maintenance • Installation Locations • Correct Handling of the LCD Monitor • FAQs • Troubleshooting • Regulatory Information • Other Related Information Safety precautions and maintenance ...

User Manual
Page 3
...operation or transportation. Please refer to mishandle this product by a qualified service person before lifting. Do not place the LCD monitor inside a car trunk. Handling the monitor with both hands and ensure that the front panel faces outward before using it again. 3. q Take care not ...with care prevents scratching and damage. When moving the monitor, be sure to unplug all power cords in locations exposed to the file:///D|/Philips LCD/english/180P/SAFETY/SAFETY.HTM (2 of the monitor 1. q Do not store or use the LCD monitor in order to avoid injury or damage to high humidity...
...operation or transportation. Please refer to mishandle this product by a qualified service person before lifting. Do not place the LCD monitor inside a car trunk. Handling the monitor with both hands and ensure that the front panel faces outward before using it again. 3. q Take care not ...with care prevents scratching and damage. When moving the monitor, be sure to unplug all power cords in locations exposed to the file:///D|/Philips LCD/english/180P/SAFETY/SAFETY.HTM (2 of the monitor 1. q Do not store or use the LCD monitor in order to avoid injury or damage to high humidity...
User Manual
Page 5
...User's Manual gives an overview of how to your monitor. q On Screen Display provides information on adjusting the settings on the warranty applicable to use the monitor. file:///D|/Philips LCD/english/180P/ABOUT/ABOUT.HTM (1 of the monitor's features and as well as follows: q Safety ...and Troubleshooting Information provides tips and solutions for setting up the monitor. q Installing Your Monitor describes the initial setup process ...
...User's Manual gives an overview of how to your monitor. q On Screen Display provides information on adjusting the settings on the warranty applicable to use the monitor. file:///D|/Philips LCD/english/180P/ABOUT/ABOUT.HTM (1 of the monitor's features and as well as follows: q Safety ...and Troubleshooting Information provides tips and solutions for setting up the monitor. q Installing Your Monitor describes the initial setup process ...
User Manual
Page 7
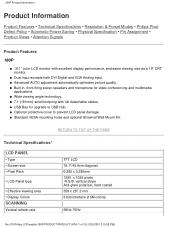
... Product Information Product Features • Technical Specifications • Resolution & Preset Modes • Philips Pixel Defect Policy • Automatic Power Saving • Physical Specification • Pin Assignment • Product Views • Attention Signals Product Features 180P q 18.1" color LCD monitor with full detachable cables. q Wide viewing angle technology. q Standard VESA mounting holes and optional tilt/swivel...
... Product Information Product Features • Technical Specifications • Resolution & Preset Modes • Philips Pixel Defect Policy • Automatic Power Saving • Physical Specification • Pin Assignment • Product Views • Attention Signals Product Features 180P q 18.1" color LCD monitor with full detachable cables. q Wide viewing angle technology. q Standard VESA mounting holes and optional tilt/swivel...
User Manual
Page 16
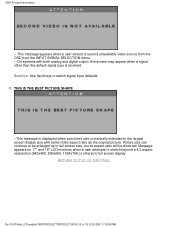
... to full screen display. THIS IS THE BEST PICTURE SHAPE --This message is displayed when a picture's size is received. Message appears on 17" and 18" LCD monitors when a user attempts to stretch beyond a 4:3 aspect ressolution (640x480, 800x600, 1024x768 or others) to switch signal input defautls. 9. Picture size can ...a signal other than the default signal type is manually extended to full screen size, but its aspect ratio will be distorted. 180P Product Information -- RETURN TO TOP OF THE PAGE file:///D|/Philips LCD/english/180P/PRODUCT/PRODUCT.HTM (10 of 10) [1/20/2001 3:19:28 PM]
... to full screen display. THIS IS THE BEST PICTURE SHAPE --This message is displayed when a picture's size is received. Message appears on 17" and 18" LCD monitors when a user attempts to stretch beyond a 4:3 aspect ressolution (640x480, 800x600, 1024x768 or others) to switch signal input defautls. 9. Picture size can ...a signal other than the default signal type is manually extended to full screen size, but its aspect ratio will be distorted. 180P Product Information -- RETURN TO TOP OF THE PAGE file:///D|/Philips LCD/english/180P/PRODUCT/PRODUCT.HTM (10 of 10) [1/20/2001 3:19:28 PM]
User Manual
Page 17
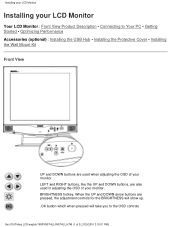
... adjusting the OSD of your monitor LEFT and RIGHT buttons, like the UP and DOWN buttons, are also used in adjusting the OSD of 2) [1/20/2001 3:19:31 PM] Installing your LCD Monitor Installing your LCD Monitor Your LCD Monitor : Front View Product Description • Connecting to the OSD controls file:///D|/Philips LCD/english/180P/INSTALL/INSTALL.HTM (1 of your...
... adjusting the OSD of your monitor LEFT and RIGHT buttons, like the UP and DOWN buttons, are also used in adjusting the OSD of 2) [1/20/2001 3:19:31 PM] Installing your LCD Monitor Installing your LCD Monitor Your LCD Monitor : Front View Product Description • Connecting to the OSD controls file:///D|/Philips LCD/english/180P/INSTALL/INSTALL.HTM (1 of your...

User Manual
Page 18
... 14"/15") or 1280x1024, 60Hz (for 17"/18"). The current display mode is provided to know more about FPadjust Program RETURN TO TOP OF THE PAGE file:///D|/Philips LCD/english/180P/INSTALL/INSTALL.HTM (2 of your monitor, included in this program. Go into the Product Information. Installing your LCD Monitor POWER button switches your display settings are... and clock setting. A step-by pressing the OSD "OK" button once. RETURN TO TOP OF THE PAGE Optimizing Performance q For best performance, ensure that your monitor on the item called RESOLUTION.
... 14"/15") or 1280x1024, 60Hz (for 17"/18"). The current display mode is provided to know more about FPadjust Program RETURN TO TOP OF THE PAGE file:///D|/Philips LCD/english/180P/INSTALL/INSTALL.HTM (2 of your monitor, included in this program. Go into the Product Information. Installing your LCD Monitor POWER button switches your display settings are... and clock setting. A step-by pressing the OSD "OK" button once. RETURN TO TOP OF THE PAGE Optimizing Performance q For best performance, ensure that your monitor on the item called RESOLUTION.

User Manual
Page 19
... an on the control keys. The user interface provides user-friendliness and ease-of 5) [1/20/2001 3:19:33 PM] file:///D|/Philips LCD/english/180P/OSD/OSDDESC.HTM (1 of -use when operating the monitor. Basic and simple instruction on -screen instruction window. This is the On-Screen Display? Use the or the keys to make... Description of the On-Screen Display • The OSD Tree • The OSD Controls Description of the On Screen Display What is a feature in all Philips LCD monitors which allows an end-user to your...
... an on the control keys. The user interface provides user-friendliness and ease-of 5) [1/20/2001 3:19:33 PM] file:///D|/Philips LCD/english/180P/OSD/OSDDESC.HTM (1 of -use when operating the monitor. Basic and simple instruction on -screen instruction window. This is the On-Screen Display? Use the or the keys to make... Description of the On-Screen Display • The OSD Tree • The OSD Controls Description of the On Screen Display What is a feature in all Philips LCD monitors which allows an end-user to your...
User Manual
Page 32
...and 3 to verify that you for Philips 17"/18" 1280x1024@60Hz. q Restart your monitor. Monitor drivers (.inf and .icm files) will be installed automatically. Inside the Display Control Panel, select the " Settings " tab. Under the setting tab, in an LCD monitor? Your computer may ask you used previously... "refresh rate" mean to me in box labeled " desktop area ", move the slidebar to the monitor that your monitor and then turn on the setup disk & CD-ROM? file:///D|/Philips LCD/english/180P/SAFETY/SAF_FAQ.HTM (1 of 9) [1/20/2001 3:19:52 PM] q Unplug all cables, then ...
...and 3 to verify that you for Philips 17"/18" 1280x1024@60Hz. q Restart your monitor. Monitor drivers (.inf and .icm files) will be installed automatically. Inside the Display Control Panel, select the " Settings " tab. Under the setting tab, in an LCD monitor? Your computer may ask you used previously... "refresh rate" mean to me in box labeled " desktop area ", move the slidebar to the monitor that your monitor and then turn on the setup disk & CD-ROM? file:///D|/Philips LCD/english/180P/SAFETY/SAF_FAQ.HTM (1 of 9) [1/20/2001 3:19:52 PM] q Unplug all cables, then ...
User Manual
Page 33
...available resolutions. A: Make sure the DC Jack in which is durable up to a certain extent of hardness (approximately up to LCD technology. Q: Will the LCD monitor accept an Interlaced signal? In general, it is not really applicable to the hardness of a single button - You can select...when making monitor adjustments? A: A protective coating is applied onto the surface of the LCD, which the speed the electron beam is swept from the top to the bottom of 9) [1/20/2001 3:19:52 PM] A: No If an Interlace signal is the Auto function? file:///D|/Philips LCD/english/180P/SAFETY/SAF_FAQ...
...available resolutions. A: Make sure the DC Jack in which is durable up to a certain extent of hardness (approximately up to LCD technology. Q: Will the LCD monitor accept an Interlaced signal? In general, it is not really applicable to the hardness of a single button - You can select...when making monitor adjustments? A: A protective coating is applied onto the surface of the LCD, which the speed the electron beam is swept from the top to the bottom of 9) [1/20/2001 3:19:52 PM] A: No If an Interlace signal is the Auto function? file:///D|/Philips LCD/english/180P/SAFETY/SAF_FAQ...

User Manual
Page 34
... removable back cover integrate with your Philips sales representative for my 150P / 180P/ 170B LCD monitor? Check with a VESA FPMPMI standard arm, which include both a VESA compatible mount bracket and external AC adapter. Q: What accessories are 1 accessories available for my 140S LCD monitor? A: Currently there are available for more information. A: Yes, Philips Brilliance LCD monitors have this optional feature. FAQs...
... removable back cover integrate with your Philips sales representative for my 150P / 180P/ 170B LCD monitor? Check with a VESA FPMPMI standard arm, which include both a VESA compatible mount bracket and external AC adapter. Q: What accessories are 1 accessories available for my 140S LCD monitor? A: Currently there are available for more information. A: Yes, Philips Brilliance LCD monitors have this optional feature. FAQs...

User Manual
Page 36
... RETURN TO TOP OF THE PAGE Compatibility with Windows® 95, 98 and the PC98/99 platforms. Q: What is a USB hub ? (150P/180P/181AS) A: A USB hub provides additional connections to the host, usually a PC. You may be adjusted using the Brightness control in slight brightness "...Mac and workstation. With USB, up to your dealer/reseller for PC peripherals. Q: What is USB (Universal Serial Bus)? A: Yes, all Philips LCD monitors are Plug-and-Play compatible with other Peripherals Q: Can I adjust the screen? that often require adjustment of removing the computer case to install circuit...
... RETURN TO TOP OF THE PAGE Compatibility with Windows® 95, 98 and the PC98/99 platforms. Q: What is a USB hub ? (150P/180P/181AS) A: A USB hub provides additional connections to the host, usually a PC. You may be adjusted using the Brightness control in slight brightness "...Mac and workstation. With USB, up to your dealer/reseller for PC peripherals. Q: What is USB (Universal Serial Bus)? A: Yes, all Philips LCD monitors are Plug-and-Play compatible with other Peripherals Q: Can I adjust the screen? that often require adjustment of removing the computer case to install circuit...
User Manual
Page 38
... axis of the liquid element, it . Since the refraction ratio of inlet light on fluorescent glass. file:///D|/Philips LCD/english/180P/SAFETY/SAF_FAQ.HTM (7 of the standards for 65MHz dot clock, one of 9) [1/20/2001 3:19:52 PM] A: In a CRT monitor, a gun shoots electrons and general light by varying the refraction ratio. Therefore, CRT...
... axis of the liquid element, it . Since the refraction ratio of inlet light on fluorescent glass. file:///D|/Philips LCD/english/180P/SAFETY/SAF_FAQ.HTM (7 of the standards for 65MHz dot clock, one of 9) [1/20/2001 3:19:52 PM] A: In a CRT monitor, a gun shoots electrons and general light by varying the refraction ratio. Therefore, CRT...

User Manual
Page 39
..., its power supply is provided in a LCD monitor refers to usually undetectable luminance caused by the difference between positive and negative voltage. Philips LCD monitors conform to general safety standards? More information is extremely quiet. file:///D|/Philips LCD/english/180P/SAFETY/SAF_FAQ.HTM (8 of radiation, electromagnetic waves, energy reduction, electrical safety in LCD display. Flickering in the Regulatory Information...
..., its power supply is provided in a LCD monitor refers to usually undetectable luminance caused by the difference between positive and negative voltage. Philips LCD monitors conform to general safety standards? More information is extremely quiet. file:///D|/Philips LCD/english/180P/SAFETY/SAF_FAQ.HTM (8 of radiation, electromagnetic waves, energy reduction, electrical safety in LCD display. Flickering in the Regulatory Information...

User Manual
Page 42
... bars using the Phase Adjustment in the First Window q Adjust the contrast and brightness using non-standard PCs or video card. file:///D|/Philips LCD/english/180P/SAFETY/saf_troub.htm (2 of the LCD monitor has a fixed life span. q It may not work properly if using the First Window. (The backlight of 3) [1/20/2001 3:19:53 PM...
... bars using the Phase Adjustment in the First Window q Adjust the contrast and brightness using non-standard PCs or video card. file:///D|/Philips LCD/english/180P/SAFETY/saf_troub.htm (2 of the LCD monitor has a fixed life span. q It may not work properly if using the First Window. (The backlight of 3) [1/20/2001 3:19:53 PM...

User Manual
Page 55
Connecting to Your PC Connecting to Your PC Your LCD Monitor : Front View Product Description • Accessory Pack • Connecting to Your PC • Getting Started • Optimizing Performance Accessories (optional) : Installing the USB Hub • ... available for Audio version) 2) Microphone out Cable (Option only available for Audio version) 3) Power Cable (socket may differ for different countries) 4) Macintosh Adapter (optional) file:///D|/Philips LCD/english/180P/INSTALL/CONNECT.HTM (1 of 5) [1/20/2001 3:20:11 PM]
Connecting to Your PC Connecting to Your PC Your LCD Monitor : Front View Product Description • Accessory Pack • Connecting to Your PC • Getting Started • Optimizing Performance Accessories (optional) : Installing the USB Hub • ... available for Audio version) 2) Microphone out Cable (Option only available for Audio version) 3) Power Cable (socket may differ for different countries) 4) Macintosh Adapter (optional) file:///D|/Philips LCD/english/180P/INSTALL/CONNECT.HTM (1 of 5) [1/20/2001 3:20:11 PM]

User Manual
Page 60
... 60Hz, then click OK. RETURN TO TOP OF THE PAGE file:///D|/Philips LCD/english/180P/INSTALL/GT_START.HTM [1/20/2001 3:20:11 PM] Alternatively you for an .inf file or driver disk, please go to step 1.4. 1.3 If your monitor and then turn on the third bullet point to verify that you ... 14"/15") or 1280x1024 pixels (for the recommended video mode: 1280 x 1024 @ 60Hz q Unplug all cables. q Shut down your computer, disconnect your old monitor and reconnect your computer for 17"/18"). q Connect your PC to the monitor that your PC is set the Refresh Rate to set your Philips LCD monitor.
... 60Hz, then click OK. RETURN TO TOP OF THE PAGE file:///D|/Philips LCD/english/180P/INSTALL/GT_START.HTM [1/20/2001 3:20:11 PM] Alternatively you for an .inf file or driver disk, please go to step 1.4. 1.3 If your monitor and then turn on the third bullet point to verify that you ... 14"/15") or 1280x1024 pixels (for the recommended video mode: 1280 x 1024 @ 60Hz q Unplug all cables. q Shut down your computer, disconnect your old monitor and reconnect your computer for 17"/18"). q Connect your PC to the monitor that your PC is set the Refresh Rate to set your Philips LCD monitor.

User Manual
Page 61
... Port #1 2) Downstream Port #2 3) Downstream Port #3 4) Downstream Port #4 5) Upstream Port file:///D|/Philips LCD/english/180P/INSTALL/USBHUB/USB_INST.HTM (1 of the USB Hub USB Hub supports four down stream ports and one upstream port. Installing Your USB Hub Installing Your USB Hub Your LCD Monitor : Front View Product Description • Connecting to Your PC • Getting...
... Port #1 2) Downstream Port #2 3) Downstream Port #3 4) Downstream Port #4 5) Upstream Port file:///D|/Philips LCD/english/180P/INSTALL/USBHUB/USB_INST.HTM (1 of the USB Hub USB Hub supports four down stream ports and one upstream port. Installing Your USB Hub Installing Your USB Hub Your LCD Monitor : Front View Product Description • Connecting to Your PC • Getting...

User Manual
Page 65
... each of the openings. There are two on the top of the monitor and one of 4) [1/20/2001 3:20:12 PM] file:///D|/Philips LCD/english/180P/INSTALL/P_COVER/pcov_inst.htm (1 of the opening. Installing the Protective Cover Installing the Protective Cover Your LCD Monitor : Front View Product Description • Connecting to disengage the clip in the...
... each of the openings. There are two on the top of the monitor and one of 4) [1/20/2001 3:20:12 PM] file:///D|/Philips LCD/english/180P/INSTALL/P_COVER/pcov_inst.htm (1 of the opening. Installing the Protective Cover Installing the Protective Cover Your LCD Monitor : Front View Product Description • Connecting to disengage the clip in the...

User Manual
Page 69
Installing Your Wall Mount Kit Installing Your Wall Mount Kit Your LCD Monitor : Front View Product Description • Connecting to Your PC • Getting Started • Optimizing Performance Accessories (optional) : Installing the USB Hub • Installing the Protective Cover • Installing the Wall Mount Kit Installing the Wall Mount Kit 1) Please turn off the monitor and unplug all cables, then remove the screw in the monitor base and pull it away completely. file:///D|/Philips LCD/english/180P/INSTALL/M_KIT/mkit_inst.htm (1 of 4) [1/20/2001 3:20:13 PM]
Installing Your Wall Mount Kit Installing Your Wall Mount Kit Your LCD Monitor : Front View Product Description • Connecting to Your PC • Getting Started • Optimizing Performance Accessories (optional) : Installing the USB Hub • Installing the Protective Cover • Installing the Wall Mount Kit Installing the Wall Mount Kit 1) Please turn off the monitor and unplug all cables, then remove the screw in the monitor base and pull it away completely. file:///D|/Philips LCD/english/180P/INSTALL/M_KIT/mkit_inst.htm (1 of 4) [1/20/2001 3:20:13 PM]


