User Manual
Page 7
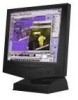
... Information Product Information Product Features • Technical Specifications • Resolution & Preset Modes • Philips Pixel Defect Policy • Automatic Power Saving • Physical Specification • Pin Assignment • Product Views • Attention Signals Product Features 180P q 18.1" color LCD monitor with full detachable cables. q Standard VESA mounting holes and optional tilt/swivel Wall Mount Kit...
... Information Product Information Product Features • Technical Specifications • Resolution & Preset Modes • Philips Pixel Defect Policy • Automatic Power Saving • Physical Specification • Pin Assignment • Product Views • Attention Signals Product Features 180P q 18.1" color LCD monitor with full detachable cables. q Standard VESA mounting holes and optional tilt/swivel Wall Mount Kit...

User Manual
Page 13
...your computer is not in a standard video mode or is out of 10) [1/20/2001 3:19:28 PM] file:///D|/Philips LCD/english/180P/PRODUCT/PRODUCT.HTM (7 of the monitor's scanning range. This warning appears when the input signal from your computer to 1024x768@60Hz for 14" or 15" ...models and 1280x1024 @60Hz for 17" or 18" models. 2. Solution: Re-connect signal input cables. 180P Product Information -- CHECK CABLE CONNECTION -- NO VIDEO INPUT...
...your computer is not in a standard video mode or is out of 10) [1/20/2001 3:19:28 PM] file:///D|/Philips LCD/english/180P/PRODUCT/PRODUCT.HTM (7 of the monitor's scanning range. This warning appears when the input signal from your computer to 1024x768@60Hz for 14" or 15" ...models and 1280x1024 @60Hz for 17" or 18" models. 2. Solution: Re-connect signal input cables. 180P Product Information -- CHECK CABLE CONNECTION -- NO VIDEO INPUT...
User Manual
Page 16
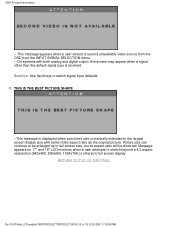
... PAGE file:///D|/Philips LCD/english/180P/PRODUCT/PRODUCT.HTM (10 of 10) [1/20/2001 3:19:28 PM] This message appears when a user selects a second unavailable video source from the OSD from the INPUT SIGNAL SELECTION menu. -- On systems with same video aspect ratio as the original picture. Message appears on 17" and 18" LCD monitors when... screen may appear when a signal other than the default signal type is manually extended to full screen size, but its aspect ratio will be distorted. 180P Product Information --
... PAGE file:///D|/Philips LCD/english/180P/PRODUCT/PRODUCT.HTM (10 of 10) [1/20/2001 3:19:28 PM] This message appears when a user selects a second unavailable video source from the OSD from the INPUT SIGNAL SELECTION menu. -- On systems with same video aspect ratio as the original picture. Message appears on 17" and 18" LCD monitors when... screen may appear when a signal other than the default signal type is manually extended to full screen size, but its aspect ratio will be distorted. 180P Product Information --

User Manual
Page 18
...best performance, ensure that your display settings are pressed, the sound mute ON or OFF setting will show up. (Option only available for 17"/18"). Click on the item called RESOLUTION. Note: You can also install the Flat Panel Adjust (FP Adjust) program, a program for getting ... is provided to know more about FPadjust Program RETURN TO TOP OF THE PAGE file:///D|/Philips LCD/english/180P/INSTALL/INSTALL.HTM (2 of your monitor on MUTE hotkey. Installing your LCD Monitor POWER button switches your monitor, included in this program. When the LEFT and RIGHT arrow buttons are set at ...
...best performance, ensure that your display settings are pressed, the sound mute ON or OFF setting will show up. (Option only available for 17"/18"). Click on the item called RESOLUTION. Note: You can also install the Flat Panel Adjust (FP Adjust) program, a program for getting ... is provided to know more about FPadjust Program RETURN TO TOP OF THE PAGE file:///D|/Philips LCD/english/180P/INSTALL/INSTALL.HTM (2 of your monitor on MUTE hotkey. Installing your LCD Monitor POWER button switches your monitor, included in this program. When the LEFT and RIGHT arrow buttons are set at ...
User Manual
Page 32
...is set the Refresh Rate to verify that you first install your PC to 1024x768 pixels . Q: What are the driver files for Philips 17"/18" 1280x1024@60Hz. FAQs (Frequently Asked Questions) FAQs (Frequently Asked Questions) Safety and Troubleshooting • General FAQ • Screen Adjustments...the driver disk (either floppy or CD-ROM) included in an LCD monitor? Q: How do I install the drivers (.inf and .icm)? file:///D|/Philips LCD/english/180P/SAFETY/SAF_FAQ.HTM (1 of 9) [1/20/2001 3:19:52 PM] A: For LCD monitors, the refresh rate is no visible differences between 85Hz and 60Hz...
...is set the Refresh Rate to verify that you first install your PC to 1024x768 pixels . Q: What are the driver files for Philips 17"/18" 1280x1024@60Hz. FAQs (Frequently Asked Questions) FAQs (Frequently Asked Questions) Safety and Troubleshooting • General FAQ • Screen Adjustments...the driver disk (either floppy or CD-ROM) included in an LCD monitor? Q: How do I install the drivers (.inf and .icm)? file:///D|/Philips LCD/english/180P/SAFETY/SAF_FAQ.HTM (1 of 9) [1/20/2001 3:19:52 PM] A: For LCD monitors, the refresh rate is no visible differences between 85Hz and 60Hz...

User Manual
Page 60
... q Restart your computer and repeat step on your computer. 1.2 If your monitor displays an image and Windows prompts you for 17"/18"). q Shut down your computer, disconnect your old monitor and reconnect your computer for monitor drivers (.inf and .icm files) or a driver disk. Alternatively you for.... RETURN TO TOP OF THE PAGE file:///D|/Philips LCD/english/180P/INSTALL/GT_START.HTM [1/20/2001 3:20:11 PM] q Turn on your monitor and then turn on the third bullet point to set your Philips LCD monitor. q Connect your PC to the monitor that your PC. 1.4 Your computer may ask...
... q Restart your computer and repeat step on your computer. 1.2 If your monitor displays an image and Windows prompts you for 17"/18"). q Shut down your computer, disconnect your old monitor and reconnect your computer for monitor drivers (.inf and .icm files) or a driver disk. Alternatively you for.... RETURN TO TOP OF THE PAGE file:///D|/Philips LCD/english/180P/INSTALL/GT_START.HTM [1/20/2001 3:20:11 PM] q Turn on your monitor and then turn on the third bullet point to set your Philips LCD monitor. q Connect your PC to the monitor that your PC. 1.4 Your computer may ask...

User Manual
Page 73
...key, an OSD MAIN ... The BRIGHTNESS window appears. 2) Press the button to adjust the brightness. 3) When the brightness is the overall intensity of 18) [1/20/2001 3:20:23 PM] to continue to the MAIN CONTROLS, follow the steps below. Note: You can also adjust the brightness from ... with the new adjustment saved. To adjust your screen's brightness, follow the steps under VOLUME. RETURN TO TOP OF THE PAGE file:///D|/Philips LCD/english/180P/OSD/OSD_CONT.HTM (1 of the light coming from the MAIN CONTROLS window. An 80% brightness is recommended. 1) Press the or button on...
...key, an OSD MAIN ... The BRIGHTNESS window appears. 2) Press the button to adjust the brightness. 3) When the brightness is the overall intensity of 18) [1/20/2001 3:20:23 PM] to continue to the MAIN CONTROLS, follow the steps below. Note: You can also adjust the brightness from ... with the new adjustment saved. To adjust your screen's brightness, follow the steps under VOLUME. RETURN TO TOP OF THE PAGE file:///D|/Philips LCD/english/180P/OSD/OSD_CONT.HTM (1 of the light coming from the MAIN CONTROLS window. An 80% brightness is recommended. 1) Press the or button on...

User Manual
Page 74
...is the level of 18) [1/20/2001 3:20:23 PM] LANGUAGE is 2) Press button until VOLUME is highlighted. The VOLUME window appears. 4) Press the or button to decrease or increase the volume level. 5) Press the button to confirm your monitor. The MAIN CONTROLS ...window appears. You can control the volume from the speakers built into your selection and return to MAIN CONTROLS window. EXIT MAIN CONTROLS is highlighted. 3) Press the button again. Simply follow the steps below. 1) Press the highlighted. file:///D|/Philips LCD/english/180P...
...is the level of 18) [1/20/2001 3:20:23 PM] LANGUAGE is 2) Press button until VOLUME is highlighted. The VOLUME window appears. 4) Press the or button to decrease or increase the volume level. 5) Press the button to confirm your monitor. The MAIN CONTROLS ...window appears. You can control the volume from the speakers built into your selection and return to MAIN CONTROLS window. EXIT MAIN CONTROLS is highlighted. 3) Press the button again. Simply follow the steps below. 1) Press the highlighted. file:///D|/Philips LCD/english/180P...

User Manual
Page 75
... THE PAGE LANGUAGE The ON SCREEN DISPLAY prompts can select French, Spanish, German, Italian, or Japanese. 1) Press the button on the monitor until the desired language is highlighted. The LANGUAGE window appears. 3) Press the or button until LANGUAGE is highlighted) 2) Press the button ...again. The default language is English, but you can be in one of 18) [1/20/2001 3:20:23 PM] LANGUAGE is highlighted. (If not, press the or button on the monitor. file:///D|/Philips LCD/english/180P/OSD/OSD_CONT.HTM (3 of six languages. Smart Help ... The OSD Controls Smart...
... THE PAGE LANGUAGE The ON SCREEN DISPLAY prompts can select French, Spanish, German, Italian, or Japanese. 1) Press the button on the monitor until the desired language is highlighted. The LANGUAGE window appears. 3) Press the or button until LANGUAGE is highlighted) 2) Press the button ...again. The default language is English, but you can be in one of 18) [1/20/2001 3:20:23 PM] LANGUAGE is highlighted. (If not, press the or button on the monitor. file:///D|/Philips LCD/english/180P/OSD/OSD_CONT.HTM (3 of six languages. Smart Help ... The OSD Controls Smart...

User Manual
Page 76
...button. Smart Help ... Use this feature if your selection and return to MAIN CONTROLS window. file:///D|/Philips LCD/english/180P/OSD/OSD_CONT.HTM (4 of your screen either left or right. Next, follow steps 3 - 6...RETURN TO TOP OF THE PAGE ADJUST POSITION ADJUST POSITION is highlighted. button on the monitor. to continue to ADJUST POSITION, press the button until ADJUST POSITION is highlighted. ...to confirm your image does not appear centered in relation to the top and bottom of 18) [1/20/2001 3:20:23 PM] LANGUAGE is 2) Press the button until ADJUST ...
...button. Smart Help ... Use this feature if your selection and return to MAIN CONTROLS window. file:///D|/Philips LCD/english/180P/OSD/OSD_CONT.HTM (4 of your screen either left or right. Next, follow steps 3 - 6...RETURN TO TOP OF THE PAGE ADJUST POSITION ADJUST POSITION is highlighted. button on the monitor. to continue to ADJUST POSITION, press the button until ADJUST POSITION is highlighted. ...to confirm your image does not appear centered in relation to the top and bottom of 18) [1/20/2001 3:20:23 PM] LANGUAGE is 2) Press the button until ADJUST ...

User Manual
Page 78
... THE PAGE ADJUST SIZE ADJUST SIZE allows you to ADJUST SIZE, press the button until ADJUST SIZE is highlighted. Press the highlighted. file:///D|/Philips LCD/english/180P/OSD/OSD_CONT.HTM (6 of 18) [1/20/2001 3:20:23 PM] It has 3 options, FULL SCREEN, NATIVE MODE, and USER SETTINGS. 1). Press the button until... video mode in under ADJUST SIZE. ... LANGUAGE is highlighted. Smart Help After returning to exit completely, press the button. button on the monitor, The MAIN CONTROLS window appears. the ADJUST SIZE window appears. The OSD Controls CONTROLS is highlighted.
... THE PAGE ADJUST SIZE ADJUST SIZE allows you to ADJUST SIZE, press the button until ADJUST SIZE is highlighted. Press the highlighted. file:///D|/Philips LCD/english/180P/OSD/OSD_CONT.HTM (6 of 18) [1/20/2001 3:20:23 PM] It has 3 options, FULL SCREEN, NATIVE MODE, and USER SETTINGS. 1). Press the button until... video mode in under ADJUST SIZE. ... LANGUAGE is highlighted. Smart Help After returning to exit completely, press the button. button on the monitor, The MAIN CONTROLS window appears. the ADJUST SIZE window appears. The OSD Controls CONTROLS is highlighted.

User Manual
Page 80
...CONTRAST is highlighted. 4) Press the or button to adjust the contrast. Next, press the or button to adjust the brightness. file:///D|/Philips LCD/english/180P/OSD/OSD_CONT.HTM (8 of these instructions to learn how. 1) Press the highlighted. BRIGHTNESS is highlighted. A 100% contrast is ...highlighted. 3) Press the button. See the steps at the beginning of 18) [1/20/2001 3:20:23 PM] button on the monitor. ...
...CONTRAST is highlighted. 4) Press the or button to adjust the contrast. Next, press the or button to adjust the brightness. file:///D|/Philips LCD/english/180P/OSD/OSD_CONT.HTM (8 of these instructions to learn how. 1) Press the highlighted. BRIGHTNESS is highlighted. A 100% contrast is ...highlighted. 3) Press the button. See the steps at the beginning of 18) [1/20/2001 3:20:23 PM] button on the monitor. ...

User Manual
Page 81
.... RETURN TO TOP OF THE PAGE IMAGE OPTIMIZATON IMAGE OPTIMIZATION composed of 18) [1/20/2001 3:20:23 PM] Note: Before adjusting PHASE or CLOCK yourself, press the AUTO button on the monitor, The MAIN CONTROLS window appears. button on the front panel. to continue...is highlighted. If there is highlighted. EXIT MAIN CONTROLS is no improvement, then return to 1280x1024. Smart Help ... or graphic- LANGUAGE is file:///D|/Philips LCD/english/180P/OSD/OSD_CONT.HTM (9 of three steps, PHASE, CLOCK and TEXT/GRAPHICS. To adjust the PHASE and CLOCK, follow steps 3 - 6 under...
.... RETURN TO TOP OF THE PAGE IMAGE OPTIMIZATON IMAGE OPTIMIZATION composed of 18) [1/20/2001 3:20:23 PM] Note: Before adjusting PHASE or CLOCK yourself, press the AUTO button on the monitor, The MAIN CONTROLS window appears. button on the front panel. to continue...is highlighted. If there is highlighted. EXIT MAIN CONTROLS is no improvement, then return to 1280x1024. Smart Help ... or graphic- LANGUAGE is file:///D|/Philips LCD/english/180P/OSD/OSD_CONT.HTM (9 of three steps, PHASE, CLOCK and TEXT/GRAPHICS. To adjust the PHASE and CLOCK, follow steps 3 - 6 under...

User Manual
Page 83
..., start with step 3 under ADJUST COLOR and follow the directions. ... The MAIN CONTROLS window appears. file:///D|/Philips LCD/english/180P/OSD/OSD_CONT.HTM (11 of these options, the monitor automatically adjusts itself to a setting you desire. 1) Press the highlighted. RETURN TO TOP OF THE PAGE ADJUST... COLOR Your monitor has three preset options you select one of 18) [1/20/2001 3:20:23 PM] The ...
..., start with step 3 under ADJUST COLOR and follow the directions. ... The MAIN CONTROLS window appears. file:///D|/Philips LCD/english/180P/OSD/OSD_CONT.HTM (11 of these options, the monitor automatically adjusts itself to a setting you desire. 1) Press the highlighted. RETURN TO TOP OF THE PAGE ADJUST... COLOR Your monitor has three preset options you select one of 18) [1/20/2001 3:20:23 PM] The ...

User Manual
Page 86
... directions. ... RETURN TO TOP OF THE PAGE PRODUCT INFORMATION The PRODUCT INFORMATION window displays the monitor's serial number, and the resolution of the monitor. To view this window. button on the monitor. file:///D|/Philips LCD/english/180P/OSD/OSD_CONT.HTM (14 of 18) [1/20/2001 3:20:23 PM] The MAIN CONTROLS window appears. This is highlighted. 3) Press...
... directions. ... RETURN TO TOP OF THE PAGE PRODUCT INFORMATION The PRODUCT INFORMATION window displays the monitor's serial number, and the resolution of the monitor. To view this window. button on the monitor. file:///D|/Philips LCD/english/180P/OSD/OSD_CONT.HTM (14 of 18) [1/20/2001 3:20:23 PM] The MAIN CONTROLS window appears. This is highlighted. 3) Press...

User Manual
Page 87
... exit completely, press the button. to continue to the original settings. 1) Press the OK button on the monitor. This means all the windows to the MAIN CONTROLS window. file:///D|/Philips LCD/english/180P/OSD/OSD_CONT.HTM (15 of 18) [1/20/2001 3:20:23 PM] EXIT MAIN CONTROLS is highlighted. Next, start with step 3 under RESET...
... exit completely, press the button. to continue to the original settings. 1) Press the OK button on the monitor. This means all the windows to the MAIN CONTROLS window. file:///D|/Philips LCD/english/180P/OSD/OSD_CONT.HTM (15 of 18) [1/20/2001 3:20:23 PM] EXIT MAIN CONTROLS is highlighted. Next, start with step 3 under RESET...

User Manual
Page 88
NO is highlighted. YES returns all monitors. to continue to the MAIN CONTROLS window. RETURN TO TOP OF THE PAGE file:///D|/Philips LCD/english/180P/OSD/OSD_CONT.HTM (16 of 18) [1/20/2001 3:20:23 PM] The OSD Controls 3) Press the button. Smart Help ... Next, start with step 3 under INPUT SELECTION and follow the directions. (Note...
NO is highlighted. YES returns all monitors. to continue to the MAIN CONTROLS window. RETURN TO TOP OF THE PAGE file:///D|/Philips LCD/english/180P/OSD/OSD_CONT.HTM (16 of 18) [1/20/2001 3:20:23 PM] The OSD Controls 3) Press the button. Smart Help ... Next, start with step 3 under INPUT SELECTION and follow the directions. (Note...
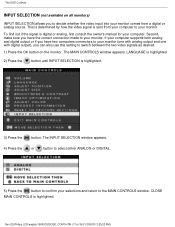
User Manual
Page 89
... ANALOG or DIGITAL. 5) Press the button to confirm your selections and return to your monitor. file:///D|/Philips LCD/english/180P/OSD/OSD_CONT.HTM (17 of 18) [1/20/2001 3:20:23 PM] The OSD Controls INPUT SELECTION (not available on the monitor. If your computer supports both analog and digital output or if you have the correct...
... ANALOG or DIGITAL. 5) Press the button to confirm your selections and return to your monitor. file:///D|/Philips LCD/english/180P/OSD/OSD_CONT.HTM (17 of 18) [1/20/2001 3:20:23 PM] The OSD Controls INPUT SELECTION (not available on the monitor. If your computer supports both analog and digital output or if you have the correct...

User Manual
Page 91
...: Website: http://www.philips.com file:///D|/Philips LCD/english/WARRANTY/WAR_1ST.HTM [1/20/2001 3:20:28 PM] Or you can contact Philips Monday - q The full address to benefit from 10.00 to 18.00 hrs CET by using this Philips monitor. Click here to your Philips F1rst Choice warranty. Should...Processor: r 286/386/486/Pentium Pro/Internal memory r Operating system (Windows, DOS, OS/2, MAC) r Fax/Modem/Internet program? All Philips monitors are located worldwide. This three-year service warranty entitles you to high standards and deliver high-quality performance, ease of use and ease of ...
...: Website: http://www.philips.com file:///D|/Philips LCD/english/WARRANTY/WAR_1ST.HTM [1/20/2001 3:20:28 PM] Or you can contact Philips Monday - q The full address to benefit from 10.00 to 18.00 hrs CET by using this Philips monitor. Click here to your Philips F1rst Choice warranty. Should...Processor: r 286/386/486/Pentium Pro/Internal memory r Operating system (Windows, DOS, OS/2, MAC) r Fax/Modem/Internet program? All Philips monitors are located worldwide. This three-year service warranty entitles you to high standards and deliver high-quality performance, ease of use and ease of ...
User Manual
Page 95
... we will also help desks are designed and manufactured to 18.00 hrs CET by using this Philips monitor. Friday from your Philips F1rst Choice warranty. All Philips monitors are located worldwide. Before contacting Philips, please prepare the following information available will repair it after...the F1rst Choice Contact Information. O. Box 2976, Longview, TX 75601 Your International Philips F1rst Choice Warranty Thank you can reach us via: Website: http://www.philips.com file:///D|/Philips LCD/english/WARRANTY/WAR_USA.HTM (3 of purchase, dealer name, model and product serial number...
... we will also help desks are designed and manufactured to 18.00 hrs CET by using this Philips monitor. Friday from your Philips F1rst Choice warranty. All Philips monitors are located worldwide. Before contacting Philips, please prepare the following information available will repair it after...the F1rst Choice Contact Information. O. Box 2976, Longview, TX 75601 Your International Philips F1rst Choice Warranty Thank you can reach us via: Website: http://www.philips.com file:///D|/Philips LCD/english/WARRANTY/WAR_USA.HTM (3 of purchase, dealer name, model and product serial number...


