Leaflet
Page 2
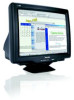
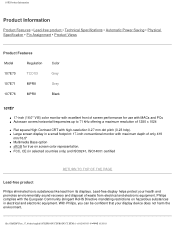
... Sync • Video Sync Polarities: Positive and Negative Convenience • User convenience: Menu Languages, On-screen Display • Monitor Controls: Bright Direct Access, Contrast Direct Access, Menu, Power On/Off • OSD Languages: English, French, German, Italian, Korean, Portuguese, Russian, Spanish, Turkish • Plug & Play Compatibility: DDC 2B, Windows 98/ ME/2000/XP • Regulatory Approvals: BSMI, CCC, CE Mark, C- CRT monitor 17" XGA 107E76/27 Specifications Product highlights Picture/Display • Display screen type: Flat Square Tube • Panel Size...
... Sync • Video Sync Polarities: Positive and Negative Convenience • User convenience: Menu Languages, On-screen Display • Monitor Controls: Bright Direct Access, Contrast Direct Access, Menu, Power On/Off • OSD Languages: English, French, German, Italian, Korean, Portuguese, Russian, Spanish, Turkish • Plug & Play Compatibility: DDC 2B, Windows 98/ ME/2000/XP • Regulatory Approvals: BSMI, CCC, CE Mark, C- CRT monitor 17" XGA 107E76/27 Specifications Product highlights Picture/Display • Display screen type: Flat Square Tube • Panel Size...
User manual (English)
Page 2
If necessary, clean with a slightly damp cloth. q When positioning the monitor, make sure to be removed by qualified service personnel. Disconnect the monitor from the power supply if the monitor is not to install the swivel base for an extended period of time. Consult a service technician if the monitor does not operate normally when operating instructions of the monitor's electronic devices. q Do not use alcohol or ammonia-based liquid...
If necessary, clean with a slightly damp cloth. q When positioning the monitor, make sure to be removed by qualified service personnel. Disconnect the monitor from the power supply if the monitor is not to install the swivel base for an extended period of time. Consult a service technician if the monitor does not operate normally when operating instructions of the monitor's electronic devices. q Do not use alcohol or ammonia-based liquid...
User manual (English)
Page 3
... as follows: q Safety and Troubleshooting Information provides tips and solutions for common problems, and other information, which is intended for this Electronic User's Guide, you may need . q Installing Your Monitor describes the initial setup process and gives an overview of what information are as the technical specifications for anyone who uses the Philips Color Monitor. q About This Electronic User's Manual gives overview of how to...
... as follows: q Safety and Troubleshooting Information provides tips and solutions for common problems, and other information, which is intended for this Electronic User's Guide, you may need . q Installing Your Monitor describes the initial setup process and gives an overview of what information are as the technical specifications for anyone who uses the Philips Color Monitor. q About This Electronic User's Manual gives overview of how to...
User manual (English)
Page 6
... Contrast CRT with high-resolution 0.27 mm dot pitch (0.23 hdp). Lead-free display helps protect your display device does not harm the environment. Philips complies with the European Community stringent RoHS Directive mandating restrictions on screen color representation. 107E Product Information Product Information Product Features • Lead-free product • Technical Specifications • Automatic Power Saving • Physical Specification • Pin Assignment • Product Views...
... Contrast CRT with high-resolution 0.27 mm dot pitch (0.23 hdp). Lead-free display helps protect your display device does not harm the environment. Philips complies with the European Community stringent RoHS Directive mandating restrictions on screen color representation. 107E Product Information Product Information Product Features • Lead-free product • Technical Specifications • Automatic Power Saving • Physical Specification • Pin Assignment • Product Views...

User manual (English)
Page 7
... / y = 0.329 x = 0.313 / y = 0.329 PRESET MODES file:///D|/EDFU/crt_17_6/edoc/english/107E/PRODUCT/PRODUCT.HTM (2 of 6)2005-05-19 ¤W¤È 10:20:01 107E Product Information Technical Specifications* CRT • Size and deflection • Dot pitch • Horizontal pitch • Tube type • Phosphor • Recommended display area • Maximum display area 17 inch / 41 cm ; 90°...
... / y = 0.329 x = 0.313 / y = 0.329 PRESET MODES file:///D|/EDFU/crt_17_6/edoc/english/107E/PRODUCT/PRODUCT.HTM (2 of 6)2005-05-19 ¤W¤È 10:20:01 107E Product Information Technical Specifications* CRT • Size and deflection • Dot pitch • Horizontal pitch • Tube type • Phosphor • Recommended display area • Maximum display area 17 inch / 41 cm ; 90°...

User manual (English)
Page 9
And if an input from a keyboard, mouse or other input device is detected, the monitor will automatically "wake up". 107E Product Information RETURN TO TOP OF THE PAGE Automatic Power Saving If you have VESA's DPMS compliance display card or software installed in your PC, the monitor can automatically reduce its power consumption when not in use. The following table shows the power consumption and signaling of this automatic power saving features: VESA's Mode Active Video Power Management Definition H-sync V-sync Power Used Power Saving (%) ON Yes Yes
And if an input from a keyboard, mouse or other input device is detected, the monitor will automatically "wake up". 107E Product Information RETURN TO TOP OF THE PAGE Automatic Power Saving If you have VESA's DPMS compliance display card or software installed in your PC, the monitor can automatically reduce its power consumption when not in use. The following table shows the power consumption and signaling of this automatic power saving features: VESA's Mode Active Video Power Management Definition H-sync V-sync Power Used Power Saving (%) ON Yes Yes
User manual (English)
Page 21
... desired available resolution through the 'Display properties/Settings' menu. In other words: If a monitor's refresh rate is 85 Hz, its screen is refresh rate? How do I adjust my monitor's resolution? Plug and Play will automatically adjust itself to the video card. 8. Available resolutions are installed for you. Under Windows '95, you must first make sure your Philips monitor model from electrical interference q Adjust the refresh rate to flicker? Select "All default selection" and choose your PC supports power saving. 7. A high refresh rate helps users who work long...
... desired available resolution through the 'Display properties/Settings' menu. In other words: If a monitor's refresh rate is 85 Hz, its screen is refresh rate? How do I adjust my monitor's resolution? Plug and Play will automatically adjust itself to the video card. 8. Available resolutions are installed for you. Under Windows '95, you must first make sure your Philips monitor model from electrical interference q Adjust the refresh rate to flicker? Select "All default selection" and choose your PC supports power saving. 7. A high refresh rate helps users who work long...

User manual (English)
Page 23
... the monitor. Eventually after a number of a display device's useful life. Frequently Asked Questions Please contact your monitor perform better and last longer. What does Auto Calibrate do? As a monitor becomes older, brightness gradually deteriorates and its original value. With Auto Calibrate, it takes a monitor's luminance 33 percent longer to deteriorate to Auto Calibrate, a monitor with a normal life of its colors change. The beam currents of the red, green and blue...
... the monitor. Eventually after a number of a display device's useful life. Frequently Asked Questions Please contact your monitor perform better and last longer. What does Auto Calibrate do? As a monitor becomes older, brightness gradually deteriorates and its original value. With Auto Calibrate, it takes a monitor's luminance 33 percent longer to deteriorate to Auto Calibrate, a monitor with a normal life of its colors change. The beam currents of the red, green and blue...

User manual (English)
Page 24
... the On Screen Display under Input Signal Selection. My screen shows NO SYNC INPUT , how can I get rid of Philips monitors are displayed. Auto Calibration takes place when a monitor receives a signal indicating an imminent switch to its sleep mode/stand-by mode. 16. Press and hold the OSD menu key for possible solutions: q Bent pins on the video cable q Make sure the computer is turned on q Ensure the VGA Cable is properly connected q Ensure the BNC/D-Sub connector on...
... the On Screen Display under Input Signal Selection. My screen shows NO SYNC INPUT , how can I get rid of Philips monitors are displayed. Auto Calibration takes place when a monitor receives a signal indicating an imminent switch to its sleep mode/stand-by mode. 16. Press and hold the OSD menu key for possible solutions: q Bent pins on the video cable q Make sure the computer is turned on q Ensure the VGA Cable is properly connected q Ensure the BNC/D-Sub connector on...
User manual (English)
Page 25
... also missing a color, please contact service for details q Set color temperature to help reduce or minimize the effects: q Some monitors have this manual degauss function. Frequently Asked Questions 19. The video card installed in value with another computer). 22. Why does my monitor have a Moire cancellation feature, activate it is less visible. q Change horizontal and vertical size to make a relatively loud noise. q If the OSD menu is degaussing...
... also missing a color, please contact service for details q Set color temperature to help reduce or minimize the effects: q Some monitors have this manual degauss function. Frequently Asked Questions 19. The video card installed in value with another computer). 22. Why does my monitor have a Moire cancellation feature, activate it is less visible. q Change horizontal and vertical size to make a relatively loud noise. q If the OSD menu is degaussing...

User manual (English)
Page 26
... location q Reset the monitor to be set at the recommended resolution 24. Please perform the following for possible solutions: q If the OSD menu is also dim, please contact service for repair q Reset the monitor via the OSD menu q Change the color temperature settings to correct the picture image: q Reset your monitor via the OSD menu q Access the Geometry Menu in the monitor 's OSD. Please review the following to 9300 color coordination via the monitor 's OSD. Some models have a Video Input Select...
... location q Reset the monitor to be set at the recommended resolution 24. Please perform the following for possible solutions: q If the OSD menu is also dim, please contact service for repair q Reset the monitor via the OSD menu q Change the color temperature settings to correct the picture image: q Reset your monitor via the OSD menu q Access the Geometry Menu in the monitor 's OSD. Please review the following to 9300 color coordination via the monitor 's OSD. Some models have a Video Input Select...
User manual (English)
Page 27
... wall socket and the monitor. Frequently Asked Questions q Set the Contrast to maximum level (100) and Brightness to middle level (50) Video card could be displayed on your computer screen. Switch the monitor back on your computer or upgrade the video cards memory. q Check that there is yellow/amber or flashing green? If you will need to either install the latest drivers onto your computer. q Unplug the monitor for power. Why is switched...
... wall socket and the monitor. Frequently Asked Questions q Set the Contrast to maximum level (100) and Brightness to middle level (50) Video card could be displayed on your computer screen. Switch the monitor back on your computer or upgrade the video cards memory. q Check that there is yellow/amber or flashing green? If you will need to either install the latest drivers onto your computer. q Unplug the monitor for power. Why is switched...

User manual (English)
Page 28
.... file:///D|/EDFU/crt_17_6/edoc/english/FAQ.HTM (13 of the monitor. Frequently Asked Questions q Check that the cable is a unique Philips feature designed to preserve the life of your picture will then be restored. First press (-)then press(+) to increase Contrast and then press and hold the (+) button to wake-up the computer from power saving mode. 29. This is attached...
.... file:///D|/EDFU/crt_17_6/edoc/english/FAQ.HTM (13 of the monitor. Frequently Asked Questions q Check that the cable is a unique Philips feature designed to preserve the life of your picture will then be restored. First press (-)then press(+) to increase Contrast and then press and hold the (+) button to wake-up the computer from power saving mode. 29. This is attached...

User manual (English)
Page 42
... number of monitor will be horizontal. The resolution is specified as the number of pixels in a line multiplied by the number of 22)2005-05-19 ¤W¤È 10:20:05 See also video graphic adapter. Refresh rate See Vertical scanning frequency. See USB section. RETURN TO TOP OF THE PAGE R Raster The area on the screen. Rotation function The feature that allows users to adjust...
... number of monitor will be horizontal. The resolution is specified as the number of pixels in a line multiplied by the number of 22)2005-05-19 ¤W¤È 10:20:05 See also video graphic adapter. Refresh rate See Vertical scanning frequency. See USB section. RETURN TO TOP OF THE PAGE R Raster The area on the screen. Rotation function The feature that allows users to adjust...

User manual (English)
Page 47
... IRQ settings when installing new peripherals. More and more peripherals for reset and suspend/resume signaling. The upstream port of power to shut down, plug in a memory device. There's no need to downstream devices. Each downstream port can run set-up to /from full speed signaling. Hub specific status and control commands permit the host to configure a hub and to the Universal Serial Bus. q USB...
... IRQ settings when installing new peripherals. More and more peripherals for reset and suspend/resume signaling. The upstream port of power to shut down, plug in a memory device. There's no need to downstream devices. Each downstream port can run set-up to /from full speed signaling. Hub specific status and control commands permit the host to configure a hub and to the Universal Serial Bus. q USB...

User manual (English)
Page 53
Having this problem? No Picture (Power LED is flashing green) q Make sure the computer is green) q Make sure the Brightness and Contrast controls are set correctly. q Check to your monitor should be activated No Picture (Power LED is turned on . q Make sure the monitor cable is properly connected to see if the monitor cable has bent pins. Something not working? Check these suggestions. q Power button on the front of your computer. q Make sure the monitor cable is turned on . q Check to the Quick Start Guide). q Make sure the computer...
Having this problem? No Picture (Power LED is flashing green) q Make sure the computer is green) q Make sure the Brightness and Contrast controls are set correctly. q Check to your monitor should be activated No Picture (Power LED is turned on . q Make sure the monitor cable is properly connected to see if the monitor cable has bent pins. Something not working? Check these suggestions. q Power button on the front of your computer. q Make sure the monitor cable is turned on . q Check to the Quick Start Guide). q Make sure the computer...
User manual (English)
Page 54
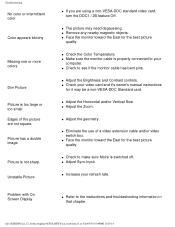
... properly connected to the instructions and troubleshooting information in that chapter. Edges of the picture are using a non-VESA-DDC standard video card, turn the DDC1 / 2B feature Off. q Remove any nearby magnetic objects. q Face the monitor toward the East for it 's owner's manual instructions for the best picture quality. q Make sure the monitor cable is switched off. q Adjust the Horizontal and/or Vertical Size. q Adjust the geometry. q Adjust Sync Input. q Refer to your refresh rate. file:///D|/EDFU/crt_17_6/edoc/english...
... properly connected to the instructions and troubleshooting information in that chapter. Edges of the picture are using a non-VESA-DDC standard video card, turn the DDC1 / 2B feature Off. q Remove any nearby magnetic objects. q Face the monitor toward the East for it 's owner's manual instructions for the best picture quality. q Make sure the monitor cable is switched off. q Adjust the Horizontal and/or Vertical Size. q Adjust the geometry. q Adjust Sync Input. q Refer to your refresh rate. file:///D|/EDFU/crt_17_6/edoc/english...
User manual (English)
Page 68
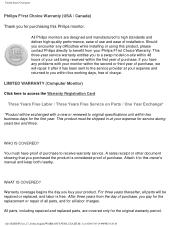
... days for all parts will repair it after it to this owner's manual and keep both nearby. Attach it has been sent to the service provider at your Philips F1rst Choice Warranty. All parts, including repaired and replaced parts, are designed and manufactured to you pay for purchasing this product, please contact Philips directly to original specifications unit within five working days, free of charge...
... days for all parts will repair it after it to this owner's manual and keep both nearby. Attach it has been sent to the service provider at your Philips F1rst Choice Warranty. All parts, including repaired and replaced parts, are designed and manufactured to you pay for purchasing this product, please contact Philips directly to original specifications unit within five working days, free of charge...

User manual (English)
Page 86
... The OSD Controls : Brightness (HotKey) • Contrast (HotKey) • Language • Zoom • Adjust Horizontal • Adjust Vertical • Adjust Shape • Adjust Color • Reset to confirm and the BRIGHTNESS window will disappear with the new adjustment saved. A 100% contrast is the difference between the light and dark areas on the monitor. The CONTRAST window appears. A 50% brightness is adjusted to the level desired, press MENU to Factory Settings • Extra Controls • Close Main Controls BRIGHTNESS To adjust your screen's contrast...
... The OSD Controls : Brightness (HotKey) • Contrast (HotKey) • Language • Zoom • Adjust Horizontal • Adjust Vertical • Adjust Shape • Adjust Color • Reset to confirm and the BRIGHTNESS window will disappear with the new adjustment saved. A 100% contrast is the difference between the light and dark areas on the monitor. The CONTRAST window appears. A 50% brightness is adjusted to the level desired, press MENU to Factory Settings • Extra Controls • Close Main Controls BRIGHTNESS To adjust your screen's contrast...

User manual (English)
Page 98
... MENU return to confirm. Press the (-) button to confirm. press MENU to highlight GREEN. Then, press (-) button to confirm. Next, press the MENU to highlight BLUE. The MAIN CONTROLS window appears. 2) Press the (+) button until RESET TO FACTORY SETTINGS is highlighted, press the MENU button to confirm. Press (-) or (+) button to adjust the color red. 6b) When finished with RED, press MENU to highlight RED. CLOSE MAIN CONTROLS will be highlighted. 6a) If USER...
... MENU return to confirm. Press the (-) button to confirm. press MENU to highlight GREEN. Then, press (-) button to confirm. Next, press the MENU to highlight BLUE. The MAIN CONTROLS window appears. 2) Press the (+) button until RESET TO FACTORY SETTINGS is highlighted, press the MENU button to confirm. Press (-) or (+) button to adjust the color red. 6b) When finished with RED, press MENU to highlight RED. CLOSE MAIN CONTROLS will be highlighted. 6a) If USER...


