
User manual (English)
Page 18
... off parts, and before cleaning the appliance. 6 Do not operate any appliance with a damaged cord or plug or after the appliance malfunctions or has been damaged in any way. Use handles or knobs. 3 To protect against fire, electric shock and personal injury do not disassemble the machine. Return appliance to fill the water tank. Repair should be done by authorized service...
... off parts, and before cleaning the appliance. 6 Do not operate any appliance with a damaged cord or plug or after the appliance malfunctions or has been damaged in any way. Use handles or knobs. 3 To protect against fire, electric shock and personal injury do not disassemble the machine. Return appliance to fill the water tank. Repair should be done by authorized service...
User manual (English)
Page 19
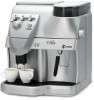
... with the intended uses; • repairs not carried out by numbers or letters, like the reference to figure 2 in this page open while reading the instructions. 1.2 How to use these operating instructions Keep these operating instructions in a safe place and make espresso coffee using coffee beans and is assumed for a heavy or professional use the coffee machine. Removable • Coffee bean hopper capacity (g) 350 g of steam and hot water. Figures corresponding to...
... with the intended uses; • repairs not carried out by numbers or letters, like the reference to figure 2 in this page open while reading the instructions. 1.2 How to use these operating instructions Keep these operating instructions in a safe place and make espresso coffee using coffee beans and is assumed for a heavy or professional use the coffee machine. Removable • Coffee bean hopper capacity (g) 350 g of steam and hot water. Figures corresponding to...
User manual (English)
Page 21
... the body from melting or being damaged. handle the steam/hot water spout with water: danger of short circuit! Power supply Only connect the coffee machine to operate a faulty machine. Cleaning Before cleaning the machine, the main power button (5) must be carried out by the manufacturer or its customer service department. Then wait for a long time, turn it off and unplug it in a dry place out of...
... the body from melting or being damaged. handle the steam/hot water spout with water: danger of short circuit! Power supply Only connect the coffee machine to operate a faulty machine. Cleaning Before cleaning the machine, the main power button (5) must be carried out by the manufacturer or its customer service department. Then wait for a long time, turn it off and unplug it in a dry place out of...
User manual (English)
Page 22
... and replace the cover (6) on , it . Keep the cleaning brush (16) to -0-. INSTALLATION Fire safety In case of the lights on the control panel (section 14). 4.3 Turning on light 4 INSTALLATION For your own and for the first time • (Fig. 25) - If the red light (22) flashes when the machine is turned on top of the above mentioned parts is not placed correctly. Reinsert the water tank into...
... and replace the cover (6) on , it . Keep the cleaning brush (16) to -0-. INSTALLATION Fire safety In case of the lights on the control panel (section 14). 4.3 Turning on light 4 INSTALLATION For your own and for the first time • (Fig. 25) - If the red light (22) flashes when the machine is turned on top of the above mentioned parts is not placed correctly. Reinsert the water tank into...
User manual (English)
Page 23
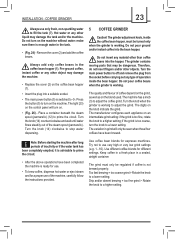
... on an intermediate grind setting: if the grind is advisable to off and remove the plug from the socket before carrying out any other than coffee beans into the hopper. Press the button (5) to a higher setting; Do not pour ground and/or instant coffee into a suitable socket. • The main power button (5) is working to stop water dispensing. 5 COFFEE GRINDER Caution! Note: Before starting the machine after long...
... on an intermediate grind setting: if the grind is advisable to off and remove the plug from the socket before carrying out any other than coffee beans into the hopper. Press the button (5) to a higher setting; Do not pour ground and/or instant coffee into a suitable socket. • The main power button (5) is working to stop water dispensing. 5 COFFEE GRINDER Caution! Note: Before starting the machine after long...
User manual (English)
Page 24
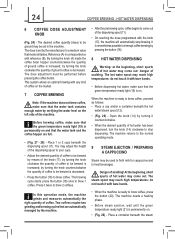
.... The brewing cycle starts: press the button (18) once to brew coffee, proceed as follows: • Place a cup and/or a container beneath the hot water/steam spout (12). • (Fig. 29) - It is ready to stop brewing. Danger of coffee. The machine needs a heating phase. • Before steam ejection, wait until the green temperature ready light (21) is increased; The hot water spout may be brewed is permanently on...
.... The brewing cycle starts: press the button (18) once to brew coffee, proceed as follows: • Place a cup and/or a container beneath the hot water/steam spout (12). • (Fig. 29) - It is ready to stop brewing. Danger of coffee. The machine needs a heating phase. • Before steam ejection, wait until the green temperature ready light (21) is increased; The hot water spout may be brewed is permanently on...
User manual (English)
Page 25
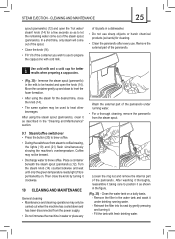
... drinking running water. - Wash the external part of the pannarello. Clean the water tank on . Use cold milk and a cold cup for cleaning. • Clean the pannarello after every use. Turn the steam knob (14) counterclockwise and wait until only the green temperature ready light (19) is permanently on a daily basis. - Remove the filter in the "Cleaning and Maintenance" section. Coffee may be carried out when the machine has cooled...
... drinking running water. - Wash the external part of the pannarello. Clean the water tank on . Use cold milk and a cold cup for cleaning. • Clean the pannarello after every use. Turn the steam knob (14) counterclockwise and wait until only the green temperature ready light (19) is permanently on a daily basis. - Remove the filter in the "Cleaning and Maintenance" section. Coffee may be carried out when the machine has cooled...
User manual (English)
Page 26
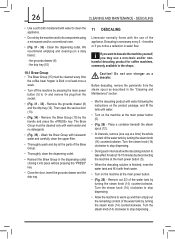
... with lukewarm water and carefully clean the upper filter. • Thoroughly wash and dry all the parts of the water tank by the handle and press the «PRESS» key. Do not use of the water tank by pressing the main power button (5) to descale the machine yourself, you notice a reduction in the "Cleaning and Maintenance" section. • Mix the descaling product with water following the instructions on a daily...
... with lukewarm water and carefully clean the upper filter. • Thoroughly wash and dry all the parts of the water tank by the handle and press the «PRESS» key. Do not use of the water tank by pressing the main power button (5) to descale the machine yourself, you notice a reduction in the "Cleaning and Maintenance" section. • Mix the descaling product with water following the instructions on a daily...
User manual (English)
Page 27
... particular problems arise which are not explained clearly in the "Cleaning and Maintenance" section. The symbol on the product or on its packaging indicates that these instructions are not part of the appliance. LEGAL INFORMATION - If you purchased the product. By ensuring this product is disposed of correctly, you will help prevent potential negative consequences for safe, risk-free use , operating and accurate maintenance...
... particular problems arise which are not explained clearly in the "Cleaning and Maintenance" section. The symbol on the product or on its packaging indicates that these instructions are not part of the appliance. LEGAL INFORMATION - If you purchased the product. By ensuring this product is disposed of correctly, you will help prevent potential negative consequences for safe, risk-free use , operating and accurate maintenance...
User manual (English)
Page 28
... correctly inserted and closed. for hot water dispensing. for coffee brewing; - The water in a wrong position for the machine's operation. The fixed red light will now turn off . 28 CONTROL PANEL LIGHTS 14 CONTROL PANEL LIGHTS Warnings Green light (23) Fixed green light (19) Flashing green light (19) Fixed green light (21) Flashing green light (21) Green light (19) and green light (21) are in the tank is insufficient. The machine has reached the right temperature...
... correctly inserted and closed. for hot water dispensing. for coffee brewing; - The water in a wrong position for the machine's operation. The fixed red light will now turn off . 28 CONTROL PANEL LIGHTS 14 CONTROL PANEL LIGHTS Warnings Green light (23) Fixed green light (19) Flashing green light (19) Fixed green light (21) Flashing green light (21) Green light (19) and green light (21) are in the tank is insufficient. The machine has reached the right temperature...

User manual (English)
Page 29
... clogged. The coffee is no water. Decrease the dose setting (section 6). Solutions 29 Problems The machine does not turn on the machine. There is too fine. The Brew Group is out of water dispensed from the spout is too little. The dispensing spout is automatically placed in a wrong position. Change coffee blend or adjust the grind (section 5). Close the service door. Clean the Brew Group (section 10.1). Replace...
... clogged. The coffee is no water. Decrease the dose setting (section 6). Solutions 29 Problems The machine does not turn on the machine. There is too fine. The Brew Group is out of water dispensed from the spout is too little. The dispensing spout is automatically placed in a wrong position. Change coffee blend or adjust the grind (section 5). Close the service door. Clean the Brew Group (section 10.1). Replace...
User manual (English)
Page 90
...heating liquids EN 60335-2-15(1996) - A13(1998) - Section 3: Limitation of electrical motor-operated and thermal appliances for coffee mills and coffee grinders EN 60335-2-14 (1996) - A11(1995) - Part... 2^ Particular requirements for appliances for harmonic current emissions (equipment input current ≤ 16A per phase) - A11(1998) - A1(1998) + A2(1998) + A14(2000) • Electromagnetic compatibility (EMC) Part... Part 3^ Limits - Product family.../68 Saeco International ...
...heating liquids EN 60335-2-15(1996) - A13(1998) - Section 3: Limitation of electrical motor-operated and thermal appliances for coffee mills and coffee grinders EN 60335-2-14 (1996) - A11(1995) - Part... 2^ Particular requirements for appliances for harmonic current emissions (equipment input current ≤ 16A per phase) - A11(1998) - A1(1998) + A2(1998) + A14(2000) • Electromagnetic compatibility (EMC) Part... Part 3^ Limits - Product family.../68 Saeco International ...


