
Owner's Manual
Page 4
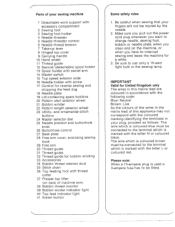
... must be connected to the terminal which is marked with thread cutter 37 Presser bar lifter (on back of your sewing machine 1 Detachable work support with accessory compartment 2 Sewing foot 3 Sewing foot holder 4 Needle threader 5 Needle threader control 6 Needle thread tension 7 Take-up lever 8 Hinged top cover...bobbins 20 Pattern start selector wheel 21 Bobbin winder 22 Pattern length selector wheel 23 Utility- Be sure to interrupt sewing and leave the machine for United Kingdom only The wires in this mains lead are coloured in accordance with the following code: Blue: Neutral...
... must be connected to the terminal which is marked with thread cutter 37 Presser bar lifter (on back of your sewing machine 1 Detachable work support with accessory compartment 2 Sewing foot 3 Sewing foot holder 4 Needle threader 5 Needle threader control 6 Needle thread tension 7 Take-up lever 8 Hinged top cover...bobbins 20 Pattern start selector wheel 21 Bobbin winder 22 Pattern length selector wheel 23 Utility- Be sure to interrupt sewing and leave the machine for United Kingdom only The wires in this mains lead are coloured in accordance with the following code: Blue: Neutral...
Owner's Manual
Page 8
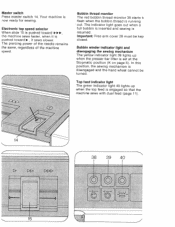
...power of the needle remains the same, regardless of the machine speed. The indicator light goes out when a full bobbin is inserted and sewing is disengaged and the hand wheel cannot be kep closed. In this position, the sewing mechanism is resumed. Top feed indicator light The green ...Electronic top speed selector When slide 15 is pushed toward the machine sews faster, when it sews slower. Your machine is engaged so that the machine sews with dual feed (page 11), Ii Bobbin winder indicator light and disengaging the sewing mechanism The yellow indicator light 39 lights up when the top ...
...power of the needle remains the same, regardless of the machine speed. The indicator light goes out when a full bobbin is inserted and sewing is disengaged and the hand wheel cannot be kep closed. In this position, the sewing mechanism is resumed. Top feed indicator light The green ...Electronic top speed selector When slide 15 is pushed toward the machine sews faster, when it sews slower. Your machine is engaged so that the machine sews with dual feed (page 11), Ii Bobbin winder indicator light and disengaging the sewing mechanism The yellow indicator light 39 lights up when the top ...
Owner's Manual
Page 17
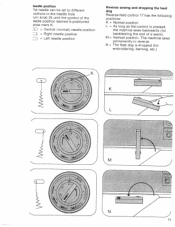
... (for embroidering, darning, etc.) CF A 13 leedle position •he needle can be set to different ositions in reverse. The machine sews permanently in the needle hole. •urn knob 25 until the symbol of the eedle position desired is positioned elow mark K. = Central (normal)... needle position = Right needle position = Left needle position Reverse sewing and dropping the feed dog Reverse-feed control 17 has the following positions: K = Normal position L As long as the control is dropped (for ...
... (for embroidering, darning, etc.) CF A 13 leedle position •he needle can be set to different ositions in reverse. The machine sews permanently in the needle hole. •urn knob 25 until the symbol of the eedle position desired is positioned elow mark K. = Central (normal)... needle position = Right needle position = Left needle position Reverse sewing and dropping the feed dog Reverse-feed control 17 has the following positions: K = Normal position L As long as the control is dropped (for ...
Owner's Manual
Page 21
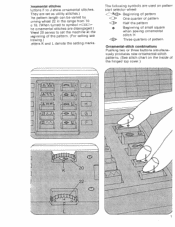
... can be varied by urning wheel 22 in the range from 10 o 18. (When turned to J show ornamental stitches. They are set the machine at the eginning of the hinged top cover.) I rawi ng.) etters K and L denote the setting marks. )rnamental stitches uttons F to symbol... patterr start selector wheel: tuIDt Beginning of pattern One quarter of pattern JIt Half the pattern • Beginning of small square when sewing ornamental stitch H 4IIIJ1 Three quarters of pattern Ornamental-stitch combinations Pushing two or three buttons simultane ously produces new ornamental-stitch patterns. ...
... can be varied by urning wheel 22 in the range from 10 o 18. (When turned to J show ornamental stitches. They are set the machine at the eginning of the hinged top cover.) I rawi ng.) etters K and L denote the setting marks. )rnamental stitches uttons F to symbol... patterr start selector wheel: tuIDt Beginning of pattern One quarter of pattern JIt Half the pattern • Beginning of small square when sewing ornamental stitch H 4IIIJ1 Three quarters of pattern Ornamental-stitch combinations Pushing two or three buttons simultane ously produces new ornamental-stitch patterns. ...
Owner's Manual
Page 28
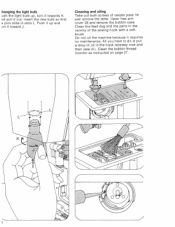
... K nd pull it toward J. Open free arm cover 28 and remove the bobbin case. Do not oil the machine because it requires no maintenance. Cleaning and oiling Take out both screws of the sewing hook with a soft brush. Clean the bobbin thread monitor as instructed on page 27. Insert the new bulb...
... K nd pull it toward J. Open free arm cover 28 and remove the bobbin case. Do not oil the machine because it requires no maintenance. Cleaning and oiling Take out both screws of the sewing hook with a soft brush. Clean the bobbin thread monitor as instructed on page 27. Insert the new bulb...

Owner's Manual
Page 29
... fuse L out of holder K. Make sure you pull out the power cord plug whenever you want to change needle, sewing foot, bobbin or needle plate, when you clean and oil the machine, or when you have to use only a 15-watt light bulb in with 11OV are without fuse. 4 Some safety rules... 1. Be sure to interrupt sewing and leave the machine for a while. 3. FF2A fuses can be injured by the needle. 2. isert a new fuse in the holder and place the holder, pushing it out. hanging...
... fuse L out of holder K. Make sure you pull out the power cord plug whenever you want to change needle, sewing foot, bobbin or needle plate, when you clean and oil the machine, or when you have to use only a 15-watt light bulb in with 11OV are without fuse. 4 Some safety rules... 1. Be sure to interrupt sewing and leave the machine for a while. 3. FF2A fuses can be injured by the needle. 2. isert a new fuse in the holder and place the holder, pushing it out. hanging...

Owner's Manual
Page 31
...put a drop of fabric under the sewing foot. Remove thread ends and dirt. 8. Yellow indicator remains on , but machine is faulty. Red indicator light remains on even during sewing. Secure attachment in hook raceway. Fundamental rules During sewing never operate the Stopmatic control. Electronic ...dog. Switch master switch off the master switch. Machine skips stitches in and around . 2 Check thread tensions. 11. Machine feeds irregularly or not at left.) Remove needle plate and clean out lint. Replace fuse. 9. Sewing lamp lights up after presser bar lifter has ...
...put a drop of fabric under the sewing foot. Remove thread ends and dirt. 8. Yellow indicator remains on , but machine is faulty. Red indicator light remains on even during sewing. Secure attachment in hook raceway. Fundamental rules During sewing never operate the Stopmatic control. Electronic ...dog. Switch master switch off the master switch. Machine skips stitches in and around . 2 Check thread tensions. 11. Machine feeds irregularly or not at left.) Remove needle plate and clean out lint. Replace fuse. 9. Sewing lamp lights up after presser bar lifter has ...


