

Owner's Manual
Page 5
... 14 Using the machine without being Needle Threader 15 connecting to the computer 28 Top Tension 16 Navigator module 29 Vertical Spool Pin 17 Navigator software 29 Needle change 18 Transfer a design from the Replace the Needle 19 computer via the USB 29 Start/Stop Button 20 Navigator tools 31 Presser...
... 14 Using the machine without being Needle Threader 15 connecting to the computer 28 Top Tension 16 Navigator module 29 Vertical Spool Pin 17 Navigator software 29 Needle change 18 Transfer a design from the Replace the Needle 19 computer via the USB 29 Start/Stop Button 20 Navigator tools 31 Presser...

Owner's Manual
Page 15
... bobbin area by the indicator under the bobbin cover. D. Place Bobbin in the direction shown by moving the small lever to begin using the Navigator software. 13 Insert the bobbin into place. Open cover to the point where you .
... bobbin area by the indicator under the bobbin cover. D. Place Bobbin in the direction shown by moving the small lever to begin using the Navigator software. 13 Insert the bobbin into place. Open cover to the point where you .

Owner's Manual
Page 28
...64257;rst time or after rebooting, you will get a message stating that you should turn on the View Designs icon . In the 3D Embroidery Intro software you will start. Ensure the embroidery machine is connected to adjust your computer and turned on 3D Embroidery Intro to open . Click on . 2. Browse...Programs and another menu will be turned on. 26 Connectivity to your computer To be able to your embroideries before you need to install the software on the browse folder icon with the cable. Move the arrow pointer to your computer screen and the Start menu appears. 3. Click the...
...64257;rst time or after rebooting, you will get a message stating that you should turn on the View Designs icon . In the 3D Embroidery Intro software you will start. Ensure the embroidery machine is connected to adjust your computer and turned on 3D Embroidery Intro to open . Click on . 2. Browse...Programs and another menu will be turned on. 26 Connectivity to your computer To be able to your embroideries before you need to install the software on the browse folder icon with the cable. Move the arrow pointer to your computer screen and the Start menu appears. 3. Click the...

Owner's Manual
Page 29
... on Send to transfer the embroidery on the 3D Intro Navigator screen, so that you can start to stitch it is the part of the software that communicates with the following options: Quick Send and Send to Machine Memory. If it out again later, if desired. Use this if you are...
... on Send to transfer the embroidery on the 3D Intro Navigator screen, so that you can start to stitch it is the part of the software that communicates with the following options: Quick Send and Send to Machine Memory. If it out again later, if desired. Use this if you are...
Owner's Manual
Page 31
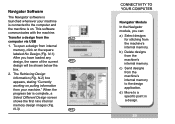
... the machine's internal memory to a specific point in a design. 29 N-3). d) Move to the design application. Navigator Software The Navigator software is launched whenever your machine." c) Send designs from the machine's internal memory. This software communicates with the machine. The Retrieving Design Information (Fig. N-2) box appears, stating "Currently working on pulling information from...
... the machine's internal memory to a specific point in a design. 29 N-3). d) Move to the design application. Navigator Software The Navigator software is launched whenever your machine." c) Send designs from the machine's internal memory. This software communicates with the machine. The Retrieving Design Information (Fig. N-2) box appears, stating "Currently working on pulling information from...

Owner's Manual
Page 32
N-4). N-6 • Click on Clear Memory to delete designs in the 3D N-5 Embroidery Intro software. You may begin stitching. 5. Click on a design icon to send it to optimize the storage area. 30 4. The colors of the design are shown in ...
N-4). N-6 • Click on Clear Memory to delete designs in the 3D N-5 Embroidery Intro software. You may begin stitching. 5. Click on a design icon to send it to optimize the storage area. 30 4. The colors of the design are shown in ...

Owner's Manual
Page 36
... reached E26 +X limit reached E27 -Y limit reached E28 +Y limit reached Fig. E-1 alerts you that all designs will be erased from the internal memory of the software. E-2 alerts you want to Stitch function is used. Fig. E-3 User's Guide In the event that a help message does not clear, restart your machine by turning...
... reached E26 +X limit reached E27 -Y limit reached E28 +Y limit reached Fig. E-1 alerts you that all designs will be erased from the internal memory of the software. E-2 alerts you want to Stitch function is used. Fig. E-3 User's Guide In the event that a help message does not clear, restart your machine by turning...

Owner's Manual
Page 41
... select C:/ 3DEmbroidery Intro/Samples/ 3D Emb1/Holidays/Heart 1. The opening screen of it (Fig. St-2 CONNECTIVITY TO YOUR COMPUTER The hoop will move when the software is launched and the machine is recognized. 39 Click on the 3D Embroidery Intro icon on top of the St-1 3D Embroidery Intro... software appears with the USB cable attached. 2. To run the program, the machine should be turned on with the Navigator screen on your desktop. 3. Open design ...
... select C:/ 3DEmbroidery Intro/Samples/ 3D Emb1/Holidays/Heart 1. The opening screen of it (Fig. St-2 CONNECTIVITY TO YOUR COMPUTER The hoop will move when the software is launched and the machine is recognized. 39 Click on the 3D Embroidery Intro icon on top of the St-1 3D Embroidery Intro... software appears with the USB cable attached. 2. To run the program, the machine should be turned on with the Navigator screen on your desktop. 3. Open design ...


