

Owner's Manual
Page 2
...it has been dropped or damaged, or dropped into any adjustment in the needle area, such as contained in this household sewing machine. Return the sewing machine to the nearest authorized dealer or service center for its intended use as a toy. The wrong plate can cause the ...when plugged in the instruction manual. • Never drop or insert any other user servicing adjustments mentioned in . Always unplug this sewing machine from the electric outlet immediately after using and before cleaning, • Always unplug before using an electrical appliance, basic safety precautions...
...it has been dropped or damaged, or dropped into any adjustment in the needle area, such as contained in this household sewing machine. Return the sewing machine to the nearest authorized dealer or service center for its intended use as a toy. The wrong plate can cause the ...when plugged in the instruction manual. • Never drop or insert any other user servicing adjustments mentioned in . Always unplug this sewing machine from the electric outlet immediately after using and before cleaning, • Always unplug before using an electrical appliance, basic safety precautions...

Owner's Manual
Page 3
...provided with the most modern sewing capabilities, the manufacturer reserves the right to use your machine, you will know you are sewing on one of the easiest to begin an exciting adventure in creativity. From the moment you first use your sewing machine, you discover the many ...advantages and the ease of operation by going through this sewing machine. Congratulations As the owner of a new sewing machine, you are about to use sewing machines...
...provided with the most modern sewing capabilities, the manufacturer reserves the right to use your machine, you will know you are sewing on one of the easiest to begin an exciting adventure in creativity. From the moment you first use your sewing machine, you discover the many ...advantages and the ease of operation by going through this sewing machine. Congratulations As the owner of a new sewing machine, you are about to use sewing machines...
Owner's Manual
Page 4
...Accessories 4 Straight stretch stitch and Stretch triple zigzag stitch 26 Extension table 5 Free-motion darning 27 Accessory tray 6 Darning 28 Connecting machine to power source 7 Free-motion monogramming and embroidering 29 Changing the light bulb 8 Quilting 30 Presser foot lifter 9 Twin needle (... 12 Inserting and changing needle 13 Threading the upper thread 14 Thread tension 15 Raising the bobbin thread 16 Reverse sewing 17 Changing sewing directions 17 Removing your work 17 Cutting the thread 17 Matching needle/ fabric/ thread 18 How to choose your ...
...Accessories 4 Straight stretch stitch and Stretch triple zigzag stitch 26 Extension table 5 Free-motion darning 27 Accessory tray 6 Darning 28 Connecting machine to power source 7 Free-motion monogramming and embroidering 29 Changing the light bulb 8 Quilting 30 Presser foot lifter 9 Twin needle (... 12 Inserting and changing needle 13 Threading the upper thread 14 Thread tension 15 Raising the bobbin thread 16 Reverse sewing 17 Changing sewing directions 17 Removing your work 17 Cutting the thread 17 Matching needle/ fabric/ thread 18 How to choose your ...

Owner's Manual
Page 8
If you don't need extension table, you can also easily take it off . When the sewing machine is not being used, store the machine with the extension table folded up. First, move the extension table slightly to the left, as the arrow (2), to unhook the left side and then move it off . 5 You can help your fabric flow easier during sewing. Extension table Before sewing, please follow the arrow (1) of the drawing, and pull down the extension table. Extension table can then take it to the right unhooking the right side (3).
If you don't need extension table, you can also easily take it off . When the sewing machine is not being used, store the machine with the extension table folded up. First, move the extension table slightly to the left, as the arrow (2), to unhook the left side and then move it off . 5 You can help your fabric flow easier during sewing. Extension table Before sewing, please follow the arrow (1) of the drawing, and pull down the extension table. Extension table can then take it to the right unhooking the right side (3).

Owner's Manual
Page 10
...be used with the foot controller: For USA and Canada, 110-1 20 V: KD-1 902 For Australia and Europe, 220-240V: KD-2902 Sewing light Press main switch (A) for power and light on "I Polarized attachment plug For USA and Canada For appliance with a polarized plug which ... reverse the plug. Foot control Foot control regulates the sewing speed. (2) A 0 Attention: Consult a qualified electrician if in doubt as illustrated. (1) The appliance is equipped with a polarized plug (one way. Connecting machine to power source Connect the machine to fit in a polarized outlet only one blade is...
...be used with the foot controller: For USA and Canada, 110-1 20 V: KD-1 902 For Australia and Europe, 220-240V: KD-2902 Sewing light Press main switch (A) for power and light on "I Polarized attachment plug For USA and Canada For appliance with a polarized plug which ... reverse the plug. Foot control Foot control regulates the sewing speed. (2) A 0 Attention: Consult a qualified electrician if in doubt as illustrated. (1) The appliance is equipped with a polarized plug (one way. Connecting machine to power source Connect the machine to fit in a polarized outlet only one blade is...

Owner's Manual
Page 12
... do need for easy positioning of fabric (light-or-heavy weight). Presser foot lifter The presser foot lifter raises and lowers your presser foot. (A) When sewing several layers or thick fabrics, the presser foot can be taken out. For heavy fabric, tighten the pressure by turning the knob counterclockwise. When the... knob can not be moved any more. 9 The presser foot pressure of the machine has been pre-set at "2". If you keep turning the knob, it any further, it lockes back in the picture.
... do need for easy positioning of fabric (light-or-heavy weight). Presser foot lifter The presser foot lifter raises and lowers your presser foot. (A) When sewing several layers or thick fabrics, the presser foot can be taken out. For heavy fabric, tighten the pressure by turning the knob counterclockwise. When the... knob can not be moved any more. 9 The presser foot pressure of the machine has been pre-set at "2". If you keep turning the knob, it any further, it lockes back in the picture.
Owner's Manual
Page 14
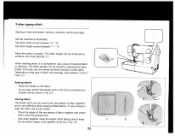
Push bobbin to spool (2). • - Please Note: When the bobbin winder spindle is in bobbin winding position the machine will not sew and the handwheel will not turn. Snap thread into thread guide (3). - Hold thread end (7). Wind thread clockwise around bobbin ...winder tension discs (4). - Step on spindle (5). - Place thread and spool cap onto spool pin (1). To start sewing, push the bobbin winder spindle to left (sewing position). )'L) 2 3 11 Thread bobbin as illustrated and place on foot control (8). - Cut thread (9) Press bobbin to the...
Push bobbin to spool (2). • - Please Note: When the bobbin winder spindle is in bobbin winding position the machine will not sew and the handwheel will not turn. Snap thread into thread guide (3). - Hold thread end (7). Wind thread clockwise around bobbin ...winder tension discs (4). - Step on spindle (5). - Place thread and spool cap onto spool pin (1). To start sewing, push the bobbin winder spindle to left (sewing position). )'L) 2 3 11 Thread bobbin as illustrated and place on foot control (8). - Cut thread (9) Press bobbin to the...

Owner's Manual
Page 20
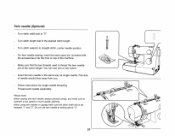
Stop the machine at the point where you wish to line up lever to the slit (B) and press down the reverse sewing lever and touch the foot control lightly. Raise the presser foot and turn the fabric to change directions with both hands, guide 'them ... the presser foot with the needle still in the new direction. Release lever and the machine will sew forwards again (All). Changing sewing directions 1. Reverse sewing Reverse sewing is used for locking the end of seam, press down . (4) 4 17 Sew a few reverse stitches. Raise the presser foot and draw the fabric away from you ...
Stop the machine at the point where you wish to line up lever to the slit (B) and press down the reverse sewing lever and touch the foot control lightly. Raise the presser foot and turn the fabric to change directions with both hands, guide 'them ... the presser foot with the needle still in the new direction. Release lever and the machine will sew forwards again (All). Changing sewing directions 1. Reverse sewing Reverse sewing is used for locking the end of seam, press down . (4) 4 17 Sew a few reverse stitches. Raise the presser foot and draw the fabric away from you ...
Owner's Manual
Page 28
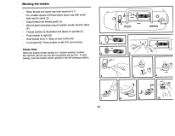
...the two fabric edges close stitches. (1) When mending tears, it is very effective when sewing knitted fabrics. First sew over the center and then overlap on lace and elastic, darning, mending, reinforcing edges. Set the machine as shown in position. "2" Place the patch in fig. (3). If nylon thread ...is used to join two pieces of fabric together and is advisable to reinforce. Sew them under the presser foot. - Depending on the type of...
...the two fabric edges close stitches. (1) When mending tears, it is very effective when sewing knitted fabrics. First sew over the center and then overlap on lace and elastic, darning, mending, reinforcing edges. Set the machine as shown in position. "2" Place the patch in fig. (3). If nylon thread ...is used to join two pieces of fabric together and is advisable to reinforce. Sew them under the presser foot. - Depending on the type of...

Owner's Manual
Page 30
...3 A darning hoop is accomplished without the sewing machine internal feed system. Remove the presser foot clamp. (2) Attach the free-motion/darning foot to bOH. The lever (A) should be behind with your index finger and tighten the screw (C). (3) For darning, first sew around the edge of the hole (to ...from left to secure the threads). (4) First row: Always work by the operator. Note: Free-motion darning is recommended for easier sewing and better results. It is necessary to "0". Turn work from behind the needle clamp screw (B). FIetIII1JLIUI1 Udritirly Install the feed dog...
...3 A darning hoop is accomplished without the sewing machine internal feed system. Remove the presser foot clamp. (2) Attach the free-motion/darning foot to bOH. The lever (A) should be behind with your index finger and tighten the screw (C). (3) For darning, first sew around the edge of the hole (to ...from left to secure the threads). (4) First row: Always work by the operator. Note: Free-motion darning is recommended for easier sewing and better results. It is necessary to "0". Turn work from behind the needle clamp screw (B). FIetIII1JLIUI1 Udritirly Install the feed dog...

Owner's Manual
Page 31
For reverse sewing instructions, see page 17. 28 Repeat this motion until the area to be darned is filled with rows of stitching. Turn stitch width dial to the desired length. - Position the fabric to be darned under the presser foot together with the under laying fabric to be used. - Lower the presser foot and alternately sew forward or reverse using the lever. - Darning Set the machine as illustrated. - Turn stitch length dial to '0". -
For reverse sewing instructions, see page 17. 28 Repeat this motion until the area to be darned is filled with rows of stitching. Turn stitch width dial to the desired length. - Position the fabric to be darned under the presser foot together with the under laying fabric to be used. - Lower the presser foot and alternately sew forward or reverse using the lever. - Darning Set the machine as illustrated. - Turn stitch length dial to '0". -

Owner's Manual
Page 32
... securing stitches at the starting to the size of hoop with smaller finger. * Embroidery hoop not included with machine. 29 Adjust the stitch width according to sew. - Place the fabric under the needle. Hold the hoop with thumb and forefingers of both hands while pressing the material with the middle and third...
... securing stitches at the starting to the size of hoop with smaller finger. * Embroidery hoop not included with machine. 29 Adjust the stitch width according to sew. - Place the fabric under the needle. Hold the hoop with thumb and forefingers of both hands while pressing the material with the middle and third...
Owner's Manual
Page 34
Follow instructions for single needle threading. Twin needle (Optional) - Make sure that the two threads used to "0". - Flat side of the machine. - Insert the twin needle in the same way as single needle. Do not use one or two colors. - Turn stitch width dial ...- Turn stitch selector to the desired stitch length. - You can use twin needle at setting above "3". 31 Thread each needle separately. For twin needle sewing, insert the extra spool pin (included with twin needle, always proceed slowly, and make sure the stitch width dial is set between "1" and '3". Please ...
Follow instructions for single needle threading. Twin needle (Optional) - Make sure that the two threads used to "0". - Flat side of the machine. - Insert the twin needle in the same way as single needle. Do not use one or two colors. - Turn stitch width dial ...- Turn stitch selector to the desired stitch length. - You can use twin needle at setting above "3". 31 Thread each needle separately. For twin needle sewing, insert the extra spool pin (included with twin needle, always proceed slowly, and make sure the stitch width dial is set between "1" and '3". Please ...
Owner's Manual
Page 35
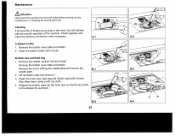
Cleaning If lint and bits of the machine. Clean the bobbin holder with the smooth operation of thread accumulate in the hook, this will interfere with a brush. Replace the bobbin case into the ... case with a brush. BHook race and feed dog 1. Remove the screw holding the needle plate and remove the B-1 needle plate. 2. B-3 32 A-2 B-2 B-4 Maintenance Attention: Disconnect the machine from the wall outlet before carrying out any maintenance or changing the sewing light bulb. A-i A.Bobbin holder 1. Remove the bobbin cover plate and bobbin.
Cleaning If lint and bits of the machine. Clean the bobbin holder with the smooth operation of thread accumulate in the hook, this will interfere with a brush. Replace the bobbin case into the ... case with a brush. BHook race and feed dog 1. Remove the screw holding the needle plate and remove the B-1 needle plate. 2. B-3 32 A-2 B-2 B-4 Maintenance Attention: Disconnect the machine from the wall outlet before carrying out any maintenance or changing the sewing light bulb. A-i A.Bobbin holder 1. Remove the bobbin cover plate and bobbin.

Owner's Manual
Page 36
...tension. 1 Select a better quality thread. 2.Remove bobbin case, thread and insert correctly. 3.Do not pull on the fabric while sewing, let it be taken up by the machine. 1 .Clean the hook and feed dog as described. 2.Replace the needle Remove the upper thread and bobbin case, turn the ... Upper thread breaks Lower thread breaks Skipped stitches Needle breaks Loose stitches Seams gather or pucker Uneven stitches, uneven feed The machine is noisy The machine jams Cause 1 .The machine is not threaded correctly. 2.The thread tension is too tight. 3.The thread is too thick for the needle. 4.The...
...tension. 1 Select a better quality thread. 2.Remove bobbin case, thread and insert correctly. 3.Do not pull on the fabric while sewing, let it be taken up by the machine. 1 .Clean the hook and feed dog as described. 2.Replace the needle Remove the upper thread and bobbin case, turn the ... Upper thread breaks Lower thread breaks Skipped stitches Needle breaks Loose stitches Seams gather or pucker Uneven stitches, uneven feed The machine is noisy The machine jams Cause 1 .The machine is not threaded correctly. 2.The thread tension is too tight. 3.The thread is too thick for the needle. 4.The...


