
Owner's Manual
Page 3
.... I. .. a Do not operate where aerosol (spray) products are being administered. • To disconnect, turn all controls to be followed, including the following: Read all moving parts. Please also observe the general safety notes on cord. Replace bulb with any from the • Always unplug before cleaning. Keep lint, dust, and loose...
.... I. .. a Do not operate where aerosol (spray) products are being administered. • To disconnect, turn all controls to be followed, including the following: Read all moving parts. Please also observe the general safety notes on cord. Replace bulb with any from the • Always unplug before cleaning. Keep lint, dust, and loose...

Owner's Manual
Page 4
... line be changed or should changes be put into a warm room. 8. No liability will be caused by it . Only original PFAFF parts may be adjusted by introducing a cold machine into operation according to the up and down movement of the needle and constantly observe the...for any damage caused if this machine is used . 12. Treatment Always protect the machine against damage which the user can be caused by a PFAFF mechanic. 5. Please note! with condensation that for a mains supply with maximum 38°' alcohol. The machine is operated incorrectly. 10. e...
... line be changed or should changes be put into a warm room. 8. No liability will be caused by it . Only original PFAFF parts may be adjusted by introducing a cold machine into operation according to the up and down movement of the needle and constantly observe the...for any damage caused if this machine is used . 12. Treatment Always protect the machine against damage which the user can be caused by a PFAFF mechanic. 5. Please note! with condensation that for a mains supply with maximum 38°' alcohol. The machine is operated incorrectly. 10. e...

Owner's Manual
Page 7
...tension Non-elastic/elastic stitches Non-stick fancy stitch foot for leather 0 Overlock stitches P Parts of the sewing machine (2044) Parts of the sewing machine (2034) Patchwork and quilting "Pattern start" "Pattern start" within stitch sequence Pattern length/pattern width, changing for ...buttonhole Top feed (integrated dual feed) Twin needle Twin needle, threading U Utility stitches, Quilt Expression 2044 Utility stitches, Expression 2034 V Voltage switch w Window, adjusting the contrast z Zippers, sewing in 1/4 inch quilt and patchwork foot 7/9 hole foot II ILl l.JUUL.11U 42 114, 115 36 ...
...tension Non-elastic/elastic stitches Non-stick fancy stitch foot for leather 0 Overlock stitches P Parts of the sewing machine (2044) Parts of the sewing machine (2034) Patchwork and quilting "Pattern start" "Pattern start" within stitch sequence Pattern length/pattern width, changing for ...buttonhole Top feed (integrated dual feed) Twin needle Twin needle, threading U Utility stitches, Quilt Expression 2044 Utility stitches, Expression 2034 V Voltage switch w Window, adjusting the contrast z Zippers, sewing in 1/4 inch quilt and patchwork foot 7/9 hole foot II ILl l.JUUL.11U 42 114, 115 36 ...

Owner's Manual
Page 15
Technical section Parts of the sewing machine (2044) 14-15 Parts of the sewing machine (2034) 16-17 Carrying case 18 I Lid with stitch chart 18 Electrical connection 19 Voltage switch 19 Accessories 20 Removable accessory ...
Technical section Parts of the sewing machine (2044) 14-15 Parts of the sewing machine (2034) 16-17 Carrying case 18 I Lid with stitch chart 18 Electrical connection 19 Voltage switch 19 Accessories 20 Removable accessory ...

Owner's Manual
Page 16
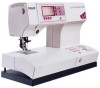
Parts of the sewing machine (mod& 2044) 1 -1+ button controls) A (stitch width/pattern width 27 Slide for lowering the feed dog 2 -7+ button controls) B (stitch length/pattern length 28 Base plate 29 Removable accessory ...
Parts of the sewing machine (mod& 2044) 1 -1+ button controls) A (stitch width/pattern width 27 Slide for lowering the feed dog 2 -7+ button controls) B (stitch length/pattern length 28 Base plate 29 Removable accessory ...

Owner's Manual
Page 18
Parts of the sewing machine (model 2034) 1 -1+ button A (stitch width/pattern width controls) 2 -1+ button B (stitch length/pattern length controls) 27 Slide for lowering the feed dog ...
Parts of the sewing machine (model 2034) 1 -1+ button A (stitch width/pattern width controls) 2 -1+ button B (stitch length/pattern length controls) 27 Slide for lowering the feed dog ...

Owner's Manual
Page 22
Arranging the accessories The standard accessories are marked with numbers. iecnnicai section 4!- 1 w L Accessory tray Open the accessory tray by placing your left index finger on the ridged area on the left of the accessory tray. ft Accessories 2034/2044 (see also pages 78-79) 20 Arrange the parts in the respective compartments of the lid and open the lid upwards and towards you.
Arranging the accessories The standard accessories are marked with numbers. iecnnicai section 4!- 1 w L Accessory tray Open the accessory tray by placing your left index finger on the ridged area on the left of the accessory tray. ft Accessories 2034/2044 (see also pages 78-79) 20 Arrange the parts in the respective compartments of the lid and open the lid upwards and towards you.

Owner's Manual
Page 31
... for sewing is lowered, the pins of the needle thread tension (35) raising the presser foot lifter. darning and buttonhole sewing 3. 29 I jI 1 pFAFF R Check: Please check that when the presser foot lifter (51) is 4 5. using the markings on the tension dial. I I Removing the presser foot... Attaching the presser foot I j Switch off the master switch Press the front part of the presser foot upwards and at the same time the rear part downwards until it disengages from Place the presser foot under the presser foot holder (30), so that the ...
... for sewing is lowered, the pins of the needle thread tension (35) raising the presser foot lifter. darning and buttonhole sewing 3. 29 I jI 1 pFAFF R Check: Please check that when the presser foot lifter (51) is 4 5. using the markings on the tension dial. I I Removing the presser foot... Attaching the presser foot I j Switch off the master switch Press the front part of the presser foot upwards and at the same time the rear part downwards until it disengages from Place the presser foot under the presser foot holder (30), so that the ...
Owner's Manual
Page 73
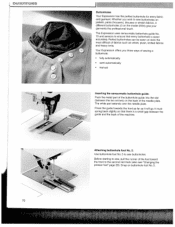
...between the two arrows) on the back of the needle plate. Snap on the model 2034) give your garments the professional touch. Your Expression offers you wish to sew buttonholes. Before starting to sew, pull the runner of fabrics such as it will go. Press the guide ...even the most difficult of the foot toward the front to ensure that there is sized accurately. Inserting the sensormatic buttonhole guide: Push the metal part of the buttonhole guide into the slot (between the guide and the back of sewing a buttonhole: • fully automatically • semiautomatically ...
...between the two arrows) on the back of the needle plate. Snap on the model 2034) give your garments the professional touch. Your Expression offers you wish to sew buttonholes. Before starting to sew, pull the runner of fabrics such as it will go. Press the guide ...even the most difficult of the foot toward the front to ensure that there is sized accurately. Inserting the sensormatic buttonhole guide: Push the metal part of the buttonhole guide into the slot (between the guide and the back of sewing a buttonhole: • fully automatically • semiautomatically ...

Owner's Manual
Page 111
... with the hand applique stitch (15). Make sure the stitch is the part that the applique can be turned right side out. I I I- • I ,iJJGtLiV VVII Iy/JJei.lctlLy 1tl II llU Quilt Appliques Appliques add that special touch for your Quilt Expression with the position, iron it on interfacing. There are satisfied with stitch...
... with the hand applique stitch (15). Make sure the stitch is the part that the applique can be turned right side out. I I I- • I ,iJJGtLiV VVII Iy/JJei.lctlLy 1tl II llU Quilt Appliques Appliques add that special touch for your Quilt Expression with the position, iron it on interfacing. There are satisfied with stitch...


