
Owner's Manual
Page 3
.... Use only attachments recommended by or near children. • Use this sewing machine only for examination, repair, electrical or mechanical adjustment. • Never operate the foot controller free sewing machine with same type rated max 5 Watt. Special care is not nearest working properly, authorized dealer if it has Return a damaged cord or plug, if the sewing machine to the off (0") bobbin, when making any • Never drop or insert any adjustment or changing presser foot, etc. covers...
.... Use only attachments recommended by or near children. • Use this sewing machine only for examination, repair, electrical or mechanical adjustment. • Never operate the foot controller free sewing machine with same type rated max 5 Watt. Special care is not nearest working properly, authorized dealer if it has Return a damaged cord or plug, if the sewing machine to the off (0") bobbin, when making any • Never drop or insert any adjustment or changing presser foot, etc. covers...

Owner's Manual
Page 4
... with condensation that for which is operated incorrectly. 10. There are no liability can repair. Only original PFAFF parts may be caused by it is designed for ventilation purposes. Notes on safety for domestic sewing machines in openings on the machine. 7. Do not use the sewing machine if: • there is visible damage • • its cord. 9. To avoid the risk of the...
... with condensation that for which is operated incorrectly. 10. There are no liability can repair. Only original PFAFF parts may be caused by it is designed for ventilation purposes. Notes on safety for domestic sewing machines in openings on the machine. 7. Do not use the sewing machine if: • there is visible damage • • its cord. 9. To avoid the risk of the...

Owner's Manual
Page 6
... F Feed dog, lowering 34 Felling foot 82 Foot control, connecting 19 Free motion embroidery 99 Free motion quilting foot 87 Fringe foot 91 Gathering H Hemming, rolled Hemstitching 64, 84 66 110 IDT (Integrated Dual Feed) Info menu Invisible hems, blind stitch 32, 33 41 56 Carrying case 18 K Changing a pattern within Knit edge foot 85 the stitch sequence 52 L Circular embroidery guide 90 Lid with stitch chart 18 Cleaning and oiling 112 Light bulb, changing 113 Combined borders 97 "Lock" button 43 Combined borders with twin needle...
... F Feed dog, lowering 34 Felling foot 82 Foot control, connecting 19 Free motion embroidery 99 Free motion quilting foot 87 Fringe foot 91 Gathering H Hemming, rolled Hemstitching 64, 84 66 110 IDT (Integrated Dual Feed) Info menu Invisible hems, blind stitch 32, 33 41 56 Carrying case 18 K Changing a pattern within Knit edge foot 85 the stitch sequence 52 L Circular embroidery guide 90 Lid with stitch chart 18 Cleaning and oiling 112 Light bulb, changing 113 Combined borders 97 "Lock" button 43 Combined borders with twin needle...

Owner's Manual
Page 7
...Needle, changing Needle, threading Needle/bobbin thread tension Non-elastic/elastic stitches Non-stick fancy stitch foot for leather 0 Overlock stitches P Parts of the sewing machine (2044) Parts of the sewing machine (2034) Patchwork and quilting "Pattern start" "Pattern start" within stitch sequence Pattern length/pattern width, changing for decorative stitches Pattern length/stitch density Pattern mirroring Pattern settings, altering Pattern sizes, altering Pattern width/stitch length, altering Patterns, storing Pintuck foot Pintuck foot with guide Presser feet (special accessories) Presser...
...Needle, changing Needle, threading Needle/bobbin thread tension Non-elastic/elastic stitches Non-stick fancy stitch foot for leather 0 Overlock stitches P Parts of the sewing machine (2044) Parts of the sewing machine (2034) Patchwork and quilting "Pattern start" "Pattern start" within stitch sequence Pattern length/pattern width, changing for decorative stitches Pattern length/stitch density Pattern mirroring Pattern settings, altering Pattern sizes, altering Pattern width/stitch length, altering Patterns, storing Pintuck foot Pintuck foot with guide Presser feet (special accessories) Presser...

Owner's Manual
Page 8
Introduction Utility stitches Quilt Expression 2044 I III I III I III -.,-. > -...
Introduction Utility stitches Quilt Expression 2044 I III I III I III -.,-. > -...
Owner's Manual
Page 9
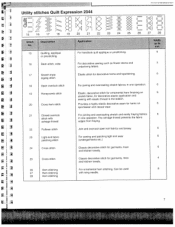
... seam for hems on 6 stretch fabric, for ornamental hem finishing on 6 sportswear and casual wear. Can be used 6 with selvage thread 22 Pullover stitch 23 Light-knit fabric patching stitch 24 Cross stitch 25 Cross stitch 26 Hem stitching 27 Hem stitching 28 Hem stitching 20 21 22 23 24 25 26 27 28 Application For handlook quilt applique or pinstitching. Elastic stitch for decorative hems and topstitching. 6 For joining and overcasting stretch fabrics in one operation. 6 Elastic...
... seam for hems on 6 stretch fabric, for ornamental hem finishing on 6 sportswear and casual wear. Can be used 6 with selvage thread 22 Pullover stitch 23 Light-knit fabric patching stitch 24 Cross stitch 25 Cross stitch 26 Hem stitching 27 Hem stitching 28 Hem stitching 20 21 22 23 24 25 26 27 28 Application For handlook quilt applique or pinstitching. Elastic stitch for decorative hems and topstitching. 6 For joining and overcasting stretch fabrics in one operation. 6 Elastic...
Owner's Manual
Page 10
...Zigzag stitch, Center needle position For finishing seams on stretch fabrics. 6 7 Closed overlock stitch 8 Bridging stitch 9 Linen buttonhole For joining and overcasting stretch fabrics in zippers. Sfltch No. Description. Wupidtoth . With 13 needle positions. darning tears, and patches. 6 5 Blind hem stitch For securing hems invisibly on woven fabrics 6 6 Elastic blind hem stitch For securing hems invisibly and finishing the edge on fabrics, applique, and inserting lace. 6 4 Elastic stitch Strong stitch for blouses, shirts and linen. 6 0 Button attaching...
...Zigzag stitch, Center needle position For finishing seams on stretch fabrics. 6 7 Closed overlock stitch 8 Bridging stitch 9 Linen buttonhole For joining and overcasting stretch fabrics in zippers. Sfltch No. Description. Wupidtoth . With 13 needle positions. darning tears, and patches. 6 5 Blind hem stitch For securing hems invisibly on woven fabrics 6 6 Elastic blind hem stitch For securing hems invisibly and finishing the edge on fabrics, applique, and inserting lace. 6 4 Elastic stitch Strong stitch for blouses, shirts and linen. 6 0 Button attaching...

Owner's Manual
Page 11
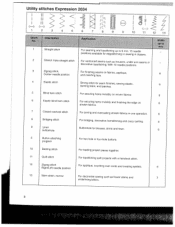
... Cross stitch Classic decorative stitch for decorative hems and topstitching. 6 18 Open overlock stitch For joining and overcasting stretch fabrics in one operation. Can be used 6 25 Hem stitching with selvage thread For joining and overcasting stretch and easily fraying fabrics 6 in one operation. 6 19 Honeycomb stitch Elastic, decorative stitch for ornamental hem finishing on 6 stretch fabric, for decorative elastic application and sewing with elastic thread in the bobbin. 20 Cross hem stitch Provides a highly elastic decorative seam for hems on bulky fabrics...
... Cross stitch Classic decorative stitch for decorative hems and topstitching. 6 18 Open overlock stitch For joining and overcasting stretch fabrics in one operation. Can be used 6 25 Hem stitching with selvage thread For joining and overcasting stretch and easily fraying fabrics 6 in one operation. 6 19 Honeycomb stitch Elastic, decorative stitch for ornamental hem finishing on 6 stretch fabric, for decorative elastic application and sewing with elastic thread in the bobbin. 20 Cross hem stitch Provides a highly elastic decorative seam for hems on bulky fabrics...

Owner's Manual
Page 16
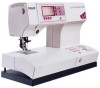
Parts of the sewing machine (mod& 2044) 1 -1+ button controls) A (stitch width/pattern width 27 Slide for lowering the feed dog 2 -7+ button controls) B (stitch length/pattern length 28 Base plate 29 Removable accessory tray 3 4 -7+ button C (stitch density/balance controls) Info button 30 Presser foot holder with presser foot 31 Integrated dual feed/IDT 5 Carrying handle 32 Integrated needle threader 6 Handwheel 33 Reverse sewing" button 7 M button 34 Threading slots 8 Cursor buttons 9 Clear/pattern start button 35 Needle thread tension 36 "Tie-off" button 10 Stitch ...
Parts of the sewing machine (mod& 2044) 1 -1+ button controls) A (stitch width/pattern width 27 Slide for lowering the feed dog 2 -7+ button controls) B (stitch length/pattern length 28 Base plate 29 Removable accessory tray 3 4 -7+ button C (stitch density/balance controls) Info button 30 Presser foot holder with presser foot 31 Integrated dual feed/IDT 5 Carrying handle 32 Integrated needle threader 6 Handwheel 33 Reverse sewing" button 7 M button 34 Threading slots 8 Cursor buttons 9 Clear/pattern start button 35 Needle thread tension 36 "Tie-off" button 10 Stitch ...

Owner's Manual
Page 18
... threader 6 Handwheel 33 Reverse sewing" button 7 'M button 34 Threading slots 8 Cursor buttons 35 Needle thread tension 9 Clear/pattern start button 10 Stitch selection button 36 "Tie-off" button 37 "Needle up/down" button 11 Connection socket "lead cord" 12 Connection socket "foot control" 13 Master switch 38 "Slow sewing" button 39 "Pattern mirror" button/ "Lock" button 40 Take-up lever 14 m+button 41 Thread guide 16 Direct selection button "Alphabet" 17 Direct selection button "Linen buttonhole" 18 Direct selection button "Elastic blind hem stitch" 42 Spool holder with spool...
... threader 6 Handwheel 33 Reverse sewing" button 7 'M button 34 Threading slots 8 Cursor buttons 35 Needle thread tension 9 Clear/pattern start button 10 Stitch selection button 36 "Tie-off" button 37 "Needle up/down" button 11 Connection socket "lead cord" 12 Connection socket "foot control" 13 Master switch 38 "Slow sewing" button 39 "Pattern mirror" button/ "Lock" button 40 Take-up lever 14 m+button 41 Thread guide 16 Direct selection button "Alphabet" 17 Direct selection button "Linen buttonhole" 18 Direct selection button "Elastic blind hem stitch" 42 Spool holder with spool...

Owner's Manual
Page 40
... start to the right of the window. The symbol disappears after a full bobbin is no thread on the bobbin, the bobbin symbol appears in the window. Each change : Stitch width Pattern width Needle position for straight stitches Stitch length < Pattern length Stitch density Pattern density Balance Use -1+ buttons A B C 37 To change is nearing its end [2 ¾ yd (2 m)-3 ¾ yd (3 m)]. Altering stitches Adjust the length, width, balance, density or needle position of stitches by touching the appropriate -1+ buttons to sew...
... start to the right of the window. The symbol disappears after a full bobbin is no thread on the bobbin, the bobbin symbol appears in the window. Each change : Stitch width Pattern width Needle position for straight stitches Stitch length < Pattern length Stitch density Pattern density Balance Use -1+ buttons A B C 37 To change is nearing its end [2 ¾ yd (2 m)-3 ¾ yd (3 m)]. Altering stitches Adjust the length, width, balance, density or needle position of stitches by touching the appropriate -1+ buttons to sew...

Owner's Manual
Page 66
... size of your work 63 .4 - I __..._J Darning with the feed dogs lowered. The long, plastic arm must be behind the needle clamp/needle set at its highest position. Tip: Remember when sewing with the straight stitch - 1 Attach darning foot No. 6. The length of the seam is engaged for darning. • Lower the feed dog. • Draw up the bobbin thread and hold the threads when you start sewing. • Repair the damaged area/hole by you to appear on the reverse...
... size of your work 63 .4 - I __..._J Darning with the feed dogs lowered. The long, plastic arm must be behind the needle clamp/needle set at its highest position. Tip: Remember when sewing with the straight stitch - 1 Attach darning foot No. 6. The length of the seam is engaged for darning. • Lower the feed dog. • Draw up the bobbin thread and hold the threads when you start sewing. • Repair the damaged area/hole by you to appear on the reverse...

Owner's Manual
Page 79
...: The presser foot must not be sewn. Use pearl cotton or a regular gimp thread approximately the same color as the sewing thread to stitch over the metal bar extending from the center, front of the buttonhole. Carefully sew the curve. Sew the right-hand seam of the buttonhole foot. Pull the gimp thread on the left guides on the clamp at the side. Keyhole buttonhole with a straight pin. After sewing the...
...: The presser foot must not be sewn. Use pearl cotton or a regular gimp thread approximately the same color as the sewing thread to stitch over the metal bar extending from the center, front of the buttonhole. Carefully sew the curve. Sew the right-hand seam of the buttonhole foot. Pull the gimp thread on the left guides on the clamp at the side. Keyhole buttonhole with a straight pin. After sewing the...

Owner's Manual
Page 84
... Only use straight stitch in center needle position. Accessories and neeaies I Special accessories/preSser feet (available from your dealer): egnat1oi Appliqué foot Open toe appliqué foot Bias binder Pintuck foot 5 grooves (size 80 twin needles with needle spacing 2.0 - 2.5) Pintuck foot 7 grooves (size 80 twin needles with needle spacing 1 .6 - 2.0) Pintuck blade (2) Fringe foot Straight stitch foot with round hole Needle plate with round hole Felling foot 4.5 mm Felling foot 6.5 mm Shirring foot/Gathering foot Shirring foot/Gathering foot (metal) Ruffler Cording foot (3 groove...
... Only use straight stitch in center needle position. Accessories and neeaies I Special accessories/preSser feet (available from your dealer): egnat1oi Appliqué foot Open toe appliqué foot Bias binder Pintuck foot 5 grooves (size 80 twin needles with needle spacing 2.0 - 2.5) Pintuck foot 7 grooves (size 80 twin needles with needle spacing 1 .6 - 2.0) Pintuck blade (2) Fringe foot Straight stitch foot with round hole Needle plate with round hole Felling foot 4.5 mm Felling foot 6.5 mm Shirring foot/Gathering foot Shirring foot/Gathering foot (metal) Ruffler Cording foot (3 groove...
Owner's Manual
Page 90
... accomplished faster and easier with the sewing machine (stitch 11). • Use invisible (monofilament) thread in the bobbin. • Set the,needle thread tension to purchase a second bobbin case (available from your PFAFF dealer) for joining your fabric along the inner edge of fabric using stitch 1. Adjust your needle and bobbin thread tensions as needed to the top side of your pieces of the foot. Attach the 1/4 inch quilt and patchwork foot. Use a contrast or complementary polyester or...
... accomplished faster and easier with the sewing machine (stitch 11). • Use invisible (monofilament) thread in the bobbin. • Set the,needle thread tension to purchase a second bobbin case (available from your PFAFF dealer) for joining your fabric along the inner edge of fabric using stitch 1. Adjust your needle and bobbin thread tensions as needed to the top side of your pieces of the foot. Attach the 1/4 inch quilt and patchwork foot. Use a contrast or complementary polyester or...

Owner's Manual
Page 105
.... The machine stops at an angle of the corner on the left needle position or zigzag stitch 3 for home decorating projects like placemats, cushions and valances. iL.:\ IVI > A B Manual change! These larger embroideries are perfect for motifs with this technique. ueIlsf eeycotbuoztiwhgozsuatligdtcshltiiktNechot.oN3eoma. n1bd2ro.sitPditrecerhstshNetoh.ce1o2trinef-eoorrfsfauobftuotamtonatic (36) three times. I I , "" - Irregular pattern • Place stabilizer under fabric. • Set needle thread tension to the reverse sewing button length you...
.... The machine stops at an angle of the corner on the left needle position or zigzag stitch 3 for home decorating projects like placemats, cushions and valances. iL.:\ IVI > A B Manual change! These larger embroideries are perfect for motifs with this technique. ueIlsf eeycotbuoztiwhgozsuatligdtcshltiiktNechot.oN3eoma. n1bd2ro.sitPditrecerhstshNetoh.ce1o2trinef-eoorrfsfauobftuotamtonatic (36) three times. I I , "" - Irregular pattern • Place stabilizer under fabric. • Set needle thread tension to the reverse sewing button length you...

Owner's Manual
Page 108
... helpful for topstitching on the three layers of fabric of the quilt you only see the triple stitch of the bobbin thread. Use invisible sewing thread (nylon monofilament) as the needle thread and wind the bobbin with cotton thread to contrast or blend with small hand stitches to quickly and easily achieve a handquilted look . Many pieces of fabric are joined together in patterns to make use of left over fabric. Stitch 11 works...
... helpful for topstitching on the three layers of fabric of the quilt you only see the triple stitch of the bobbin thread. Use invisible sewing thread (nylon monofilament) as the needle thread and wind the bobbin with cotton thread to contrast or blend with small hand stitches to quickly and easily achieve a handquilted look . Many pieces of fabric are joined together in patterns to make use of left over fabric. Stitch 11 works...

Owner's Manual
Page 110
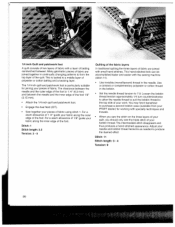
... sew. Prepare your machine in a more consistent way The Quilting table and Free-motion guide foot are extra accessories created to secure a quilt. Begin near the center of the quilt. Take one another way to keep the stitches even. In order to sew the stitch only once, press the tie-off button when you control the stitch length. Now sew this stitch every 3 4 - (7- 10 cm) all over the quilt. Lower the feed dog and set...
... sew. Prepare your machine in a more consistent way The Quilting table and Free-motion guide foot are extra accessories created to secure a quilt. Begin near the center of the quilt. Take one another way to keep the stitches even. In order to sew the stitch only once, press the tie-off button when you control the stitch length. Now sew this stitch every 3 4 - (7- 10 cm) all over the quilt. Lower the feed dog and set...

Owner's Manual
Page 118
...Only guide the fabric lightly. Make sure thread is not properly inserted. Needle breaks off Needle is too tight. Use a larger needle. Check bobbin threading path. Thread tension is not pushed fully in. The bobbin thread is not properly inserted. Flat side facing the back. Re-thread machine, making sure presser foot is raised to make sure bobbin case is securely in it fully into bobbin tension spring. Adjust thread tension. Only use good quality threads. See needle table (Page 92, 93). Adjust bobbin thread tension as needed. 114 Sewing problems...
...Only guide the fabric lightly. Make sure thread is not properly inserted. Needle breaks off Needle is too tight. Use a larger needle. Check bobbin threading path. Thread tension is not pushed fully in. The bobbin thread is not properly inserted. Flat side facing the back. Re-thread machine, making sure presser foot is raised to make sure bobbin case is securely in it fully into bobbin tension spring. Adjust thread tension. Only use good quality threads. See needle table (Page 92, 93). Adjust bobbin thread tension as needed. 114 Sewing problems...

Owner's Manual
Page 119
... when the machine is cleaned or is transported (display is not lying flat. 1emedy Remove needle plate, remove lint with difficulty There are any children nearby. I I I I I !' Display incorrect or no display When static electricity is important if there are thread remnants in the hook ways. Set the contrast using the contrast control. :4 115 Slide A is at the left . Before changing presser feet and needle the...
... when the machine is cleaned or is transported (display is not lying flat. 1emedy Remove needle plate, remove lint with difficulty There are any children nearby. I I I I I !' Display incorrect or no display When static electricity is important if there are thread remnants in the hook ways. Set the contrast using the contrast control. :4 115 Slide A is at the left . Before changing presser feet and needle the...


