
Owner's Manual
Page 3
... dropped into any adjustment or changing presser foot, etc. It may deflect the needle causing it still does not fit, -I . .. If it to the off (0") bobbin, when making any • Never drop or insert any object into water. DANGER -To reduce the risk of burns, fire, electric shock, or injury to...
... dropped into any adjustment or changing presser foot, etc. It may deflect the needle causing it still does not fit, -I . .. If it to the off (0") bobbin, when making any • Never drop or insert any object into water. DANGER -To reduce the risk of burns, fire, electric shock, or injury to...

Owner's Manual
Page 6
...A Accessories Applique foot Applique designs Automatic tapering B Balance Basting Bias binder Blind hem Bobbin case Bobbin thread monitor (model 2044) Bobbin thread tension Bobbin thread, drawing up Bobbin winding Bobbin winding through the needle Braiding foot Bridging Buttonhole, fully-automatic Buttonholes Buttonholes with gimp thread...23 30 89 65 72 70-76 75 76 71 61 Decorative sewing, general notes 96 Decorative stitches, Quilt Expression 2044 10 Decorative stitches, Expression 2034 11 E Elastic utility stitches Electrical connection Eyelet embroidery Eyelets 56-60, 65 19 109 61 F...
...A Accessories Applique foot Applique designs Automatic tapering B Balance Basting Bias binder Blind hem Bobbin case Bobbin thread monitor (model 2044) Bobbin thread tension Bobbin thread, drawing up Bobbin winding Bobbin winding through the needle Braiding foot Bridging Buttonhole, fully-automatic Buttonholes Buttonholes with gimp thread...23 30 89 65 72 70-76 75 76 71 61 Decorative sewing, general notes 96 Decorative stitches, Quilt Expression 2044 10 Decorative stitches, Expression 2034 11 E Elastic utility stitches Electrical connection Eyelet embroidery Eyelets 56-60, 65 19 109 61 F...

Owner's Manual
Page 7
...Integrated Needle, changing Needle, threading Needle/bobbin thread tension Non-elastic/elastic stitches Non-stick fancy stitch foot for leather 0 Overlock stitches P Parts of the sewing machine (2044) Parts of the sewing machine (2034) Patchwork and quilting "Pattern start" "Pattern start" within... Top feed (integrated dual feed) Twin needle Twin needle, threading U Utility stitches, Quilt Expression 2044 Utility stitches, Expression 2034 V Voltage switch w Window, adjusting the contrast z Zippers, sewing in 1/4 inch quilt and patchwork foot 7/9 hole foot II ILl l.JUUL.11U 42 114, 115 36 ...
...Integrated Needle, changing Needle, threading Needle/bobbin thread tension Non-elastic/elastic stitches Non-stick fancy stitch foot for leather 0 Overlock stitches P Parts of the sewing machine (2044) Parts of the sewing machine (2034) Patchwork and quilting "Pattern start" "Pattern start" within... Top feed (integrated dual feed) Twin needle Twin needle, threading U Utility stitches, Quilt Expression 2044 Utility stitches, Expression 2034 V Voltage switch w Window, adjusting the contrast z Zippers, sewing in 1/4 inch quilt and patchwork foot 7/9 hole foot II ILl l.JUUL.11U 42 114, 115 36 ...
Owner's Manual
Page 9
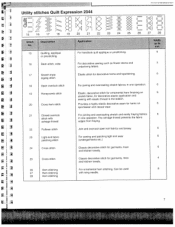
...operation. The selvage thread prevents the fabric edges from fraying. For joining and overcasting stretch and easily fraying fabrics 6 in the bobbin. Quilting, appliqué or pinstitching 16 Stem stitch, wide 17 Stretch triple zigzag stitch 18 Open overlock stitch 19 Honeycomb stitch 20... 26 Hem stitching 27 Hem stitching 28 Hem stitching 20 21 22 23 24 25 26 27 28 Application For handlook quilt applique or pinstitching. Utility stitches Quilt Expression 2044 II 11.1 %..A.A1l.i%_I o 1 z 7 = 15 16 17 18 19 Stitch No 15 Description . Can be ...
...operation. The selvage thread prevents the fabric edges from fraying. For joining and overcasting stretch and easily fraying fabrics 6 in the bobbin. Quilting, appliqué or pinstitching 16 Stem stitch, wide 17 Stretch triple zigzag stitch 18 Open overlock stitch 19 Honeycomb stitch 20... 26 Hem stitching 27 Hem stitching 28 Hem stitching 20 21 22 23 24 25 26 27 28 Application For handlook quilt applique or pinstitching. Utility stitches Quilt Expression 2044 II 11.1 %..A.A1l.i%_I o 1 z 7 = 15 16 17 18 19 Stitch No 15 Description . Can be ...

Owner's Manual
Page 11
... wing needle. 26 Hem stitching 9 -] L F E F F Fl F F Utility stitches Expression 2034 7=1 II II II 14 15 16 17 18 19 20 21 22 23 24 Stitch I'4o Description Application... 14 Decorative elastic stitch 15 Quilting, appliqué or pinstitching For joining overlapped seams on bulky fabrics such as flower... stitch with selvage thread For joining and overcasting stretch and easily fraying fabrics 6 in the bobbin. 20 Cross hem stitch Provides a highly elastic decorative seam for garments, linen 6 and kitchen...
... wing needle. 26 Hem stitching 9 -] L F E F F Fl F F Utility stitches Expression 2034 7=1 II II II 14 15 16 17 18 19 20 21 22 23 24 Stitch I'4o Description Application... 14 Decorative elastic stitch 15 Quilting, appliqué or pinstitching For joining overlapped seams on bulky fabrics such as flower... stitch with selvage thread For joining and overcasting stretch and easily fraying fabrics 6 in the bobbin. 20 Cross hem stitch Provides a highly elastic decorative seam for garments, linen 6 and kitchen...

Owner's Manual
Page 15
...the sewing machine (2044) 14-15 Parts of the sewing machine (2034) 16-17 Carrying case 18 I Lid with stitch chart 18 Electrical connection 19 Voltage switch 19 Accessories 20 Removable accessory tray 21 Bobbin winding 21-23 Bobbin case 24-25 Needle/bobbin thread tension 24-25... Threading the needle thread 26 Integrated needle threader 27 Drawing up the bobbin thread 28 Presser foot lifter 28 Thread cutter 28 Changing...
...the sewing machine (2044) 14-15 Parts of the sewing machine (2034) 16-17 Carrying case 18 I Lid with stitch chart 18 Electrical connection 19 Voltage switch 19 Accessories 20 Removable accessory tray 21 Bobbin winding 21-23 Bobbin case 24-25 Needle/bobbin thread tension 24-25... Threading the needle thread 26 Integrated needle threader 27 Drawing up the bobbin thread 28 Presser foot lifter 28 Thread cutter 28 Changing...

Owner's Manual
Page 16
Parts of the sewing machine (mod& 2044) 1 -1+ button controls) A (stitch width/pattern width 27 Slide for lowering the feed dog 2 -7+ button controls) B (stitch length/pattern length 28 Base plate 29 Removable accessory ..." selection button "Stretch triple straight 42 Spool holder with spool cap 43 Hole for second spool holder 44 Lid with stitch program chart 45 Bobbin winder 46 Bobbin door 47 Free arm 48 Sewing bulb (max. 5 W) 21 Direct selection button "Blind hem stitch" 22 Direct selection button "Bridging stitch" 23 Direct selection...
Parts of the sewing machine (mod& 2044) 1 -1+ button controls) A (stitch width/pattern width 27 Slide for lowering the feed dog 2 -7+ button controls) B (stitch length/pattern length 28 Base plate 29 Removable accessory ..." selection button "Stretch triple straight 42 Spool holder with spool cap 43 Hole for second spool holder 44 Lid with stitch program chart 45 Bobbin winder 46 Bobbin door 47 Free arm 48 Sewing bulb (max. 5 W) 21 Direct selection button "Blind hem stitch" 22 Direct selection button "Bridging stitch" 23 Direct selection...

Owner's Manual
Page 18
... "Elastic blind hem stitch" 42 Spool holder with spool cap 43 Hole for second spool holder 44 Lid with stitch program chart 45 Bobbin winder 19 Direct selection button "Zigzag stitch" 20 Direct selection button "Stretch triple straight stitch" 21 Direct selection button "Blindhem stitch" ...22 Direct selection button "Bridging stitch" 23 Direct selection button "Button attaching program" 46 Bobbin door 47 Free arm 48 Sewing bulb (max. 5 W) 49 Thread cutter 50 Thread take-up 51 Presser foot lifter 24 Direct selection button ...
... "Elastic blind hem stitch" 42 Spool holder with spool cap 43 Hole for second spool holder 44 Lid with stitch program chart 45 Bobbin winder 19 Direct selection button "Zigzag stitch" 20 Direct selection button "Stretch triple straight stitch" 21 Direct selection button "Blindhem stitch" ...22 Direct selection button "Bridging stitch" 23 Direct selection button "Button attaching program" 46 Bobbin door 47 Free arm 48 Sewing bulb (max. 5 W) 49 Thread cutter 50 Thread take-up 51 Presser foot lifter 24 Direct selection button ...

Owner's Manual
Page 23
... only be wound if it upwards out of the hole. j 68 69 7Q 72 73 ] NI Push the bobbin to the right. 21 I I I I i•g U 7O 71 73 74, 75,W . . -. -, I Technical sectic Removing the accessory tray (free arm) In order to sew using the free ... the accessory tray to the left and lift it is flush with the free arm of the bobbin. /6 Fr. Preparing the machine for bobbin winding Place an empty bobbin so that the black pin of the bobbin winder snaps into the slot of the sewing machine. When replacing the tray, make sure it is...
... only be wound if it upwards out of the hole. j 68 69 7Q 72 73 ] NI Push the bobbin to the right. 21 I I I I i•g U 7O 71 73 74, 75,W . . -. -, I Technical sectic Removing the accessory tray (free arm) In order to sew using the free ... the accessory tray to the left and lift it is flush with the free arm of the bobbin. /6 Fr. Preparing the machine for bobbin winding Place an empty bobbin so that the black pin of the bobbin winder snaps into the slot of the sewing machine. When replacing the tray, make sure it is...

Owner's Manual
Page 24
Technical section 1. i . !. . Wind the start of the right size for the thread spool. Push the bobbin to front). Threading Place the thread into guide A from the spool pin Place the sewing thread on the master switch Hold the end of the ... under the thread guide C (from back to the left, cut the thread and remove bobbin from the winder. 22 if !LJ I . 4.,. , . . ,. As soon as the bobbin is full, the winding action will be stopped automatically. Winding the bobbin from the front and pull it counterclockwise through the pre-tension device B. To obtain free...
Technical section 1. i . !. . Wind the start of the right size for the thread spool. Push the bobbin to front). Threading Place the thread into guide A from the spool pin Place the sewing thread on the master switch Hold the end of the ... under the thread guide C (from back to the left, cut the thread and remove bobbin from the winder. 22 if !LJ I . 4.,. , . . ,. As soon as the bobbin is full, the winding action will be stopped automatically. Winding the bobbin from the front and pull it counterclockwise through the pre-tension device B. To obtain free...

Owner's Manual
Page 25
s - -- - jr, r o)o)o) ( cj c) j j 3 j I I 3 3 I I 3 I I 23 i Kr ,- As soon as shown on the master switch Hold the end of the thread firmly and press the foot control. Cut the thread, push the bobbin to the left and remove bobbin from the second spool holder Insert the second spool holder in the hole provided. E' 9 V 1.; '\ Technical secti : t. . Switch on page 22. I -4 ? 12 jO tXI P'R#F o44 DtJ DC B Winding from the winder. _____ -- II h \ i--- Threading Thread as the bobbin is full, the winding action will be stopped automatically.
s - -- - jr, r o)o)o) ( cj c) j j 3 j I I 3 3 I I 3 I I 23 i Kr ,- As soon as shown on the master switch Hold the end of the thread firmly and press the foot control. Cut the thread, push the bobbin to the left and remove bobbin from the second spool holder Insert the second spool holder in the hole provided. E' 9 V 1.; '\ Technical secti : t. . Switch on page 22. I -4 ? 12 jO tXI P'R#F o44 DtJ DC B Winding from the winder. _____ -- II h \ i--- Threading Thread as the bobbin is full, the winding action will be stopped automatically.

Owner's Manual
Page 26
...tension is too tight. Top thread is visible on the underside of the fabric: The needle thread tension is too loose or the bobbin thread tension is too loose. The thread tension must be corrected. the threads evenly meet between the two fabric layers. For decorative stitches... the top thread should be corrected. tiIIiiiI rrrnTnI Thread tension To obtain a perfect seam appearance and durability make sure the needle and bobbin thread tensions are correctly adjusted with regard to each other, i.e. The thread tension must be visible on the underside of the fabric. 24
...tension is too tight. Top thread is visible on the underside of the fabric: The needle thread tension is too loose or the bobbin thread tension is too loose. The thread tension must be corrected. the threads evenly meet between the two fabric layers. For decorative stitches... the top thread should be corrected. tiIIiiiI rrrnTnI Thread tension To obtain a perfect seam appearance and durability make sure the needle and bobbin thread tensions are correctly adjusted with regard to each other, i.e. The thread tension must be visible on the underside of the fabric. 24

Owner's Manual
Page 27
... with each hand movement Correcting the tension: Turn adjusting screw C just a little to the left to increase the bobbin thread tension. The bobbin case must turn clockwise. t E Checking the bobbin thread tension: Hold the bobbin case by the thread and move your hand sharply upwards. When doing so, pull the thread sideways through slot...
... with each hand movement Correcting the tension: Turn adjusting screw C just a little to the left to increase the bobbin thread tension. The bobbin case must turn clockwise. t E Checking the bobbin thread tension: Hold the bobbin case by the thread and move your hand sharply upwards. When doing so, pull the thread sideways through slot...

Owner's Manual
Page 30
While holding the end of the needle thread, press the foot control so the needle moves down and up the bobbin thread Raise the presser foot. Pull the needle thread to draw up the bobbin thread. / I, Bobbin thread Close the bobbin door (46) and pull the thread under the presser foot to the front over the thread cutter (49). 28 I tftE IF IJUdI SULlUI I t Thread cutter Pull the thread from the back to the left I ) Presser foot lifter The presser foot is raised or lowered with the presser foot lifter (51). Drawing-up .
While holding the end of the needle thread, press the foot control so the needle moves down and up the bobbin thread Raise the presser foot. Pull the needle thread to draw up the bobbin thread. / I, Bobbin thread Close the bobbin door (46) and pull the thread under the presser foot to the front over the thread cutter (49). 28 I tftE IF IJUdI SULlUI I t Thread cutter Pull the thread from the back to the left I ) Presser foot lifter The presser foot is raised or lowered with the presser foot lifter (51). Drawing-up .

Owner's Manual
Page 32
..., - Pull the needle and upward through the needle It is possible to wind bobbins even when the machine is fully threaded. the right under thread guide Push the bobbin to right through the take -up lever (40). bobbin in a 30 Wind the beginning of the thread several Hold the end of the... thread firmly and press times around the the foot control. _ I 0 1 2 PVAcF 2044 Winding a bobbin through the thread underneath the...
..., - Pull the needle and upward through the needle It is possible to wind bobbins even when the machine is fully threaded. the right under thread guide Push the bobbin to right through the take -up lever (40). bobbin in a 30 Wind the beginning of the thread several Hold the end of the... thread firmly and press times around the the foot control. _ I 0 1 2 PVAcF 2044 Winding a bobbin through the thread underneath the...

Owner's Manual
Page 37
Seithig functions Adjusting the contrast in the Expression window 36 Stitch selection 36 Bobbin thread monitor (model 2044) 37 Altering pattern sizes 37 Altering the stitch width/needle position 38 '1ng the pattern length 38, 39 mg the pattern *Th density 39 40 'reverse sewing button 41 ii ion buttons 42 43 44 45 : A I j z-
Seithig functions Adjusting the contrast in the Expression window 36 Stitch selection 36 Bobbin thread monitor (model 2044) 37 Altering pattern sizes 37 Altering the stitch width/needle position 38 '1ng the pattern length 38, 39 mg the pattern *Th density 39 40 'reverse sewing button 41 ii ion buttons 42 43 44 45 : A I j z-

Owner's Manual
Page 40
.jcvvii 1LAI IL,LJLII I Bobbin thread monitor (model 2044) If the bobbin is no thread on the bobbin, the bobbin symbol appears in the window. The symbol disappears after a full bobbin is visible in the window. To change is inserted and you start to the right of stitches by touching the appropriate -1+ buttons to sew again. ...
.jcvvii 1LAI IL,LJLII I Bobbin thread monitor (model 2044) If the bobbin is no thread on the bobbin, the bobbin symbol appears in the window. The symbol disappears after a full bobbin is visible in the window. To change is inserted and you start to the right of stitches by touching the appropriate -1+ buttons to sew again. ...

Owner's Manual
Page 66
... directions over the area again. Tighten the set screw. the stitch length is engaged for darning. • Lower the feed dog. • Draw up the bobbin thread and hold the threads when you start sewing. • Repair the damaged area/hole by you to sew a more consistent length of the damaged...
... directions over the area again. Tighten the set screw. the stitch length is engaged for darning. • Lower the feed dog. • Draw up the bobbin thread and hold the threads when you start sewing. • Repair the damaged area/hole by you to sew a more consistent length of the damaged...

Owner's Manual
Page 67
.... Secure all thread ends. Lower needle thread tension to 3. • Mark the first gathering line on the ends of gathering is determined by pulling the bobbin (bottom) threads to the desired fullness. • Distribute the gathers evenly and knot the thread ends together to gather. LJUIIL LIL'...iI I''j 64 Gathering with...
.... Secure all thread ends. Lower needle thread tension to 3. • Mark the first gathering line on the ends of gathering is determined by pulling the bobbin (bottom) threads to the desired fullness. • Distribute the gathers evenly and knot the thread ends together to gather. LJUIIL LIL'...iI I''j 64 Gathering with...

Owner's Manual
Page 83
... Order No.: 93-035 91 0-91/000 1 Needle box Order No.: 48-020 804-32/000 2 Felt pad Order No.: 93-033 064-05/000 3 Bobbins Order No.: 93-040 970-45/000 4-6 Spool cap 4. Order No.: 93-036 048-44/000 6. e Sensormatic buttonhole guide No. 10 Order No.: 93-037...
... Order No.: 93-035 91 0-91/000 1 Needle box Order No.: 48-020 804-32/000 2 Felt pad Order No.: 93-033 064-05/000 3 Bobbins Order No.: 93-040 970-45/000 4-6 Spool cap 4. Order No.: 93-036 048-44/000 6. e Sensormatic buttonhole guide No. 10 Order No.: 93-037...

