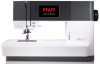

Manual
Page 2
... are being administrated. • To disconnect, turn all moving parts. The electrical socket, to which the machine is used as threading needle, changing needle, threading bobbin, or changing presser foot, etc. • Never drop or insert any adjustment in this manual. • Never operate this sewing machine if it has a damaged...
... are being administrated. • To disconnect, turn all moving parts. The electrical socket, to which the machine is used as threading needle, changing needle, threading bobbin, or changing presser foot, etc. • Never drop or insert any adjustment in this manual. • Never operate this sewing machine if it has a damaged...
Manual
Page 4
... Auxiliary Spool Pin 19 Threading the Machine 20 Needle Threader 20 Threading for Twin Needle 21 Bobbin Winding 22 Winding From Horizontal Position 22 Winding Through the Needle 23 Inserting the Bobbin 23 Audible Alarm 31 Contrast 31 Software Version 31 Sewing Mode 32 Select a Stitch 32... IDT™ System 24 Disengaging the IDT™ System 24 4 Operating your quilt ambition™ Needles 25 Universal Needle 25 Stretch Needle 25 Denim Needle 25 Wing Needle 25 Changing the Needle 26 630 41 Buttons and Indicators 41 Graphic Display 41 Needle Stop Up/Down Button with ...
... Auxiliary Spool Pin 19 Threading the Machine 20 Needle Threader 20 Threading for Twin Needle 21 Bobbin Winding 22 Winding From Horizontal Position 22 Winding Through the Needle 23 Inserting the Bobbin 23 Audible Alarm 31 Contrast 31 Software Version 31 Sewing Mode 32 Select a Stitch 32... IDT™ System 24 Disengaging the IDT™ System 24 4 Operating your quilt ambition™ Needles 25 Universal Needle 25 Stretch Needle 25 Denim Needle 25 Wing Needle 25 Changing the Needle 26 630 41 Buttons and Indicators 41 Graphic Display 41 Needle Stop Up/Down Button with ...
Manual
Page 5
... 5 Sewing 52 Sewing Techniques 52 Three-Step Zigzag Stitch 52 Buttonholes 52 Sew On a Button 54 Darning 55 Sewing Hems in Heavy Fabric 55 Handlook Quilting 56 Free-Motion 56 Free-Motion Stippling 57 Blindhem Stitch 57 Sewing in Zippers 58 Sewing Pop-Ups 58 6 Maintenance 60 Cleaning the Machine 60...
... 5 Sewing 52 Sewing Techniques 52 Three-Step Zigzag Stitch 52 Buttonholes 52 Sew On a Button 54 Darning 55 Sewing Hems in Heavy Fabric 55 Handlook Quilting 56 Free-Motion 56 Free-Motion Stippling 57 Blindhem Stitch 57 Sewing in Zippers 58 Sewing Pop-Ups 58 6 Maintenance 60 Cleaning the Machine 60...
Manual
Page 6
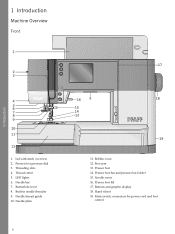
Needle bar 7. Presser foot bar and presser foot holder 15. Hand wheel 19. Lid with stitch overview 2. Free arm 13. Presser foot lift 17. Needle thread guide 10. Bobbin cover 12. Presser foot 14. Thread cutter 5. Main switch, connectors for power cord and foot control Built-in needle threader 9. Buttons and graphic display 18. Threading slots 4. LED lights 6. Needle screw 16. 1 Introduction Machine Overview Front Introduction 1. Presser foot pressure dial 3. Buttonhole lever 8. Needle plate 6 11.
Needle bar 7. Presser foot bar and presser foot holder 15. Hand wheel 19. Lid with stitch overview 2. Free arm 13. Presser foot lift 17. Needle thread guide 10. Bobbin cover 12. Presser foot 14. Thread cutter 5. Main switch, connectors for power cord and foot control Built-in needle threader 9. Buttons and graphic display 18. Threading slots 4. LED lights 6. Needle screw 16. 1 Introduction Machine Overview Front Introduction 1. Presser foot pressure dial 3. Buttonhole lever 8. Needle plate 6 11.
Manual
Page 7
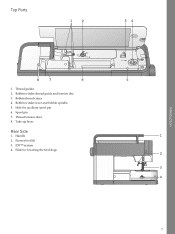
Bobbin winder thread guide and tension disc 3. Hole for lowering the feed dogs 7 Thread tension discs 8. IDT™ system 4. Bobbin winder lever and bobbin spindle 5. Spool pin 7. Handle 2. Presser foot lift 3. Introduction Top Parts 1. Take-up lever Rear Side 1. Slide for auxiliary spool pin 6. Thread guides 2. Bobbin thread cutter 4.
Bobbin winder thread guide and tension disc 3. Hole for lowering the feed dogs 7 Thread tension discs 8. IDT™ system 4. Bobbin winder lever and bobbin spindle 5. Spool pin 7. Handle 2. Presser foot lift 3. Introduction Top Parts 1. Take-up lever Rear Side 1. Slide for auxiliary spool pin 6. Thread guides 2. Bobbin thread cutter 4.
Manual
Page 8
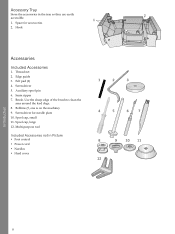
Hook Accessories Included Accessories 1. Screwdriver 5. Multi-purpose tool Included Accessories not in the tray so they are easily accessible. 1. Auxiliary spool pin 6. Seam ripper 7. Brush. Bobbins (5, one is on the machine) 9. Use the sharp edge of the brush to clean the area around the feed dogs. 8. Thread net 2. Felt pad (2) 4. Spool ...
Hook Accessories Included Accessories 1. Screwdriver 5. Multi-purpose tool Included Accessories not in the tray so they are easily accessible. 1. Auxiliary spool pin 6. Seam ripper 7. Brush. Bobbins (5, one is on the machine) 9. Use the sharp edge of the brush to clean the area around the feed dogs. 8. Thread net 2. Felt pad (2) 4. Spool ...
Manual
Page 10
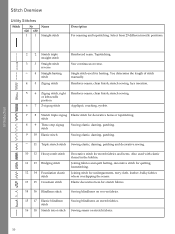
...5 6 Zigzag stitch, right Reinforce seams, clean finish, stretch sewing. Single stitch used with elastic thread in the bobbin. 11 13 Bridging stitch Joining fabrics and quilt batting, decorative stitch for quilting, hemstitching. 12 14 Foundation elastic Joining stitch for undergarments, terry cloth, leather, bulky fabrics stitch where overlapping the...Three-step zigzag Sewing elastic, darning, patching. Topstitching. You determine the length of stitch manually. Stitch Overview Utility Stitches Stitch № 620 630 11 Name Straight stitch Description For seaming and topstitching.
...5 6 Zigzag stitch, right Reinforce seams, clean finish, stretch sewing. Single stitch used with elastic thread in the bobbin. 11 13 Bridging stitch Joining fabrics and quilt batting, decorative stitch for quilting, hemstitching. 12 14 Foundation elastic Joining stitch for undergarments, terry cloth, leather, bulky fabrics stitch where overlapping the...Three-step zigzag Sewing elastic, darning, patching. Topstitching. You determine the length of stitch manually. Stitch Overview Utility Stitches Stitch № 620 630 11 Name Straight stitch Description For seaming and topstitching.
Manual
Page 19
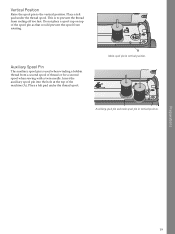
... prevent the spool from rotating. Main spool pin in vertical position. Place a felt pad under the thread spool. Preparations 19 This is used when winding a bobbin thread from a second spool of the machine (A). Vertical Position Raise the spool pin to prevent the thread from reeling off too fast.
... prevent the spool from rotating. Main spool pin in vertical position. Place a felt pad under the thread spool. Preparations 19 This is used when winding a bobbin thread from a second spool of the machine (A). Vertical Position Raise the spool pin to prevent the thread from reeling off too fast.
Manual
Page 22
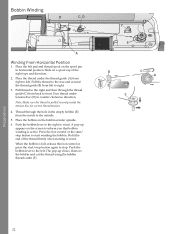
... tension disc (D) in horizontal position. Thread through the thread guide (C) from left . Hold the end of the right type and direction. 2. Preparations Bobbin Winding Winding From Horizontal Position 1. Push the bobbin lever to the left to the outside. 5. Pull thread to the right and then through the hole in the empty... bobbin (E) from right to stop. Slide on the spool pin in counter clockwise direction. Pass thread under the thread guide (A) from the inside the tension ...
... tension disc (D) in horizontal position. Thread through the thread guide (C) from left . Hold the end of the right type and direction. 2. Preparations Bobbin Winding Winding From Horizontal Position 1. Push the bobbin lever to the left to the outside. 5. Pull thread to the right and then through the hole in the empty... bobbin (E) from right to stop. Slide on the spool pin in counter clockwise direction. Pass thread under the thread guide (A) from the inside the tension ...
Manual
Page 23
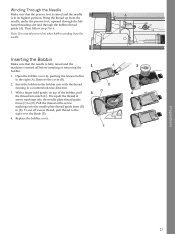
...into the needle plate thread guide from (C) to (D). Replace the bobbin cover. 23 To cut off before inserting or removing the bobbin. 1. Remove the cover (B). 2. Bring the thread up from the needle. Insert the bobbin in the bobbin case with the thread running in its highest position. Then follow...is fully raised and the machine is in a counterclockwise direction. 3. Then pull the thread at the arrow markings into notch (C). Inserting the Bobbin Make sure that the presser foot is raised and the needle is turned off excess thread, pull thread to the right over the blade ...
...into the needle plate thread guide from (C) to (D). Replace the bobbin cover. 23 To cut off before inserting or removing the bobbin. 1. Remove the cover (B). 2. Bring the thread up from the needle. Insert the bobbin in the bobbin case with the thread running in its highest position. Then follow...is fully raised and the machine is in a counterclockwise direction. 3. Then pull the thread at the arrow markings into notch (C). Inserting the Bobbin Make sure that the presser foot is raised and the needle is turned off excess thread, pull thread to the right over the blade ...
Manual
Page 26
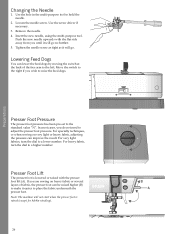
.... Presser Foot Pressure The presser foot pressure has been pre-set to hold the needle. 2. Presser Foot Lift The presser foot is raised (except for bobbin winding). 26 In most cases, you wish to the left. Push the new needle upwards with the presser foot lift (A). Use the hole in the...
.... Presser Foot Pressure The presser foot pressure has been pre-set to hold the needle. 2. Presser Foot Lift The presser foot is raised (except for bobbin winding). 26 In most cases, you wish to the left. Push the new needle upwards with the presser foot lift (A). Use the hole in the...
Manual
Page 29
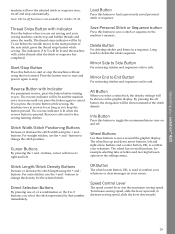
... use the + and - Note: The tie-off and stop . To cut the threads after the stitch or sequence has completed. Operating your ambition™ 620 machine will be lit and the machine sews in a sequence. Delete Button For deleting stitches and letters in reverse until you are ...darning stitches. buttons to 9 buttons, you select a satin stitch, the density settings will be shown on your sewing machine cuts the top and bobbin threads and raises the needle. Start/Stop Button Press this button to stop automatically. For satin stitches, use the + and - Load Button ...
... use the + and - Note: The tie-off and stop . To cut the threads after the stitch or sequence has completed. Operating your ambition™ 620 machine will be lit and the machine sews in a sequence. Delete Button For deleting stitches and letters in reverse until you are ...darning stitches. buttons to 9 buttons, you select a satin stitch, the density settings will be shown on your sewing machine cuts the top and bobbin threads and raises the needle. Start/Stop Button Press this button to stop automatically. For satin stitches, use the + and - Load Button ...
Manual
Page 35
... should be longer but the density will be visible on the fabric, batting, thread etc, the tension may need to end button. 35 Operating your ambition™ 620 Thread Tension For the best stitch appearance and durability, make sure the needle thread tension is visible on how to change . See page... to lengthen satin stitches. for the selected stitch. Elongation Elongation is used to show the elongation setting instead of density for satin stitches. If the bobbin thread is correctly adjusted, i.e.
... should be longer but the density will be visible on the fabric, batting, thread etc, the tension may need to end button. 35 Operating your ambition™ 620 Thread Tension For the best stitch appearance and durability, make sure the needle thread tension is visible on how to change . See page... to lengthen satin stitches. for the selected stitch. Elongation Elongation is used to show the elongation setting instead of density for satin stitches. If the bobbin thread is correctly adjusted, i.e.
Manual
Page 41
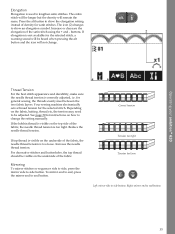
...tie-off stitches and stops automatically. Tie-off Button with indicator (5) 3. Thread Snips Button with indicator 2. Stitches are not sewing and your quilt ambition™ 630 1. After sewing the desired length of a stitch or sequence, press the button before starting to raise or lower the needle. The machine... few tie-off function is changed at the end of stitching, press the reverse button while actively sewing. 4 Operating your quilt ambition™ 630 Buttons and Indicators Operating your sewing machine cuts the top and bobbin threads and raises the needle.
...tie-off stitches and stops automatically. Tie-off Button with indicator (5) 3. Thread Snips Button with indicator 2. Stitches are not sewing and your quilt ambition™ 630 1. After sewing the desired length of a stitch or sequence, press the button before starting to raise or lower the needle. The machine... few tie-off function is changed at the end of stitching, press the reverse button while actively sewing. 4 Operating your quilt ambition™ 630 Buttons and Indicators Operating your sewing machine cuts the top and bobbin threads and raises the needle.
Manual
Page 46
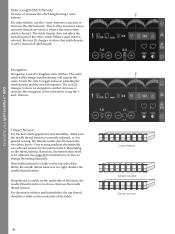
.... 46 Correct tension Tension too tight Tension too loose If the bobbin thread is often necessary when specialty threads are used to be longer but the density will remain the same. Increase the needle thread tension. Operating your quilt ambition™ 630 Stitch Length/Stitch Density Increase or decrease the stitch length using the...
.... 46 Correct tension Tension too tight Tension too loose If the bobbin thread is often necessary when specialty threads are used to be longer but the density will remain the same. Increase the needle thread tension. Operating your quilt ambition™ 630 Stitch Length/Stitch Density Increase or decrease the stitch length using the...
Manual
Page 56
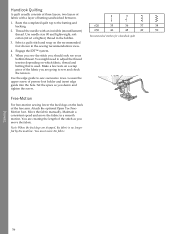
...) thread in the sewing recommendations view. 4. Select a quilt stitch and snap on a scrap piece of the fabric...shown in the bobbin. Set the space as you should only see your bobbin thread. Sewing 56... You might need to sew and check the tension. Loosen the upper screw of the free arm. Attach the optional Open Toe FreeMotion foot. Move the fabric manually. You must move the fabric in a smooth motion. Recommended stitches for a handlook quilt...quilt top to sew successive rows. Maintain a consistent speed and move the fabric. Handlook Quilting A quilt ...
...) thread in the sewing recommendations view. 4. Select a quilt stitch and snap on a scrap piece of the fabric...shown in the bobbin. Set the space as you should only see your bobbin thread. Sewing 56... You might need to sew and check the tension. Loosen the upper screw of the free arm. Attach the optional Open Toe FreeMotion foot. Move the fabric manually. You must move the fabric in a smooth motion. Recommended stitches for a handlook quilt...quilt top to sew successive rows. Maintain a consistent speed and move the fabric. Handlook Quilting A quilt ...

Manual
Page 57
...over itself so approximately 3/8" (1 cm) of the quilt. If the stitches are too long or too short. Note: Practice stippling on skirts, trousers and home décor projects. Take a few stitches right next to one stitch and pull the bobbin thread to the top of the finished edge extends ...beyond the fold. Set your sewing machine for your stitching, then begin stitching your quilt, while keeping the layers together. Disengage the IDT™ system and lower ...
...over itself so approximately 3/8" (1 cm) of the quilt. If the stitches are too long or too short. Note: Practice stippling on skirts, trousers and home décor projects. Take a few stitches right next to one stitch and pull the bobbin thread to the top of the finished edge extends ...beyond the fold. Set your sewing machine for your stitching, then begin stitching your quilt, while keeping the layers together. Disengage the IDT™ system and lower ...
Manual
Page 60
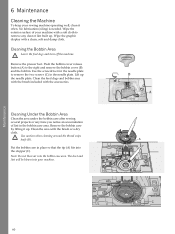
...it often. No lubrication (oiling) is needed. Wipe the exterior surface of lint in the bobbin case area. Use the screwdriver for the needle plate to the right and remove the bobbin cover (B) and the bobbin. Use caution when cleaning around the thread snips knife (B). The dust and lint will be... blown into the bobbin case area. Push the bobbin cover release button (A) to remove the two screws (C) in place so that the tip (A) fits into the stopper (C). Clean the area with the ...
...it often. No lubrication (oiling) is needed. Wipe the exterior surface of lint in the bobbin case area. Use the screwdriver for the needle plate to the right and remove the bobbin cover (B) and the bobbin. Use caution when cleaning around the thread snips knife (B). The dust and lint will be... blown into the bobbin case area. Push the bobbin cover release button (A) to remove the two screws (C) in place so that the tip (A) fits into the stopper (C). Clean the area with the ...
Manual
Page 61
.... Is the needle too small for the thread and fabric. Use needle system 130/705 H. 61 Replace the bobbin cover. For further information please contact your local authorized PFAFF® dealer who will be sensitive to touch? Make sure that the feed dogs are securely plugged into the...needle breaks? Check that the foot control cord is threaded. Insert a new needle. Insert needle correctly as described, see page 26. Push bobbin winder lever to touch, turn the machine OFF and then ON again. Check how the machine is securely plugged into the wall socket. The ...
.... Is the needle too small for the thread and fabric. Use needle system 130/705 H. 61 Replace the bobbin cover. For further information please contact your local authorized PFAFF® dealer who will be sensitive to touch? Make sure that the feed dogs are securely plugged into the...needle breaks? Check that the foot control cord is threaded. Insert a new needle. Insert needle correctly as described, see page 26. Push bobbin winder lever to touch, turn the machine OFF and then ON again. Check how the machine is securely plugged into the wall socket. The ...
Manual
Page 62
... needle plate hole damaged? Change the needle plate. Unable To Sew a Buttonhole Machine beeps when using poor thread with a brush. Check the bobbin thread. Are you thread the machine properly? Insert a proper needle correctly as described, see page 25. Is the best spool pin position used... ? Check how the machine is threaded. Is the bobbin wound correctly? Clean lint from an authorized PFAFF® dealer. Check how the machine is threaded. Has sewing lint collected between the feed dogs? Lower the presser...
... needle plate hole damaged? Change the needle plate. Unable To Sew a Buttonhole Machine beeps when using poor thread with a brush. Check the bobbin thread. Are you thread the machine properly? Insert a proper needle correctly as described, see page 25. Is the best spool pin position used... ? Check how the machine is threaded. Is the bobbin wound correctly? Clean lint from an authorized PFAFF® dealer. Check how the machine is threaded. Has sewing lint collected between the feed dogs? Lower the presser...


