
Manual
Page 2
... not use outdoors. • Do not operate where aerosol (spray) products are being used as contained in the instruction manual. Special care is required around the sewing machine needle. • Always use as threading needle, changing needle, threading bobbin, or changing presser foot, etc. • Never drop or insert any object into water. It may deflect the needle causing it to break. • Wear safety glasses. • Switch the sewing machine off ("0") position, then remove plug...
... not use outdoors. • Do not operate where aerosol (spray) products are being used as contained in the instruction manual. Special care is required around the sewing machine needle. • Always use as threading needle, changing needle, threading bobbin, or changing presser foot, etc. • Never drop or insert any object into water. It may deflect the needle causing it to break. • Wear safety glasses. • Switch the sewing machine off ("0") position, then remove plug...
Manual
Page 4
... 4 Operating your quilt ambition™ Needles 25 Universal Needle 25 Stretch Needle 25 Denim Needle 25 Wing Needle 25 Changing the Needle 26 630 41 Buttons and Indicators 41 Graphic Display 41 Needle Stop Up/Down Button with Indicator 41 Tie-off Button with Indicator 41 Lowering Feed Dogs 26 Presser Foot Pressure 26 Presser Foot Lift 26 Changing the Presser Foot 27 Remove Presser Foot 27 Thread Snips Button with Indicator 41 Start/Stop Button 42 Reverse Button with Indicator 42 Speed Control Lever 42 Settings Menu 42 Thread Tension 42
... 4 Operating your quilt ambition™ Needles 25 Universal Needle 25 Stretch Needle 25 Denim Needle 25 Wing Needle 25 Changing the Needle 26 630 41 Buttons and Indicators 41 Graphic Display 41 Needle Stop Up/Down Button with Indicator 41 Tie-off Button with Indicator 41 Lowering Feed Dogs 26 Presser Foot Pressure 26 Presser Foot Lift 26 Changing the Presser Foot 27 Remove Presser Foot 27 Thread Snips Button with Indicator 41 Start/Stop Button 42 Reverse Button with Indicator 42 Speed Control Lever 42 Settings Menu 42 Thread Tension 42
Manual
Page 5
... Your Sequences 50 Sewing a sequence 50 Sequencing Pop-Ups 51 5 Sewing 52 Sewing Techniques 52 Three-Step Zigzag Stitch 52 Buttonholes 52 Sew On a Button 54 Darning 55 Sewing Hems in Heavy Fabric 55 Handlook Quilting 56 Free-Motion 56 Free-Motion Stippling 57 Blindhem Stitch 57 Sewing in Zippers 58 Sewing Pop-Ups 58 6 Maintenance 60 Cleaning the Machine 60 Cleaning the Bobbin Area 60 Cleaning Under the Bobbin Area 60 Replacing the Needle Plate 61 Troubleshooting 61 Technical specification 63 Index...
... Your Sequences 50 Sewing a sequence 50 Sequencing Pop-Ups 51 5 Sewing 52 Sewing Techniques 52 Three-Step Zigzag Stitch 52 Buttonholes 52 Sew On a Button 54 Darning 55 Sewing Hems in Heavy Fabric 55 Handlook Quilting 56 Free-Motion 56 Free-Motion Stippling 57 Blindhem Stitch 57 Sewing in Zippers 58 Sewing Pop-Ups 58 6 Maintenance 60 Cleaning the Machine 60 Cleaning the Bobbin Area 60 Cleaning Under the Bobbin Area 60 Replacing the Needle Plate 61 Troubleshooting 61 Technical specification 63 Index...
Manual
Page 9
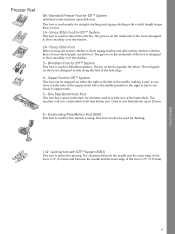
... that button size. Blindhem Foot for blindhem stitches. One Step Buttonhole Foot This foot has a space in the back for a button used for IDT™ System This foot is used for free-motion sewing. Embroidery/Free-Motion Foot (630) This foot is used to zipper teeth. 5 - Move the needle position to the right or left of the toe is designed to 25 mm. 6 - The toe on the foot is 1/8" (3.15 mm). This foot can be used for darning. 1/4" quilting foot with...
... that button size. Blindhem Foot for blindhem stitches. One Step Buttonhole Foot This foot has a space in the back for a button used for IDT™ System This foot is used for free-motion sewing. Embroidery/Free-Motion Foot (630) This foot is used to zipper teeth. 5 - Move the needle position to the right or left of the toe is designed to 25 mm. 6 - The toe on the foot is 1/8" (3.15 mm). This foot can be used for darning. 1/4" quilting foot with...
Manual
Page 10
... position 6 7 Z-zigzag stitch Appliqué, couching, eyelets. 7 8 Stretch triple zigzag Elastic stitch for basting. Select from 29 different needle positions. Topstitching. stitch 9 10 Elastic stitch Sewing elastic, darning, patching. - 11 Triple stretch stitch Sewing elastic, darning, patching and decorative sewing. 10 12 Honeycomb stitch Decorative stitch for stretch fabrics and hems. Also used for decorative hems or topstitching. You determine the length of stitch manually. Introduction 2 2 Stretch triple straight stitch 3 3 Straight stitch reverse - 4 Straight basting...
... position 6 7 Z-zigzag stitch Appliqué, couching, eyelets. 7 8 Stretch triple zigzag Elastic stitch for basting. Select from 29 different needle positions. Topstitching. stitch 9 10 Elastic stitch Sewing elastic, darning, patching. - 11 Triple stretch stitch Sewing elastic, darning, patching and decorative sewing. 10 12 Honeycomb stitch Decorative stitch for stretch fabrics and hems. Also used for decorative hems or topstitching. You determine the length of stitch manually. Introduction 2 2 Stretch triple straight stitch 3 3 Straight stitch reverse - 4 Straight basting...
Manual
Page 20
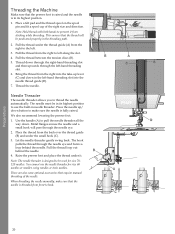
... Machine Make sure that the presser foot is raised and the needle is threaded from front to back. 20 When threading the needle manually, make sure the needle is designed to be used for size 60 needles or smaller, wing needles or twin needles. Place a felt pad and the thread spool on the spool pin and fit a spool cap of the needle. Note: Hold thread with both hands to thread the needle automatically. Use the handle (A) to pull the needle threader...
... Machine Make sure that the presser foot is raised and the needle is threaded from front to back. 20 When threading the needle manually, make sure the needle is designed to be used for size 60 needles or smaller, wing needles or twin needles. Place a felt pad and the thread spool on the spool pin and fit a spool cap of the needle. Note: Hold thread with both hands to thread the needle automatically. Use the handle (A) to pull the needle threader...
Manual
Page 21
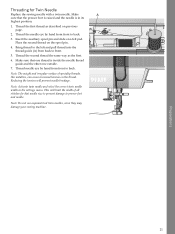
... twin needle and select the correct twin needle width in its highest position. 1. Thread needle eye by hand from back to back. Insert the auxiliary spool pin and slide on the spool pin. 4. Bring thread to the left and pull thread into the thread guide (A) from front to back. 3. Thread the second thread the same way as described on the thread. Preparations Threading for that needle size to prevent damage to presser foot and needle. Make...
... twin needle and select the correct twin needle width in its highest position. 1. Thread needle eye by hand from back to back. Insert the auxiliary spool pin and slide on the spool pin. 4. Bring thread to the left and pull thread into the thread guide (A) from front to back. 3. Thread the second thread the same way as described on the thread. Preparations Threading for that needle size to prevent damage to presser foot and needle. Make...
Manual
Page 29
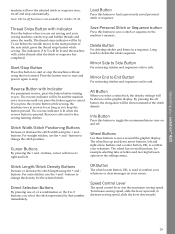
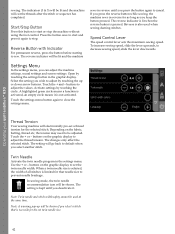
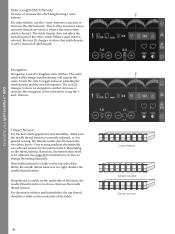
... screen. Reverse is pressed. Info Button Press this button to decrease sewing speed, slide the lever downwards. 29 Stitch Length/Stitch Density Buttons Increase or decrease the stitch length using the foot control. The wheel has up and down arrow buttons, left . Mirror End to End Button For mirroring stitches and sequences end to toggle the recommendations view on and off. Operating your ambition™ 620 machine will cut before starting to...
... screen. Reverse is pressed. Info Button Press this button to decrease sewing speed, slide the lever downwards. 29 Stitch Length/Stitch Density Buttons Increase or decrease the stitch length using the foot control. The wheel has up and down arrow buttons, left . Mirror End to End Button For mirroring stitches and sequences end to toggle the recommendations view on and off. Operating your ambition™ 620 machine will cut before starting to...
Manual
Page 41
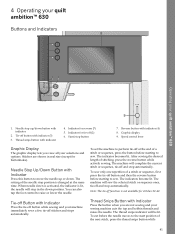
...; 630 1. Thread Snips Button with indicator 2. Start/stop position is changed at the end of a stitch or sequence, press the button before the needle moves to sew. Speed control lever Graphic Display The graphic display lets you are shown in the down is activated, the indicator is not available for reverse (7) 5. 4 Operating your quilt ambition™ 630 Buttons and Indicators Operating your selections and options. The indicators become lit. The machine...
...; 630 1. Thread Snips Button with indicator 2. Start/stop position is changed at the end of a stitch or sequence, press the button before the needle moves to sew. Speed control lever Graphic Display The graphic display lets you are shown in the down is activated, the indicator is not available for reverse (7) 5. 4 Operating your quilt ambition™ 630 Buttons and Indicators Operating your selections and options. The indicators become lit. The machine...
Manual
Page 42
... selected stitch. Speed Control Lever The speed control lever sets the maximum sewing speed. Open by touching the settings button in the settings menu. Depending on the fabric, batting, thread etc, the tension may need to sew. The setting will be shown if you select a stitch that needle size to start and press it is pressed. Use the + or - The setting is kept until you select another stitch. Operating your quilt ambition™ 630 sewing. Start/Stop Button Press this button to prevent needle breakage. Reverse Button with...
... selected stitch. Speed Control Lever The speed control lever sets the maximum sewing speed. Open by touching the settings button in the settings menu. Depending on the fabric, batting, thread etc, the tension may need to sew. The setting will be shown if you select a stitch that needle size to start and press it is pressed. Use the + or - The setting is kept until you select another stitch. Operating your quilt ambition™ 630 sewing. Start/Stop Button Press this button to prevent needle breakage. Reverse Button with...
Manual
Page 44
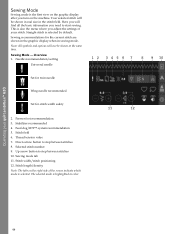
... you turn on the machine. Sewing Mode - Sewing mode tab 11. The selected mode is highlighted in the stitch field. Needle recommendation/setting Universal needle Set for twin needle Wing needle recommended Set for the current stitch are shown in the graphic display when in sewing mode. Up arrow button to step between stitches 8. Sewing recommendations for stitch width safety 2. Presser foot recommendation 3. Stitch field 6. Operating your quilt ambition™ 630 Sewing Mode Sewing mode is the...
... you turn on the machine. Sewing Mode - Sewing mode tab 11. The selected mode is highlighted in the stitch field. Needle recommendation/setting Universal needle Set for twin needle Wing needle recommended Set for the current stitch are shown in the graphic display when in sewing mode. Up arrow button to step between stitches 8. Sewing recommendations for stitch width safety 2. Presser foot recommendation 3. Stitch field 6. Operating your quilt ambition™ 630 Sewing Mode Sewing mode is the...
Manual
Page 45
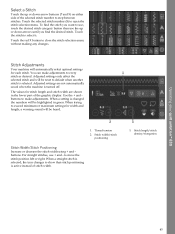
.... When a straight stitch is selected, the icon changes to default when another stitch is turned off. Stitch Adjustments Your machine will be heard. 1. Touch the stitch to open the stitch selection menu. The values for each stitch. Touch the selected stitch number (8) to select it. Use the + and buttons to every stitch as desired. For straight stitches, use ; Adjusted settings are shown in green. You can make adjustments to make adjustments. Operating your quilt ambition™ 630 Select a Stitch Touch...
.... When a straight stitch is selected, the icon changes to default when another stitch is turned off. Stitch Adjustments Your machine will be heard. 1. Touch the stitch to open the stitch selection menu. The values for each stitch. Touch the selected stitch number (8) to select it. Use the + and buttons to every stitch as desired. For straight stitches, use ; Adjusted settings are shown in green. You can make adjustments to make adjustments. Operating your quilt ambition™ 630 Select a Stitch Touch...
Manual
Page 46
... selected stitch. for general sewing, the threads evenly meet between adjusting the stitch density and the stitch elongation. Depending on the underside of the entire stitch. For decorative stitches and buttonholes, the top thread should be visible on the fabric, batting, thread etc, the tension may need to toggle between the two fabric layers. Elongation Elongation is correctly adjusted, i.e. buttons. Operating your quilt ambition™ 630 Stitch Length/Stitch Density Increase or decrease the stitch length using...
... selected stitch. for general sewing, the threads evenly meet between adjusting the stitch density and the stitch elongation. Depending on the underside of the entire stitch. For decorative stitches and buttonholes, the top thread should be visible on the fabric, batting, thread etc, the tension may need to toggle between the two fabric layers. Elongation Elongation is correctly adjusted, i.e. buttons. Operating your quilt ambition™ 630 Stitch Length/Stitch Density Increase or decrease the stitch length using...
Manual
Page 56
... you are dropped, the fabric is used. Attach the optional Open Toe FreeMotion foot. Note: When the feed dogs are going to adjust the thread tension depending on the recommended foot shown in the sewing recommendations view. 4. Thread the needle with a layer of presser foot holder and insert edge guide into the hole. Use needle size 90 and lightweight, soft cotton (60 wt or lighter) thread in a smooth motion. Select a quilt stitch and snap on which fabric, thread and batting...
... you are dropped, the fabric is used. Attach the optional Open Toe FreeMotion foot. Note: When the feed dogs are going to adjust the thread tension depending on the recommended foot shown in the sewing recommendations view. 4. Thread the needle with a layer of presser foot holder and insert edge guide into the hole. Use needle size 90 and lightweight, soft cotton (60 wt or lighter) thread in a smooth motion. Select a quilt stitch and snap on which fabric, thread and batting...
Manual
Page 61
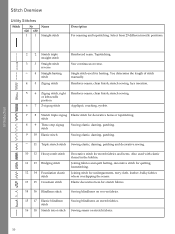
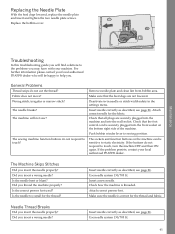
Maintenance Troubleshooting In this troubleshooting guide you may have with your machine. Wrong stitch, irregular or narrow stitch? Remove needle plate and clean lint from bobbin area. The sockets and function buttons on the bottom right side of the machine. If the buttons do not respond to sewing position. Did you insert the needle properly? Is the needle too small for the fabric. Use needle system 130/705 H. Insert a new needle. Make sure the needle is threaded. Replace the bobbin cover. The machine will...
Maintenance Troubleshooting In this troubleshooting guide you may have with your machine. Wrong stitch, irregular or narrow stitch? Remove needle plate and clean lint from bobbin area. The sockets and function buttons on the bottom right side of the machine. If the buttons do not respond to sewing position. Did you insert the needle properly? Is the needle too small for the fabric. Use needle system 130/705 H. Insert a new needle. Make sure the needle is threaded. Replace the bobbin cover. The machine will...
Manual
Page 62
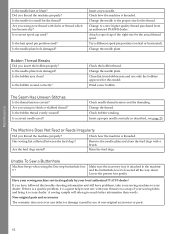
... needle used ? Check bobbin winding. Have your sewing fabric and bring it is a great help to test sew with your thread on a scrap of your sewing machine serviced regularly by use only the bobbins approved for the thread. Maintenance Is the needle bent or blunt? Insert a new needle. Attach a spool cap of non-original accessories or parts. 62 Is the needle plate hole damaged? Change the needle plate. Is the bobbin thread evenly wound? Change the thread. Check how the machine is threaded. Remove the needle plate and clean the feed dogs...
... needle used ? Check bobbin winding. Have your sewing fabric and bring it is a great help to test sew with your thread on a scrap of your sewing machine serviced regularly by use only the bobbins approved for the thread. Maintenance Is the needle bent or blunt? Insert a new needle. Attach a spool cap of non-original accessories or parts. 62 Is the needle plate hole damaged? Change the needle plate. Is the bobbin thread evenly wound? Change the thread. Check how the machine is threaded. Remove the needle plate and clean the feed dogs...
Manual
Page 65
... The Seam Has Uneven Stitches 62 Thread Cutter 18 Thread Snips Button with Indicator 29, 41 Thread Tension 30, 35, 42, 46 Threading for Twin Needle 21 Threading the Machine 20 Three-Step Zigzag Stitch 52 Tie-off Button with Indicator 28, 41 Top Parts 7 Troubleshooting 61 Twin Needle 30, 42 Q Quilt Stitches 13 R Rear Side 7 Recommended stitches for a handlook quilt 56 Remove Presser Foot 27 Replacing the Needle Plate 61 Reverse Button with Indicator 29, 42 U Unable To Sew a Buttonhole 62 Unpacking 16 Using...
... The Seam Has Uneven Stitches 62 Thread Cutter 18 Thread Snips Button with Indicator 29, 41 Thread Tension 30, 35, 42, 46 Threading for Twin Needle 21 Threading the Machine 20 Three-Step Zigzag Stitch 52 Tie-off Button with Indicator 28, 41 Top Parts 7 Troubleshooting 61 Twin Needle 30, 42 Q Quilt Stitches 13 R Rear Side 7 Recommended stitches for a handlook quilt 56 Remove Presser Foot 27 Replacing the Needle Plate 61 Reverse Button with Indicator 29, 42 U Unable To Sew a Buttonhole 62 Unpacking 16 Using...
Brochure
Page 2
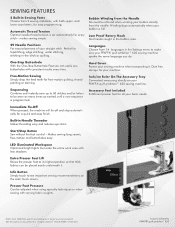
... sew buttonholes with less shadows. Free-Motion Sewing: Simply drop the feed teeth for full control. Presser Foot Pressure: Can be sewn as many times as wanted until a new sequence is 200mm, or 7.9 inches great for perfect stitching every time. Jam Proof Rotary Hook: No threads caught in the settings menu. Unique embellishments, stitched perfectly. Large Sewing Space: The sewing area to different sizes and fabrics. Make sure your PFAFF® ambition™ sewing machine for free-motion quilting, thread painting, or darning...
... sew buttonholes with less shadows. Free-Motion Sewing: Simply drop the feed teeth for full control. Presser Foot Pressure: Can be sewn as many times as wanted until a new sequence is 200mm, or 7.9 inches great for perfect stitching every time. Jam Proof Rotary Hook: No threads caught in the settings menu. Unique embellishments, stitched perfectly. Large Sewing Space: The sewing area to different sizes and fabrics. Make sure your PFAFF® ambition™ sewing machine for free-motion quilting, thread painting, or darning...
Features and Benefits
Page 1
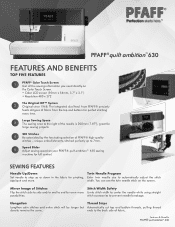
.... 5 Speed Slider Adjust sewing speed on the screen. SEWING FEATURES Needle Up/Down Twin Needle Program Set needle to stop up to end for pivoting, Enter twin needle size to automatically adjust the stitch appliqué and more Limits stitch width to prevent needle breakage. ® PFAFF®quilt ambition™630 FEATURES AND BENEFITS TOP FIVE FEATURES 1 PFAFF® Color Touch Screen Get all types of fabric from PFAFF® precisely feeds all the sewing information you need directly on...
.... 5 Speed Slider Adjust sewing speed on the screen. SEWING FEATURES Needle Up/Down Twin Needle Program Set needle to stop up to end for pivoting, Enter twin needle size to automatically adjust the stitch appliqué and more Limits stitch width to prevent needle breakage. ® PFAFF®quilt ambition™630 FEATURES AND BENEFITS TOP FIVE FEATURES 1 PFAFF® Color Touch Screen Get all types of fabric from PFAFF® precisely feeds all the sewing information you need directly on...
Features and Benefits
Page 2
... free-motion quilting, thread painting or darning. Makes sewing long seams, free-motion and buttonholes easy. Free-Motion Sewing Simply drop the feed teeth for your PFAFF® quilt ambition™ 630 sewing machine speaks the same language you can be adjusted when using specialty techniques or when sewing with both upper- Start/Stop Button Sew without the foot control - Presser Foot Pressure Can be placed easily underneath it . ITEM NUMBER: 471057226 Features & Benefits PFAFF® quilt ambition™ 630 Bobbin Winding from the Needle No need to its highest position...
... free-motion quilting, thread painting or darning. Makes sewing long seams, free-motion and buttonholes easy. Free-Motion Sewing Simply drop the feed teeth for your PFAFF® quilt ambition™ 630 sewing machine speaks the same language you can be adjusted when using specialty techniques or when sewing with both upper- Start/Stop Button Sew without the foot control - Presser Foot Pressure Can be placed easily underneath it . ITEM NUMBER: 471057226 Features & Benefits PFAFF® quilt ambition™ 630 Bobbin Winding from the Needle No need to its highest position...


