

Owner's Manual
Page 3
... looper Threading the left looper Threading the two-thread chainstitch looper Threading the needles Inserting the lint box Setting the standard thread tension Sewing test Points to observe during sewing Securing the seam 5-thread safety seam, 2-thread chainstitch with overedge stitch 3- and ...4-thread overedge seam Checking and adjusting the thread tension Regulating the sewing foot pressure 3-thread overedge seam Thread chart for 5-thread overedge seam Thread chart for 4-thread overedge seam Adjusting ...
... looper Threading the left looper Threading the two-thread chainstitch looper Threading the needles Inserting the lint box Setting the standard thread tension Sewing test Points to observe during sewing Securing the seam 5-thread safety seam, 2-thread chainstitch with overedge stitch 3- and ...4-thread overedge seam Checking and adjusting the thread tension Regulating the sewing foot pressure 3-thread overedge seam Thread chart for 5-thread overedge seam Thread chart for 4-thread overedge seam Adjusting ...

Owner's Manual
Page 5
... the sewing machine 1 Foot pressure regulating dial 2 Thread guide 3 Carrying handle 4 Left needle thread tension dial 5 Right needle thread tension dial 6 Right looper thread tension dial 7 Left looper thread tension dial 8 Looper thread tension dial for two- thread chainstitch 9 Thread tension cover 10 Knife guard 11 Hand wheel and feed regulator 12 Looper cover 13 Looper...
... the sewing machine 1 Foot pressure regulating dial 2 Thread guide 3 Carrying handle 4 Left needle thread tension dial 5 Right needle thread tension dial 6 Right looper thread tension dial 7 Left looper thread tension dial 8 Looper thread tension dial for two- thread chainstitch 9 Thread tension cover 10 Knife guard 11 Hand wheel and feed regulator 12 Looper cover 13 Looper...

Owner's Manual
Page 9
... work support, push it to the right until it locks. To close the looper cover, push it up until it down. and C) and the thread tensions to be engaged or disengaged (see pages 9-i 2. Below this, a needle diagram with the respective set screws is possible to see whether the overedge looper has...
... work support, push it to the right until it locks. To close the looper cover, push it up until it down. and C) and the thread tensions to be engaged or disengaged (see pages 9-i 2. Below this, a needle diagram with the respective set screws is possible to see whether the overedge looper has...

Owner's Manual
Page 10
... the following sequence: 1. When threading is completed, push the carrying handle fully down again. Left looper (yellow) 3. Remove the needles that are indicated. Needle thread tension (blue) 5. AS Needle combinations On the table behind the carrying handle. B Now pull the respective thread into the corresponding guides and...
... the following sequence: 1. When threading is completed, push the carrying handle fully down again. Left looper (yellow) 3. Remove the needles that are indicated. Needle thread tension (blue) 5. AS Needle combinations On the table behind the carrying handle. B Now pull the respective thread into the corresponding guides and...

Owner's Manual
Page 11
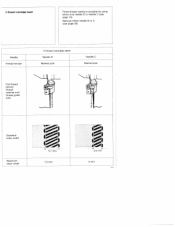
Important: In order to 9 and pull approximately 10 cm (4") of thread through the looper eye (the thread path is marked green). Threading the nght looper: Thread the right looper in sequence 1 to obtain perfect sewing results, the thread must be pulled between the tension discs when threading the tensions. 9
Important: In order to 9 and pull approximately 10 cm (4") of thread through the looper eye (the thread path is marked green). Threading the nght looper: Thread the right looper in sequence 1 to obtain perfect sewing results, the thread must be pulled between the tension discs when threading the tensions. 9

Owner's Manual
Page 16
...on the fabric type and thread size used. Only for the blue thread tension there are two standard settings: When using needle A (only for two-thread chainstitch), the N must be set depends on the thread tension dials opposite the respective color symbol. Only for stitch type 6 (needles... B and C), the standard thread tension N for two-thread chainstitch. -j Make the correct adjustment after examination of the interlocking of...
...on the fabric type and thread size used. Only for the blue thread tension there are two standard settings: When using needle A (only for two-thread chainstitch), the N must be set depends on the thread tension dials opposite the respective color symbol. Only for stitch type 6 (needles... B and C), the standard thread tension N for two-thread chainstitch. -j Make the correct adjustment after examination of the interlocking of...

Owner's Manual
Page 20
sewn with needle A Thread tensions: blue = triangular symbol mauve = triangular symbol Application examples: Joining seams on blouses, shirts, jeans and bed linen with serging seam Face side Two thread ...a n at t cii Reverse side underside 5-thread safety seam Two-thread chainstitch with overedge stitch (narrow) Stitch type 2, sewn with needles A and B Thread tensions blue - sewn with needles A and C Thread tensions: blue = triangular symbol pink = point symbol green = point symbol yellow = point symbol mauve = triangular symbol Application examples. _______ Face side I Two-thread...
sewn with needle A Thread tensions: blue = triangular symbol mauve = triangular symbol Application examples: Joining seams on blouses, shirts, jeans and bed linen with serging seam Face side Two thread ...a n at t cii Reverse side underside 5-thread safety seam Two-thread chainstitch with overedge stitch (narrow) Stitch type 2, sewn with needles A and B Thread tensions blue - sewn with needles A and C Thread tensions: blue = triangular symbol pink = point symbol green = point symbol yellow = point symbol mauve = triangular symbol Application examples. _______ Face side I Two-thread...

Owner's Manual
Page 21
.... Face side Overedge stitch top side 3-thread overedge seam Stitch type 4, sewn with needle C (narrow) Stitch type 5, sewn with needles B and C Thread tensions: blue = point symbol pink = point symbol green point symbol yellow = point symbol Application examples: For sewing and serging all kinds of fabric. J top side... 4-thread overedge seam Stitch type 6, sewn with needle B (wide) Thread tensions: pink = point symbol green = point symbol yellow = point symbol Application example: For serging all kinds of fabric.
.... Face side Overedge stitch top side 3-thread overedge seam Stitch type 4, sewn with needle C (narrow) Stitch type 5, sewn with needles B and C Thread tensions: blue = point symbol pink = point symbol green point symbol yellow = point symbol Application examples: For sewing and serging all kinds of fabric. J top side... 4-thread overedge seam Stitch type 6, sewn with needle B (wide) Thread tensions: pink = point symbol green = point symbol yellow = point symbol Application example: For serging all kinds of fabric.

Owner's Manual
Page 22
Direction + = ncreased tension Direction - = decreased tension Two-thread chainstitch The thread tension of the thread tensions lies between -5 and +5. The blue thread tension must be turned in direction +. Adjust tensions accordingly! I I I I I Needle thread A Incorrect thread tensions: The tension range of needle A is too weak. or +range. It is too loose (yellow thread tension). Depending on the appearance of needle B is...
Direction + = ncreased tension Direction - = decreased tension Two-thread chainstitch The thread tension of the thread tensions lies between -5 and +5. The blue thread tension must be turned in direction +. Adjust tensions accordingly! I I I I I Needle thread A Incorrect thread tensions: The tension range of needle A is too weak. or +range. It is too loose (yellow thread tension). Depending on the appearance of needle B is...

Owner's Manual
Page 23
... flow son) nr e ght ooper thread s too I uper thread s too loose w t iion) or the nght looper 0 thrc i too hght (green tensofl) a also ossbIe that both tensions are flCThPty set.
... flow son) nr e ght ooper thread s too I uper thread s too loose w t iion) or the nght looper 0 thrc i too hght (green tensofl) a also ossbIe that both tensions are flCThPty set.

Owner's Manual
Page 24
The pink thread tension must be turned in direction +. For processing very thick fabrics, set the dial at 4. For very thin fabrics, set the regulating dial at 1. 4-thread overedge seam The thread tension of needle B is too weak The blue thread tension must be turned in direction +. Needle thread C 4-thread overedge seam The thread tension of needle C is the standard sewing toot pressure. thread B Sewing foot pressure Position N on the regulating dial is too weak.
The pink thread tension must be turned in direction +. For processing very thick fabrics, set the dial at 4. For very thin fabrics, set the regulating dial at 1. 4-thread overedge seam The thread tension of needle B is too weak The blue thread tension must be turned in direction +. Needle thread C 4-thread overedge seam The thread tension of needle C is the standard sewing toot pressure. thread B Sewing foot pressure Position N on the regulating dial is too weak.
Owner's Manual
Page 25
seam width 72mm 5mm I l Standard seam width Maximum . Needle Thread tension 3thread overedge seam Needle B Marked pink Needle C Marked pink Pull thread behind thread retainer and thread guide wire. Remove either only needle B or needle C (see page 35). 3-thread overedge seam Threethread sewing is possible by using either needle B or C (see page 12).
seam width 72mm 5mm I l Standard seam width Maximum . Needle Thread tension 3thread overedge seam Needle B Marked pink Needle C Marked pink Pull thread behind thread retainer and thread guide wire. Remove either only needle B or needle C (see page 35). 3-thread overedge seam Threethread sewing is possible by using either needle B or C (see page 12).
Owner's Manual
Page 33
Disengage the upper knife according to re-adjust the thread tension. 31 The desired seam width is marked with adjusting knob 35. Note: After adjusting the seam width, it may be necessary to the description on the seamwidth adjustment knob ranges from 2.5 to 5. Sew a test seam. The scale on page 29. Set the upper knife at its basic position again and close the looper cover. Adjusting the seam width The standard seam width setting is set with N (3.5 mm).
Disengage the upper knife according to re-adjust the thread tension. 31 The desired seam width is marked with adjusting knob 35. Note: After adjusting the seam width, it may be necessary to the description on the seamwidth adjustment knob ranges from 2.5 to 5. Sew a test seam. The scale on page 29. Set the upper knife at its basic position again and close the looper cover. Adjusting the seam width The standard seam width setting is set with N (3.5 mm).

Owner's Manual
Page 36
... 'R" Seam width, from 1 0 to 1 5 (short stitch length) Thread: polyester thread 100-140 for pink and yellow tensions Threading path: 1 nght looper green path 2. "N" +5 approx. green tension polyester thread 120-140 for pink, green, and yellow thread tensions Threading path: 1 right looper, green path 2. "N" approx. "N" to -3 Depending on material) Stitch length: from 25 to...
... 'R" Seam width, from 1 0 to 1 5 (short stitch length) Thread: polyester thread 100-140 for pink and yellow tensions Threading path: 1 nght looper green path 2. "N" +5 approx. green tension polyester thread 120-140 for pink, green, and yellow thread tensions Threading path: 1 right looper, green path 2. "N" approx. "N" to -3 Depending on material) Stitch length: from 25 to...

Owner's Manual
Page 40
... 3, push it in direction 2. Inserting the light bulb: Insert the new bulb (15 Watt max.) with the accessories to remove dust and lint from the tensions. Close and fasten housing cover. Behind it, the light bulb of the sewing light is situated. -3 Removing the light bulb: Push the light bulb upwards...
... 3, push it in direction 2. Inserting the light bulb: Insert the new bulb (15 Watt max.) with the accessories to remove dust and lint from the tensions. Close and fasten housing cover. Behind it, the light bulb of the sewing light is situated. -3 Removing the light bulb: Push the light bulb upwards...

Owner's Manual
Page 42
...iiade. Insert needle correctly (page 35). Needle not fully inserted. Sewing foot pressure too weak. Insert new needle. I Puckered seams Thread tension too tight. Thread correctly (pages 7-12). Thread breakage Incorrectly threaded. Incorrect needle used . Use needle system 130/705 H or lSx...H. Thread has caught. Thread correctly (see pages 8 and 35). Thread correctly (pages 7-il). Incorrect setting of threadj Set thread tensions correctly tensions. (pages 14, 20, 21, 22). They can easily be corrected by following the instructions below may occur are due no to...
...iiade. Insert needle correctly (page 35). Needle not fully inserted. Sewing foot pressure too weak. Insert new needle. I Puckered seams Thread tension too tight. Thread correctly (pages 7-12). Thread breakage Incorrectly threaded. Incorrect needle used . Use needle system 130/705 H or lSx...H. Thread has caught. Thread correctly (see pages 8 and 35). Thread correctly (pages 7-il). Incorrect setting of threadj Set thread tensions correctly tensions. (pages 14, 20, 21, 22). They can easily be corrected by following the instructions below may occur are due no to...

Owner's Manual
Page 44
... feed setting: set at - (see page 27) Needle: remove needles A and B Sewing foot: engage blind-hemming foot Seam width: "N" Stitch length: longest stitch length Thread tension: "N" (pink, green and yellow) The hem is trimmed, serged and sewn in one thread is caught. must be adjusted. Ply shifting in hem section -3-. Loosen...
... feed setting: set at - (see page 27) Needle: remove needles A and B Sewing foot: engage blind-hemming foot Seam width: "N" Stitch length: longest stitch length Thread tension: "N" (pink, green and yellow) The hem is trimmed, serged and sewn in one thread is caught. must be adjusted. Ply shifting in hem section -3-. Loosen...

Owner's Manual
Page 45
...along the right sewing Important: The upper knife may only foot edge. Stitch length: 3 to 4 mm Determine the proper thread tension by sewing a trial seam (N = standard setting) Note: If the pearl tape is possible to sew to 5 (see page ...1 needle B 1-1.5mm Fig. 2 j Pearl sewing toot (Fig. 1) Tcohrisdss.pTechieaslefosoewt iisngusoepderfoartioatntsacahriengcaprreiaerdls,ouspt awnigthlens,eesdtrlaessB tapes, lead or C only. knife; 6. Thread tension: pink = -3 to -5 green = -1 to-3 yellow = +2 to +3 The needle should enter the fabric 1 to the fabric edge, needle C must...
...along the right sewing Important: The upper knife may only foot edge. Stitch length: 3 to 4 mm Determine the proper thread tension by sewing a trial seam (N = standard setting) Note: If the pearl tape is possible to sew to 5 (see page ...1 needle B 1-1.5mm Fig. 2 j Pearl sewing toot (Fig. 1) Tcohrisdss.pTechieaslefosoewt iisngusoepderfoartioatntsacahriengcaprreiaerdls,ouspt awnigthlens,eesdtrlaessB tapes, lead or C only. knife; 6. Thread tension: pink = -3 to -5 green = -1 to-3 yellow = +2 to +3 The needle should enter the fabric 1 to the fabric edge, needle C must...

Owner's Manual
Page 46
... in "up" position, a slight resistance must be felt when pulling the elastic tape through. at - (see page 27) Sewing foot: engage tape attaching foot Thread tension: "N" (3 or 4 x) Seam width: approx 4 to the rear under the foot.
... in "up" position, a slight resistance must be felt when pulling the elastic tape through. at - (see page 27) Sewing foot: engage tape attaching foot Thread tension: "N" (3 or 4 x) Seam width: approx 4 to the rear under the foot.


