

Owner's Manual
Page 3
...3-thread overedge seam Thread chart for 5-thread overedge seam Thread chart for 4-thread overedge seam Adjusting the stitch length Adjusting the differential teed Disengageing the upper knife Disengageing the overedge looper Adjusting the machine for two-thread chainstitch seam Inserting the workpiece guide plate Adjusting the seam width Changing the sewing foot Sewing rolled hems Changing the needles Changing the lower knife Changing the upper knife Changing the light bulb Cleaning the thread tensions Oiling the machine Sewing problems and their removal Accessories Specifications Thread spool...
...3-thread overedge seam Thread chart for 5-thread overedge seam Thread chart for 4-thread overedge seam Adjusting the stitch length Adjusting the differential teed Disengageing the upper knife Disengageing the overedge looper Adjusting the machine for two-thread chainstitch seam Inserting the workpiece guide plate Adjusting the seam width Changing the sewing foot Sewing rolled hems Changing the needles Changing the lower knife Changing the upper knife Changing the light bulb Cleaning the thread tensions Oiling the machine Sewing problems and their removal Accessories Specifications Thread spool...

Owner's Manual
Page 5
... Needle plate 18 Sewing foot 19 Needle bar 20 Sewing foot lifting lever 21 Thread spool stand 22 Thread spool holder 23 Machine socket 24 Master switch 25 Lint box 26 Foot control 27 Foot control plug 28 Mains plug 29 Lower knife 30 Knife clamp screw 31 Right looper 32 Left looper 33 Two-thread chainstitch looper 34 Thread guides behind the carrying handle 35 Seam width adjustment knob behind work support 15 27 31 Controls of the sewing machine 1 Foot pressure regulating dial 2 Thread guide...
... Needle plate 18 Sewing foot 19 Needle bar 20 Sewing foot lifting lever 21 Thread spool stand 22 Thread spool holder 23 Machine socket 24 Master switch 25 Lint box 26 Foot control 27 Foot control plug 28 Mains plug 29 Lower knife 30 Knife clamp screw 31 Right looper 32 Left looper 33 Two-thread chainstitch looper 34 Thread guides behind the carrying handle 35 Seam width adjustment knob behind work support 15 27 31 Controls of the sewing machine 1 Foot pressure regulating dial 2 Thread guide...

Owner's Manual
Page 6
... on a special sewing table. Connecting the foot control: Insert the plug of the control in as far as it off at the master switch and disconnect the plug from the power source. j The accessories are illustrated on page 41. Then connect the mains plug to a power source. I Accessory box Open the work support and pull out the accessory box. To replace the accessory box, slide it...
... on a special sewing table. Connecting the foot control: Insert the plug of the control in as far as it off at the master switch and disconnect the plug from the power source. j The accessories are illustrated on page 41. Then connect the mains plug to a power source. I Accessory box Open the work support and pull out the accessory box. To replace the accessory box, slide it...

Owner's Manual
Page 9
... to be used are indicated by colors. The respectively necessary needle combinations (A, B. Additionally, at B it locks. To close the work support, push it to the right until it locks. To open the work support, push it down. Each threading path has its own color. and C) and the thread tensions to be engaged or disengaged (see pages 9-i 2. Below this, a needle diagram with the respective set screws is...
... to be used are indicated by colors. The respectively necessary needle combinations (A, B. Additionally, at B it locks. To close the work support, push it to the right until it locks. To open the work support, push it down. Each threading path has its own color. and C) and the thread tensions to be engaged or disengaged (see pages 9-i 2. Below this, a needle diagram with the respective set screws is...

Owner's Manual
Page 10
... again. Needle thread tension (blue) 5. B Now pull the respective thread into the corresponding guides and tension discs. Diagram C shows threading of the thread guides behind looper cover 12, the needle combinations for stitch types ito 6 are not necessary by loosening set screws A, B, or C (For needle change, see page 35.) - Chainstitch looper (mauve) 4. AS Needle combinations On the table behind the carrying handle. Thread the machine in the following sequence: 1. Remove the needles that are...
... again. Needle thread tension (blue) 5. B Now pull the respective thread into the corresponding guides and tension discs. Diagram C shows threading of the thread guides behind looper cover 12, the needle combinations for stitch types ito 6 are not necessary by loosening set screws A, B, or C (For needle change, see page 35.) - Chainstitch looper (mauve) 4. AS Needle combinations On the table behind the carrying handle. Thread the machine in the following sequence: 1. Remove the needles that are...

Owner's Manual
Page 16
... stitch type 6 (needles B and C), the standard thread tension N for needle B must be set opposite the blue triangular symbol. Make the correct adjustment after examination of the interlocking of the threads (see pages 18 to be set depends on the thread tension dials opposite the respective color symbol. The mauve tension is only needed for two-thread chainstitch), the N must be set opposite the blue point symbol. Setting the standard thread tension...
... stitch type 6 (needles B and C), the standard thread tension N for needle B must be set opposite the blue triangular symbol. Make the correct adjustment after examination of the interlocking of the threads (see pages 18 to be set depends on the thread tension dials opposite the respective color symbol. The mauve tension is only needed for two-thread chainstitch), the N must be set opposite the blue point symbol. Setting the standard thread tension...

Owner's Manual
Page 19
... of the upper knife holder serves to pull the thread chain into the seam. Explanation: The screw of seam. Securing the seam: Knot the thread chain. Or: Sew about 2 turns. On this machine, all kinds of the upper knife. 17 Then turn the workpiece around and sew a few stitches over the seam just sewn without cutting the thread chain. For knit fabrics, a crochet needle can be used to tighten...
... of the upper knife holder serves to pull the thread chain into the seam. Explanation: The screw of seam. Securing the seam: Knot the thread chain. Or: Sew about 2 turns. On this machine, all kinds of the upper knife. 17 Then turn the workpiece around and sew a few stitches over the seam just sewn without cutting the thread chain. For knit fabrics, a crochet needle can be used to tighten...

Owner's Manual
Page 27
... No. 40-60 Synthetic thread No, 70-140 Polyester thread No. 100-140 Mercerized thread (bulk thread> Stitch length 2.0 to 4.0 mm 2.0 to 4.0 mm 2.0 to 40 mm 2.0 to 4.0 mm 1.0 to 1.5mm Adjusting the stitch length Open work support 15. Press main feed dog stop (see arrow) fully down ! 25 Keep the main feed dog stop locks in the direction indicated by the arrow until the feed stop pressed down and...
... No. 40-60 Synthetic thread No, 70-140 Polyester thread No. 100-140 Mercerized thread (bulk thread> Stitch length 2.0 to 4.0 mm 2.0 to 4.0 mm 2.0 to 40 mm 2.0 to 4.0 mm 1.0 to 1.5mm Adjusting the stitch length Open work support 15. Press main feed dog stop (see arrow) fully down ! 25 Keep the main feed dog stop locks in the direction indicated by the arrow until the feed stop pressed down and...

Owner's Manual
Page 28
h 1/7 Adjusting the stitch length With the main feed dog stop and close work support 15 When the desired stitch length s set, release main feed dog stop pressed down, set the stitch length (ito 4) indicated on hand wneel 11 opposite mark A The standard stitch length is indicated oy N (3 mmt Note: the handwheel can not be turned past stitch length numbers 1 and 4, respectively.
h 1/7 Adjusting the stitch length With the main feed dog stop and close work support 15 When the desired stitch length s set, release main feed dog stop pressed down, set the stitch length (ito 4) indicated on hand wneel 11 opposite mark A The standard stitch length is indicated oy N (3 mmt Note: the handwheel can not be turned past stitch length numbers 1 and 4, respectively.
Owner's Manual
Page 29
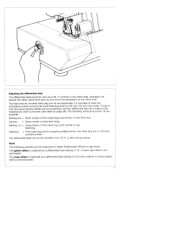
... same time The feed amount of either feed dog can be set separately. Owing to process (see table on garments The gather effect is obtained at a differential feed setting of 0 5 when medium o heavy elastic fabrics are processed. The wave effect is obtained at a differential feed setting of 15-2 when light fabrics are accomplished. Set the differential feed according to the material you wish to that very good sewing...
... same time The feed amount of either feed dog can be set separately. Owing to process (see table on garments The gather effect is obtained at a differential feed setting of 0 5 when medium o heavy elastic fabrics are processed. The wave effect is obtained at a differential feed setting of 15-2 when light fabrics are accomplished. Set the differential feed according to the material you wish to that very good sewing...

Owner's Manual
Page 32
... to its original position Insert knife guard plate 10 in its downmost position. For sewing the next seam, insert the correct needles Pull the looper disengageing lever fully forward and turn it is level with the needle plate. Now the two-thread chainstitch seam can be sewn I After sewing the two-thread chainstitch seam, the following adjustments must be made to 6. Then open the work support and insert the lint box...
... to its original position Insert knife guard plate 10 in its downmost position. For sewing the next seam, insert the correct needles Pull the looper disengageing lever fully forward and turn it is level with the needle plate. Now the two-thread chainstitch seam can be sewn I After sewing the two-thread chainstitch seam, the following adjustments must be made to 6. Then open the work support and insert the lint box...

Owner's Manual
Page 36
... 1 5 (short stitch length) Thread: polyester thread 100-140 for pink and yellow tensions Threading path: 1 nght looper green path 2. needle thread, pink path polyester thread polyester thread polyester thread For threading of needle and loopers, see pages 7 to -3 Depending on material and thread, the respective thread tension must be set higher or lower. Rolled hem with polyester thread (ill. 1 and 2, page 33) Preparation of the sewing machine: Needle: remove needle A and B Sewing foot: engage rolled hem foot 'R" Seam width, from...
... 1 5 (short stitch length) Thread: polyester thread 100-140 for pink and yellow tensions Threading path: 1 nght looper green path 2. needle thread, pink path polyester thread polyester thread polyester thread For threading of needle and loopers, see pages 7 to -3 Depending on material and thread, the respective thread tension must be set higher or lower. Rolled hem with polyester thread (ill. 1 and 2, page 33) Preparation of the sewing machine: Needle: remove needle A and B Sewing foot: engage rolled hem foot 'R" Seam width, from...

Owner's Manual
Page 37
... arrow until the needle bar is in its highest position. Changing the needles Pull out the mains plug. Inserting the needle Set the needle bar at its highest position. Using the tweezers, push the needle up into the needle holder as far as spare parts Changing the lower knife. An incorrectly inserted needle will go. Hold the needle to be changed with the screw driver. Pull out the mains plug Disengage the upper knife, see...
... arrow until the needle bar is in its highest position. Changing the needles Pull out the mains plug. Inserting the needle Set the needle bar at its highest position. Using the tweezers, push the needle up into the needle holder as far as spare parts Changing the lower knife. An incorrectly inserted needle will go. Hold the needle to be changed with the screw driver. Pull out the mains plug Disengage the upper knife, see...
Owner's Manual
Page 39
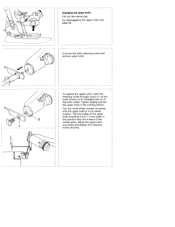
Changing the upper knife: Pull out the mains plug. Screw it into threaded hole (2) of the needle plate. The front edge of the upper knife should be 0.5 to 1.0 mm lower in this position than the surface of the knife holder. Adjust the upper knife accurately and tighten the retaining screw securely. Tighten slightly and set the upper knife in its lowest position. Turn the hand wheel counter-clockwise...
Changing the upper knife: Pull out the mains plug. Screw it into threaded hole (2) of the needle plate. The front edge of the upper knife should be 0.5 to 1.0 mm lower in this position than the surface of the knife holder. Adjust the upper knife accurately and tighten the retaining screw securely. Tighten slightly and set the upper knife in its lowest position. Turn the hand wheel counter-clockwise...

Owner's Manual
Page 40
... the tension cover. Cleaning thread tensions: Fold the tension cover down. Inserting the light bulb: Insert the new bulb (15 Watt max.) with the accessories to remove dust and lint from the tensions. Loosen the housing cover retaining screw. Close and fasten housing cover. Use the brush provided with pins into slots 3, push it in direction 2. Open the housing cover. Changing the light bulb: Pull out the mains plug. Behind it, the light bulb of the sewing light is situated. -3 Removing the light bulb...
... the tension cover. Cleaning thread tensions: Fold the tension cover down. Inserting the light bulb: Insert the new bulb (15 Watt max.) with the accessories to remove dust and lint from the tensions. Loosen the housing cover retaining screw. Close and fasten housing cover. Use the brush provided with pins into slots 3, push it in direction 2. Open the housing cover. Changing the light bulb: Pull out the mains plug. Behind it, the light bulb of the sewing light is situated. -3 Removing the light bulb...

Owner's Manual
Page 42
... Cause Sewing foot pressure too weak Needle bent or point damaged. Incorrectly threaded. Sewing foot pressure too weak. Incorrect setting of the kind described below . Solution Turn foot pressure regulating dial clockwise to incorrect threading. Do not pull material during sewing. Insert needle correctly (page 35). Material pulled. I Puckered seams Thread tension too tight. Re-adjust differential feed. Sewing problems developed for light materials) (pages 14, 20, 21, 22). and ration errors. Needle not fully inserted. Incorrect needle used . Thread correctly...
... Cause Sewing foot pressure too weak Needle bent or point damaged. Incorrectly threaded. Sewing foot pressure too weak. Incorrect setting of the kind described below . Solution Turn foot pressure regulating dial clockwise to incorrect threading. Do not pull material during sewing. Insert needle correctly (page 35). Material pulled. I Puckered seams Thread tension too tight. Re-adjust differential feed. Sewing problems developed for light materials) (pages 14, 20, 21, 22). and ration errors. Needle not fully inserted. Incorrect needle used . Thread correctly...

Owner's Manual
Page 43
3 4 5 /___) 8 0 9 - Specifications: Highest sewing speed Seam width Stitch length Sewing foot Lubrication Needle system Needle size Dimensions Weight Accessories 1 Screwdriver 2 Screwdriver 3 Lint brush 4 Tweezers 5 Lower knife 6 Thread unreeling disc 7 Needles 8 Sewing machine oil 9 Rolled hem presser foot 10 Thread spool net (see page 42) Optional accessories, see pages 42 to 44, available against extra charge Blindhem foot Part No. 29-924993-68/001 Elastic foot Part No. 29-924993-67/001 Pearl sewing foot Part No. 29-924993-79/001 IL • . •...
3 4 5 /___) 8 0 9 - Specifications: Highest sewing speed Seam width Stitch length Sewing foot Lubrication Needle system Needle size Dimensions Weight Accessories 1 Screwdriver 2 Screwdriver 3 Lint brush 4 Tweezers 5 Lower knife 6 Thread unreeling disc 7 Needles 8 Sewing machine oil 9 Rolled hem presser foot 10 Thread spool net (see page 42) Optional accessories, see pages 42 to 44, available against extra charge Blindhem foot Part No. 29-924993-68/001 Elastic foot Part No. 29-924993-67/001 Pearl sewing foot Part No. 29-924993-79/001 IL • . •...

Owner's Manual
Page 44
... screw -1- Before starting sewing in by 2 cm. and adjust edge guide -2- Thread spool net. of the needle in one thread is thus avoided. Useful for synthetic thread which tends to become loose, unravel and slip down. 2 1, 3 Sewing foot for blind-hemming operations Prepanng the sewing machine Differential feed setting: set at - (see page 27) Needle: remove needles A and B Sewing foot: engage blind-hemming foot Seam width: "N" Stitch length: longest stitch length Thread tension: "N" (pink, green and yellow) The hem is trimmed, serged and sewn in the fabric...
... screw -1- Before starting sewing in by 2 cm. and adjust edge guide -2- Thread spool net. of the needle in one thread is thus avoided. Useful for synthetic thread which tends to become loose, unravel and slip down. 2 1, 3 Sewing foot for blind-hemming operations Prepanng the sewing machine Differential feed setting: set at - (see page 27) Needle: remove needles A and B Sewing foot: engage blind-hemming foot Seam width: "N" Stitch length: longest stitch length Thread tension: "N" (pink, green and yellow) The hem is trimmed, serged and sewn in the fabric...

Owner's Manual
Page 45
... used within the range of N to the end of the foot with or without upper (Fig. 1). Fig. 1 material pearls Ii 2 1 needle B 1-1.5mm Fig. 2 j Pearl sewing toot (Fig. 1) Tcohrisdss.pTechieaslefosoewt iisngusoepderfoartioatntsacahriengcaprreiaerdls,ouspt awnigthlens,eesdtrlaessB tapes, lead or C only. Engage pearl sewing foot. 3, For small pearls, remove needle B. 4. 5. Set differential feed at - ,see page 31). 7. 8. Stitch length: 3 to 4 mm Determine the proper thread tension by sewing a trial seam (N = standard setting...
... used within the range of N to the end of the foot with or without upper (Fig. 1). Fig. 1 material pearls Ii 2 1 needle B 1-1.5mm Fig. 2 j Pearl sewing toot (Fig. 1) Tcohrisdss.pTechieaslefosoewt iisngusoepderfoartioatntsacahriengcaprreiaerdls,ouspt awnigthlens,eesdtrlaessB tapes, lead or C only. Engage pearl sewing foot. 3, For small pearls, remove needle B. 4. 5. Set differential feed at - ,see page 31). 7. 8. Stitch length: 3 to 4 mm Determine the proper thread tension by sewing a trial seam (N = standard setting...

Owner's Manual
Page 46
... excess fabric cut off. and tilt brake -1 - 213 1E Sewing foot for tape attaching operations This special sewing foot allows elastic tape attaching in "up" position, a slight resistance must be felt when pulling the elastic tape through. again with screw -2-. Test-sew. Preparing the machine: Differential feed setting: set at the same time the material is turned in, the more screw -2- at - (see page 27) Sewing foot: engage tape attaching foot Thread tension: "N" (3 or 4 x) Seam width...
... excess fabric cut off. and tilt brake -1 - 213 1E Sewing foot for tape attaching operations This special sewing foot allows elastic tape attaching in "up" position, a slight resistance must be felt when pulling the elastic tape through. again with screw -2-. Test-sew. Preparing the machine: Differential feed setting: set at the same time the material is turned in, the more screw -2- at - (see page 27) Sewing foot: engage tape attaching foot Thread tension: "N" (3 or 4 x) Seam width...


