
Owner's Manual
Page 3
... looper Threading the needles Inserting the lint box Sewing test Points to observe during sewing Securing the seam Checking and adjusting thread tension 4-thread safety-stitch seam 2-thread chainstitch seam 2-thread overedge seam Adjustment of the machine for two-thread chainstitch seam Thread chart Adjusting the stitch length Regulating the sewing foot pressure Adjusting the seam width Machine care Changing the needles Changing the lower knife Changing the upper knife Changing the light bulb Oiling the machine Accessories Specifications Sewing problems and solutions Changing the sewing feet...
... looper Threading the needles Inserting the lint box Sewing test Points to observe during sewing Securing the seam Checking and adjusting thread tension 4-thread safety-stitch seam 2-thread chainstitch seam 2-thread overedge seam Adjustment of the machine for two-thread chainstitch seam Thread chart Adjusting the stitch length Regulating the sewing foot pressure Adjusting the seam width Machine care Changing the needles Changing the lower knife Changing the upper knife Changing the light bulb Oiling the machine Accessories Specifications Sewing problems and solutions Changing the sewing feet...
Owner's Manual
Page 5
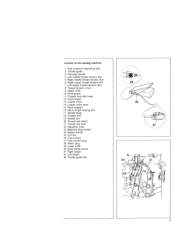
...the sewing machine 1 Foot pressure regulating dial 2 Thread guide 3 Carrying handle 4 Left needle thread tension dial 5 Right needle thread tension dial 6 Right looper thread tension dial 7 Left looper thread tension dial 8 Thread tension cover 9 Upper knife 10 Knife guard 11 Presser foot lifter lever 12 Hand wheel 13 Looper cover 14 Looper cover lever 15 Work support 16 Stitch length setting dial 17 Needle plate 18 Presser foot 19 Needle bar 20 Thread reel stand 21 Thread reel pins 22 Adjusting knob 23 Machine plug socket 24 Master switch 25 Lint box 26 Foot control 27 Foot control plug...
...the sewing machine 1 Foot pressure regulating dial 2 Thread guide 3 Carrying handle 4 Left needle thread tension dial 5 Right needle thread tension dial 6 Right looper thread tension dial 7 Left looper thread tension dial 8 Thread tension cover 9 Upper knife 10 Knife guard 11 Presser foot lifter lever 12 Hand wheel 13 Looper cover 14 Looper cover lever 15 Work support 16 Stitch length setting dial 17 Needle plate 18 Presser foot 19 Needle bar 20 Thread reel stand 21 Thread reel pins 22 Adjusting knob 23 Machine plug socket 24 Master switch 25 Lint box 26 Foot control 27 Foot control plug...
Owner's Manual
Page 6
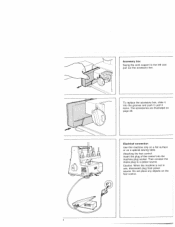
When the machine is not in use, disconnect plug from power source. Electrical connection Use this machine only on a flat surface or on the foot control. 1. Then connect the mains plug to the left and pull out the accessory box. Do not place any objects on a special sewing table. The accessories are illustrated on page 28. Attaching the foot control; Caution; To replace the accessory box, slide it locks. Accessory box Swing the work support to a power source. Insert the plug of the control into the grooves and push it until it into the machine plug socket.
When the machine is not in use, disconnect plug from power source. Electrical connection Use this machine only on a flat surface or on the foot control. 1. Then connect the mains plug to the left and pull out the accessory box. Do not place any objects on a special sewing table. The accessories are illustrated on page 28. Attaching the foot control; Caution; To replace the accessory box, slide it locks. Accessory box Swing the work support to a power source. Insert the plug of the control into the grooves and push it until it into the machine plug socket.
Owner's Manual
Page 9
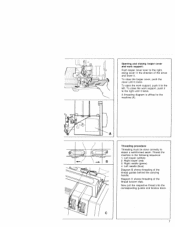
... pull the respective thread into the corresponding guides and tension discs. A threading diagram is affixed to obtain a well-formed seam. Right looper (red) 3. Thread the machine in the direction of the arrow and lower it locks. Right needle (green) 4. Diagram C shows threading of the thread guides behind the carrying handle. To close the work support; Opening and closing looper cover and work support: Push looper cover lever to the right, swing cover in the following...
... pull the respective thread into the corresponding guides and tension discs. A threading diagram is affixed to obtain a well-formed seam. Right looper (red) 3. Thread the machine in the direction of the arrow and lower it locks. Right needle (green) 4. Diagram C shows threading of the thread guides behind the carrying handle. To close the work support; Opening and closing looper cover and work support: Push looper cover lever to the right, swing cover in the following...
Owner's Manual
Page 14
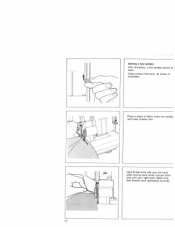
Raise presser foot lever, as shown in illustration. Hold thread ends with your left hand while turning hand wheel counter-clock wise with your right hand. Make sure that threads have interlocked correctly. 12 Sewing a test sample After threading, a test sample should b sewn. Place a piece of fabric under the needle and lower presser foot.
Raise presser foot lever, as shown in illustration. Hold thread ends with your left hand while turning hand wheel counter-clock wise with your right hand. Make sure that threads have interlocked correctly. 12 Sewing a test sample After threading, a test sample should b sewn. Place a piece of fabric under the needle and lower presser foot.
Owner's Manual
Page 15
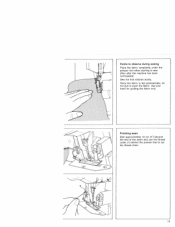
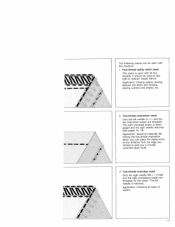
Points to observe during sewing Place the fabric completely under the presser foot when starting to cut the thread chain. Use your hand for guiding the fabric only. Finishing seam Sew approximately 10 cm (4") beyond the end of the seam and use the thread cutter (1) behind the presser foot to sew. (Also after the machine has been re-threaded). Sew the first stitches slowly. Since the fabric is fed automatically, do not pull or push the fabric.
Points to observe during sewing Place the fabric completely under the presser foot when starting to cut the thread chain. Use your hand for guiding the fabric only. Finishing seam Sew approximately 10 cm (4") beyond the end of the seam and use the thread cutter (1) behind the presser foot to sew. (Also after the machine has been re-threaded). Sew the first stitches slowly. Since the fabric is fed automatically, do not pull or push the fabric.

Owner's Manual
Page 16
... of knitted fabrics, a crochet needle can be used in order to very heavy fabrics. Flip fabri over the seam approximately 2 cm (1/2") without cutting the chain. Securing the seam: Knot the thread chain. Note: When sewing thin fabrics, loosen the upper knife screw after sewing on heavy fabrics. (See illustration). 14 Lower presser foot and sew over . Or: Sew approximately 3 cm (1") beyond the seam. In case of fabric: This machine will sew through very...
... of knitted fabrics, a crochet needle can be used in order to very heavy fabrics. Flip fabri over the seam approximately 2 cm (1/2") without cutting the chain. Securing the seam: Knot the thread chain. Note: When sewing thin fabrics, loosen the upper knife screw after sewing on heavy fabrics. (See illustration). 14 Lower presser foot and sew over . Or: Sew approximately 3 cm (1") beyond the seam. In case of fabric: This machine will sew through very...
Owner's Manual
Page 17
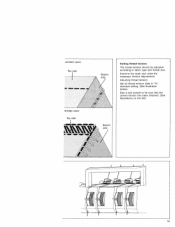
Examine the seam and make the necessary tension adjustments. Setting thread tension: The thread tension should be adjusted according to be sure that the correct tension has been obtained. (See illustrations on the left). Sew a test sample to fabric type and thread size. Adjusting thread tension: Set all thread tension dials to "N", standard setting. (See illustration below).
Examine the seam and make the necessary tension adjustments. Setting thread tension: The thread tension should be adjusted according to be sure that the correct tension has been obtained. (See illustrations on the left). Sew a test sample to fabric type and thread size. Adjusting thread tension: Set all thread tension dials to "N", standard setting. (See illustration below).
Owner's Manual
Page 18
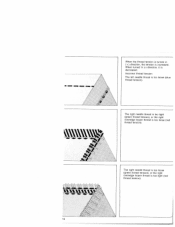
The right needle thread is too tight (green thread tension), or the right overedge looper thread is too tight (red thread tension). 16 The right needle thread is too loose (green thread tension), or the right overedge looper thread is too loose (red thread tension). When turned in (+) direction, the tension is decreased. - -- - / t\ When the thread tension is turned in (-) direction, it is increased. Incorrect thread tension: The left needle thread is too loose (blue thread tension).
The right needle thread is too tight (green thread tension), or the right overedge looper thread is too tight (red thread tension). 16 The right needle thread is too loose (green thread tension), or the right overedge looper thread is too loose (red thread tension). When turned in (+) direction, the tension is decreased. - -- - / t\ When the thread tension is turned in (-) direction, it is increased. Incorrect thread tension: The left needle thread is too loose (blue thread tension).
Owner's Manual
Page 19
... seam width. 3. By sewing the two-thread chainstitch seam, you can be used to sew light to give you choose to medium weight fabrics. Application: Seaming materials. Application: Finishing all four threads. The left chainstitch looper are threaded for this machine: 1. The right overedge looper is removed. Four-thread safety stitch seam This seam is sewn with this seam. Two-thread chainstitch seam Only the left needle JL x 1 and the left needle...
... seam width. 3. By sewing the two-thread chainstitch seam, you can be used to sew light to give you choose to medium weight fabrics. Application: Seaming materials. Application: Finishing all four threads. The left chainstitch looper are threaded for this machine: 1. The right overedge looper is removed. Four-thread safety stitch seam This seam is sewn with this seam. Two-thread chainstitch seam Only the left needle JL x 1 and the left needle...
Owner's Manual
Page 20
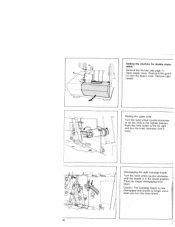
... locks. Open looper cover. Remove right needle. Raising the upper knife: Turn the hand wheel counter-clockwise to the far right and turn the hand wheel. 18 Caution: The overedge looper is in the highest position. Push the knife holder to set the knife in the lowest position. Remove knife guard (1) from the looper cover. Press the looper disengaging lever down. Setting the machine for double...
... locks. Open looper cover. Remove right needle. Raising the upper knife: Turn the hand wheel counter-clockwise to the far right and turn the hand wheel. 18 Caution: The overedge looper is in the highest position. Push the knife holder to set the knife in the lowest position. Remove knife guard (1) from the looper cover. Press the looper disengaging lever down. Setting the machine for double...
Owner's Manual
Page 21
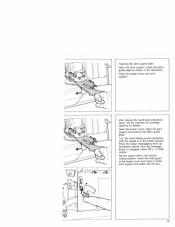
... work support and remove the fabric guide plate. Press the looper disengaging lever up (illustration below). Insert the knife guard in the normal cutting position. Inserting the fabric guide plate: Open the work support and attach the lint box. 19 Now the overedge looper is in the illustration. After sewing the two-thread chainstitch seam, set the machine for overedge seaming as shown in the lowest position. Insert the fabric guide plate as follows: Open the looper cover. Insert DB x 1 (1738) needle...
... work support and remove the fabric guide plate. Press the looper disengaging lever up (illustration below). Insert the knife guard in the normal cutting position. Inserting the fabric guide plate: Open the work support and attach the lint box. 19 Now the overedge looper is in the illustration. After sewing the two-thread chainstitch seam, set the machine for overedge seaming as shown in the lowest position. Insert the fabric guide plate as follows: Open the looper cover. Insert DB x 1 (1738) needle...

Owner's Manual
Page 22
... Size 70-1 40 2-3 mm Cotton Size 60-100 Silk Size 50-1 00 Synthetics Size 70-1 40 3-4 mm Cotton Size 40-60 Silk Size 40-60 Synthetics Size 70-140 2-4 mm Cotton Size 40-60 Synthetics Size 70-140 Cotton Size 40-50 Silk Size 50-1 00 2-3 mm Synthetics . Chainstitch Overedge stitch Medium fabrics Cotton, medium knits, linen, satin, dress fabrics, etc. Thread chart :1 Material type Stitch type Light fabrics Organdy, light knit fabrics...
... Size 70-1 40 2-3 mm Cotton Size 60-100 Silk Size 50-1 00 Synthetics Size 70-1 40 3-4 mm Cotton Size 40-60 Silk Size 40-60 Synthetics Size 70-140 2-4 mm Cotton Size 40-60 Synthetics Size 70-140 Cotton Size 40-50 Silk Size 50-1 00 2-3 mm Synthetics . Chainstitch Overedge stitch Medium fabrics Cotton, medium knits, linen, satin, dress fabrics, etc. Thread chart :1 Material type Stitch type Light fabrics Organdy, light knit fabrics...
Owner's Manual
Page 23
A = The red mark on the dial is the standard sewing foot pressure. Sewing foot pressure: Position "N" of the foot pressure dial is the setting mark. Heavy fabrics: Increase sewing foot pressure by turning the stitch length dial. Adjusting the stitch length: The stitch length is regulated by setting to a lower number. The normal stitch length is normally reset only for very thin or heavy fabrics. Thin fabrics: Reduce the sewing foot pressure by setting to a higher number. 21 The numbers indicate the stitch length in mm. It is "N".
A = The red mark on the dial is the standard sewing foot pressure. Sewing foot pressure: Position "N" of the foot pressure dial is the setting mark. Heavy fabrics: Increase sewing foot pressure by turning the stitch length dial. Adjusting the stitch length: The stitch length is regulated by setting to a lower number. The normal stitch length is normally reset only for very thin or heavy fabrics. Thin fabrics: Reduce the sewing foot pressure by setting to a higher number. 21 The numbers indicate the stitch length in mm. It is "N".
Owner's Manual
Page 24
... stitch width dial (3). Reset the upper knife to fabric type and seam requirements. To disengage upper knife, open looper cover. Sew a test sample. Normal stitch width is 3.5 mm. Adjusting seam width: Standard setting is "N". The seam width can be necessary to the far right. Turn knurled knob clockwise (2) until it may be changed from 2.5 to 7.0 mm, according to the lower (cutting) position and close the looper cover. Note: After adjusting the seam...
... stitch width dial (3). Reset the upper knife to fabric type and seam requirements. To disengage upper knife, open looper cover. Sew a test sample. Normal stitch width is 3.5 mm. Adjusting seam width: Standard setting is "N". The seam width can be necessary to the far right. Turn knurled knob clockwise (2) until it may be changed from 2.5 to 7.0 mm, according to the lower (cutting) position and close the looper cover. Note: After adjusting the seam...
Owner's Manual
Page 25
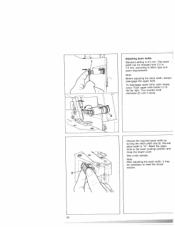
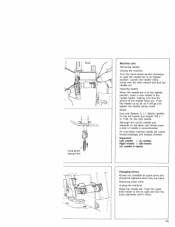
... the right needle. Loosen the needle clamp screw with the allen wrench and pull the needle out. Raise the needle bar. An incorrectly inserted needle will go and tighten the needle clamp screw. Right needle = DB needle (JL needle is at the highest position, insert a new needle in the needle holder, making sure that the groove of the needle faces you. Machine care Removing needle: Unplug the machine. Although the correct needle size depends on the fabric and thread used, a size 14 needle is...
... the right needle. Loosen the needle clamp screw with the allen wrench and pull the needle out. Raise the needle bar. An incorrectly inserted needle will go and tighten the needle clamp screw. Right needle = DB needle (JL needle is at the highest position, insert a new needle in the needle holder, making sure that the groove of the needle faces you. Machine care Removing needle: Unplug the machine. Although the correct needle size depends on the fabric and thread used, a size 14 needle is...
Owner's Manual
Page 27
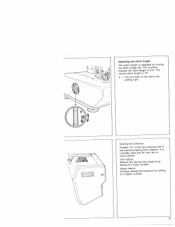
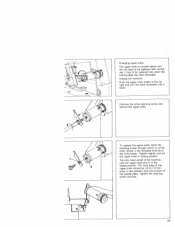
Changing upper knife: The upper knife is in the lowest position. Tighten slightly and set the upper knife in this position than the surface of the knife. To replace the upper knife, insert the retaining screw through cutout (1) of the needle plate. Push the upper knife holder to the far right and turn the knob clockwise until the upper knife arm is carbide tipped and will not need to...
Changing upper knife: The upper knife is in the lowest position. Tighten slightly and set the upper knife in this position than the surface of the knife. To replace the upper knife, insert the retaining screw through cutout (1) of the needle plate. Push the upper knife holder to the far right and turn the knob clockwise until the upper knife arm is carbide tipped and will not need to...
Owner's Manual
Page 28
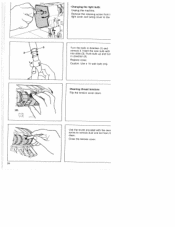
Insert the new bulb with the accE sories to remove dust and lint from light cover and swing cover to the Turn the bulb in direction (2). Replace cover. Close the tension cover. 26 Use the brush provided with into slots (3). Push bulb up and turr in direction (1) and remove it. Caution: Use a 15 watt bulb only. • Changing the light bulb: Unplug the machine. Cleaning thread tensions Flip the tension cover down. Remove the retaining screw from il discs.
Insert the new bulb with the accE sories to remove dust and lint from light cover and swing cover to the Turn the bulb in direction (2). Replace cover. Close the tension cover. 26 Use the brush provided with into slots (3). Push bulb up and turr in direction (1) and remove it. Caution: Use a 15 watt bulb only. • Changing the light bulb: Unplug the machine. Cleaning thread tensions Flip the tension cover down. Remove the retaining screw from il discs.
Owner's Manual
Page 30
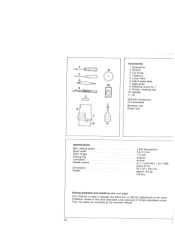
... 4 Tweezers 5 Lower knife 6 Fabric guide plate 7 Edge guide 8 Retaining screw for 7 9 Thread unreeling disc 10 Needles 11 Oil Optional accessories: (not illustrated) Blindhem foot Elastic foot Specifications Max. errors. 28 sewing speed Seam width Stitch length Sewing foot Lubrication Needle system Dimensions Weight 1,300 stitches/mm. 3.0-7.0 mm 1-5 mm Snap-on manual JL x 1 and DR x 1 (or 1738) (sizes 9-14) 24 x 22 x 18.5 cm approx. 8,5 kg (19 lbs.) Sewing problems and solutions (see next page) This machine is easy to operate and...
... 4 Tweezers 5 Lower knife 6 Fabric guide plate 7 Edge guide 8 Retaining screw for 7 9 Thread unreeling disc 10 Needles 11 Oil Optional accessories: (not illustrated) Blindhem foot Elastic foot Specifications Max. errors. 28 sewing speed Seam width Stitch length Sewing foot Lubrication Needle system Dimensions Weight 1,300 stitches/mm. 3.0-7.0 mm 1-5 mm Snap-on manual JL x 1 and DR x 1 (or 1738) (sizes 9-14) 24 x 22 x 18.5 cm approx. 8,5 kg (19 lbs.) Sewing problems and solutions (see next page) This machine is easy to operate and...
Owner's Manual
Page 31
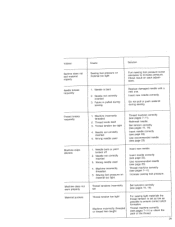
... to increase pressure. Fabric is pulled during sewing. fhread breaks requently Machine skips stitches nedoes not work properly Material puckers 1 Machine incorrectly threaded 2. Needle not correctly inserted 3. Wrong needle used 4. Use recommended needle (see page 23). Insert needle correctly (see page 23). 1. Needle is set Thread tension too tight Machine incorrectly th or thread has caught. Replace damaged needle with a new one. Wrong needle used Thread machine correctly (see page 23). Sewing foot pressure on each adjust ment. Set tension correctly...
... to increase pressure. Fabric is pulled during sewing. fhread breaks requently Machine skips stitches nedoes not work properly Material puckers 1 Machine incorrectly threaded 2. Needle not correctly inserted 3. Wrong needle used 4. Use recommended needle (see page 23). Insert needle correctly (see page 23). 1. Needle is set Thread tension too tight Machine incorrectly th or thread has caught. Replace damaged needle with a new one. Wrong needle used Thread machine correctly (see page 23). Sewing foot pressure on each adjust ment. Set tension correctly...


