
Pfaff hobbylock 795 Support Question
Pfaff hobbylock 795 Support Question
Find answers below for this question about Pfaff hobbylock 795.Need a Pfaff hobbylock 795 manual? We have 1 online manual for this item!
Question posted by anniecumbria on January 23rd, 2016
I Have A Pfaff Quilt Expression 2038 & Foot Pedal Has Stopped Working. How Do I
Foot pedal has stopped working on 2038. How can I look inside pedal to see if wiring is faulty? I have taken out the 2 obvious screws but still can't open up box. Thanks Ann UK
Current Answers
Answer #1: Posted by TommyKervz on January 23rd, 2016 2:56 PM
TommyKervz

Member since:
January 10th, 2013 Points: 17,776,813

Member since:
January 10th, 2013 Points: 17,776,813
Go here http://www.ebay.com/gds/HOW-TO-REPAIR-YOUR-SEWING-MACHINE-FOOT-CONTROL-/10000000010300003/g.html for a solution.
Related Pfaff hobbylock 795 Manual Pages
Owner's Manual - Page 2

... of the needle, the user must be adjusted by anyone but an authorized Pfaff agent. B) When leaving the machine, chan ging parts or accessories, the ma chine must take sufficient care to avoid injury and observe the sewing area continuously while sewing.
Notes on safety
A) Due to the up and down movement of the...
Owner's Manual - Page 3
Contents
The controls of the sewing machine Accessory box Electrical connection Foot control Preparing for threading Threading, 4-thread safety-stitch seam Threading chainstitch looper Threading overedge looper Threading the needles Inserting the lint box Sewing test Points to observe during sewing Securing the seam Checking and adjusting thread tension 4-thread safety-stitch seam 2-thread ...
Owner's Manual - Page 5
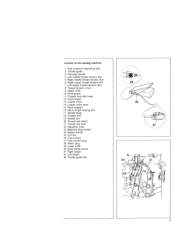
... lever 15 Work support 16 Stitch length setting dial 17 Needle plate 18 Presser foot 19 Needle bar 20 Thread reel stand 21 Thread reel pins 22 Adjusting knob 23 Machine plug socket 24 Master switch
25
Lint
box
26 Foot control
27 Foot control plug
28 Mains plug
29 Lower knife
30 Knife clamp screw
31...
Owner's Manual - Page 6
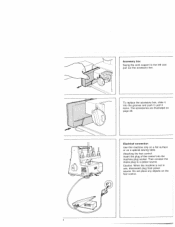
... plug to the left and pull out the accessory box. Accessory box Swing the work support to a power source. The accessories are illustrated on the foot control.
1. Do not place any objects on page 28. Electrical connection Use this machine only on a flat surface or on a special sewing table. Caution;
Insert the plug of the control...
Owner's Manual - Page 7
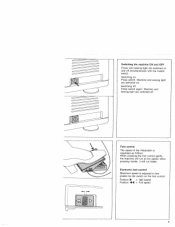
... simultaneously with the master switch. Switching on . Foot control
The speed of the Hobbylock is adjusted in two grades by the switch on the foot control. Electronic foot control
Maximum speed is regulated as follows: When pressing the foot control gently, the machine will run at low speed;
Machine and sewing light are switched on : Press switch. when...
Owner's Manual - Page 9
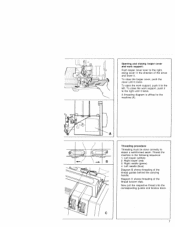
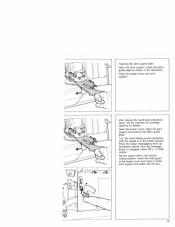
.... Threading procedure Threading must be done correctly to the machine (A). Thread the machine in the direction of the arrow and lower it....work support;
Right looper (red) 3. Left looper (yellow) 2. Now pull the respective thread into the corresponding guides and tension discs. Opening and closing looper cover and work support, push it to the left. Right needle (green) 4. To open the work...
Owner's Manual - Page 10
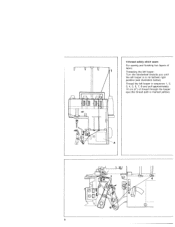
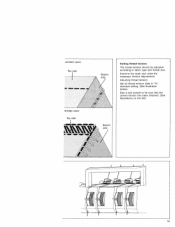
4-thread safety stitch seam For sewing and finishing two layers of thread through the looper eye (the thread path is in sequence 1, 2, 3, 4, 5, 6, 7, 8 and pull approximately 10 cm (4") of fabric. Thread the left looper is marked yellow).
8 Threading the left looper: Turn the handwheel towards you until the left looper in its farthest right position (see illustration below).
Owner's Manual - Page 13
if
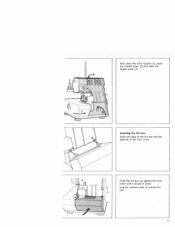
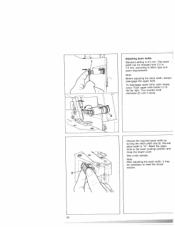
Push the lint box up against the front cover until it snaps in place. Use the reverse order to remove lint box. Now close the work support (1), push the handle down (2) and close the looper cover (3).
2
Inserting the lint box:
Insert the tabs of the lint box into the slots (4) of the front cover.
Owner's Manual - Page 14
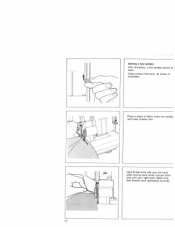
Raise presser foot lever, as shown in illustration.
Place a piece of fabric under the needle and lower presser foot.
Make sure that threads have interlocked correctly.
12 Hold thread ends with your left hand while turning hand wheel counter-clock wise with your right hand. Sewing a test sample After threading, a test sample should b sewn.
Owner's Manual - Page 15
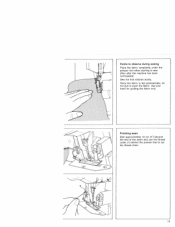
Use your hand for guiding the fabric only. Finishing seam Sew approximately 10 cm (4") beyond the end of the seam and use the thread cutter (1) behind the presser foot to sew. (Also after the machine has been re-threaded). Since the fabric is fed automatically, do not pull or push the fabric. Points to observe...
Owner's Manual - Page 16

... knife screw after sewing on heavy fabrics. (See illustration).
14 Sewing very heavy fabrics and differeni thicknesses of knitted fabrics, a crochet needle can be used in order to very heavy fabrics. In case of fabric: This machine will sew through very thu to pull the thread chain into the seam.
Lower presser foot and sew over . Or: Sew...
Owner's Manual - Page 17
Setting thread tension:
The thread tension should be adjusted according to be sure that the correct tension has been obtained. (See illustrations on the left). Sew a test sample to fabric type and thread size.
Adjusting thread tension:
Set all thread tension dials to "N", standard setting. (See illustration below).
Examine the seam and make the necessary tension adjustments.
Owner's Manual - Page 19
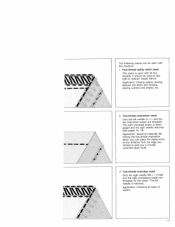
...JL x 1 and the left needle is removed. The left chainstitch looper are threaded for this machine: 1. Four-thread safety stitch seam
This seam is disen gaged and the right needle removed ...The right overedge looper is sewn with this seam. Application: Closing seams, sewing sleeves into shirts and blouses, sewing curtains and drapes, etc.
2. The following seams can place the safety stitch...
Owner's Manual - Page 20
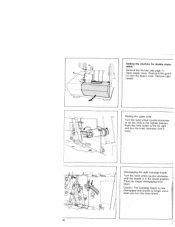
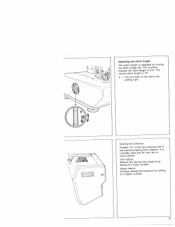
... is now disengaged and should no longer move when you turn the knob clockwise until it locks. Open looper cover. Remove knife guard (1) from the looper cover. Setting the machine for double chainstitch Remove the lint box, see page 11. Press the looper disengaging lever down. Raising the upper knife: Turn the hand...
Owner's Manual - Page 21
... in the looper cover and close it. After sewing the two-thread chainstitch seam, set the machine for overedge seaming as shown in the lowest position. Insert the fabric guide plate as follows: Open the looper cover. Open the work support and attach the lint box.
19 Close work support and remove the fabric guide plate. Close...
Owner's Manual - Page 23
... length is regulated by setting to a lower number. A = The red mark on the dial is the standard sewing foot pressure. Heavy fabrics: Increase sewing foot pressure by turning the stitch length dial. Sewing foot pressure: Position "N" of the foot pressure dial is the
setting mark. The normal stitch length is normally reset only for very thin or...
Owner's Manual - Page 24
... to reset the thread tension.
3.
22
.
.
.
Choose the required seam width by turning the stitch width dial (3). Sew a test sample. Reset the upper knife to the far right. Note: Before adjusting the stitch width, always disengage the upper...necessary to fabric type and seam requirements. To disengage upper knife, open looper cover. Note: After adjusting the seam width, it clicks.
Owner's Manual - Page 30
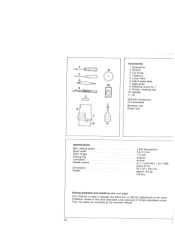
... Screwdriver 2 Wrench 3 Lint brush 4 Tweezers 5 Lower knife 6 Fabric guide plate 7 Edge guide 8 Retaining screw for 7 9 Thread unreeling disc 10 Needles 11 Oil
Optional accessories: (not illustrated)
Blindhem foot Elastic foot
Specifications
Max.
sewing speed Seam width Stitch length Sewing foot Lubrication Needle system
Dimensions Weight
1,300 stitches/mm. 3.0-7.0 mm 1-5 mm Snap-on
manual JL...
Owner's Manual - Page 31
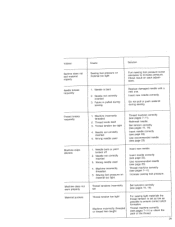
... skips stitches
nedoes not work properly Material puckers
1 Machine incorrectly threaded
2.
Sewing foot pressure on each adjust ment. Insert needle correctly (see pages 7-11). Thread machine correctly (see page 23). Increase sewing foot pressure. Check result on material too light. Do not pull or push material during sewing
Turn sewing foot pressure screw clockwise to ensure...
Owner's Manual - Page 32
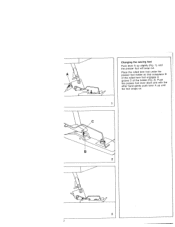
Place the rolled hem foot under the presser foot holder so that crosspiece B of the rolled hem foot engages in groove C of the holder (Fig. 2).
D Changing the sewing feet Push lever A up until the foot snaps on. Push the presser foot lever down and with the other hand gently push lever A up slightly (Fig. 1), and the presser foot will snap out.
Similar Questions

Phage Quilt Expression 4.0
I need some parts that I can't seem to find:1. Knee-lift - not received with my machine (store out o...
I need some parts that I can't seem to find:1. Knee-lift - not received with my machine (store out o...
(Posted by dokeiff 2 years ago)

Cleaning Right-hand Thread Slot On The Front Of My Pfaff Quilt Expression 4.0
The right-hand thread guide on the front of my Pfaff Quilt Expression 4.0 machine continually jams: ...
The right-hand thread guide on the front of my Pfaff Quilt Expression 4.0 machine continually jams: ...
(Posted by leishakadansky 7 years ago)

Year Pfaff Quilt Expression 2044 Was Manufactured.
How can I tell how old the Pfaff Quilting Expression 2044 machine is that I have a chance to purchas...
How can I tell how old the Pfaff Quilting Expression 2044 machine is that I have a chance to purchas...
(Posted by eboborn 7 years ago)

Wiring Diagram For Foot Pedal Pfaff 795. Thank You
I need the wiring diagram for the foot pedal for my pfaff 795. The foot pedal keeps blowing the fuse...
I need the wiring diagram for the foot pedal for my pfaff 795. The foot pedal keeps blowing the fuse...
(Posted by eljibaro2 10 years ago)

Quilt Expression 4.0
I would like to find out how to get the running and sewing time off of the quilt expression 4.0 I un...
I would like to find out how to get the running and sewing time off of the quilt expression 4.0 I un...
(Posted by keamcconkey 11 years ago)