
Owner's Manual
Page 2
D) The drive belt must never be disconnected from the power source. B) When leaving the machine, changing parts or accessories, the machine must take sufficient care to avoid injury and observe the sewing area continuously while sewing. Notes on safety A) Due to the up and down movement of the light bulb is 15 watts. C) The maximum approved wattage of the needle, the user must be adjusted by anyone but an authorized Pfaff agent.
D) The drive belt must never be disconnected from the power source. B) When leaving the machine, changing parts or accessories, the machine must take sufficient care to avoid injury and observe the sewing area continuously while sewing. Notes on safety A) Due to the up and down movement of the light bulb is 15 watts. C) The maximum approved wattage of the needle, the user must be adjusted by anyone but an authorized Pfaff agent.
Owner's Manual
Page 3
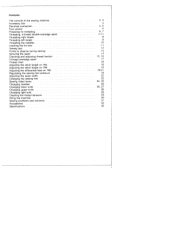
... sewing machine Accessory box Electrical connection Foot control Preparing for threading Threading, 4-thread double-overedge seam Threading right looper Threading left looper Threading the needles Inserting the lint box Sewing test Points to observe during sewing Securing the seam Checking and adjusting thread tension 3-thread overedge seam Thread chart Adjusting the stitch length on 794...
... sewing machine Accessory box Electrical connection Foot control Preparing for threading Threading, 4-thread double-overedge seam Threading right looper Threading left looper Threading the needles Inserting the lint box Sewing test Points to observe during sewing Securing the seam Checking and adjusting thread tension 3-thread overedge seam Thread chart Adjusting the stitch length on 794...
Owner's Manual
Page 5
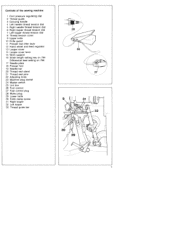
Controls of the sewing machine 1 Foot pressure regulating dial 2 Thread guide 3 Carrying handle 4 Left needle thread tension dial 5 Right needle thread tension...wheel and feed regulator 13 Looper cover 14 Looper cover lever 15 Work support 16 Stitch length setting key on 794 Differential feed setting on 796 17 Needle plate 18 Presser foot 19 Needle bar 20 Thread reel stand 21 Thread... reel pins 22 Adjusting knob 23 Machine plug socket 24 Master switch 25 Lint box 26 Foot control 27 Foot control plug 28 Mains plug 29 ...
Controls of the sewing machine 1 Foot pressure regulating dial 2 Thread guide 3 Carrying handle 4 Left needle thread tension dial 5 Right needle thread tension...wheel and feed regulator 13 Looper cover 14 Looper cover lever 15 Work support 16 Stitch length setting key on 794 Differential feed setting on 796 17 Needle plate 18 Presser foot 19 Needle bar 20 Thread reel stand 21 Thread... reel pins 22 Adjusting knob 23 Machine plug socket 24 Master switch 25 Lint box 26 Foot control 27 Foot control plug 28 Mains plug 29 ...
Owner's Manual
Page 6
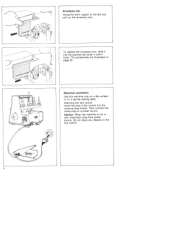
To replace the accessory box, slide it locks. Caution: When the machine is not in use, disconnect plug from power source. Do not place any objects on page 32. The accessories are illustrated on the foot control. Then connect the mains plug to the left and pull out the accessory box. Attaching the toot control: Insert the plug of the control into the grooves and push it until it into the machine plug socket. Electrical connection Use this machine only on a flat surface or on a special sewing table. Accessory box Swing the work support to a power source.
To replace the accessory box, slide it locks. Caution: When the machine is not in use, disconnect plug from power source. Do not place any objects on page 32. The accessories are illustrated on the foot control. Then connect the mains plug to the left and pull out the accessory box. Attaching the toot control: Insert the plug of the control into the grooves and push it until it into the machine plug socket. Electrical connection Use this machine only on a flat surface or on a special sewing table. Accessory box Swing the work support to a power source.
Owner's Manual
Page 7
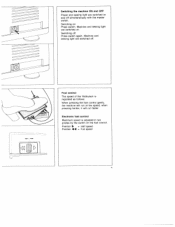
... speed of the HObbyIo is adjusted in two g5 rad by the switch on the foot control Pos,ho,, = Half Speed Posillon 4 = Full speed Machine and sewing light are switched on : Press switch. Switching off . when Pressing harder it will run faster. Electronic foot control Maximum speed is regula as follows: When...
... speed of the HObbyIo is adjusted in two g5 rad by the switch on the foot control Pos,ho,, = Half Speed Posillon 4 = Full speed Machine and sewing light are switched on : Press switch. Switching off . when Pressing harder it will run faster. Electronic foot control Maximum speed is regula as follows: When...
Owner's Manual
Page 15
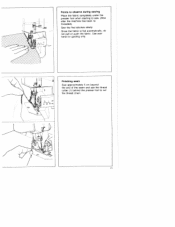
Use your hand for guiding only. Finishing seam Sew approximately 5 cm beyond the end of the seam and use the thread cutter (1) behind the presser foot to sew. (Also after the machine has been re threaded). Points to observe during sewing Place the fabric completely under the presser foot when starting to cut the thread chain. Since the fabric is fed automatically, do not pull or push the fabric. Sew the first stitches slowly.
Use your hand for guiding only. Finishing seam Sew approximately 5 cm beyond the end of the seam and use the thread cutter (1) behind the presser foot to sew. (Also after the machine has been re threaded). Points to observe during sewing Place the fabric completely under the presser foot when starting to cut the thread chain. Since the fabric is fed automatically, do not pull or push the fabric. Sew the first stitches slowly.
Owner's Manual
Page 16
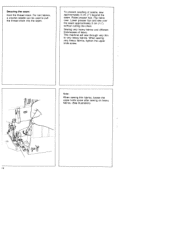
... heavy fabrics and different thicknesses of seams, sew approximately 3 cm (1") beyond the seam. When sewing very heavy fabrics, tighten the upper knife screw. Note: When sewing thin fabrics, loosen the upper knife screw after sewing on heavy fabrics. (See illustration). To prevent ravelling of fabric: This machine will sew through very thin to pull the thread...
... heavy fabrics and different thicknesses of seams, sew approximately 3 cm (1") beyond the seam. When sewing very heavy fabrics, tighten the upper knife screw. Note: When sewing thin fabrics, loosen the upper knife screw after sewing on heavy fabrics. (See illustration). To prevent ravelling of fabric: This machine will sew through very thin to pull the thread...
Owner's Manual
Page 33
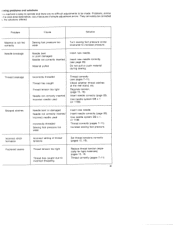
...pressure. Thread tension too tight Thread has caught due to be corrected the solutions offered. Do not pull or push material during sewing. Regulate tension, (page 15, 16). Check whether thread catches at the reel stand, etc. Needle bent or damaged Needle ...be made. Incorrect setting of simple adjustment errors. ewing problems and solutions hs machine is not fed correctly Needle breakage Thread breakage Skipped stitches Incorrect stitch formation Puckered seams Sewing foot pressure too weak Turn sewing foot pressure screw clockwise to increase pressure. Use needle system DB x 1,...
...pressure. Thread tension too tight Thread has caught due to be corrected the solutions offered. Do not pull or push material during sewing. Regulate tension, (page 15, 16). Check whether thread catches at the reel stand, etc. Needle bent or damaged Needle ...be made. Incorrect setting of simple adjustment errors. ewing problems and solutions hs machine is not fed correctly Needle breakage Thread breakage Skipped stitches Incorrect stitch formation Puckered seams Sewing foot pressure too weak Turn sewing foot pressure screw clockwise to increase pressure. Use needle system DB x 1,...


