Pfaff kayser 44 Support and Manuals
Get Help and Manuals for this Pfaff item

View All Support Options Below
Free Pfaff kayser 44 manuals!
Problems with Pfaff kayser 44?
Ask a Question
Free Pfaff kayser 44 manuals!
Problems with Pfaff kayser 44?
Ask a Question
Popular Pfaff kayser 44 Manual Pages
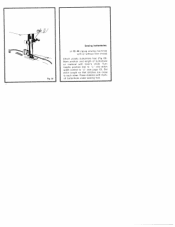
Owner's Manual - Page 2
... this instruction book which holds the answers to all the questions you . You are now the proud owner of controls on your choice. With the help you may have any sewing problems, don't hesitate to contact your nearest dealer who will be glad to help of the diagrams and names of the new KAYSER sewing machine...
Owner's Manual - Page 3
...12
Changing the needle position . . . 13
Setting the stitch width for zigzag
sewing
13
Changing the sewing foot .
. 14
Dropping the machine feed .
. 15
A few dos and donts
15
Sewing
16
Contents
Sewing on buttons
16 17
Sewing buttonholes on zigzag
sewing machines
18 19
Sewing buttonholes on zigzag and
utility-stitch sewing machines . 20 21
Blindstitching on zigzag and
utility...
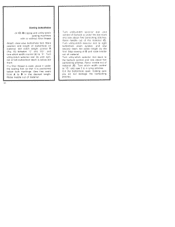
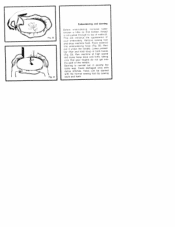
Owner's Manual - Page 5
... of parts shown on opposite page
15 Drop feed control 16 Bedplate 17 Bedplate cover 18 Needle plate 19 Shuttle (not visible) 20 Sewing foot 21 Sewing foot thumb screw 22 Needle bar 23 Thread guides 24 ...Presser bar lifter (at back) 25 Light switch 26 Face cover 27 Needle thread tension 28 Thread cutter 29 Needle set screw...
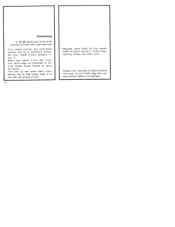
Owner's Manual - Page 14
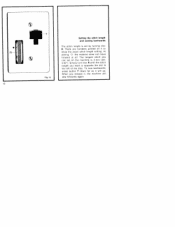
... does not move forward at all. -T
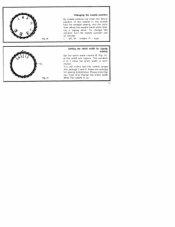
Fig. The longest stitch you want is 4 mm (abt. 532"). There are numbers printed on the machine is opposite the dot to show the exact stitch length setting. is
Setting the stitch length and sewing backwards
The stitch length is set on it to the left of the disc.
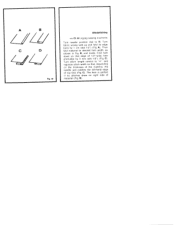
Owner's Manual - Page 15
...numbers 0 to the width you must only change this position. these are settings for straight sewing, and the point from which the needle starts when mak ing a zigzag ...that the control snaps into settings 2 and 4; To change the stitch width when the needle is up.
40 turn the needle position dial
L left, M middle, R right
Setting the stitch width for zigzag sewing
Set the stitch width control C...
Owner's Manual - Page 17
... mal and heavy materials. Dropping the machine feed
The machine feed has three positions which are set by turning the drop feed control shown in Fig 19. 0 (feed completely dropped) for em
broidering, darning and button sew ing. 1 (feed partly raised) for sewing deli cate fabrics. 2 (feed fully raised) for sewing Removing the work
Raise the needle...
Owner's Manual - Page 18
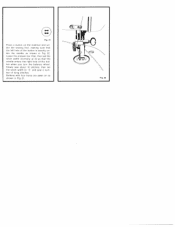
... needle to its highest point. For the moment, set the stitch width to "0". Exchange the sewing toot with the but ton sewing foot shown in Fig. 20.
the machine will sew zigzag stitches of the desired width
Fig. 20
Sewing on the balance wheel is set at 0 . Straight-stitch sewing
When the stitch width control (Fig. 17) is...
Owner's Manual - Page 19
... ber of tying stitches. p
Fig. 21
Place a button on as shown in Fig. 21. Slowly sew about 10 stitches, then set the stitch width (normally at 4) so that the left hole of the but ton when you turn the balance wheel. Buttons with four holes are ...
Owner's Manual - Page 20
... on CI. 44 zigzag sewing machines with or without filler thread
Attach niastic buttonhole foot (Fig. 23). Turn needle position dial to "L" and stitch width control to each other. Set stitch length so that stitches are close to 2 (see page 13). Place material with mark ad buttonhole under sewing foot. Fig. 23
Sewing buttonholes
on material...
Owner's Manual - Page 22
... bol of buttonhole on Cl. 46 zigzag and utility-stitch sewing machines
with or without filler thread
Attach clear-view buttonhole foot. and sew second seam the same length as the first. Turn utilly-stitch selector dial back to 4 tying stitches. Sewing buttonholes
on material, Set stitch length control R (Fig. 15) between "0" and "0.5", and turn...
Owner's Manual - Page 24
... and utility-stitch sewing machines with zig zag stitches before it is in line with left stitch exactly in folded edge, catching merely one grade. Re duce needle thread tension by about 5 mm (abt. 3/16") from fabric edge, as illustrated (1). Regulate stitch width so that folded edge is hemmed.
Set stitch length control...
Owner's Manual - Page 26
... no stitches show on the thickness of the material, the
needle just catches the left-hand edge
of top fold (Fig. A
B
Blindstitching
on CI. 44 zigzag sewing machines
Turn needle position dial to desired hem width, as shown in Fig. Fold hem
down so that , depending
on right side of 1/2"-wide hem protrudes...
Owner's Manual - Page 27
terry cloth and other elastic materials. Fig. 31 Particularly well suited for sewing tricot.
Sewing elastic seams
on Cl. 46 zigzag and utility-stitch sewing machines
Attach ordinary sewing foot, Turn needle position and utility-stitch selector dial (5) to elastic-seam symbol and stitch width control (6) to 5 Set stitch length control between 0 and 1.5', as required.
Owner's Manual - Page 28
Cover damaged area with the normal sewing foot by sewing back and forth. Tears can be darned
with dense stitches. Run machine at higri speed and move hoop back and forth, taking care that bobbin thread s not ... tension a iftie so that your fingers do not get into the path of ycur embroidery Remove sewing foot and drop machine feed. Darning is carried out iii exactly the same way.
Owner's Manual - Page 38
... nferior oil. Read instructions on page 30. Machine runs heavily and is noisy
Remedy:
Clean shuttle and shuttle race as instructed on page 29. Clean the machine thoroughly with cleaning fluid (kerosene) and oil it with
highquality sewing machine oil.
36
Machine has not been serviced for a longer time.
3. Cause:
1 Dust and pieces of thread have accumulated in...
Pfaff kayser 44 Reviews
We have not received any reviews for Pfaff yet.