

Owner's Manual
Page 2
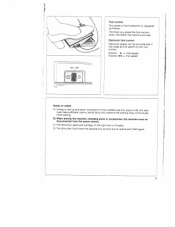
adjusted Pfaff C) The maximum approved the light bulb is 15 watts. wattage of D) The drive belt must be by anyone but an authorized agent. Notes on safety A) aatoOhvrfeweotaihidunecsgioenntrnjoeutmeirntydhuuleaseotnsuudtspaalnykoadebnwsdstehhuridelfvefoeiuwcspietnehpwneemitrnscgoeka.vwnreieifmnegt,eont B) When leaving the machine, changing parts or machine must never be accessories, disconnected the from the power source.
adjusted Pfaff C) The maximum approved the light bulb is 15 watts. wattage of D) The drive belt must be by anyone but an authorized agent. Notes on safety A) aatoOhvrfeweotaihidunecsgioenntrnjoeutmeirntydhuuleaseotnsuudtspaalnykoadebnwsdstehhuridelfvefoeiuwcspietnehpwneemitrnscgoeka.vwnreieifmnegt,eont B) When leaving the machine, changing parts or machine must never be accessories, disconnected the from the power source.
Owner's Manual
Page 7
C) The maximum approved wattage of the light bulb is regulated as follows: The more you press the foot control down movement of the Hobbylock is 15 watts. D) The drive belt must take sufficient care to the up and down , the faster the machine will sew. Position = Half speed Position...foot control Maximum speed can be disconnected from the power source. B) When leaving the machine, changing parts or accessories, the machine must be pre-selected in two steps by anyone but an authorized Pfaff agent. 5 Foot control The speed of the needles and the upper knife, the user must never ...
C) The maximum approved wattage of the light bulb is regulated as follows: The more you press the foot control down movement of the Hobbylock is 15 watts. D) The drive belt must take sufficient care to the up and down , the faster the machine will sew. Position = Half speed Position...foot control Maximum speed can be disconnected from the power source. B) When leaving the machine, changing parts or accessories, the machine must be pre-selected in two steps by anyone but an authorized Pfaff agent. 5 Foot control The speed of the needles and the upper knife, the user must never ...

Owner's Manual
Page 8
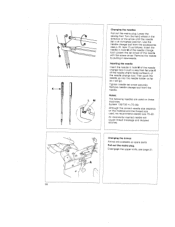
Push thread guiding part 18 into guide bar 19. Pull up to the screw head. Insert thread spool stand 1 from the top. Tighten 4 / - Insert four thread spool holders 17 with centering pieces 36 fully in the holes of the thread spool stand. clamp screw A securely. ______I / A Installing the thread spool stand Loosen clamp screw A a little and pull washer up guide bar and align it so that I thread guides 18 are exactly above the spool holders. 6
Push thread guiding part 18 into guide bar 19. Pull up to the screw head. Insert thread spool stand 1 from the top. Tighten 4 / - Insert four thread spool holders 17 with centering pieces 36 fully in the holes of the thread spool stand. clamp screw A securely. ______I / A Installing the thread spool stand Loosen clamp screw A a little and pull washer up guide bar and align it so that I thread guides 18 are exactly above the spool holders. 6
Owner's Manual
Page 28
... of the needle with the screw driver. Loosen the set screw securely. Then push the needle up into the needle holder as far as spare parts. Disengage the upper knife, see p. 31, tern 11) as follows: Insert the needle in such a way that flat side K of the needle shank faces surface...
... of the needle with the screw driver. Loosen the set screw securely. Then push the needle up into the needle holder as far as spare parts. Disengage the upper knife, see p. 31, tern 11) as follows: Insert the needle in such a way that flat side K of the needle shank faces surface...


