

Owner's Manual
Page 2
... looper cover and side cover 6 6 g. Adjusting the stitch length 16 c. Replacing needle (S) 18 e, Replacing the upper knife 19 f. Roll hemming h. Points to adjust the foot controfler 4 4 d. Adjusting the seam width 16 b. Preparation 4 b. Thread tension adjustment (Normal hemming) c. Replacing the lower knife 19 g. CONTENTS 2 A. Test sewing b. Replacing the light bulb 20 F. Threading procedure 9 C. Sewing problems...
... looper cover and side cover 6 6 g. Adjusting the stitch length 16 c. Replacing needle (S) 18 e, Replacing the upper knife 19 f. Roll hemming h. Points to adjust the foot controfler 4 4 d. Adjusting the seam width 16 b. Preparation 4 b. Thread tension adjustment (Normal hemming) c. Replacing the lower knife 19 g. CONTENTS 2 A. Test sewing b. Replacing the light bulb 20 F. Threading procedure 9 C. Sewing problems...

Owner's Manual
Page 4
• Accessories Accessories case Screw driver Screw driver (For needle) Iweezers Oiler • Looper mechanism • Specifications Maximum speed Overlock seam width Stitch length Presser foot Presser foot lift Needle Number of threads Lubrication Dimentions Net weight 1 300 s.p.m. 3.5mm (standard) 1.0 - 4.0mm Hinged 5mm 130 / 705H No.75 - No.90 4 Manual 278(W) x 264(D) x 310(H) 7Kg Brush for dusting Roll hemming presser foot Upper knife Thread stripping discs (4 pcs.) Li Needle • Controller Dust cover 3
• Accessories Accessories case Screw driver Screw driver (For needle) Iweezers Oiler • Looper mechanism • Specifications Maximum speed Overlock seam width Stitch length Presser foot Presser foot lift Needle Number of threads Lubrication Dimentions Net weight 1 300 s.p.m. 3.5mm (standard) 1.0 - 4.0mm Hinged 5mm 130 / 705H No.75 - No.90 4 Manual 278(W) x 264(D) x 310(H) 7Kg Brush for dusting Roll hemming presser foot Upper knife Thread stripping discs (4 pcs.) Li Needle • Controller Dust cover 3
Owner's Manual
Page 10
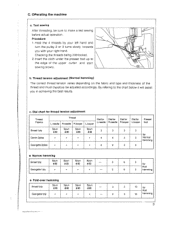
...slowly towards you in achieving the best results. Checking the threads being interlocked. 2. Insert the cloth under the presser foot up to the chart below it will assist you with your right hand. c. By refering to the edge of ... R.needle Dial for R.lper 3 3 3 4 4 3 2 2 3 Dial for L.looper 1 Presser ft I 3 for 3 Normal hemming J3 • Narrow hemming i • Fold-over hemming I Spun Spun Spun Spun Broad iply I *80 *80 *80 *80 - 3 3 10 for Roll Georgetteiply - 2 3 10 hemming 9 Test sewing After threading, be adjusted accordingly. b.
...slowly towards you in achieving the best results. Checking the threads being interlocked. 2. Insert the cloth under the presser foot up to the chart below it will assist you with your right hand. c. By refering to the edge of ... R.needle Dial for R.lper 3 3 3 4 4 3 2 2 3 Dial for L.looper 1 Presser ft I 3 for 3 Normal hemming J3 • Narrow hemming i • Fold-over hemming I Spun Spun Spun Spun Broad iply I *80 *80 *80 *80 - 3 3 10 for Roll Georgetteiply - 2 3 10 hemming 9 Test sewing After threading, be adjusted accordingly. b.
Owner's Manual
Page 13
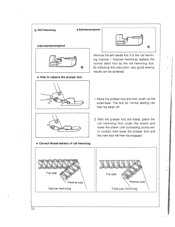
... good sewing results can then be taken off. 2. The foot for normal sewing can be engaged. • Correct thread tension of roll hemming o 0 0 0 00 Narrow hemming 12 Top side Fold-over hemming g. Roll hemming foot . For the roll hemm ng (narrow / foldover hemming) replace the normal stitch foot by the roll hemming foot. Normal hemming toot • How to replace the presser toot Remove the...
... good sewing results can then be taken off. 2. The foot for normal sewing can be engaged. • Correct thread tension of roll hemming o 0 0 0 00 Narrow hemming 12 Top side Fold-over hemming g. Roll hemming foot . For the roll hemm ng (narrow / foldover hemming) replace the normal stitch foot by the roll hemming foot. Normal hemming toot • How to replace the presser toot Remove the...


