

Owner's Manual
Page 3
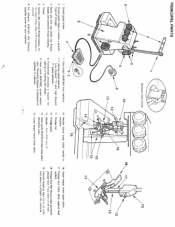
... PARTS 2 threading and sewing. Be sure not to machine. BLINDSTITCH 11 CONTACT YOUR PFAFF DEALER DECORATIVE FLATLOCK 12 WHERE YOU PURCHASED THIS PRODUCT. ACCESSORIES 3 • Before connecting machine be sure voltage on floor. INSTRUCTION SYMBOLS 3 CONNECTING AND RUNNING MACHINE 3 TRIAL SEWING 3 ADJUSTING THREAD TENSION 4 PREPARATION FOR THREADING 5 TYING ON THREADING 5 THREADING PATH A (LOWER LOOPER) STEP 1 6 THREADING PATH B (UPPER LOOPER) STEP 2 7 THREADING PATH C (NEEDLE) STEP 3 8 • Handle foot switch with care and avoid dropping...
... PARTS 2 threading and sewing. Be sure not to machine. BLINDSTITCH 11 CONTACT YOUR PFAFF DEALER DECORATIVE FLATLOCK 12 WHERE YOU PURCHASED THIS PRODUCT. ACCESSORIES 3 • Before connecting machine be sure voltage on floor. INSTRUCTION SYMBOLS 3 CONNECTING AND RUNNING MACHINE 3 TRIAL SEWING 3 ADJUSTING THREAD TENSION 4 PREPARATION FOR THREADING 5 TYING ON THREADING 5 THREADING PATH A (LOWER LOOPER) STEP 1 6 THREADING PATH B (UPPER LOOPER) STEP 2 7 THREADING PATH C (NEEDLE) STEP 3 8 • Handle foot switch with care and avoid dropping...
Owner's Manual
Page 4
... fabric against feed system. 18. Do not adjust these dials until threading is displayed on rightside of thread. 3. Thread 5. Needle - Presser bar 12. Lower looper forms lower stitch. 6. AC adaptor #287581 (9V 650mA) supplies power for raising or lowering the needle. 9. Upper looper forms upper stitch. 17. Style 2020 size 14 14. Press down to ensure a smooth flow of machine. 19 10. Internal threading light (turns off when foot switch is plugged into machine) Tension dial controls thread tension. Thread guide holder .II 7 7-1 7. Needle clamp...
... fabric against feed system. 18. Do not adjust these dials until threading is displayed on rightside of thread. 3. Thread 5. Needle - Presser bar 12. Lower looper forms lower stitch. 6. AC adaptor #287581 (9V 650mA) supplies power for raising or lowering the needle. 9. Upper looper forms upper stitch. 17. Style 2020 size 14 14. Press down to ensure a smooth flow of machine. 19 10. Internal threading light (turns off when foot switch is plugged into machine) Tension dial controls thread tension. Thread guide holder .II 7 7-1 7. Needle clamp...
Owner's Manual
Page 5
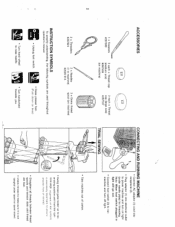
...; Check thread to make sure it is extremely important to ensure smooth flow of carton. 2 x Threaders #287824 2 x Needles (1 in light will go out. • Connect foot switch (3) to run machine and turn on lever) • Turn hand wheel to raise needle. • Turn handwheel towards you. • Straighten all threads between thread spools and tension dials until thread are used throughout operator's manual. • Swing thread guide holder up to power machine and...
...; Check thread to make sure it is extremely important to ensure smooth flow of carton. 2 x Threaders #287824 2 x Needles (1 in light will go out. • Connect foot switch (3) to run machine and turn on lever) • Turn hand wheel to raise needle. • Turn handwheel towards you. • Straighten all threads between thread spools and tension dials until thread are used throughout operator's manual. • Swing thread guide holder up to power machine and...
Owner's Manual
Page 6
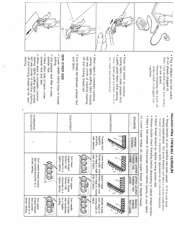
... thread tension to improve stitch appearance and eliminate skipping. • Adjust thread tension by slightly turning tension dial. • Always double check threading before attempting to adjust thread tension. • Make a test sample to a tighter tighter setting. Note: Seam guide is complete continue sewing, lightly pulling fabric toward ALTERNATIVE left rear corner of machine chaining off and forming thread tail for proocr width and sewing angle. ADJUSTMENT SEW OTHER SIDE • Lower needle clamp body to lowest setting. • Use presser foot...
... thread tension to improve stitch appearance and eliminate skipping. • Adjust thread tension by slightly turning tension dial. • Always double check threading before attempting to adjust thread tension. • Make a test sample to a tighter tighter setting. Note: Seam guide is complete continue sewing, lightly pulling fabric toward ALTERNATIVE left rear corner of machine chaining off and forming thread tail for proocr width and sewing angle. ADJUSTMENT SEW OTHER SIDE • Lower needle clamp body to lowest setting. • Use presser foot...
Owner's Manual
Page 7
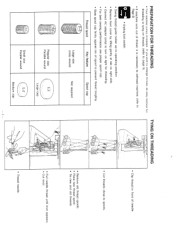
... necessary to rethread machine. (refer to Page 6) • Unplug foot switch. • Swing thread guide holder up to operating position. • Remove front cover by lifting gently at tab on right side. • Connect AC adaptor (only) to turn on light for threading. • For best sewing performance use proper spool cap. • Slide spool cap firmly against rim of needle. • Cut threads close to prevent...
... necessary to rethread machine. (refer to Page 6) • Unplug foot switch. • Swing thread guide holder up to operating position. • Remove front cover by lifting gently at tab on right side. • Connect AC adaptor (only) to turn on light for threading. • For best sewing performance use proper spool cap. • Slide spool cap firmly against rim of needle. • Cut threads close to prevent...
Owner's Manual
Page 8
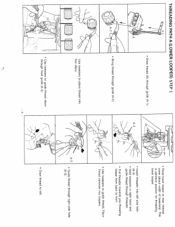
... optimum position for threading lower looper. • Insert threader into two discs. Place thread between two loopers. A-5 • Guide thread through right side hole (A-5). • Use tweezers to guide thread down through front guide (A-3). -6- • Draw thread to guide thread. THREADING PATH A (LOWER LOOPER) STEP 1 Ai • Draw thread (A) through threader. • Pull threader towards you threading looper from back to front. • Use tweezers to left. Dj Use tweezers to near internal cover (about...
... optimum position for threading lower looper. • Insert threader into two discs. Place thread between two loopers. A-5 • Guide thread through right side hole (A-5). • Use tweezers to guide thread down through front guide (A-3). -6- • Draw thread to guide thread. THREADING PATH A (LOWER LOOPER) STEP 1 Ai • Draw thread (A) through threader. • Pull threader towards you threading looper from back to front. • Use tweezers to left. Dj Use tweezers to near internal cover (about...
Owner's Manual
Page 9
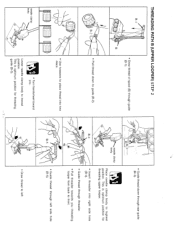
... position. fID iII • Use tweezers to guide (B-2). This is optimum position for threading guide (B-3). -7- Di /T • Guide thread down to place thread into right side hole (B-4). • Guide thread through threader. • Pull threader towards you threading looper from back to front. • Guide thread through rear guide (B-3). needle clamp body Place needle clamp body to left. This is optimum position for threading upper looper. • Insert threader into two discs. needle clamp body • Turn handwheel toward Lower needle clamp...
... position. fID iII • Use tweezers to guide (B-2). This is optimum position for threading guide (B-3). -7- Di /T • Guide thread down to place thread into right side hole (B-4). • Guide thread through threader. • Pull threader towards you threading looper from back to front. • Guide thread through rear guide (B-3). needle clamp body Place needle clamp body to left. This is optimum position for threading upper looper. • Insert threader into two discs. needle clamp body • Turn handwheel toward Lower needle clamp...
Owner's Manual
Page 10
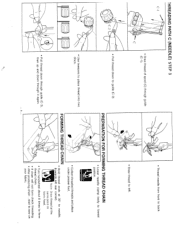
... FORMING THREAD CHAIN 9 (,c/ • Lower needle clamp body to lowest positon. • Use tweezers to sew on your fabric. LI • Collect threaded threads and place under presser foot. // FORMING THREAD CHAIN • Hold thread ends at the same pace as fabric feed. • Turn handwheel about 8 times to form thread chain. • If chain will not form check threading. • After producing chain , start to place thread into two...
... FORMING THREAD CHAIN 9 (,c/ • Lower needle clamp body to lowest positon. • Use tweezers to sew on your fabric. LI • Collect threaded threads and place under presser foot. // FORMING THREAD CHAIN • Hold thread ends at the same pace as fabric feed. • Turn handwheel about 8 times to form thread chain. • If chain will not form check threading. • After producing chain , start to place thread into two...
Owner's Manual
Page 11
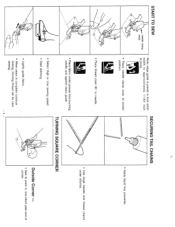
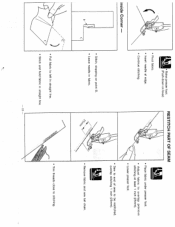
... - • Sew to needle. • Use large needle and thread chains under stitches. • Place fabric under presser foot touching needle and against seam guide. TURNING SQUARE CORNER • Select High or Low sewing speed. • Stan stitching. \ • Lightly guide fabric. • When seam is preset to limit stitch width to approximately 11/64 inch (4.2mm). __ START TO SEW needle clamp body Note: edge guide is complete continue sewing, forming thread tail for next sewing. -9---- SECURING...
... - • Sew to needle. • Use large needle and thread chains under stitches. • Place fabric under presser foot touching needle and against seam guide. TURNING SQUARE CORNER • Select High or Low sewing speed. • Stan stitching. \ • Lightly guide fabric. • When seam is preset to limit stitch width to approximately 11/64 inch (4.2mm). __ START TO SEW needle clamp body Note: edge guide is complete continue sewing, forming thread tail for next sewing. -9---- SECURING...
Owner's Manual
Page 12
... PART OF SEAM 4 N. '% • Place fabric under presser foot. • Adjust fabric to stitching. 10 Sew to end of area to be restitched, overlap stitching 1 inch (25mm). • Remove fabric and sew tail chain. • Puil fabric to left in straight tine. • Stitch and hold fabric in fabric. down on lever) • Pivot fabric. • Insert needle at edge. • Continue stitching. • Stitch, stopping on point B. • Leave needle in straight line. • Trim threads...
... PART OF SEAM 4 N. '% • Place fabric under presser foot. • Adjust fabric to stitching. 10 Sew to end of area to be restitched, overlap stitching 1 inch (25mm). • Remove fabric and sew tail chain. • Puil fabric to left in straight tine. • Stitch and hold fabric in fabric. down on lever) • Pivot fabric. • Insert needle at edge. • Continue stitching. • Stitch, stopping on point B. • Leave needle in straight line. • Trim threads...
Owner's Manual
Page 13
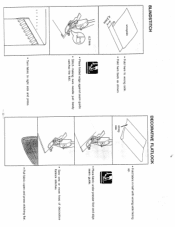
LkI • Place fabric under presser foot and align seam guide. • Sew one or more lines of decorative flatlock stitches. • Turn fabric to wrong side. • Fold hem back as shown. 4.2mm - 0 LI • Place folded edge against seam guide. • Stitch making sure needle just barely catches the fold. wrong skie I \M Fold fabric in half with wrong side facing up. BLINDSTITCH DECORATiVE FLATLOCK ongde • Fold hem to right side and press. -11 • Pull fabric open and press stitching flat.
LkI • Place fabric under presser foot and align seam guide. • Sew one or more lines of decorative flatlock stitches. • Turn fabric to wrong side. • Fold hem back as shown. 4.2mm - 0 LI • Place folded edge against seam guide. • Stitch making sure needle just barely catches the fold. wrong skie I \M Fold fabric in half with wrong side facing up. BLINDSTITCH DECORATiVE FLATLOCK ongde • Fold hem to right side and press. -11 • Pull fabric open and press stitching flat.
Owner's Manual
Page 14
... sewing, pull fabric flat and press. Needle inserted incorrectly. • Thread guide holder not aligned. Use hand only to guide the fabric. • Tighten screw firmly. • Thread machine correctly. (page 6,7 & 8) • Replace needle. (page 12) • Adjust tension. (page 4) • Thread correctly. (page 6,7 & 8) • Insert needle correctly. (page 12) • Align bar symbols (page 3) • Replace needle. (page 12) • Set needle firmly in position. (page 12) • Thread machine correctly. (page 6,7 .& 8) Use Cat. 2020-01 4. • Adjust tension...
... sewing, pull fabric flat and press. Needle inserted incorrectly. • Thread guide holder not aligned. Use hand only to guide the fabric. • Tighten screw firmly. • Thread machine correctly. (page 6,7 & 8) • Replace needle. (page 12) • Adjust tension. (page 4) • Thread correctly. (page 6,7 & 8) • Insert needle correctly. (page 12) • Align bar symbols (page 3) • Replace needle. (page 12) • Set needle firmly in position. (page 12) • Thread machine correctly. (page 6,7 .& 8) Use Cat. 2020-01 4. • Adjust tension...


