

Owner's Manual
Page 2
... deÁect the needle causing it to the nearest authorized dealer or service center for its intended use as threading needle, changing needle, threading bobbin, or changing presser foot, etc. • Always unplug the sewing machine from the electrical outlet when removing covers, lubricating, or when making any adjustment in...
... deÁect the needle causing it to the nearest authorized dealer or service center for its intended use as threading needle, changing needle, threading bobbin, or changing presser foot, etc. • Always unplug the sewing machine from the electrical outlet when removing covers, lubricating, or when making any adjustment in...
Owner's Manual
Page 5
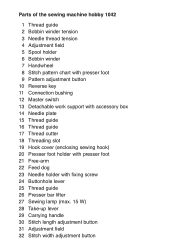
Parts of the sewing machine hobby 1042 1 Thread guide 2 Bobbin winder tension 3 Needle thread tension 4 Adjustment field 5 Spool holder 6 Bobbin winder 7 Handwheel 8 Stitch pattern chart with presser foot 9 Pattern adjustment button 10 Reverse key 11 Connection bushing 12 Master switch 13 Detachable work support with ...
Parts of the sewing machine hobby 1042 1 Thread guide 2 Bobbin winder tension 3 Needle thread tension 4 Adjustment field 5 Spool holder 6 Bobbin winder 7 Handwheel 8 Stitch pattern chart with presser foot 9 Pattern adjustment button 10 Reverse key 11 Connection bushing 12 Master switch 13 Detachable work support with ...

Owner's Manual
Page 7
Parts of the sewing machine hobby 1022 and 1032 1 Thread guide 2 Bobbin winder tension 3 Needle thread tension 4 Adjustment field 5 Spool holder 6 Bobbin winder 7 Handwheel 8 Stitch pattern chart with presser foot 9 Pattern adjustment button 10 Reverse key 11 Connection bushing 12 Master switch 13 Detachable work support with ...
Parts of the sewing machine hobby 1022 and 1032 1 Thread guide 2 Bobbin winder tension 3 Needle thread tension 4 Adjustment field 5 Spool holder 6 Bobbin winder 7 Handwheel 8 Stitch pattern chart with presser foot 9 Pattern adjustment button 10 Reverse key 11 Connection bushing 12 Master switch 13 Detachable work support with ...
Owner's Manual
Page 8
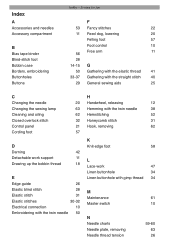
Index A Accessories and needles Accessory compartment B Bias tape binder Blind-stitch foot Bobbin case Borders, embroidering Buttonholes Buttons hobby - Sewing for fun F 53 Fancy stitches 22 11 Feed dog, lowering 20 Felling foot 57 Foot control 10 56 Free arm 11 28 ...63 Cleaning and oiling 62 Closed overlock stitch 32 Control panel 21 Cording foot 57 D Darning 42 Detachable work support 11 Drawing up the bobbin thread 18 E Edge guide 26 Elastic blind stitch 28 Elastic stitch 31 Elastic stitches 30-32 Electrical connection 10 Embroidering with the twin ...
Index A Accessories and needles Accessory compartment B Bias tape binder Blind-stitch foot Bobbin case Borders, embroidering Buttonholes Buttons hobby - Sewing for fun F 53 Fancy stitches 22 11 Feed dog, lowering 20 Felling foot 57 Foot control 10 56 Free arm 11 28 ...63 Cleaning and oiling 62 Closed overlock stitch 32 Control panel 21 Cording foot 57 D Darning 42 Detachable work support 11 Drawing up the bobbin thread 18 E Edge guide 26 Elastic blind stitch 28 Elastic stitch 31 Elastic stitches 30-32 Electrical connection 10 Embroidering with the twin ...

Owner's Manual
Page 9
... 18 Thread tension 14 Threading 16-17 Threading the needle thread 16 Topstitching 26 Traditional embroidery techniques 49 Troubleshooting 64 Twin needle 38 W Winding the bobbin 12-13 S Safety notes 2 Serging with the blind stitch foot 28 Serging with the zigzag stitch 27 Setting utility stitches 22 Sewing feet (normal accessories... problems and their solutions 64 Shell edging 48 Smocking 39 Special accessories chart 55 Spool placement 12 Stitch chart 6, 7, 8 Z Zigzag stitch Zippers 27 44-45 hobby -
... 18 Thread tension 14 Threading 16-17 Threading the needle thread 16 Topstitching 26 Traditional embroidery techniques 49 Troubleshooting 64 Twin needle 38 W Winding the bobbin 12-13 S Safety notes 2 Serging with the blind stitch foot 28 Serging with the zigzag stitch 27 Setting utility stitches 22 Sewing feet (normal accessories... problems and their solutions 64 Shell edging 48 Smocking 39 Special accessories chart 55 Spool placement 12 Stitch chart 6, 7, 8 Z Zigzag stitch Zippers 27 44-45 hobby -

Owner's Manual
Page 13
Operating the machine Bobbin winding Bobbin case Changing the needle Changing the presser foot Control panel Detachable work support Drawing up the bobbin thread Electrical connection Free arm Lowering the feed dog Needle thread tension Presser bar lifter Reverse serging Setting the utility stitches Setting the stretch stitches Threading the needle thread Thread cutter 12-13 14 20 19 21 11 18 10 11 20 20 17 24 22 23 16-17 18 9
Operating the machine Bobbin winding Bobbin case Changing the needle Changing the presser foot Control panel Detachable work support Drawing up the bobbin thread Electrical connection Free arm Lowering the feed dog Needle thread tension Presser bar lifter Reverse serging Setting the utility stitches Setting the stretch stitches Threading the needle thread Thread cutter 12-13 14 20 19 21 11 18 10 11 20 20 17 24 22 23 16-17 18 9
Owner's Manual
Page 16
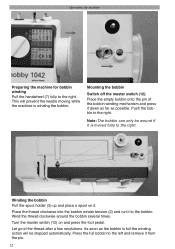
... spool on and press the foot pedal. Let go of the bobbin winding mechanism and press it from the pin. 12 Wind the thread clockwise around the bobbin several times. Mounting the bobbin Switch off the master switch (12) Place the empty bobbin onto the pin of the thread after a few revolutions. As... soon as possible. Press the full bobbin to the bobbin. Place the thread clockwise into the bobbin winder tension (2) and run it to the left and remove it down as far as the bobbin is winding the bobbin. Turn the master switch (12) on it is moved fully to...
... spool on and press the foot pedal. Let go of the bobbin winding mechanism and press it from the pin. 12 Wind the thread clockwise around the bobbin several times. Mounting the bobbin Switch off the master switch (12) Place the empty bobbin onto the pin of the thread after a few revolutions. As... soon as possible. Press the full bobbin to the bobbin. Place the thread clockwise into the bobbin winder tension (2) and run it to the left and remove it down as far as the bobbin is winding the bobbin. Turn the master switch (12) on it is moved fully to...
Owner's Manual
Page 17
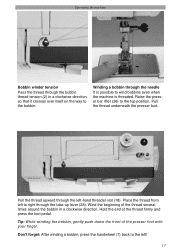
...from left ! 13 Don·t forget: After winding a bobbin, press the handwheel (7) back to the left to the bobbin. Hold the end of the presser foot with your finger. Operating the machine Bobbin winder tension Pass the thread through the bobbin thread tension (2) in a clockwise direction. Wind the beginning...through the take-up lever (28). Raise the presser bar lifter (26) to wind bobbins even when the machine is threaded. Pull the thread underneath the presser foot. Tip: While winding the bobbin, gently push down the front of the thread Àrmly and press the foot pedal...
...from left ! 13 Don·t forget: After winding a bobbin, press the handwheel (7) back to the left to the bobbin. Hold the end of the presser foot with your finger. Operating the machine Bobbin winder tension Pass the thread through the bobbin thread tension (2) in a clockwise direction. Wind the beginning...through the take-up lever (28). Raise the presser bar lifter (26) to wind bobbins even when the machine is threaded. Pull the thread underneath the presser foot. Tip: While winding the bobbin, gently push down the front of the thread Àrmly and press the foot pedal...
Owner's Manual
Page 18
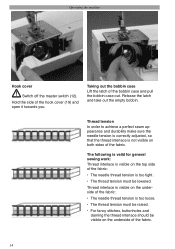
... Lift the latch of the hook cover (19) and open it towards you. Release the latch and take out the empty bobbin. Thread tension In order to achieve a perfect seam appearance and durability make sure the needle tension is correctly adjusted, so that the thread interlace is ...not visible on the underside of the fabric. 14 Hold the side of the bobbin case and pull the bobbin case out. Thread interlace is visible on the underside of the fabric: • The needle thread tension is too loose. • The thread...
... Lift the latch of the hook cover (19) and open it towards you. Release the latch and take out the empty bobbin. Thread tension In order to achieve a perfect seam appearance and durability make sure the needle tension is correctly adjusted, so that the thread interlace is ...not visible on the underside of the fabric. 14 Hold the side of the bobbin case and pull the bobbin case out. Thread interlace is visible on the underside of the fabric: • The needle thread tension is too loose. • The thread...
Owner's Manual
Page 19
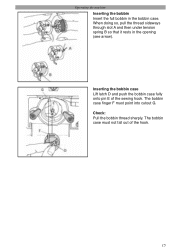
The bobbin case Ànger F must not fall out of the sewing hook. Inserting the bobbin case Lift latch D and push the bobbin case fully onto pin E of the hook. 15 Operating the machine Inserting the bobbin Insert the full bobbin in the opening (see arrow). Check: Pull the bobbin thread sharply. When doing so, pull the thread sideways through slot A and then under tension spring B so that it rests in the bobbin case. The bobbin case must point into cutout G.
The bobbin case Ànger F must not fall out of the sewing hook. Inserting the bobbin case Lift latch D and push the bobbin case fully onto pin E of the hook. 15 Operating the machine Inserting the bobbin Insert the full bobbin in the opening (see arrow). Check: Pull the bobbin thread sharply. When doing so, pull the thread sideways through slot A and then under tension spring B so that it rests in the bobbin case. The bobbin case must point into cutout G.
Owner's Manual
Page 22
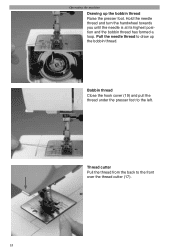
Bobbin thread Close the hook cover (19) and pull the thread under the presser foot to the front over the thread cutter (17). 18 Hold the needle thread and turn the handwheel towards you until the needle is at its highest position and the bobbin thread has formed a loop. Thread cutter Pull the thread from the back to the left. Operating the machine Drawing up the bobbin thread. Pull the needle thread to draw up the bobbin thread Raise the presser foot.
Bobbin thread Close the hook cover (19) and pull the thread under the presser foot to the front over the thread cutter (17). 18 Hold the needle thread and turn the handwheel towards you until the needle is at its highest position and the bobbin thread has formed a loop. Thread cutter Pull the thread from the back to the left. Operating the machine Drawing up the bobbin thread. Pull the needle thread to draw up the bobbin thread Raise the presser foot.

Owner's Manual
Page 41
.... • Once you have completed sewing all the buttonholes, push the buttonhole lever (24) upward as far as it will go. • By pulling the bobbin thread, bring the needle thread to prevent damaging the bartack by cutting open the buttonhole, insert a pin into the bartack. 37 Utility stitches and practical...
.... • Once you have completed sewing all the buttonholes, push the buttonhole lever (24) upward as far as it will go. • By pulling the bobbin thread, bring the needle thread to prevent damaging the bartack by cutting open the buttonhole, insert a pin into the bartack. 37 Utility stitches and practical...

Owner's Manual
Page 43
Don·t forget however, the higher the bobbin thread tension, the tighter the gathering effect. • Sew a test seam to determine the level of gather. • Mark the Àrst line on the ... gather will be set very loose. As the elastic thread is much stronger than the normal bobbin thread, the tension of the bobbin case must stretch the fabric to one another, you should use an additional bobbin case and wind it . • Each additional seam can be sewn at the beginning and end...
Don·t forget however, the higher the bobbin thread tension, the tighter the gathering effect. • Sew a test seam to determine the level of gather. • Mark the Àrst line on the ... gather will be set very loose. As the elastic thread is much stronger than the normal bobbin thread, the tension of the bobbin case must stretch the fabric to one another, you should use an additional bobbin case and wind it . • Each additional seam can be sewn at the beginning and end...

Owner's Manual
Page 44
... knotting the thread ends. 40 You determine the amount of gather by how much you pull the thread. • Secure the gathers by pulling the bobbin thread. Utility stitches and practical sewing Gathering with the straight stitch With program B you should sew two or three rows of gathers. • Mark the...
... knotting the thread ends. 40 You determine the amount of gather by how much you pull the thread. • Secure the gathers by pulling the bobbin thread. Utility stitches and practical sewing Gathering with the straight stitch With program B you should sew two or three rows of gathers. • Mark the...

Owner's Manual
Page 45
... thread around the needle. • Lower the presser foot and sew a few stitches using an elastic thread. Utility stitches and practical sewing Models 1032, 1042: stitch E stretch Gathering with ease using the honeycomb stitch and leave the needle in the middle of the presser foot. The needle must be gathered... with the elastic thread Sleeve and waist seams can also be wound onto the bobbin. • Mark the Àrst gathering seam on the reverse side of the fabric. • Sew a few stitches. Due to secure the ...
... thread around the needle. • Lower the presser foot and sew a few stitches using an elastic thread. Utility stitches and practical sewing Models 1032, 1042: stitch E stretch Gathering with ease using the honeycomb stitch and leave the needle in the middle of the presser foot. The needle must be gathered... with the elastic thread Sleeve and waist seams can also be wound onto the bobbin. • Mark the Àrst gathering seam on the reverse side of the fabric. • Sew a few stitches. Due to secure the ...
Owner's Manual
Page 58
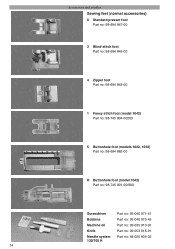
Accessories and needles Sewing feet (normal accessories) 0 Standard presser foot Part no: 98-694 847-00 3 Blind-stitch foot Part no: 98-694 845-00 4 Zipper foot Part no: 98-694 843-00 1 Fancy stitch foot (model 1042) Part no: 98-745 804-00200 5 Buttonhole foot (models 1022, 1032) Part no: 98-694 882-00 R Buttonhole foot (model 1042) Part no: 98-745 801-00/900 Screwdriver Part no: 93-040 971-41 Bobbins Part no: 93-040 970-45 Machine oil Part no: 93-035 910-91 Knife Part no: 99-053 016-91 Needle system 130/705 H Part no: 48-020 804-32 54
Accessories and needles Sewing feet (normal accessories) 0 Standard presser foot Part no: 98-694 847-00 3 Blind-stitch foot Part no: 98-694 845-00 4 Zipper foot Part no: 98-694 843-00 1 Fancy stitch foot (model 1042) Part no: 98-745 804-00200 5 Buttonhole foot (models 1022, 1032) Part no: 98-694 882-00 R Buttonhole foot (model 1042) Part no: 98-745 801-00/900 Screwdriver Part no: 93-040 971-41 Bobbins Part no: 93-040 970-45 Machine oil Part no: 93-035 910-91 Knife Part no: 99-053 016-91 Needle system 130/705 H Part no: 48-020 804-32 54

Owner's Manual
Page 66
Note: Turn the handwheel (7) until the needle is maintenance-free and must not be oiled at its highest position. Maintenance and troubleshooting Removing the hook Pull the hook cover ring out towards you. You can now remove the hook. 62 Cleaning and oiling • Clean the hook race with the brush. • Place one drop of oil into the hook race (every 15-20 hours of the hook race. The machine is at any other points. Switch off the master switch (12). Take out the bobbin case. To unlock the hook, fold open the black bar of operation).
Note: Turn the handwheel (7) until the needle is maintenance-free and must not be oiled at its highest position. Maintenance and troubleshooting Removing the hook Pull the hook cover ring out towards you. You can now remove the hook. 62 Cleaning and oiling • Clean the hook race with the brush. • Place one drop of oil into the hook race (every 15-20 hours of the hook race. The machine is at any other points. Switch off the master switch (12). Take out the bobbin case. To unlock the hook, fold open the black bar of operation).

Owner's Manual
Page 68
...Problem/Cause 1. Use needle system 130/705 H. Use a larger needle. 2. Thread is poor or has slubs in use. Use needle with brush. 6. The bobbin case is too thick, slubbed or hard. Only guide the fabric lightly. Thread is not properly inserted. Only use good quality threads. The machine does... in . Insert new needle. See needle table (Page 59, 60). Pull lightly on the end of fabric. The seam is secure. 4. The bobbin thread is running with difÀculty There are thread remnants in the hook ways. Check the needle thread tension. 5. The machine is unevenly wound...
...Problem/Cause 1. Use needle system 130/705 H. Use a larger needle. 2. Thread is poor or has slubs in use. Use needle with brush. 6. The bobbin case is too thick, slubbed or hard. Only guide the fabric lightly. Thread is not properly inserted. Only use good quality threads. The machine does... in . Insert new needle. See needle table (Page 59, 60). Pull lightly on the end of fabric. The seam is secure. 4. The bobbin thread is running with difÀculty There are thread remnants in the hook ways. Check the needle thread tension. 5. The machine is unevenly wound...

