

Owner's Manual
Page 2
..., turn all controls to the off ("0") when making any object into water. Replace bulb with IEC/EN 60335-2-28 and UL1594 IMPORTANT SAFETY INSTRUCTIONS When using this sewing machine from all instructions before relamping. To reduce the risk of burns, Àre, electric shock, or injury to persons: • Do not allow to...
..., turn all controls to the off ("0") when making any object into water. Replace bulb with IEC/EN 60335-2-28 and UL1594 IMPORTANT SAFETY INSTRUCTIONS When using this sewing machine from all instructions before relamping. To reduce the risk of burns, Àre, electric shock, or injury to persons: • Do not allow to...

Owner's Manual
Page 3
... questions, just ask your machine can do and make sewing much easier for fun hobby Congratulations! It is certainly time well spent, and is the best way to assist you with help or advice. Sewing for you. Before you start sewing, please take the time ...sewing machine is as simple to operate as this instruction manual is sure to read these instructions carefully. Your new sewing machine features the very latest in design and technology. We wish you have bought a quality product made by Pfaff which will be happy to find out just what your Pfaff dealer, who will make full use...
... questions, just ask your machine can do and make sewing much easier for fun hobby Congratulations! It is certainly time well spent, and is the best way to assist you with help or advice. Sewing for you. Before you start sewing, please take the time ...sewing machine is as simple to operate as this instruction manual is sure to read these instructions carefully. Your new sewing machine features the very latest in design and technology. We wish you have bought a quality product made by Pfaff which will be happy to find out just what your Pfaff dealer, who will make full use...

Owner's Manual
Page 14
...carrying handle of the sewing machine from dust and damage during transport. Make sure the sewing machine symbol on the carrying case is pointing toward you. 220 V 10 120 V Electrical connection Connect the plug of the basic equipment, protects your sewing machine from behind. The machine is turned on. ...Carrying case The carrying case, which is regulated by pressing the foot pedal. Master switch The sewing lamp lights up the carrying handle. For this sewing machine has to sew. The sewing speed is part of the foot pedal to the connection bushing (11) on the carrying case,...
...carrying handle of the sewing machine from dust and damage during transport. Make sure the sewing machine symbol on the carrying case is pointing toward you. 220 V 10 120 V Electrical connection Connect the plug of the basic equipment, protects your sewing machine from behind. The machine is turned on. ...Carrying case The carrying case, which is regulated by pressing the foot pedal. Master switch The sewing lamp lights up the carrying handle. For this sewing machine has to sew. The sewing speed is part of the foot pedal to the connection bushing (11) on the carrying case,...
Owner's Manual
Page 24
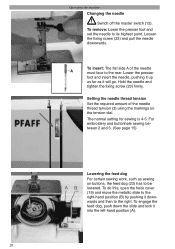
... foot and set the needle to the rear. For embroidery and buttonhole sewing between 2 and 3. (See page 15) AB Lowering the feed dog For certain sewing work, such as it into the left-hand position (A). 20 Operating the machine Changing the needle Switch off the master switch (12). Setting the needle... it will go. Lower the presser foot and insert the needle, pushing it up as far as sewing on the tension dial. To insert: The Áat side A of the needle thread tension (3) using the markings on buttons, the feed dog (22) has to the right. The normal setting for...
... foot and set the needle to the rear. For embroidery and buttonhole sewing between 2 and 3. (See page 15) AB Lowering the feed dog For certain sewing work, such as it into the left-hand position (A). 20 Operating the machine Changing the needle Switch off the master switch (12). Setting the needle... it will go. Lower the presser foot and insert the needle, pushing it up as far as sewing on the tension dial. To insert: The Áat side A of the needle thread tension (3) using the markings on buttons, the feed dog (22) has to the right. The normal setting for...
Owner's Manual
Page 25
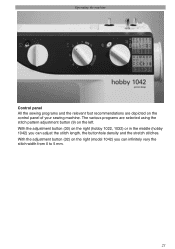
With the adjustment button (30) on the right (model 1042) you can in the middle (hobby 1042) you can adjust the stitch length, the buttonhole density and the stretch stitches. With the adjustment button (32) on the right (hobby 1022, 1032) or in Ànitely vary the stitch width from 0 to 5 mm. 21 Operating the machine Control panel All the sewing programs and the relevant foot recommendations are selected using the stitch pattern adjustment button (9) on the control panel of your sewing machine. The various programs are depicted on the left.
With the adjustment button (30) on the right (model 1042) you can in the middle (hobby 1042) you can adjust the stitch length, the buttonhole density and the stretch stitches. With the adjustment button (32) on the right (hobby 1022, 1032) or in Ànitely vary the stitch width from 0 to 5 mm. 21 Operating the machine Control panel All the sewing programs and the relevant foot recommendations are selected using the stitch pattern adjustment button (9) on the control panel of your sewing machine. The various programs are depicted on the left.

Owner's Manual
Page 26
The lower value shows you can sew with your machine are illustrated in the adjustment Àeld (4). Setting fancy stitches (model 1042 only) Using the stitch pattern adjustment button (9) select the fancy stitches M-P. Note: For embroidering use the clear view foot. 22 Operating the machine Setting utility stitches All stitch patterns that you can set the desired...
The lower value shows you can sew with your machine are illustrated in the adjustment Àeld (4). Setting fancy stitches (model 1042 only) Using the stitch pattern adjustment button (9) select the fancy stitches M-P. Note: For embroidering use the clear view foot. 22 Operating the machine Setting utility stitches All stitch patterns that you can set the desired...
Owner's Manual
Page 37
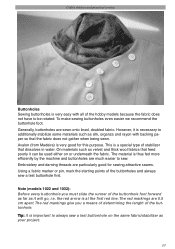
..., it is necessary to additionally stabilize some materials such as silk, organza and rayon with all of the hobby models because the fabric does not have to be used either on the same fabric/stabilizer as your project. 33 The red markings give you must slide the runner...markings are sewn onto lined, doubled fabric. The material is thus fed more efÀciently by the machine and buttonholes are particularly good for this purpose. Avalon (from Madeira) is very good for sewing attractive seams. Using a fabric marker or pin, mark the starting points of the buttonhole. To make...
..., it is necessary to additionally stabilize some materials such as silk, organza and rayon with all of the hobby models because the fabric does not have to be used either on the same fabric/stabilizer as your project. 33 The red markings give you must slide the runner...markings are sewn onto lined, doubled fabric. The material is thus fed more efÀciently by the machine and buttonholes are particularly good for this purpose. Avalon (from Madeira) is very good for sewing attractive seams. Using a fabric marker or pin, mark the starting points of the buttonhole. To make...

Owner's Manual
Page 39
...as far as it will go. • Attach the buttonhole foot R. 35 Set the required stitch width using the stitch width adjustment button (32). Push the button holder apart. Set the machine: Stitch A Stitch length at "buttonhole" symbol • Place the button on the fabric and mark ...the upper and lower point to 2.5 cm (1ß) can be placed in the special buttonhole foot R. Utility stitches and practical sewing 1 step buttonhole (model 1042) For the 1 step ...
...as far as it will go. • Attach the buttonhole foot R. 35 Set the required stitch width using the stitch width adjustment button (32). Push the button holder apart. Set the machine: Stitch A Stitch length at "buttonhole" symbol • Place the button on the fabric and mark ...the upper and lower point to 2.5 cm (1ß) can be placed in the special buttonhole foot R. Utility stitches and practical sewing 1 step buttonhole (model 1042) For the 1 step ...
Owner's Manual
Page 54
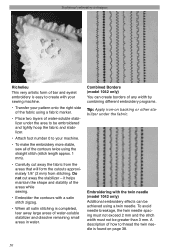
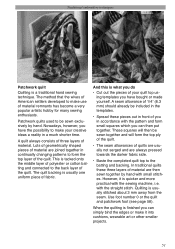
... embroidery techniques Richelieu This very artistic form of bar and eyelet embroidery is easy to create with your sewing machine. • Transfer your pattern onto the right side of the fabric using a fabric marker. • Place two layers of water-soluble stabilizer under the area to be embroidered...contours twice using a twin needle. Do not cut away the fabric from the areas that will form the cutouts approximately 1/8ß (2 mm) from stitching. it helps maintain the shape and stability of the areas while sewing. • Embroider the contours with the twin needle (model 1042 only) ...
... embroidery techniques Richelieu This very artistic form of bar and eyelet embroidery is easy to create with your sewing machine. • Transfer your pattern onto the right side of the fabric using a fabric marker. • Place two layers of water-soluble stabilizer under the area to be embroidered...contours twice using a twin needle. Do not cut away the fabric from the areas that will form the cutouts approximately 1/8ß (2 mm) from stitching. it helps maintain the shape and stability of the areas while sewing. • Embroider the contours with the twin needle (model 1042 only) ...
Owner's Manual
Page 55
...layers of material are joined together in a much shorter time. In traditional quilts these pieces out in front of you in accordance with the sewing machine, i.e. A seam allowance of 1/4ß (6.3 mm) should already be sewn exclusively by hand with the straight stitch. Nowadays, however, you...practical with the pattern and form small squares which you can simply bind the edges or make use of material remnants has become a very popular artistic hobby for many sewing enthusiasts. Quilting is usually one uniform piece of fabric. When the quilting is tacked onto ...
...layers of material are joined together in a much shorter time. In traditional quilts these pieces out in front of you in accordance with the sewing machine, i.e. A seam allowance of 1/4ß (6.3 mm) should already be sewn exclusively by hand with the straight stitch. Nowadays, however, you...practical with the pattern and form small squares which you can simply bind the edges or make use of material remnants has become a very popular artistic hobby for many sewing enthusiasts. Quilting is usually one uniform piece of fabric. When the quilting is tacked onto ...

Owner's Manual
Page 68
... not attempt to the hook. Needle breaks off . When leaving the machine, even for thread. This is unevenly wound. The machine skips stitches The needle is in . Maintenance and troubleshooting Sewing problems and their solutions Problem/Cause 1. Wrong needle is not properly inserted. Use needle with large eye (system 130 N). 3. Pull lightly on the...
... not attempt to the hook. Needle breaks off . When leaving the machine, even for thread. This is unevenly wound. The machine skips stitches The needle is in . Maintenance and troubleshooting Sewing problems and their solutions Problem/Cause 1. Wrong needle is not properly inserted. Use needle with large eye (system 130 N). 3. Pull lightly on the...


