

Owner's Manual
Page 3
Parts of the sewing machine hobby 1016 1 Thread guide 2 Bobbin winder tension 3 Needle thread tension 4 Adjustment field 5 Spool holder 6 Bobbin winder 7 Handwheel 8 Stitch pattern chart with presser foot 9 Pattern adjustment button 10 ... Detachable work support with accessory box 14 Needle plate 15 Thread guide 16 Thread guide 17 Thread cutter 18 Threading slot 19 Hook cover (enclosing sewing hook) 20 Presser foot holder with presser foot 21 Free-arm 22 Feed dog 23 Needle holder with fixing screw 25 Thread guide 26 Presser...
Parts of the sewing machine hobby 1016 1 Thread guide 2 Bobbin winder tension 3 Needle thread tension 4 Adjustment field 5 Spool holder 6 Bobbin winder 7 Handwheel 8 Stitch pattern chart with presser foot 9 Pattern adjustment button 10 ... Detachable work support with accessory box 14 Needle plate 15 Thread guide 16 Thread guide 17 Thread cutter 18 Threading slot 19 Hook cover (enclosing sewing hook) 20 Presser foot holder with presser foot 21 Free-arm 22 Feed dog 23 Needle holder with fixing screw 25 Thread guide 26 Presser...
Owner's Manual
Page 5
...find out just what your very own fashion ideas. If you have bought a quality product made hours by of all its features. Your sewing machThe is as simple to operate as this instruction manual is sure to assist you with help or advice. You have any further questions,... just ask your Pfaff dealer, who will make full use of Pfaff which will be happy to bring sewing pleasure. Sewing for you. Furthermore, it has numerous practical features which is to read these instructions carefully. Your...
...find out just what your very own fashion ideas. If you have bought a quality product made hours by of all its features. Your sewing machThe is as simple to operate as this instruction manual is sure to assist you with help or advice. You have any further questions,... just ask your Pfaff dealer, who will make full use of Pfaff which will be happy to bring sewing pleasure. Sewing for you. Furthermore, it has numerous practical features which is to read these instructions carefully. Your...
Owner's Manual
Page 6
...also observe the general safety notes on cord. KEEP THESE NSTRUCTONS N A SAFE PLACE IMPORTANT SAFETY NSTRUCTONS For the United States only This sewing machine is designed and manufactured use an electric appliance, the following basic safety for HOUSEHOLD use bent or blunt needles. Do not reach for.... Do not place in this manual. Do not operate where aerosol (spray) products are being used or where oxygen is required around the sewing machine needle. 12. Do not allow to off (0") needle, when making any air openings blocked. Never drop or insert anything into water ...
...also observe the general safety notes on cord. KEEP THESE NSTRUCTONS N A SAFE PLACE IMPORTANT SAFETY NSTRUCTONS For the United States only This sewing machine is designed and manufactured use an electric appliance, the following basic safety for HOUSEHOLD use bent or blunt needles. Do not reach for.... Do not place in this manual. Do not operate where aerosol (spray) products are being used or where oxygen is required around the sewing machine needle. 12. Do not allow to off (0") needle, when making any air openings blocked. Never drop or insert anything into water ...
Owner's Manual
Page 7
... controlled foot control can reach up -and-down movement of elec tronic appliances such as petrol (gas) or low-viscosity che micals for domestic sewing machines The machines meet the relevant safety requirements. 1. The user must be used properly, the temperature of the outer components of 1- 4 %.... permitted in the direct vicinity of the needle and constantly observe the sewing area during mainte- Treatment Always avoid damage to use at a low speed is installed in the home. nance work . 2. An authorized PFAFF mechanic only must be made to the up to interference, but it...
... controlled foot control can reach up -and-down movement of elec tronic appliances such as petrol (gas) or low-viscosity che micals for domestic sewing machines The machines meet the relevant safety requirements. 1. The user must be used properly, the temperature of the outer components of 1- 4 %.... permitted in the direct vicinity of the needle and constantly observe the sewing area during mainte- Treatment Always avoid damage to use at a low speed is installed in the home. nance work . 2. An authorized PFAFF mechanic only must be made to the up to interference, but it...

Owner's Manual
Page 8
...the bobbin thread 31 L 9 Lace-work 35 16 Linen buttonhole 27 Linen buttonhole with the straight stitch 30 26-27 General sewing aids 22 24 H Handwheel. Index A Accessories and needles Accessory compartment B Bias tape binder Bobbin case Bobbin thread tension Buttonholes ...Buttons C Changing the needle Changing the sewing lamp Cleaning and oiling Control panel Cording foot hobby - Sewingforfun F 41 Feed dog, lowering 18 9 Felling foot 45 Foot control 8 Free arm 9 44 12-...
...the bobbin thread 31 L 9 Lace-work 35 16 Linen buttonhole 27 Linen buttonhole with the straight stitch 30 26-27 General sewing aids 22 24 H Handwheel. Index A Accessories and needles Accessory compartment B Bias tape binder Bobbin case Bobbin thread tension Buttonholes ...Buttons C Changing the needle Changing the sewing lamp Cleaning and oiling Control panel Cording foot hobby - Sewingforfun F 41 Feed dog, lowering 18 9 Felling foot 45 Foot control 8 Free arm 9 44 12-...
Owner's Manual
Page 9
... 47-48 51 22 50 39-40 21 15 46 31 20 38 34 44 Setting utility stitches 20 Sewing feet (normal accessories) 42 Sewing feet (special accessories) 43 Sewing lamp 51 Sewing on patches 31 Sewing problems and their solutions 52 Shell edging 36 Smocking 29 Special accessories chart 43 Spool placement 10 Stitch... zigzag stitch z 2 Zigzag stitch 23 Zippers 23 32-33 N Needle charts Needle plate, removing Needle thread tension O Oiling the machine Optional accessories p Patchwork quilt Practical sewing Presser bar lifter o Quilt and patchwork foot R Repairing tears Reverse...
... 47-48 51 22 50 39-40 21 15 46 31 20 38 34 44 Setting utility stitches 20 Sewing feet (normal accessories) 42 Sewing feet (special accessories) 43 Sewing lamp 51 Sewing on patches 31 Sewing problems and their solutions 52 Shell edging 36 Smocking 29 Special accessories chart 43 Spool placement 10 Stitch... zigzag stitch z 2 Zigzag stitch 23 Zippers 23 32-33 N Needle charts Needle plate, removing Needle thread tension O Oiling the machine Optional accessories p Patchwork quilt Practical sewing Presser bar lifter o Quilt and patchwork foot R Repairing tears Reverse...
Owner's Manual
Page 10
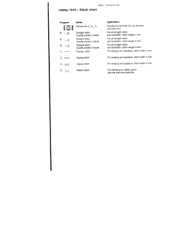
Elastic stitch Application Standard buttonhole for fun hobby 1016- blouses and bed linen For all straight stitch and lockstitch, stitch length 1 mm For all straight stitch and lockstitch, stitch length 2 mm For all straight ... chart Program 1 23 B 83 9 C, -"-"--" Name Buttonhole A3 A 42 A1 Straight stitch needle position middle Straight stitch needle position middle Straight stitch needle position middle Zigzag- Sewing for e.g. hobby -
Elastic stitch Application Standard buttonhole for fun hobby 1016- blouses and bed linen For all straight stitch and lockstitch, stitch length 1 mm For all straight stitch and lockstitch, stitch length 2 mm For all straight ... chart Program 1 23 B 83 9 C, -"-"--" Name Buttonhole A3 A 42 A1 Straight stitch needle position middle Straight stitch needle position middle Straight stitch needle position middle Zigzag- Sewing for e.g. hobby -
Owner's Manual
Page 12
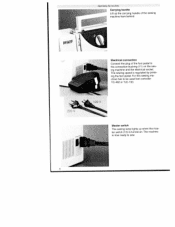
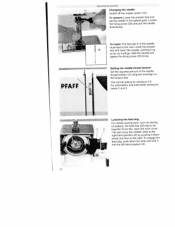
Electrical connection Connect the plug of the foot pedal to be used foot controller YC-482 or TJC-1 50. 220 V Master switch The sewing lamp lights up the carrying handle of the sewing machine from behind. For this sewing ma chine has to the connection bushing (11) on . The machine is regulated by press ing the foot pedal. The sewing speed is now ready to sew. 8 pFFF Operating the machine Carrying handle Lift up when the mas ter switch (12) is turned on the sew ing machine and the electrical socket.
Electrical connection Connect the plug of the foot pedal to be used foot controller YC-482 or TJC-1 50. 220 V Master switch The sewing lamp lights up the carrying handle of the sewing machine from behind. For this sewing ma chine has to the connection bushing (11) on . The machine is regulated by press ing the foot pedal. The sewing speed is now ready to sew. 8 pFFF Operating the machine Carrying handle Lift up when the mas ter switch (12) is turned on the sew ing machine and the electrical socket.
Owner's Manual
Page 13
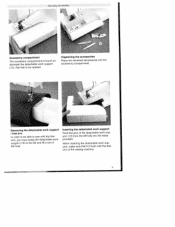
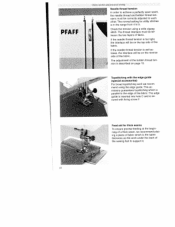
When inserting the detachable work sup port, make sure that has to be able to sew with the free arm of the sewing machine. 9 Inserting the detachable work support Push the pins of the detachable work support (13> to be opened. Operating the machine ) Accessory compartment The accessory ...
When inserting the detachable work sup port, make sure that has to be able to sew with the free arm of the sewing machine. 9 Inserting the detachable work support Push the pins of the detachable work support (13> to be opened. Operating the machine ) Accessory compartment The accessory ...
Owner's Manual
Page 16
... of the bobbin case and pull the bobbin case out. Release the latch and take out the empty bobbin. The following is valid for general sewing work: Thread interlace is visible on the top side of the fabric: • The needle thread tension is too tight or the bobbin thread tension...
... of the bobbin case and pull the bobbin case out. Release the latch and take out the empty bobbin. The following is valid for general sewing work: Thread interlace is visible on the top side of the fabric: • The needle thread tension is too tight or the bobbin thread tension...
Owner's Manual
Page 17
... case. Turn setting screw C just a little to the right to decrease the bobbin thread ten sion. The bobbin case must not fall out of the sewing hook. Checking the bobbin thread tension Hold the thread protruding from the accesso ries, turn setting screw C just a little to the left to increase the...
... case. Turn setting screw C just a little to the right to decrease the bobbin thread ten sion. The bobbin case must not fall out of the sewing hook. Checking the bobbin thread tension Hold the thread protruding from the accesso ries, turn setting screw C just a little to the left to increase the...
Owner's Manual
Page 22
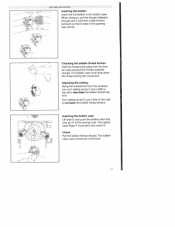
... the needle Switch off the master switch (12). To remove: Lower the presser foot and set the needle to the rear. The normal setting for sewing is 4-5. Loosen the fixing screw (23) and pull the needle downwards. To do this, open the hook cover (19) and move the metallic slide to... be tween 2 and 3. J PFAFF To insert: The flat side A of the needle thread tension (3) using the markings on buttons, the feed dog (22) has to the right-hand position...
... the needle Switch off the master switch (12). To remove: Lower the presser foot and set the needle to the rear. The normal setting for sewing is 4-5. Loosen the fixing screw (23) and pull the needle downwards. To do this, open the hook cover (19) and move the metallic slide to... be tween 2 and 3. J PFAFF To insert: The flat side A of the needle thread tension (3) using the markings on buttons, the feed dog (22) has to the right-hand position...
Owner's Manual
Page 23
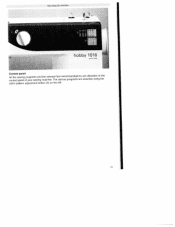
The various programs are are depicted on the selected using the stitch pattern adjustment button (9) on the left. '9 hobby 1016 Control panel All the sewing programs and control panel of your sewing the relevant foot recommendations machine. Operating the machine -
The various programs are are depicted on the selected using the stitch pattern adjustment button (9) on the left. '9 hobby 1016 Control panel All the sewing programs and control panel of your sewing the relevant foot recommendations machine. Operating the machine -
Owner's Manual
Page 24
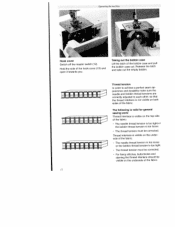
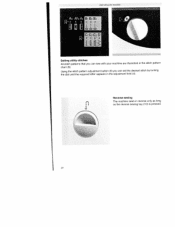
Reverse sewing The machine sews in the adjustment field (4). Operating the machine Setting utitity stitches All stitch patterns that you can sew with your machine are illustrated in the stitch pattern chart (8). Using the stitch pattern adjustment button (9) you can set the desired stitch by turning the dial until the required letter appears in reverse only as long as the reverse sewing key (10) is pressed. 20
Reverse sewing The machine sews in the adjustment field (4). Operating the machine Setting utitity stitches All stitch patterns that you can sew with your machine are illustrated in the stitch pattern chart (8). Using the stitch pattern adjustment button (9) you can set the desired stitch by turning the dial until the required letter appears in reverse only as long as the reverse sewing key (10) is pressed. 20
Owner's Manual
Page 25
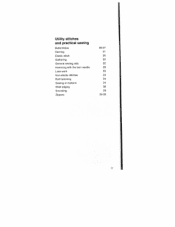
Utility stitches and practical sewing Buttonholes Darning Elastic stitch Gathering General sewing aids Hemming with the twin needle Lace work Non-elastic stitches Roll hemming Sewing on buttons Shell edging Smocking Zippers 26-27 31 25 30 22 28 35 23 34 24 36 29 32 33 2?
Utility stitches and practical sewing Buttonholes Darning Elastic stitch Gathering General sewing aids Hemming with the twin needle Lace work Non-elastic stitches Roll hemming Sewing on buttons Shell edging Smocking Zippers 26-27 31 25 30 22 28 35 23 34 24 36 29 32 33 2?
Owner's Manual
Page 26
...edge guide is inserted into hole C and is se cured with the edge guide (special accessories) For broad topstitching work under the back of the sewing toot to the edge of the fabric. If the needle thread tension is parallel to support it. 22 This ac cessory guarantees topstitching which is...seams To ensure precise feeding at the begin ning of a thick seam, we recom mend using a wide zigzag stitch. j P FA F F Utility stitches wid pruc&aI sewing Needle thread tension In order to achieve a perfectly sewn seam, the needle thread and bobbin thread ten sions must be between the two layers of...
...edge guide is inserted into hole C and is se cured with the edge guide (special accessories) For broad topstitching work under the back of the sewing toot to the edge of the fabric. If the needle thread tension is parallel to support it. 22 This ac cessory guarantees topstitching which is...seams To ensure precise feeding at the begin ning of a thick seam, we recom mend using a wide zigzag stitch. j P FA F F Utility stitches wid pruc&aI sewing Needle thread tension In order to achieve a perfectly sewn seam, the needle thread and bobbin thread ten sions must be between the two layers of...

Owner's Manual
Page 27
... 03: stitch length 1.5 mm; stitch width 5 mm Tip: Blind stitch foot no. 3 is the basic straight stitch in center needle position. Utility titches and practical sewing 4 r. This ensures a good, smooth seam. Use adjustment button to select: B: stitch length 1 mm B 2 : stitch length 2 mm B: stitch length 4 mm Zigzag stitch C: stitch length 0.5 mm; While...
... 03: stitch length 1.5 mm; stitch width 5 mm Tip: Blind stitch foot no. 3 is the basic straight stitch in center needle position. Utility titches and practical sewing 4 r. This ensures a good, smooth seam. Use adjustment button to select: B: stitch length 1 mm B 2 : stitch length 2 mm B: stitch length 4 mm Zigzag stitch C: stitch length 0.5 mm; While...

Owner's Manual
Page 28
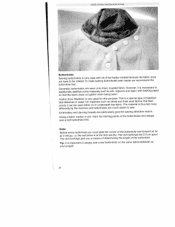
Select the 4 mm zigzag stitch, stitch 02, by turning the stitch adjustment button (9). Utility stitches wtd practtctd sewing fi Sewing on buttons For sewing on this page. • Remove the match and pull the fabric and the button apart. • Wrap the shank with a thread shank • Attach the presser foot. • Place a match between the holes in the button and sew as described in the left hand column on buttons, the presser foot must be removed and the feed dog must be lowered (ci. Sewing on buttons with the sewing thread and knot it. 24 page 20).
Select the 4 mm zigzag stitch, stitch 02, by turning the stitch adjustment button (9). Utility stitches wtd practtctd sewing fi Sewing on buttons For sewing on this page. • Remove the match and pull the fabric and the button apart. • Wrap the shank with a thread shank • Attach the presser foot. • Place a match between the holes in the button and sew as described in the left hand column on buttons, the presser foot must be removed and the feed dog must be lowered (ci. Sewing on buttons with the sewing thread and knot it. 24 page 20).
Owner's Manual
Page 29
... stitch is sewn onto the prepared edge with the 4 4 mm long straight stitch (c.f. You may find it easier to han dle if you sew. • Overlap the ends slightly and secure with the elastic stitch. • On skirts and pants (trousers) the elastic is used for... sewing on underwear; Utility stiteiws and prarticai sewing Elastic stitch Stitch D Because of its edge. • If needed, gather the fabric edge with the elastic stitch. 25 on elastic band...
... stitch is sewn onto the prepared edge with the 4 4 mm long straight stitch (c.f. You may find it easier to han dle if you sew. • Overlap the ends slightly and secure with the elastic stitch. • On skirts and pants (trousers) the elastic is used for... sewing on underwear; Utility stiteiws and prarticai sewing Elastic stitch Stitch D Because of its edge. • If needed, gather the fabric edge with the elastic stitch. 25 on elastic band...
Owner's Manual
Page 30
... are additionally stabilize some sewn onto lined, doubled fabric, However, materials such as far apart. Tip: It is important to always sew a test buttonhole on or underneath the fabric. thick The wool fabrics that the fabric does not gather when being sewn. of the... hobby models because the fabric buttonholes even easier we recommend does the buttonhole foot. very easy with backing paper so that feed material is very good for sewing attractive seams. Using a fabric marker or pin, mark the starting...
... are additionally stabilize some sewn onto lined, doubled fabric, However, materials such as far apart. Tip: It is important to always sew a test buttonhole on or underneath the fabric. thick The wool fabrics that the fabric does not gather when being sewn. of the... hobby models because the fabric buttonholes even easier we recommend does the buttonhole foot. very easy with backing paper so that feed material is very good for sewing attractive seams. Using a fabric marker or pin, mark the starting...


