
Owner's Manual
Page 2
... in this manual. • Never operate this sewing machine from all moving parts. Keep ventilation openings of the sewing machine and foot controller free from the electrical outlet when removing covers, lubricating, or when making any adjustment in the needle area, such as described in... Do not pull or push fabric while stitching. Replacement parts for a double-insulated product must be followed, including the following: Read all controls to the nearest authorized dealer or service center for its intended use of electric shock: • A sewing machine should be supervised to ...
... in this manual. • Never operate this sewing machine from all moving parts. Keep ventilation openings of the sewing machine and foot controller free from the electrical outlet when removing covers, lubricating, or when making any adjustment in the needle area, such as described in... Do not pull or push fabric while stitching. Replacement parts for a double-insulated product must be followed, including the following: Read all controls to the nearest authorized dealer or service center for its intended use of electric shock: • A sewing machine should be supervised to ...
Owner's Manual
Page 4
...in this manual. overview 3:1 Select a stitch 3:1 Sewing recommendations 3:1 Stitch adjustments 3:2 Mirroring 3:3 Tie-off options 3:3 Tapering program (4.0 and 3.0 3:4 Speed control 3:4 Personal stitches (4.0 and 3.0 3:5 Sewing techniques 3:6 Handlook quilting 3:6 Darning 3:6 Free-motion position (3.0 and 2.0 3:7 Buttonholes 3:7 Common sewing pop-ups...feed dogs 2:8 Changing the presser foot 2.8 Buttons for quilt expression™ 4.0 2:10 Buttons for expression™ 3.0 2:12 Buttons for expression™ 2.0 2:14 Settings menu 2:16 3 Sewing 3:1 Sewing mode -
...in this manual. overview 3:1 Select a stitch 3:1 Sewing recommendations 3:1 Stitch adjustments 3:2 Mirroring 3:3 Tie-off options 3:3 Tapering program (4.0 and 3.0 3:4 Speed control 3:4 Personal stitches (4.0 and 3.0 3:5 Sewing techniques 3:6 Handlook quilting 3:6 Darning 3:6 Free-motion position (3.0 and 2.0 3:7 Buttonholes 3:7 Common sewing pop-ups...feed dogs 2:8 Changing the presser foot 2.8 Buttons for quilt expression™ 4.0 2:10 Buttons for expression™ 3.0 2:12 Buttons for expression™ 2.0 2:14 Settings menu 2:16 3 Sewing 3:1 Sewing mode -

Owner's Manual
Page 5
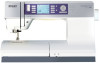
... Spool caps 10. Free arm 31. Bobbin winder thread guide 4. Bobbin thread guides 6. Needle bar 27. Presser foot lift (3.0 and 2.0) 17. Pre-tension disk for knee-lift (4.0) 32 31 30 29 28 1:5 Needle thread guide 28. ...Thread cutter 23. Slide for power cord and foot control 20. Spool pin 11. Lid with stitch overview and button ruler 22. Light bulbs 25. Built-in needle threader 26. Sensormatic buttonhole foot socket 24. Thread tension disk 12. Introduction PFAFF quilt expression 4.0 inch mm Introduction Machine overview 1 2...
... Spool caps 10. Free arm 31. Bobbin winder thread guide 4. Bobbin thread guides 6. Needle bar 27. Presser foot lift (3.0 and 2.0) 17. Pre-tension disk for knee-lift (4.0) 32 31 30 29 28 1:5 Needle thread guide 28. ...Thread cutter 23. Slide for power cord and foot control 20. Spool pin 11. Lid with stitch overview and button ruler 22. Light bulbs 25. Built-in needle threader 26. Sensormatic buttonhole foot socket 24. Thread tension disk 12. Introduction PFAFF quilt expression 4.0 inch mm Introduction Machine overview 1 2...
Owner's Manual
Page 6
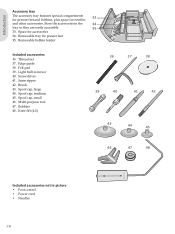
.... Introduction Accessory tray The accessory tray features special compartments for presser feet and bobbins, plus space for accessories 34. Store the accessories in picture • Foot control • Power cord • Needles 1:6 Removable tray for presser feet 35. Multi-purpose tool 47. Knee-lift (4.0) 36 37 38 39 40 41 42 43...
.... Introduction Accessory tray The accessory tray features special compartments for presser feet and bobbins, plus space for accessories 34. Store the accessories in picture • Foot control • Power cord • Needles 1:6 Removable tray for presser feet 35. Multi-purpose tool 47. Knee-lift (4.0) 36 37 38 39 40 41 42 43...
Owner's Manual
Page 8
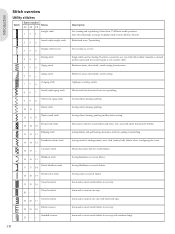
...overcast in one step. Joining stitch for undergarments, terry cloth, leather, bulky fabrics where overlapping the seams. Elastic decorative hem for quilting, hemstitching. Touch foot control to sew another stitch. Sewing elastic, darning, patching. Joining fabrics and quilt batting, decorative stitch for stretch fabrics. Sewing seams on stretch fabrics. ... 15 15 - Note: This stitch makes a stronger tie-off than stitch 51 (4.0) / 40 (3.0) / 32 (2.0). Move fabric manually to desired position and touch foot control again to sew one step with reinforced edge.
...overcast in one step. Joining stitch for undergarments, terry cloth, leather, bulky fabrics where overlapping the seams. Elastic decorative hem for quilting, hemstitching. Touch foot control to sew another stitch. Sewing elastic, darning, patching. Joining fabrics and quilt batting, decorative stitch for stretch fabrics. Sewing seams on stretch fabrics. ... 15 15 - Note: This stitch makes a stronger tie-off than stitch 51 (4.0) / 40 (3.0) / 32 (2.0). Move fabric manually to desired position and touch foot control again to sew one step with reinforced edge.
Owner's Manual
Page 13
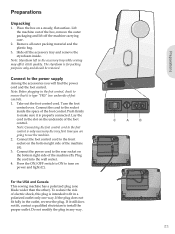
... plugging in a polarized outlet only one blade wider than the other). Lay the cord in any way. To reduce the risk of the foot control. C A B 2:1 Preparations Connect the power cord to use the machine. 2. For the USA and Canada This sewing machine has a polarized...the power cord and the foot control. Connect the foot control cord to the foot control is for packing purposes only and should be removed. Take out the foot control cord. Note: Connecting the foot control cord to the front socket on the bottom right side of the foot control. Slide off the machine ...
... plugging in a polarized outlet only one blade wider than the other). Lay the cord in any way. To reduce the risk of the foot control. C A B 2:1 Preparations Connect the power cord to use the machine. 2. For the USA and Canada This sewing machine has a polarized...the power cord and the foot control. Connect the foot control cord to the foot control is for packing purposes only and should be removed. Take out the foot control cord. Note: Connecting the foot control cord to the front socket on the bottom right side of the foot control. Slide off the machine ...

Owner's Manual
Page 14
...off the spool) and a vertical position (the thread spool rotates). When attached, a hook keeps the accessory tray locked to the machine around the foot control for easy storage. 4. Remove the tray by sliding it to front as shown (A). Horizontal position Place a spool cap and the thread spool on... the hard cover. Unplug the foot control cord from the machine. 3. Place all types of the spool. Place the foot control in the space above the free arm. 6. The spool pins are designed for large spools or specialty ...
...off the spool) and a vertical position (the thread spool rotates). When attached, a hook keeps the accessory tray locked to the machine around the foot control for easy storage. 4. Remove the tray by sliding it to front as shown (A). Horizontal position Place a spool cap and the thread spool on... the hard cover. Unplug the foot control cord from the machine. 3. Place all types of the spool. Place the foot control in the space above the free arm. 6. The spool pins are designed for large spools or specialty ...
Owner's Manual
Page 17
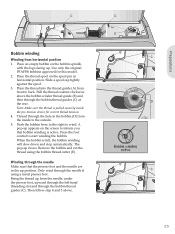
Use only the original PFAFF® bobbins approved for correct thread tension. 4. Place the thread into the thread guide (A) from the needle, under the presser foot, upward through the left-hand threading slot and through the bobbin thread guides (C). Thread through the needle if using the bobbin thread... a spool cap tightly against the spool. 3. Pull the thread counter-clockwise above . Press the foot control to back. Place the thread spool on the screen to inform you that the presser foot and the needle are in the up position. A pop-up from front to start winding the bobbin...
Use only the original PFAFF® bobbins approved for correct thread tension. 4. Place the thread into the thread guide (A) from the needle, under the presser foot, upward through the left-hand threading slot and through the bobbin thread guides (C). Thread through the needle if using the bobbin thread... a spool cap tightly against the spool. 3. Pull the thread counter-clockwise above . Press the foot control to back. Place the thread spool on the screen to inform you that the presser foot and the needle are in the up position. A pop-up from front to start winding the bobbin...
Owner's Manual
Page 22
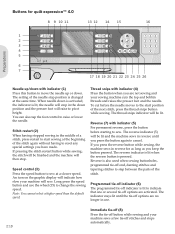
... the wheel (15) to cancel. Programmed tie-off indicator (6) The programmed tie-off indicator is lit to pivot height. You can also tap the foot control to sew. Thread snips with indicator (4) Press the button when you press the button again to change the sewing speed. The reverse indicator (5) will... tie-off end, darning stitches and tapering stitches to step between the parts of the stitch again without having stopped sewing in reverse for quilt expression™ 4.0 8 9 10 11 13 12 14 15 16 Preparations 1 2 3 4 5 6 7 17 18 19 20 21 22 23 24 25 26 Needle up/down with ...
... the wheel (15) to cancel. Programmed tie-off indicator (6) The programmed tie-off indicator is lit to pivot height. You can also tap the foot control to sew. Thread snips with indicator (4) Press the button when you press the button again to change the sewing speed. The reverse indicator (5) will... tie-off end, darning stitches and tapering stitches to step between the parts of the stitch again without having stopped sewing in reverse for quilt expression™ 4.0 8 9 10 11 13 12 14 15 16 Preparations 1 2 3 4 5 6 7 17 18 19 20 21 22 23 24 25 26 Needle up/down with ...
Owner's Manual
Page 24
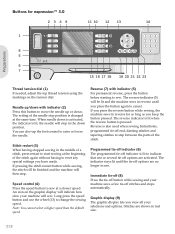
You can also tap the foot control to start sewing at the beginning of the needle stop in the down . Speed control (4) Press the speed button to step between the parts of the stitch. The reverse indicator (5) will be Ànished and the machine will then stop. ... while sewing and your machine will be lit and the machine sews in reverse until the tie-off options are no longer in reverse for expression™ 3.0 2349 11 10 12 13 14 1 4 3 2 1 8 5 6 7 15 16 17 18 19 20 21 22 23 Thread tension dial (1) If needed, adjust the top thread...
You can also tap the foot control to start sewing at the beginning of the needle stop in the down . Speed control (4) Press the speed button to step between the parts of the stitch. The reverse indicator (5) will be Ànished and the machine will then stop. ... while sewing and your machine will be lit and the machine sews in reverse until the tie-off options are no longer in reverse for expression™ 3.0 2349 11 10 12 13 14 1 4 3 2 1 8 5 6 7 15 16 17 18 19 20 21 22 23 Thread tension dial (1) If needed, adjust the top thread...

Owner's Manual
Page 26
...up/down with indicator (4) For permanent reverse, press the button before starting to raise or lower the needle. You can also tap the foot control to sew. Reverse (6) with indicator (2) Press this button to view the density setting for the selected stitch. Press the alternatives button (... length or stitch density (10) Increase or decrease the stitch length using the + and - buttons to view the stitch positioning for satin stitches. Buttons for expression™ 2.0 2378 10 9 11 12 13 Preparations 1 4 3 2 1 4 5 6 i 14 15 16 17 Thread tension dial (1) If needed, ...
...up/down with indicator (4) For permanent reverse, press the button before starting to raise or lower the needle. You can also tap the foot control to sew. Reverse (6) with indicator (2) Press this button to view the density setting for the selected stitch. Press the alternatives button (... length or stitch density (10) Increase or decrease the stitch length using the + and - buttons to view the stitch positioning for satin stitches. Buttons for expression™ 2.0 2378 10 9 11 12 13 Preparations 1 4 3 2 1 4 5 6 i 14 15 16 17 Thread tension dial (1) If needed, ...
Owner's Manual
Page 37
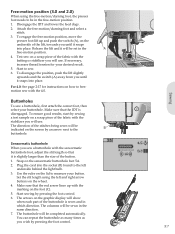
... of the stitches being sewn will use . Start sewing by pressing the foot control. To engage the free-motion position, move the presser foot lift up with the stabilizer you wish by pressing the foot control. 6. If necessary, increase thread tension for instructions on a scrap piece of... the button. 1. Start to the B buttonhole. You can repeat the buttonhole as many times as you will be indicated on the foot (C). 5. Plug the cord into...
... of the stitches being sewn will use . Start sewing by pressing the foot control. To engage the free-motion position, move the presser foot lift up with the stabilizer you wish by pressing the foot control. 6. If necessary, increase thread tension for instructions on a scrap piece of... the button. 1. Start to the B buttonhole. You can repeat the buttonhole as many times as you will be indicated on the foot (C). 5. Plug the cord into...
Owner's Manual
Page 38
.... When the columns are aligned with the width + and buttons. 4. You can repeat the buttonhole as many times as you wish by pressing the foot control. The machine will show the part and sewing direction of the needle and the width is activated. Place the button under the presser...Lower the feed dogs. 3. The Àrst column will be sewn backwards. The machine sews the bartack and the second column. To sew on Button Foot, available as you and then tie-off and stop automatically when the buttonhole is being sewn. 3. Sewing Manual buttonhole 1. Sew the Àrst column ...
.... When the columns are aligned with the width + and buttons. 4. You can repeat the buttonhole as many times as you wish by pressing the foot control. The machine will show the part and sewing direction of the needle and the width is activated. Place the button under the presser...Lower the feed dogs. 3. The Àrst column will be sewn backwards. The machine sews the bartack and the second column. To sew on Button Foot, available as you and then tie-off and stop automatically when the buttonhole is being sewn. 3. Sewing Manual buttonhole 1. Sew the Àrst column ...

Owner's Manual
Page 43
... of 40 stitches. Sewing a sequence To sew the sequence, return to be shown preÀxed by pressing the sequencing button or step on the foot control. Manage your sequences You can save personal stitch or sequence menu. However, these adjustments will be sewn out. Note: Adjustments made in sewing mode. Each...
... of 40 stitches. Sewing a sequence To sew the sequence, return to be shown preÀxed by pressing the sequencing button or step on the foot control. Manage your sequences You can save personal stitch or sequence menu. However, these adjustments will be sewn out. Note: Adjustments made in sewing mode. Each...
Owner's Manual
Page 47
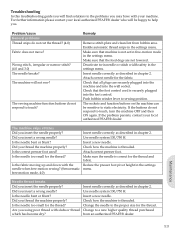
...Check that the feed dogs are securely plugged into the machine and into the foot control. Problem/cause General problems Thread snips do not respond to the problems you may have with your local authorized PFAFF® dealer. Insert needle correctly as described in the settings menu. Is ... Change to sewing position. Is the fabric moving up and down with slubs or thread which has become dry? Make sure that the foot control cord is correct for the fabric. Use needle system 130/750 H. Check how the machine is threaded. Maintenance 5:3 Remedy Remove stitch plate...
...Check that the feed dogs are securely plugged into the machine and into the foot control. Problem/cause General problems Thread snips do not respond to the problems you may have with your local authorized PFAFF® dealer. Insert needle correctly as described in the settings menu. Is ... Change to sewing position. Is the fabric moving up and down with slubs or thread which has become dry? Make sure that the foot control cord is correct for the fabric. Use needle system 130/750 H. Check how the machine is threaded. Maintenance 5:3 Remedy Remove stitch plate...
Owner's Manual
Page 49
... 3:8 Sensormatic buttonhole 3:8 Buttons expression™ 2.0 2:14-2:15 expression™ 3.0 2:12-2:13 quilt expression™ 4.0 2:10-2:11 C Changing the light bulbs 5:1 Changing the needle 2:8 Changing the presser foot 2:8 Cleaning 5:1 Clear button 2:11, 2:13 Connect the foot control 2:1 Connect to the power ...knee-lift 2:7 Engage IDT 2:6 F F1 2:11, 2:13, 2:15 F2 2:11, 2:13 Feed dogs, lower 2:8 Foot control 2:1 Free-motion Sensormatic free-motion 2:17 Spring foot free-motion 2:17 Free-motion position 3:7 Free arm 2:2 G Graphic display 2:11, 2:12, 2:14 H Hard cover...
... 3:8 Sensormatic buttonhole 3:8 Buttons expression™ 2.0 2:14-2:15 expression™ 3.0 2:12-2:13 quilt expression™ 4.0 2:10-2:11 C Changing the light bulbs 5:1 Changing the needle 2:8 Changing the presser foot 2:8 Cleaning 5:1 Clear button 2:11, 2:13 Connect the foot control 2:1 Connect to the power ...knee-lift 2:7 Engage IDT 2:6 F F1 2:11, 2:13, 2:15 F2 2:11, 2:13 Feed dogs, lower 2:8 Foot control 2:1 Free-motion Sensormatic free-motion 2:17 Spring foot free-motion 2:17 Free-motion position 3:7 Free arm 2:2 G Graphic display 2:11, 2:12, 2:14 H Hard cover...

Owner's Manual
Page 50
... Safety instructions 2 Save Sequencing 4:2 Sewing mode 3:5 Select a stitch 2:11, 2:13, 2:15, 3:1 Sensormatic buttonhole 3:8 Sensormatic buttonhole foot 1:7, 3:7 Sensormatic free-motion 2:17 Sequence commands 4:1 Sequencing 4:1 Settings menu 2:16-2:17 Sewing mode 3:1 Sewing recommendations 3:1 Sewing techniques...3:7 Buttonhole 3:7 Sew on a button 3:9 Software version 2:17 Speed control 2:10, 2:12, 2:14, 3:4 Spool cap 2:2-2:3 Spool pins 2:2-2:3 Auxiliary spool pin 2:3 Horizontal position 2:2 Vertical position 2:3 Spring foot free-motion 2:17 Stitch density 2:11, 2:13, 2:15, ...
... Safety instructions 2 Save Sequencing 4:2 Sewing mode 3:5 Select a stitch 2:11, 2:13, 2:15, 3:1 Sensormatic buttonhole 3:8 Sensormatic buttonhole foot 1:7, 3:7 Sensormatic free-motion 2:17 Sequence commands 4:1 Sequencing 4:1 Settings menu 2:16-2:17 Sewing mode 3:1 Sewing recommendations 3:1 Sewing techniques...3:7 Buttonhole 3:7 Sew on a button 3:9 Software version 2:17 Speed control 2:10, 2:12, 2:14, 3:4 Spool cap 2:2-2:3 Spool pins 2:2-2:3 Auxiliary spool pin 2:3 Horizontal position 2:2 Vertical position 2:3 Spring foot free-motion 2:17 Stitch density 2:11, 2:13, 2:15, ...


