Owner's Manual
Page 2
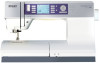
... on a double-insulated product, nor should always be identical to those parts in this manual. • Never operate this manual. WARNING - Keep ventilation openings of the sewing machine and foot controller free from the accumulation of lint, dust, and loose cloth. • Keep Àngers away from the electrical outlet when removing covers, lubricating, or when making any adjustment in the needle area, such as threading needle, changing needle, threading bobbin, or changing presser foot, etc...
... on a double-insulated product, nor should always be identical to those parts in this manual. • Never operate this manual. WARNING - Keep ventilation openings of the sewing machine and foot controller free from the accumulation of lint, dust, and loose cloth. • Keep Àngers away from the electrical outlet when removing covers, lubricating, or when making any adjustment in the needle area, such as threading needle, changing needle, threading bobbin, or changing presser foot, etc...
Owner's Manual
Page 4
...5 Maintenance 5:1 Changing the light bulbs 5:1 Cleaning the machine 5:1 Replacing the stitch plate 5:2 Troubleshooting 5:3 Index 5:5 Note: The machine models will be referred to the power supply 2:1 Pack away after sewing 2.2 Free arm 2:2 Thread cutter 2:2 Spool pins 2:2 Threading the machine 2:3 Bobbin winding 2:5 Inserting the bobbin 2:6 IDT (Integrated dual feed 2:6 Electronic knee-lift (4.0 2:7 Needles 2:7 Changing the needle 2:8 Lowering feed dogs 2:8 Changing the presser foot 2.8 Buttons for quilt expression™ 4.0 2:10 Buttons for expression...
...5 Maintenance 5:1 Changing the light bulbs 5:1 Cleaning the machine 5:1 Replacing the stitch plate 5:2 Troubleshooting 5:3 Index 5:5 Note: The machine models will be referred to the power supply 2:1 Pack away after sewing 2.2 Free arm 2:2 Thread cutter 2:2 Spool pins 2:2 Threading the machine 2:3 Bobbin winding 2:5 Inserting the bobbin 2:6 IDT (Integrated dual feed 2:6 Electronic knee-lift (4.0 2:7 Needles 2:7 Changing the needle 2:8 Lowering feed dogs 2:8 Changing the presser foot 2.8 Buttons for quilt expression™ 4.0 2:10 Buttons for expression...

Owner's Manual
Page 5
Thread cutter 23. Light bulbs 25. Bobbin thread guides 6. Built-in needle threader 26. Needle thread guide 28. Bobbin cover 30. IDT 14. Slide for knee-lift (4.0) 32 31 30 29 28 1:5 Threading slots winding 3. Bobbin winder thread guide 4. Sensormatic buttonhole foot socket 24. Stitch plate 29. Free arm 31. Buttons and graphic display 18. Needle bar 27. Spool caps 10. Presser foot lift (3.0 and 2.0) 17. Connection for lowering the feed dogs 21. Introduction PFAFF quilt expression 4.0 inch mm Introduction Machine overview 1 2 3 ...
Thread cutter 23. Light bulbs 25. Bobbin thread guides 6. Built-in needle threader 26. Needle thread guide 28. Bobbin cover 30. IDT 14. Slide for knee-lift (4.0) 32 31 30 29 28 1:5 Threading slots winding 3. Bobbin winder thread guide 4. Sensormatic buttonhole foot socket 24. Stitch plate 29. Free arm 31. Buttons and graphic display 18. Needle bar 27. Spool caps 10. Presser foot lift (3.0 and 2.0) 17. Connection for lowering the feed dogs 21. Introduction PFAFF quilt expression 4.0 inch mm Introduction Machine overview 1 2 3 ...

Owner's Manual
Page 7
... hole at the back of the presser foot holder. The "C-shaped" guide should be behind the needle bar. The long arm must be positioned around the presser foot bar. Introduction Presser feet Standard presser foot 0A with IDT (attached on the machine upon delivery) This foot is designed to ride along the fold of the hem edge. The red guide on the foot is used for straight stitching and zigzag stitching with a stitch length longer than 1.0mm stitch length, use this foot. Manual buttonhole foot 5M This foot...
... hole at the back of the presser foot holder. The "C-shaped" guide should be behind the needle bar. The long arm must be positioned around the presser foot bar. Introduction Presser feet Standard presser foot 0A with IDT (attached on the machine upon delivery) This foot is designed to ride along the fold of the hem edge. The red guide on the foot is used for straight stitching and zigzag stitching with a stitch length longer than 1.0mm stitch length, use this foot. Manual buttonhole foot 5M This foot...
Owner's Manual
Page 8
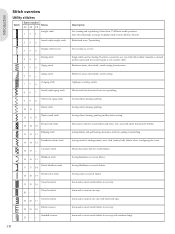
... Elastic decorative hem for basting. Sewing seams on stretch fabrics. Seam and overcast stretch fabrics in the bobbin. Touch foot control to sew another stitch. Seam and overcast stretch fabrics in one step. Single stitch used with reinforced edge. Seam and overcast stretch fabrics in one step with elastic thread in one stitch. Introduction Stitch overview Utility stitches Stitch number Stitch Name 4.0 3.0 2.0 Straight stitch 111 Stretch triple straight stitch 222 Straight stitch reverse 333 Basting stitch 444 Zigzag stitch 555 Zigzag stitch 66- Appliqu...
... Elastic decorative hem for basting. Sewing seams on stretch fabrics. Seam and overcast stretch fabrics in the bobbin. Touch foot control to sew another stitch. Seam and overcast stretch fabrics in one step. Single stitch used with reinforced edge. Seam and overcast stretch fabrics in one step with elastic thread in one stitch. Introduction Stitch overview Utility stitches Stitch number Stitch Name 4.0 3.0 2.0 Straight stitch 111 Stretch triple straight stitch 222 Straight stitch reverse 333 Basting stitch 444 Zigzag stitch 555 Zigzag stitch 66- Appliqu...

Owner's Manual
Page 16
... the bobbin winder thread guide (B) on the spool pin and Àt a spool cap of the right size. The hook pulls the thread through the needle eye and forms a loop behind the needle. Slide on the spool pin. 2. Place the second thread on a large spool cap and a felt pad. Make sure that one thread is inside the needle thread guide (F) and the other one thread to use the needle threader for twin needle Replace the sewing needle with a twin needle. Thread the needles. 2:4 H G C B A E D F B C Note: The needle threader...
... the bobbin winder thread guide (B) on the spool pin and Àt a spool cap of the right size. The hook pulls the thread through the needle eye and forms a loop behind the needle. Slide on the spool pin. 2. Place the second thread on a large spool cap and a felt pad. Make sure that one thread is inside the needle thread guide (F) and the other one thread to use the needle threader for twin needle Replace the sewing needle with a twin needle. Thread the needles. 2:4 H G C B A E D F B C Note: The needle threader...
Owner's Manual
Page 18
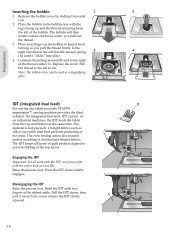
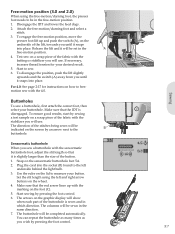
Inserting the bobbin 1 2 1. Pull the thread to the left into the tension spring 3 4 (A) until it engages. A C Preparations IDT (integrated dual feed) D For sewing any fabric precisely PFAFF® expression™ sewing machine provides the ideal solution: the integrated dual feed, IDT system. The IDT keeps all work with the IDT, use presser feet with the center back cut . Press the IDT down , then pull it "clicks" into place...
Inserting the bobbin 1 2 1. Pull the thread to the left into the tension spring 3 4 (A) until it engages. A C Preparations IDT (integrated dual feed) D For sewing any fabric precisely PFAFF® expression™ sewing machine provides the ideal solution: the integrated dual feed, IDT system. The IDT keeps all work with the IDT, use presser feet with the center back cut . Press the IDT down , then pull it "clicks" into place...
Owner's Manual
Page 19
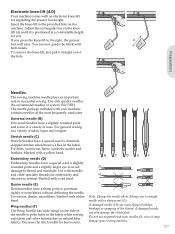
... threads for best results. Preparations Needles The sewing machine needle plays an important role in the provided hole on the side of the most frequently used sizes. For knits, swimwear, Áeece, synthetic suedes and leathers. Insert the knee-lift in successful sewing. Decrease the stitch width for embroidery and H decorative sewing. Do not use a straight needle with a blue band. Note: Change the needle often. Always use asymmetrical twin needles (I Denim needles...
... threads for best results. Preparations Needles The sewing machine needle plays an important role in the provided hole on the side of the most frequently used sizes. For knits, swimwear, Áeece, synthetic suedes and leathers. Insert the knee-lift in successful sewing. Decrease the stitch width for embroidery and H decorative sewing. Do not use a straight needle with a blue band. Note: Change the needle often. Always use asymmetrical twin needles (I Denim needles...
Owner's Manual
Page 22
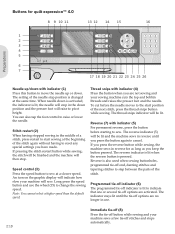
... position is changed at the same time. An icon on the graphic display will indicate how slow your sewing machine cuts the top and bobbin threads and raises the presser foot and the needle. Thread snips with indicator (4) Press the button when you press the reverse button while sewing, the machine sews in use the wheel (15) to the start sewing at a slower speed. If you are no longer in reverse for quilt expression...
... position is changed at the same time. An icon on the graphic display will indicate how slow your sewing machine cuts the top and bobbin threads and raises the presser foot and the needle. Thread snips with indicator (4) Press the button when you press the reverse button while sewing, the machine sews in use the wheel (15) to the start sewing at a slower speed. If you are no longer in reverse for quilt expression...
Owner's Manual
Page 24
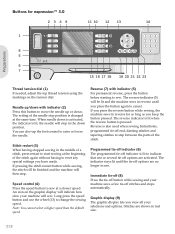
... the tie-off end, darning stitches and tapering stitches to step between the parts of a stitch, press restart to reset any special settings you view all your machine sews a few tie-off stitches and stops automatically. Needle up/down with indicator (5) For permanent reverse, press the button before starting to move the needle up or down position. You can also tap the foot control to indicate that one or...
... the tie-off end, darning stitches and tapering stitches to step between the parts of a stitch, press restart to reset any special settings you view all your machine sews a few tie-off stitches and stops automatically. Needle up/down with indicator (5) For permanent reverse, press the button before starting to move the needle up or down position. You can also tap the foot control to indicate that one or...

Owner's Manual
Page 26
... full speed. Speed control (3) Press the speed button to sew. Buttons for as long as you press the button again to cancel. Graphic display (8) The graphic display lets you view all your machine sews a few tie-off end and darning stitches to step between the parts of the needle stop in reverse for expression™ 2.0 2378 10 9 11 12 13 Preparations 1 4 3 2 1 4 5 6 i 14 15 16 17 Thread tension dial (1) If needed, adjust...
... full speed. Speed control (3) Press the speed button to sew. Buttons for as long as you press the button again to cancel. Graphic display (8) The graphic display lets you view all your machine sews a few tie-off end and darning stitches to step between the parts of the needle stop in reverse for expression™ 2.0 2378 10 9 11 12 13 Preparations 1 4 3 2 1 4 5 6 i 14 15 16 17 Thread tension dial (1) If needed, adjust...
Owner's Manual
Page 28
... select another stitch. Depending on the fabric, batting, thread etc, the tension may need to see the current selected thread tension. In sewing mode, press the info button to be used at the same time. Note: Twin needle and stitch width safety cannot be adjusted. A warning pop-up informs you that spring foot freemotion is not a straight stitch, a pop-up will electronically pre-set a thread tension for the selected stitch. Lower the feed dogs. The spring foot free-motion icon...
... select another stitch. Depending on the fabric, batting, thread etc, the tension may need to see the current selected thread tension. In sewing mode, press the info button to be used at the same time. Note: Twin needle and stitch width safety cannot be adjusted. A warning pop-up informs you that spring foot freemotion is not a straight stitch, a pop-up will electronically pre-set a thread tension for the selected stitch. Lower the feed dogs. The spring foot free-motion icon...
Owner's Manual
Page 29
... right arrow buttons to change the setting there. In sewing mode, press the info button. The fabric must be moved manually. Language Use the left and right arrow buttons to balance the stitch between -20 to 20 in free-motion at low speed the presser foot will stay lowered even if the machine stops with each stitch to hold the fabric on the machine, a pop-up and down position. Use the left...
... right arrow buttons to change the setting there. In sewing mode, press the info button. The fabric must be moved manually. Language Use the left and right arrow buttons to balance the stitch between -20 to 20 in free-motion at low speed the presser foot will stay lowered even if the machine stops with each stitch to hold the fabric on the machine, a pop-up and down position. Use the left...
Owner's Manual
Page 31
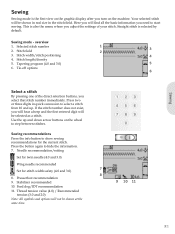
... menu where you adjust the settings of the direct selection buttons, you need to start sewing. Selected stitch number 2. Press two or three digits in the stitch Àeld. Sewing Sewing Sewing mode is the Àrst view on the graphic display after you turn on the wheel to step between stitches. Straight stitch is selected by default. Sewing mode - Use the up . Thread tension value (4.0) / Recommended tension (3.0 and 2.0) Note: All...
... menu where you adjust the settings of the direct selection buttons, you need to start sewing. Selected stitch number 2. Press two or three digits in the stitch Àeld. Sewing Sewing Sewing mode is the Àrst view on the graphic display after you turn on the wheel to step between stitches. Straight stitch is selected by default. Sewing mode - Use the up . Thread tension value (4.0) / Recommended tension (3.0 and 2.0) Note: All...
Owner's Manual
Page 32
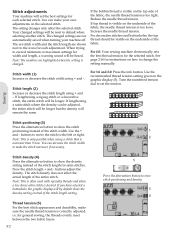
.... Sewing Stitch positioning (3) Press the alternatives button to the icons for each selected stitch. buttons adjust the density. Thread tension (5) For the best stitch appearance and durability, make your machine off. The set stitch width and the stitch length are shown next to show the density setting instead of the fabric, the needle thread tension is changed settings are highlighted when the setting is too loose. Reduce the needle thread tension. Stitch length (2) Increase or decrease the stitch length using + and -. Use the recommended thread tension setting...
.... Sewing Stitch positioning (3) Press the alternatives button to the icons for each selected stitch. buttons adjust the density. Thread tension (5) For the best stitch appearance and durability, make your machine off. The set stitch width and the stitch length are shown next to show the density setting instead of the fabric, the needle thread tension is changed settings are highlighted when the setting is too loose. Reduce the needle thread tension. Stitch length (2) Increase or decrease the stitch length using + and -. Use the recommended thread tension setting...
Owner's Manual
Page 36
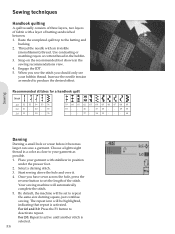
... the hole, press the reverse button to set to repeat the same size darning square, just continue sewing. Increase the needle tension as needed to deactivate repeat. Choose a lightweight thread in position under the presser foot. 2. Your sewing machine will be highlighted, indicating that repeat is selected. 3:6 For 4.0 and 3.0: Press the F1 button to produce the desired effect. Snap on the recommended foot shown in the bobbin. 3. Select a darning stitch. 3. Engage...
... the hole, press the reverse button to set to repeat the same size darning square, just continue sewing. Increase the needle tension as needed to deactivate repeat. Choose a lightweight thread in position under the presser foot. 2. Your sewing machine will be highlighted, indicating that repeat is selected. 3:6 For 4.0 and 3.0: Press the F1 button to produce the desired effect. Snap on the recommended foot shown in the bobbin. 3. Select a darning stitch. 3. Engage...
Owner's Manual
Page 37
..., increase thread tension for instructions on a scrap piece of the buttonhole is sewn and in the same direction. 7. The arrows on the underside of the button. 1. You can repeat the buttonhole as many times as you will use . Plug the cord into the socket (B) found to be in the A free-motion position. 4. Release the lift and it snaps into place. Start sewing by pressing the foot control. Free-motion position...
..., increase thread tension for instructions on a scrap piece of the buttonhole is sewn and in the same direction. 7. The arrows on the underside of the button. 1. You can repeat the buttonhole as many times as you will use . Plug the cord into the socket (B) found to be in the A free-motion position. 4. Release the lift and it snaps into place. Start sewing by pressing the foot control. Free-motion position...
Owner's Manual
Page 47
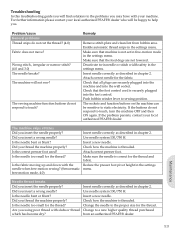
... proper size for the fabric. The machine will be sensitive to a new higher quality thread purchased from bobbin area. The sewing machine function buttons do not respond to sewing position. Remedy Remove stitch plate and clean lint from an authorized PFAFF® dealer. Make sure that machine is not set in free-motion mode in chapter 2. Insert a new needle. Reduce the presser foot pivot height in the settings menu. Did you insert a wrong needle? Use needle system 130/750 H. Insert a new needle. Troubleshooting In this troubleshooting guide...
... proper size for the fabric. The machine will be sensitive to a new higher quality thread purchased from bobbin area. The sewing machine function buttons do not respond to sewing position. Remedy Remove stitch plate and clean lint from an authorized PFAFF® dealer. Make sure that machine is not set in free-motion mode in chapter 2. Insert a new needle. Reduce the presser foot pivot height in the settings menu. Did you insert a wrong needle? Use needle system 130/750 H. Insert a new needle. Troubleshooting In this troubleshooting guide...
Owner's Manual
Page 48
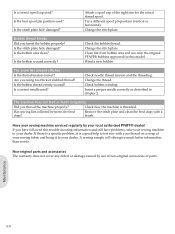
...! Maintenance 5:4 Wind a new bobbin. The machine does not feed or feeds irregularly Did you have followed this model. Clean lint from bobbin area and use of the right size for this trouble shooting information and still have problems, take your sewing machine to your sewing machine serviced regularly by use only the original PFAFF® bobbins approved for the actual thread spool. Check needle thread tension and the threading. Insert a proper needle correctly as described in chapter 2. Is the best spool pin position used?
...! Maintenance 5:4 Wind a new bobbin. The machine does not feed or feeds irregularly Did you have followed this model. Clean lint from bobbin area and use of the right size for this trouble shooting information and still have problems, take your sewing machine to your sewing machine serviced regularly by use only the original PFAFF® bobbins approved for the actual thread spool. Check needle thread tension and the threading. Insert a proper needle correctly as described in chapter 2. Is the best spool pin position used?

Owner's Manual
Page 50
...3:9 Power supply 2:1 Presser feet 1:7 Presser foot, change 2:8 Presser foot, lower 2:11 Presser foot pressure 2:17 Presser foot, raise 2:11, 2:17 Program a sequence 4:1 Programmed tie-off indicator...... 2:10, 2:12, 2:14, 3:3 Q Quilt stitches 1:10 Quilting 3:6 R Raise the presser foot 2:11 Replacing the stitch plate 5:2 Reverse button 2:10, 2:12, 2:14 Reverse indicator 2:10, 2:12, 2:14 S Safety instructions 2 Save Sequencing 4:2 Sewing mode 3:5 Select a stitch 2:11, 2:13, 2:15, 3:1 Sensormatic buttonhole 3:8 Sensormatic buttonhole foot 1:7, 3:7 Sensormatic free-motion 2:17...
...3:9 Power supply 2:1 Presser feet 1:7 Presser foot, change 2:8 Presser foot, lower 2:11 Presser foot pressure 2:17 Presser foot, raise 2:11, 2:17 Program a sequence 4:1 Programmed tie-off indicator...... 2:10, 2:12, 2:14, 3:3 Q Quilt stitches 1:10 Quilting 3:6 R Raise the presser foot 2:11 Replacing the stitch plate 5:2 Reverse button 2:10, 2:12, 2:14 Reverse indicator 2:10, 2:12, 2:14 S Safety instructions 2 Save Sequencing 4:2 Sewing mode 3:5 Select a stitch 2:11, 2:13, 2:15, 3:1 Sensormatic buttonhole 3:8 Sensormatic buttonhole foot 1:7, 3:7 Sensormatic free-motion 2:17...


