

Owner's Manual
Page 4
... A Accessories Applique designs Applique toot B Balance Basting Bias binder Blind hem Bobbin case Bobbin thread tension Bobbin thread, drawing up Bobbin winding Bobbin winding through the needle Braiding foot Bridging Buttonhole, fully-automatic Buttonholes Buttonholes with gimp thread Buttonhole tips Buttons, sewing on C Carrying case Circular embroidery guide Cleaning and oiling Combined borders Combined borders with twin needle Cording toot Cross hem stitch Cross-stitch 0 Darning, sewing on patches Decorative sewing, general notes Decorative stitches, Espression 2024 Decorative stitches...
... A Accessories Applique designs Applique toot B Balance Basting Bias binder Blind hem Bobbin case Bobbin thread tension Bobbin thread, drawing up Bobbin winding Bobbin winding through the needle Braiding foot Bridging Buttonhole, fully-automatic Buttonholes Buttonholes with gimp thread Buttonhole tips Buttons, sewing on C Carrying case Circular embroidery guide Cleaning and oiling Combined borders Combined borders with twin needle Cording toot Cross hem stitch Cross-stitch 0 Darning, sewing on patches Decorative sewing, general notes Decorative stitches, Espression 2024 Decorative stitches...

Owner's Manual
Page 5
... sewing machine (2024) Parts of the sewing machine (2014) Patchwork and quilting Pattern lengthpattern width, cr'anging for a perfect buttotthole Top teed (integrated dual feed) (2024) Twin needle Twin needle, threading 84 36 38 34-37 34 35. 36 71 76 68. 69 66, 67 26 27 U Utility stitches, Express on Stitch width/needle pos lion, altering T Tapering witri satin-stitch zigzag Technical data Thread cutter Thread tension, general notes Threading Tips for decorative stitches Pattern length/stitch density Pattern m rroring Pattern settings, altering Pattern sizes...
... sewing machine (2024) Parts of the sewing machine (2014) Patchwork and quilting Pattern lengthpattern width, cr'anging for a perfect buttotthole Top teed (integrated dual feed) (2024) Twin needle Twin needle, threading 84 36 38 34-37 34 35. 36 71 76 68. 69 66, 67 26 27 U Utility stitches, Express on Stitch width/needle pos lion, altering T Tapering witri satin-stitch zigzag Technical data Thread cutter Thread tension, general notes Threading Tips for decorative stitches Pattern length/stitch density Pattern m rroring Pattern settings, altering Pattern sizes...

Owner's Manual
Page 6
...topstitching up to 6 mm. 13 needle positions available for edgestitching or sewing in one operation. 6 For bridging, decorative hemstitching and crazy quilting. 6 Buttonhole for seam finishes, sewing elastic. 6 darning tears, and patches. 5 Blind hem stitch For securing hems invisibly on woven fabrics 6 6 Elastic blind hem stitch For securing hems Invisibly and finishing the edge on 6 stretch fabrics. 7 Closvd ovvrlock stitch 8 Bridging stitch 9 Linen buttonhole For joining and overcasting stretch fabrics in zippers. Introduction Utility stitches Expression 2024...
...topstitching up to 6 mm. 13 needle positions available for edgestitching or sewing in one operation. 6 For bridging, decorative hemstitching and crazy quilting. 6 Buttonhole for seam finishes, sewing elastic. 6 darning tears, and patches. 5 Blind hem stitch For securing hems invisibly on woven fabrics 6 6 Elastic blind hem stitch For securing hems Invisibly and finishing the edge on 6 stretch fabrics. 7 Closvd ovvrlock stitch 8 Bridging stitch 9 Linen buttonhole For joining and overcasting stretch fabrics in zippers. Introduction Utility stitches Expression 2024...

Owner's Manual
Page 7
... stitches Expression 2024 E !ntroductjor - Description Application Width uplo mm 12 Zigzag stitch For applique couching over cords and creafing eyelets. 6 Right/Left need e position 13 Stem Stitch, narrow For decorafive sewing such as fiower stems and 3 undert n ng letters. 14 Decorat ye elastic stitch For Joining overlapped seams on bulky fabrics 6 such as leathers and terry cloth. 15 Ope'r overlock stitch For joini'g and overcastng stretch fabrics in the bobbin...
... stitches Expression 2024 E !ntroductjor - Description Application Width uplo mm 12 Zigzag stitch For applique couching over cords and creafing eyelets. 6 Right/Left need e position 13 Stem Stitch, narrow For decorafive sewing such as fiower stems and 3 undert n ng letters. 14 Decorat ye elastic stitch For Joining overlapped seams on bulky fabrics 6 such as leathers and terry cloth. 15 Ope'r overlock stitch For joini'g and overcastng stretch fabrics in the bobbin...

Owner's Manual
Page 8
III LI r,,Js_4I.AI_,LIIJI Utility stitches Expression 2014 I II > 4> >
III LI r,,Js_4I.AI_,LIIJI Utility stitches Expression 2014 I II > 4> >

Owner's Manual
Page 12
... 6 Direct selection buttons 7 Stitch selection button 8 Connection socket "lead cord" 9 Connection socket "foot control" 10 Master switch 11 Base plate 12 Removable accessory tray 13 Presser foot holder with presser foot 14 Integrated dual feed/IDT 15 Integrated needle threader 16 Reverse sewing" button 17 Threading slots 18 Needle thread tension 19 Take-up lever 20 Presser foot lifter 21 Thread guide 22 Spool holder with spool cap 23 Hole for second spool holder 24 Lid with stitch chart 25 Bobbin winder 26 Bobbin door 27 Free arm 28 Sewing bulb (max. 5 W) 29 Thread cutter 30 "Pattern...
... 6 Direct selection buttons 7 Stitch selection button 8 Connection socket "lead cord" 9 Connection socket "foot control" 10 Master switch 11 Base plate 12 Removable accessory tray 13 Presser foot holder with presser foot 14 Integrated dual feed/IDT 15 Integrated needle threader 16 Reverse sewing" button 17 Threading slots 18 Needle thread tension 19 Take-up lever 20 Presser foot lifter 21 Thread guide 22 Spool holder with spool cap 23 Hole for second spool holder 24 Lid with stitch chart 25 Bobbin winder 26 Bobbin door 27 Free arm 28 Sewing bulb (max. 5 W) 29 Thread cutter 30 "Pattern...

Owner's Manual
Page 14
... Direct selection buttons 7 Stitch selection button 8 Connection socket "lead cord" 9 Connection socket "foot control" 10 Master switch 11 Base plate 12 Removable accessory tray 13 Presser foot holder with presser foot 15 Integrated needle threader 16 'Reverse sewing" button 17 Threading slots 18 Needle thread tension 19 Take-up lever 20 Presser foot lifter 21 Thread guide 22 Spool holder with spool cap 23 Hole for second spool holder 24 Lid with stitch program chart 25 Bobbin winder 26 Bobbin door 27 Free arm 28 Sewing bulb (max. 5 W) 29 Thread cutter 30 "Pattern mirror" button/"Lock" button...
... Direct selection buttons 7 Stitch selection button 8 Connection socket "lead cord" 9 Connection socket "foot control" 10 Master switch 11 Base plate 12 Removable accessory tray 13 Presser foot holder with presser foot 15 Integrated needle threader 16 'Reverse sewing" button 17 Threading slots 18 Needle thread tension 19 Take-up lever 20 Presser foot lifter 21 Thread guide 22 Spool holder with spool cap 23 Hole for second spool holder 24 Lid with stitch program chart 25 Bobbin winder 26 Bobbin door 27 Free arm 28 Sewing bulb (max. 5 W) 29 Thread cutter 30 "Pattern mirror" button/"Lock" button...

Owner's Manual
Page 43
Explanation of presser foot Special accessories 42 These tables give you will find the settings we recommend for sewing the selected stitches - whether you should sew with the Integrated Dual Feed (IDT) engaged or disengaged, needle thread tension setting and recommended presser foot,. 2024 Stitch -% •'' ', _2 *' 1F3J 2024 2014 Stitch Expression 2024 Expression 2014 Stitch number Stitch width in mm Stitch length in mm Top feed switched on• switched off 0 Needle thread tension Number of the sewing recommendations table In the following table you...
Explanation of presser foot Special accessories 42 These tables give you will find the settings we recommend for sewing the selected stitches - whether you should sew with the Integrated Dual Feed (IDT) engaged or disengaged, needle thread tension setting and recommended presser foot,. 2024 Stitch -% •'' ', _2 *' 1F3J 2024 2014 Stitch Expression 2024 Expression 2014 Stitch number Stitch width in mm Stitch length in mm Top feed switched on• switched off 0 Needle thread tension Number of the sewing recommendations table In the following table you...

Owner's Manual
Page 45
uiiiiy suicries Stitch
uiiiiy suicries Stitch

Owner's Manual
Page 47
Stitch v .,', 2024 / ,/ 3 3.0 /2014
Stitch v .,', 2024 / ,/ 3 3.0 /2014

Owner's Manual
Page 52
s..#LIIILy .)LIL.,I I -4. Stitch "-?v'
s..#LIIILy .)LIL.,I I -4. Stitch "-?v'
Owner's Manual
Page 53
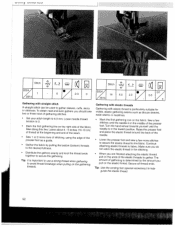
...; Lower the presser foot and sew a few stitches until the needle is particularly suitable for visible, elastic gathering seams such as a guide. • Gather the fabric by the amount you pull on the ends of the seam. • Sew 1 or 2 more stitches to secure the elastic thread to gather. Sew a few more rows of stitching, using the edge of the presser foot. Make sure you do not catch the elastic thread in the lowest position. Gathering with elastic threads Gathering with straight stitch A straight stitch...
...; Lower the presser foot and sew a few stitches until the needle is particularly suitable for visible, elastic gathering seams such as a guide. • Gather the fabric by the amount you pull on the ends of the seam. • Sew 1 or 2 more stitches to secure the elastic thread to gather. Sew a few more rows of stitching, using the edge of the presser foot. Make sure you do not catch the elastic thread in the lowest position. Gathering with elastic threads Gathering with straight stitch A straight stitch...
Owner's Manual
Page 72
.... Pull the two fabric layers taut during sewing. By using a sewing thread of the lower ply by the foot and is overstitched along the folded edge with a narrow satin stitch zigzag. The hem is available in place on your base fabric. • Place a stabilizer under the presser foot. You can make these seams particularly decorative by using different materials and patterns you can make a perfect densely stitched seam with this overlapping...
.... Pull the two fabric layers taut during sewing. By using a sewing thread of the lower ply by the foot and is overstitched along the folded edge with a narrow satin stitch zigzag. The hem is available in place on your base fabric. • Place a stabilizer under the presser foot. You can make these seams particularly decorative by using different materials and patterns you can make a perfect densely stitched seam with this overlapping...

Owner's Manual
Page 73
... 5 grooves and the large pintuck blade. eul ts aria neec , Pintuck foot This classic heirloom sewing technique can attach front edge a pin tuck blade (special accessory) on many types of fabric such as light cotton and linens. through the hole at • Replace the needle plate. size 80). • Thread the two needles (see page 29). • Using a water-soluble marker, draw a placement line for your...
... 5 grooves and the large pintuck blade. eul ts aria neec , Pintuck foot This classic heirloom sewing technique can attach front edge a pin tuck blade (special accessory) on many types of fabric such as light cotton and linens. through the hole at • Replace the needle plate. size 80). • Thread the two needles (see page 29). • Using a water-soluble marker, draw a placement line for your...
Owner's Manual
Page 77
...; Remove the presser foot and holder. The faster you need unfolded bias tape about 1 (2.5 cm) along the bias tape. • Insert the edge of the fabric to be positioned behind the needle clamp. • Tighten the screw. • Bring the free-motion quilt foot into the slot of the free-motion quilt foot must be bound between the bias tape edges into the darning position (see page 51) and lower the feed dog (see...
...; Remove the presser foot and holder. The faster you need unfolded bias tape about 1 (2.5 cm) along the bias tape. • Insert the edge of the fabric to be positioned behind the needle clamp. • Tighten the screw. • Bring the free-motion quilt foot into the slot of the free-motion quilt foot must be bound between the bias tape edges into the darning position (see page 51) and lower the feed dog (see...
Owner's Manual
Page 91
...sewing. Select the zigzag stitch needle position (stitch 12). Zigzag stitch 3 is used when a center (B) needle position motif is desired. • Set stitch length to 3. Begin sewing. • With -1+ button A increase the width from a right (C) to left needle position or zigzag stitch 3 for motifs with this technique. These larger embroideries are perfect for motifs with a right or left (A) needle position stitch. I ' 7 Manual change/ Regular pattern Place stabilizer under fabric. • Set needle thread tension to 3. Pressing the "Pattern mirror button" (16) will change...
...sewing. Select the zigzag stitch needle position (stitch 12). Zigzag stitch 3 is used when a center (B) needle position motif is desired. • Set stitch length to 3. Begin sewing. • With -1+ button A increase the width from a right (C) to left needle position or zigzag stitch 3 for motifs with this technique. These larger embroideries are perfect for motifs with a right or left (A) needle position stitch. I ' 7 Manual change/ Regular pattern Place stabilizer under fabric. • Set needle thread tension to 3. Pressing the "Pattern mirror button" (16) will change...
Owner's Manual
Page 92
Decorative buttonhole This buttonhole is to run in the opposite direction, work with the left-hand needle position (stitch 12 and 'Pattern mirror button (30)). Since you determine the seam width yourself the buttonhole can be up to 12mm wide. • Set stitch No. 3, stitch width 3 mm, stitch length 0.2 mm. • Set needle thread tension at the 6.0 mm width. Sew one stitch. • Increase the width by 0.5 mm to 1 mm. alter the stitch width...
Decorative buttonhole This buttonhole is to run in the opposite direction, work with the left-hand needle position (stitch 12 and 'Pattern mirror button (30)). Since you determine the seam width yourself the buttonhole can be up to 12mm wide. • Set stitch No. 3, stitch width 3 mm, stitch length 0.2 mm. • Set needle thread tension at the 6.0 mm width. Sew one stitch. • Increase the width by 0.5 mm to 1 mm. alter the stitch width...

Owner's Manual
Page 94
... Expression 2024 and 2014 have quilt stitch No. 11, which were originally used by North American pioneer women to the inner edge). The needle thread tension must be hand-quilted. When you sew the stitch on jackets and overcoats. The intermediate stitch disappears and thus appears to be set thread quite tight to pull the (7), and the bobbin thread tension quite loose (approximately 1/4 bobbin thread to quickly and easily achieve a hand-quilted...
... Expression 2024 and 2014 have quilt stitch No. 11, which were originally used by North American pioneer women to the inner edge). The needle thread tension must be hand-quilted. When you sew the stitch on jackets and overcoats. The intermediate stitch disappears and thus appears to be set thread quite tight to pull the (7), and the bobbin thread tension quite loose (approximately 1/4 bobbin thread to quickly and easily achieve a hand-quilted...

Owner's Manual
Page 102
... . Insert new needle and push fully in thread tension system. Check needle and bobbin thread tensions. Needle is too thick. Needle thread breaks See reasons above . Thread is bent or blunt. Thread loops at top or underside of needle. Only guide the fabric lightly. Check bobbin threading path. The bobbin case is too tight. Flat side facing the back. Use needle with large eye (system 130 N). Only use good quality threads. Re-thread machine, making sure presser foot is raised to make sure bobbin case...
... . Insert new needle and push fully in thread tension system. Check needle and bobbin thread tensions. Needle is too thick. Needle thread breaks See reasons above . Thread is bent or blunt. Thread loops at top or underside of needle. Only guide the fabric lightly. Check bobbin threading path. The bobbin case is too tight. Flat side facing the back. Use needle with large eye (system 130 N). Only use good quality threads. Re-thread machine, making sure presser foot is raised to make sure bobbin case...

Owner's Manual
Page 103
... brush. Select the desired stitch again. 101 The machine does not sew the selected stitch Switch off the main switch. Do not attempt to the left. Feed dog is important if there are thread remnants in the hook ways. Push slide B to sew without fabric under the presser foot. This is lowered. Switch off . Maintenanc I I I I - - •I I- - Before changing presser feet and needle the main switch must appear...
... brush. Select the desired stitch again. 101 The machine does not sew the selected stitch Switch off the main switch. Do not attempt to the left. Feed dog is important if there are thread remnants in the hook ways. Push slide B to sew without fabric under the presser foot. This is lowered. Switch off . Maintenanc I I I I - - •I I- - Before changing presser feet and needle the main switch must appear...


