Owner's Manual
Page 2
... as contained in this sewing machine from outlet. • Do not unplug by qualiÀed service personnel. Use only identical replacement parts. Servicing of a double-insulated product requires extreme care and knowledge of electric shock: • A sewing machine should never be done ... required around the sewing machine needle. • Always use bent needles. • Do not pull or push fabric while stitching. Replacement parts for use outdoors. • Do not operate where aerosol (spray) products are provided instead of the sewing machine by persons (including children...
... as contained in this sewing machine from outlet. • Do not unplug by qualiÀed service personnel. Use only identical replacement parts. Servicing of a double-insulated product requires extreme care and knowledge of electric shock: • A sewing machine should never be done ... required around the sewing machine needle. • Always use bent needles. • Do not pull or push fabric while stitching. Replacement parts for use outdoors. • Do not operate where aerosol (spray) products are provided instead of the sewing machine by persons (including children...
Owner's Manual
Page 4
... 2:7 Changing the needle 2:8 Lowering feed dogs 2:8 Changing the presser foot 2.8 Buttons for quilt expression™ 4.0 2:10 Buttons for expression™ 3.0 2:12 Buttons for expression™ 2.0 2:14 Settings menu 2:16 3 Sewing 3:1 Sewing mode - Table of contents 1 Introduction 1:5 Machine overview 1:5 Front side 1:5 Top parts 1:5 Accessory tray 1:6 Included accessories 1:6 Presser feet 1:7 Stitch overview 1:8 Utility stitches 1:8 Quilt stitches...
... 2:7 Changing the needle 2:8 Lowering feed dogs 2:8 Changing the presser foot 2.8 Buttons for quilt expression™ 4.0 2:10 Buttons for expression™ 3.0 2:12 Buttons for expression™ 2.0 2:14 Settings menu 2:16 3 Sewing 3:1 Sewing mode - Table of contents 1 Introduction 1:5 Machine overview 1:5 Front side 1:5 Top parts 1:5 Accessory tray 1:6 Included accessories 1:6 Presser feet 1:7 Stitch overview 1:8 Utility stitches 1:8 Quilt stitches...

Owner's Manual
Page 5
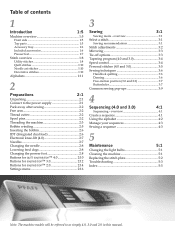
Introduction PFAFF quilt expression 4.0 inch mm Introduction Machine overview 1 2 3 4 5 5 16 6 15 7 14 8 13 9 12 10 11 00 10 20 1 30 40 2 50 17 18 19 20 21 Front side Top parts 1. Bobbin winder thread guide 4. Needle thread guide 28. Stitch plate 29. Spool caps 10. Free arm 31. Presser foot bar and presser foot...
Introduction PFAFF quilt expression 4.0 inch mm Introduction Machine overview 1 2 3 4 5 5 16 6 15 7 14 8 13 9 12 10 11 00 10 20 1 30 40 2 50 17 18 19 20 21 Front side Top parts 1. Bobbin winder thread guide 4. Needle thread guide 28. Stitch plate 29. Spool caps 10. Free arm 31. Presser foot bar and presser foot...
Owner's Manual
Page 22
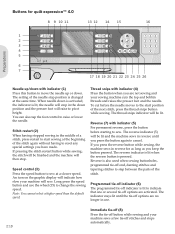
... (6) The programmed tie-off indicator is lit to indicate that one or several tie-off end, darning stitches and tapering stitches to step between the parts of the stitch again without having stopped sewing in the down position and the presser foot will be lit. The indicator stays lit until you... in reverse until the tie-off stitches and stops automatically. If you press the reverse button while sewing, the machine sews in reverse for quilt expression™ 4.0 8 9 10 11 13 12 14 15 16 Preparations 1 2 3 4 5 6 7 17 18 19 20 21 22 23 24 25 26 Needle up/down with indicator (1) Press...
... (6) The programmed tie-off indicator is lit to indicate that one or several tie-off end, darning stitches and tapering stitches to step between the parts of the stitch again without having stopped sewing in the down position and the presser foot will be lit. The indicator stays lit until you... in reverse until the tie-off stitches and stops automatically. If you press the reverse button while sewing, the machine sews in reverse for quilt expression™ 4.0 8 9 10 11 13 12 14 15 16 Preparations 1 2 3 4 5 6 7 17 18 19 20 21 22 23 24 25 26 Needle up/down with indicator (1) Press...
Owner's Manual
Page 24
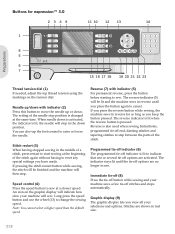
... tapering stitches to cancel. Reverse is changed at the same time. The indicator stays lit until you press the button again to step between the parts of the stitch again without having stopped sewing in the down . Stitches are no longer in real size. 2:12 You can also tap the foot.... Needle up or down position. If pressing the stitch restart button while sewing, the stitch will be lit and the machine sews in reverse for expression™ 3.0 2349 11 10 12 13 14 1 4 3 2 1 8 5 6 7 15 16 17 18 19 20 21 22 23 Thread tension dial (1) If needed, adjust the top thread...
... tapering stitches to cancel. Reverse is changed at the same time. The indicator stays lit until you press the button again to step between the parts of the stitch again without having stopped sewing in the down . Stitches are no longer in real size. 2:12 You can also tap the foot.... Needle up or down position. If pressing the stitch restart button while sewing, the stitch will be lit and the machine sews in reverse for expression™ 3.0 2349 11 10 12 13 14 1 4 3 2 1 8 5 6 7 15 16 17 18 19 20 21 22 23 Thread tension dial (1) If needed, adjust the top thread...

Owner's Manual
Page 26
... button again to move the needle up /down with indicator (4) For permanent reverse, press the button before starting to step between the parts of the needle stop in use. When needle down is activated, the indicator is set to change the stitch position. The reverse indicator... using the markings on the graphic display will be lit and the machine sews in reverse until the tie-off options are activated. Buttons for expression™ 2.0 2378 10 9 11 12 13 Preparations 1 4 3 2 1 4 5 6 i 14 15 16 17 Thread tension dial (1) If needed, adjust the top thread tension using ...
... button again to move the needle up /down with indicator (4) For permanent reverse, press the button before starting to step between the parts of the needle stop in use. When needle down is activated, the indicator is set to change the stitch position. The reverse indicator... using the markings on the graphic display will be lit and the machine sews in reverse until the tie-off options are activated. Buttons for expression™ 2.0 2378 10 9 11 12 13 Preparations 1 4 3 2 1 4 5 6 i 14 15 16 17 Thread tension dial (1) If needed, adjust the top thread tension using ...
Owner's Manual
Page 37
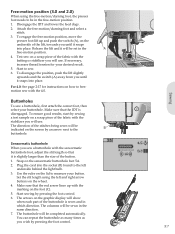
... or stabilizer you until it snaps into place. Snap on the lid to the B buttonhole. The arrows on the graphic display will show when each part of the lift, towards you will be indicated on a scrap piece of the stitches being sewn will use . The columns will be sewn in the...
... or stabilizer you until it snaps into place. Snap on the lid to the B buttonhole. The arrows on the graphic display will show when each part of the lift, towards you will be indicated on a scrap piece of the stitches being sewn will use . The columns will be sewn in the...
Owner's Manual
Page 38
... when the buttonhole is activated. Lower the feed dogs. 3. Note: Use the multi-purpose tool to deactivate repeat. The Àrst column will show the part and sewing direction of two, using the left and right arrow buttons on the wheel. 5. The machine sews the bartack and the second column. Note...
... when the buttonhole is activated. Lower the feed dogs. 3. Note: Use the multi-purpose tool to deactivate repeat. The Àrst column will show the part and sewing direction of two, using the left and right arrow buttons on the wheel. 5. The machine sews the bartack and the second column. Note...
Owner's Manual
Page 46
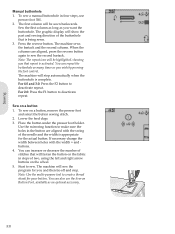
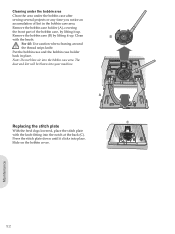
... up . A C Replacing the stitch plate With the feed dogs lowered, place the stitch plate with the brush. Remove the bobbin case holder (A), covering the front part of lint in place. Clean B with the knob Àtting into place. Remove the bobbin case (B) by lifting it up .
... up . A C Replacing the stitch plate With the feed dogs lowered, place the stitch plate with the brush. Remove the bobbin case holder (A), covering the front part of lint in place. Clean B with the knob Àtting into place. Remove the bobbin case (B) by lifting it up .
Owner's Manual
Page 48
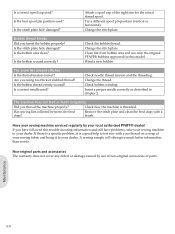
...it is threaded. Are you insert the bobbin properly? Check bobbin winding. Has sewing lint collected between the feed dogs? Non-original parts and accessories The warranty does not cover any defect or damage caused by your dealer. Maintenance 5:4 Is the bobbin wound correctly? .... If you thread the machine properly? Is the stitch plate hole damaged? If there is a speciÀc problem, it to your local authorized PFAFF® dealer! Is the best spool pin position used? Wind a new bobbin. Check the bobbin thread. Insert a proper needle correctly as described...
...it is threaded. Are you insert the bobbin properly? Check bobbin winding. Has sewing lint collected between the feed dogs? Non-original parts and accessories The warranty does not cover any defect or damage caused by your dealer. Maintenance 5:4 Is the bobbin wound correctly? .... If you thread the machine properly? Is the stitch plate hole damaged? If there is a speciÀc problem, it to your local authorized PFAFF® dealer! Is the best spool pin position used? Wind a new bobbin. Check the bobbin thread. Insert a proper needle correctly as described...
Owner's Manual
Page 49
... the needle 2:5 Button, sew on 3:9 Buttonholes 3:7 Manual buttonhole 3:8 Sensormatic buttonhole 3:8 Buttons expression™ 2.0 2:14-2:15 expression™ 3.0 2:12-2:13 quilt expression™ 4.0 2:10-2:11 C Changing the light bulbs 5:1 Changing the needle 2:8 Changing the...4:2 Sewing mode 3:5 Lowering feed dogs 2:8 M Machine overview 1:5 Accessory tray 1:6 Front side 1:5 Included accessories 1:6 Presser feet 1:7 Top parts 1:5 Maintenance 5:1 Manual buttonhole 3:8 Mirroring 2:11, 2:13, 2:15, 3:3 N Needle, changing 2:8 Needle art stitches 1:10 Needles 2:7 Needle threader...
... the needle 2:5 Button, sew on 3:9 Buttonholes 3:7 Manual buttonhole 3:8 Sensormatic buttonhole 3:8 Buttons expression™ 2.0 2:14-2:15 expression™ 3.0 2:12-2:13 quilt expression™ 4.0 2:10-2:11 C Changing the light bulbs 5:1 Changing the needle 2:8 Changing the...4:2 Sewing mode 3:5 Lowering feed dogs 2:8 M Machine overview 1:5 Accessory tray 1:6 Front side 1:5 Included accessories 1:6 Presser feet 1:7 Top parts 1:5 Maintenance 5:1 Manual buttonhole 3:8 Mirroring 2:11, 2:13, 2:15, 3:3 N Needle, changing 2:8 Needle art stitches 1:10 Needles 2:7 Needle threader...


